2003 Hyundai Santa Fe flat tire
[x] Cancel search: flat tirePage 152 of 221
WHAT TO DO IN AN EMERGENCY 3- 7
D060D01A-AAT3. Loosen Wheel NutsD060E01A-AAT4. Put the Jack in Place
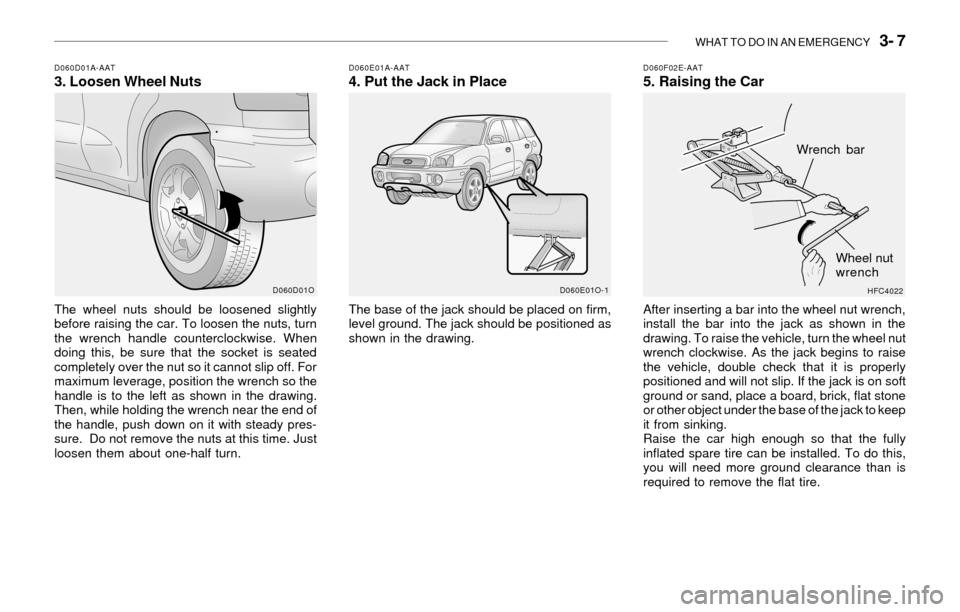
The wheel nuts should be loosened slightly
before raising the car. To loosen the nuts, turn
the wrench handle counterclockwise. When
doing this, be sure that the socket is seated
completely over the nut so it cannot slip off. For
maximum leverage, position the wrench so the
handle is to the left as shown in the drawing.
Then, while holding the wrench near the end of
the handle, push down on it with steady pres-
sure. Do not remove the nuts at this time. Just
loosen them about one-half turn.The base of the jack should be placed on firm,
level ground. The jack should be positioned as
shown in the drawing.
D060F02E-AAT5. Raising the Car
After inserting a bar into the wheel nut wrench,
install the bar into the jack as shown in the
drawing. To raise the vehicle, turn the wheel nut
wrench clockwise. As the jack begins to raise
the vehicle, double check that it is properly
positioned and will not slip. If the jack is on soft
ground or sand, place a board, brick, flat stone
or other object under the base of the jack to keep
it from sinking.
Raise the car high enough so that the fully
inflated spare tire can be installed. To do this,
you will need more ground clearance than is
required to remove the flat tire.
D060D01O D060E01O-1
HFC4022
Wrench bar
Wheel nut
wrench
Page 153 of 221
3- 8 WHAT TO DO IN AN EMERGENCY
!
D060G02Y-AAT6. Changing Wheels
D060H02A-AAT7. Reinstall Wheel Nuts
WARNING:
Do not get under the car when it is sup-
ported by the jack! This is very dangerous
as the vehicle could fall and cause serious
injury or death. No one should stay in the
car while the jack is being used.
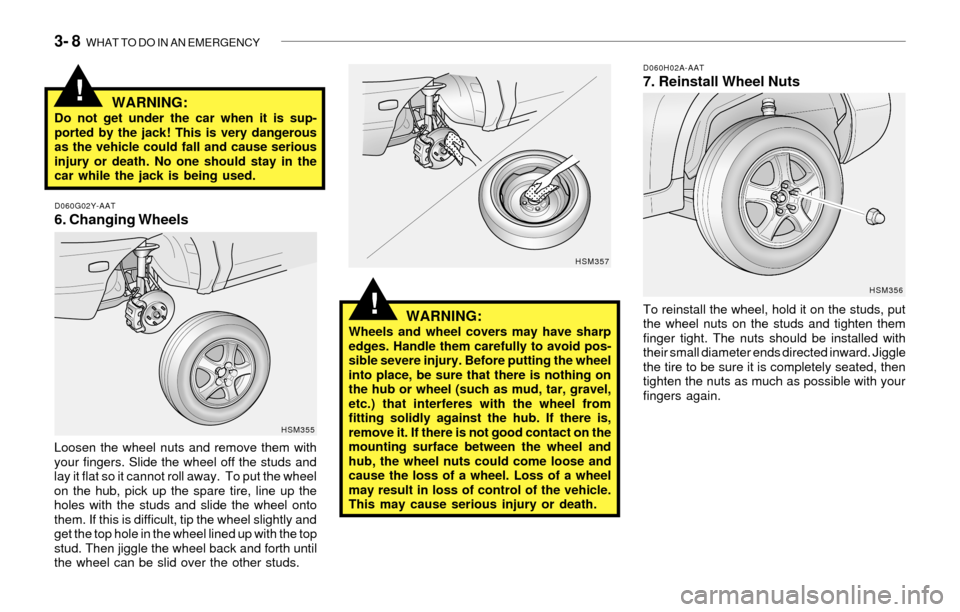
Loosen the wheel nuts and remove them with
your fingers. Slide the wheel off the studs and
lay it flat so it cannot roll away. To put the wheel
on the hub, pick up the spare tire, line up the
holes with the studs and slide the wheel onto
them. If this is difficult, tip the wheel slightly and
get the top hole in the wheel lined up with the top
stud. Then jiggle the wheel back and forth until
the wheel can be slid over the other studs.
WARNING:Wheels and wheel covers may have sharp
edges. Handle them carefully to avoid pos-
sible severe injury. Before putting the wheel
into place, be sure that there is nothing on
the hub or wheel (such as mud, tar, gravel,
etc.) that interferes with the wheel from
fitting solidly against the hub. If there is,
remove it. If there is not good contact on the
mounting surface between the wheel and
hub, the wheel nuts could come loose and
cause the loss of a wheel. Loss of a wheel
may result in loss of control of the vehicle.
This may cause serious injury or death.To reinstall the wheel, hold it on the studs, put
the wheel nuts on the studs and tighten them
finger tight. The nuts should be installed with
their small diameter ends directed inward. Jiggle
the tire to be sure it is completely seated, then
tighten the nuts as much as possible with your
fingers again.
HSM355HSM357
HSM356
!
Page 154 of 221
WHAT TO DO IN AN EMERGENCY 3- 9
!
D080A01A-AATIF YOUR CAR MUST BE TOWEDD060I01E-AAT8. Lower Vehicle and Tighten NutsD060J02O-AATAfter Changing Wheels
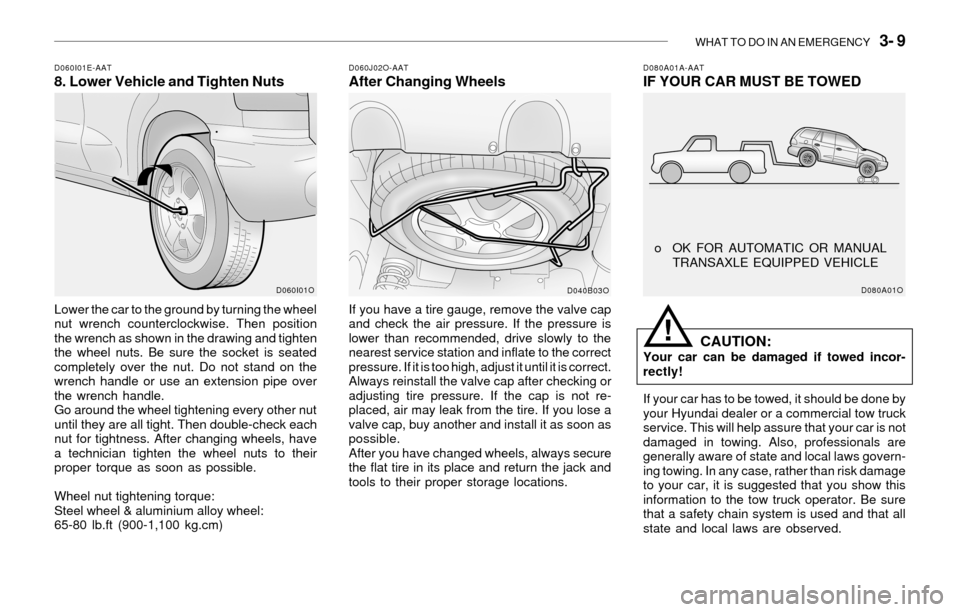
Lower the car to the ground by turning the wheel
nut wrench counterclockwise. Then position
the wrench as shown in the drawing and tighten
the wheel nuts. Be sure the socket is seated
completely over the nut. Do not stand on the
wrench handle or use an extension pipe over
the wrench handle.
Go around the wheel tightening every other nut
until they are all tight. Then double-check each
nut for tightness. After changing wheels, have
a technician tighten the wheel nuts to their
proper torque as soon as possible.
Wheel nut tightening torque:
Steel wheel & aluminium alloy wheel:
65-80 lb.ft (900-1,100 kg.cm)If you have a tire gauge, remove the valve cap
and check the air pressure. If the pressure is
lower than recommended, drive slowly to the
nearest service station and inflate to the correct
pressure. If it is too high, adjust it until it is correct.
Always reinstall the valve cap after checking or
adjusting tire pressure. If the cap is not re-
placed, air may leak from the tire. If you lose a
valve cap, buy another and install it as soon as
possible.
After you have changed wheels, always secure
the flat tire in its place and return the jack and
tools to their proper storage locations.
CAUTION:Your car can be damaged if towed incor-
rectly!
If your car has to be towed, it should be done by
your Hyundai dealer or a commercial tow truck
service. This will help assure that your car is not
damaged in towing. Also, professionals are
generally aware of state and local laws govern-
ing towing. In any case, rather than risk damage
to your car, it is suggested that you show this
information to the tow truck operator. Be sure
that a safety chain system is used and that all
state and local laws are observed.
D060I01O
D040B03OD080A01O
o OK FOR AUTOMATIC OR MANUAL
TRANSAXLE EQUIPPED VEHICLE
Page 193 of 221
DO-IT-YOURSELF MAINTENANCE 6- 23
!
G250A01A-AATFOR MORE INFORMATION ABOUT
YOUR HYUNDAI
If you desire additional information about main-
taining and servicing your Hyundai, you may
purchase a factory Shop Manual at your Hyundai
dealer's parts department. This is the same
manual used by dealership technicians and
while it is highly technical it can be useful in
obtaining a better understanding of your car and
how it works.
G240A01A-AATPOWER STEERING HOSES
It is suggested that you check the power steer-
ing hose connections for fluid leakage at regular
intervals. The power steering hoses should be
replaced if there is severe surface cracking,
scuffing or worn spots. Deterioration of the hose
could cause premature failure. Recommended Fluid
Use PSF-3 type fluid
NOTE:Do not start the engine when the power
steering oil reservoir is empty.
G290A02O-AATHEADLIGHT AIMING ADJUSTMENT
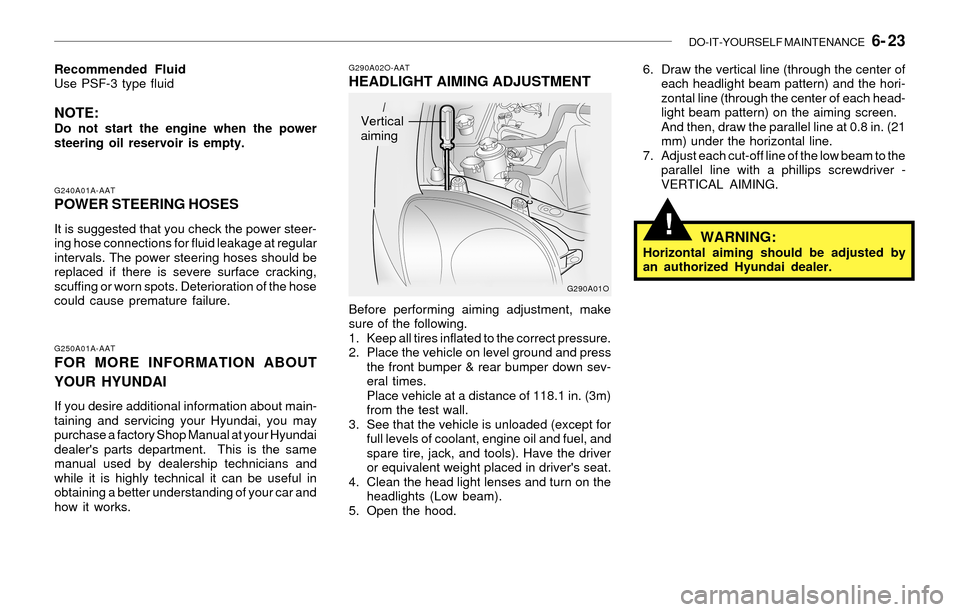
Before performing aiming adjustment, make
sure of the following.
1. Keep all tires inflated to the correct pressure.
2. Place the vehicle on level ground and press
the front bumper & rear bumper down sev-
eral times.
Place vehicle at a distance of 118.1 in. (3m)
from the test wall.
3. See that the vehicle is unloaded (except for
full levels of coolant, engine oil and fuel, and
spare tire, jack, and tools). Have the driver
or equivalent weight placed in driver's seat.
4. Clean the head light lenses and turn on the
headlights (Low beam).
5. Open the hood.6. Draw the vertical line (through the center of
each headlight beam pattern) and the hori-
zontal line (through the center of each head-
light beam pattern) on the aiming screen.
And then, draw the parallel line at 0.8 in. (21
mm) under the horizontal line.
7. Adjust each cut-off line of the low beam to the
parallel line with a phillips screwdriver -
VERTICAL AIMING.
WARNING:Horizontal aiming should be adjusted by
an authorized Hyundai dealer.
G290A01O
Vertical
aiming
Page 204 of 221
8. CONSUMER INFORMATION
& REPORTING SAFETY DEFECTS
Vehicle Identification Number (VIN) ................................................. 8-2
Engine Number ................................................................................ 8-2
Recommended Inflation Pressures .................................................. 8-2
Snow Tires ....................................................................................... 8-3
Tire Chains ....................................................................................... 8-3
Tire Rotation ..................................................................................... 8-4
Tire Balancing .................................................................................. 8-4
Tire Traction ..................................................................................... 8-4
When to Replace Tires ..................................................................... 8-4
Spare Tire and Tools ........................................................................ 8-5
Warranties for Your Hyundai Vehicle ............................................... 8-5
Consumer Information ...................................................................... 8-6
Reporting Safety Defects ................................................................. 8-7
8
Page 205 of 221
8- 2 CONSUMER INFORMATION & REPORTING SAFETY DEFECTS
I030A02S-AAT
RECOMMENDED INFLATION PRES-
SURES
I020A01A-AATTIRE INFORMATION
The tires supplied on your new Hyundai are
chosen to provide the best performance for
normal driving.
I010B01A-AATEngine NumberI010A01A-AATVEHICLE IDENTIFICATION
NUMBER (VIN)
RIM
SIZETIRE
SIZEPRESSURE, kPa (PSI)
UP TO 2 PERSONS
UP TO MAX.LOAD
FRONT
207(30)REAR
207(30)FRONT
221(32)REAR
221(32)
225/70R16 6.5Jx16
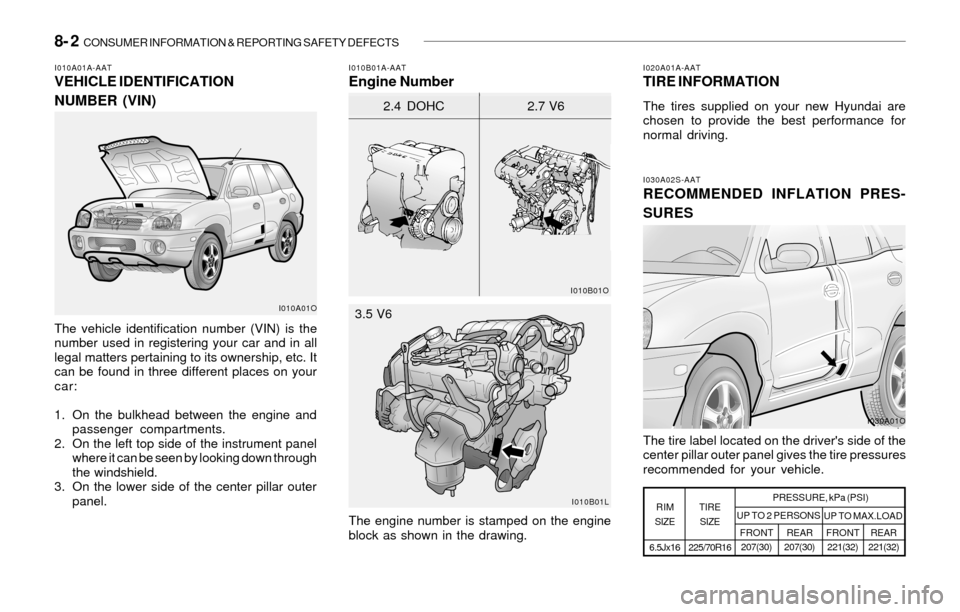
The vehicle identification number (VIN) is the
number used in registering your car and in all
legal matters pertaining to its ownership, etc. It
can be found in three different places on your
car:
1. On the bulkhead between the engine and
passenger compartments.
2. On the left top side of the instrument panel
where it can be seen by looking down through
the windshield.
3. On the lower side of the center pillar outer
panel.
The engine number is stamped on the engine
block as shown in the drawing.The tire label located on the driver's side of the
center pillar outer panel gives the tire pressures
recommended for your vehicle.
I010A01O
I030A01O
I010B01O
2.4 DOHC 2.7 V6
I010B01L
3.5 V6
Page 206 of 221
CONSUMER INFORMATION & REPORTING SAFETY DEFECTS 8- 3
!
!
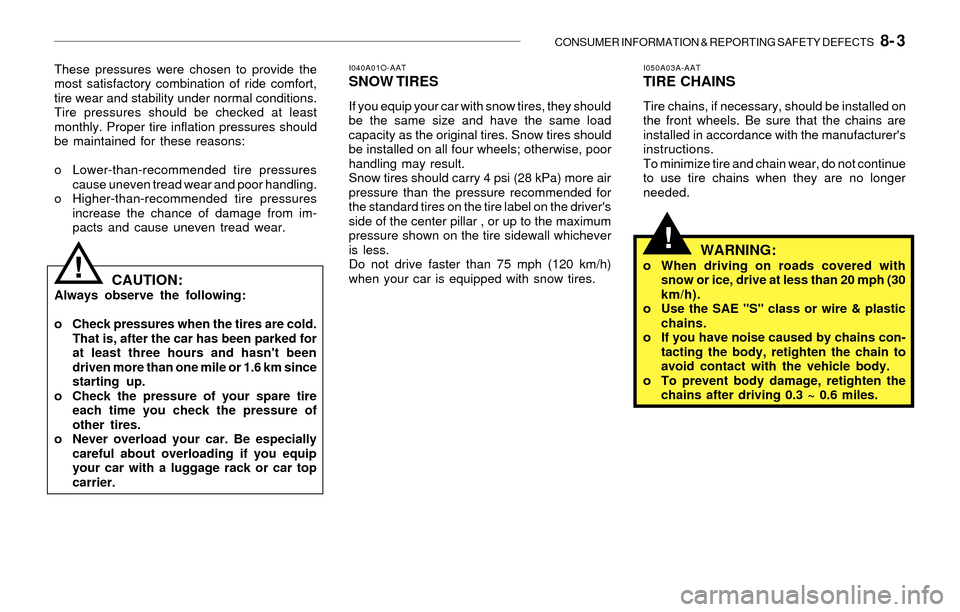
I050A03A-AATTIRE CHAINS
Tire chains, if necessary, should be installed on
the front wheels. Be sure that the chains are
installed in accordance with the manufacturer's
instructions.
To minimize tire and chain wear, do not continue
to use tire chains when they are no longer
needed.
I040A01O-AATSNOW TIRES
If you equip your car with snow tires, they should
be the same size and have the same load
capacity as the original tires. Snow tires should
be installed on all four wheels; otherwise, poor
handling may result.
Snow tires should carry 4 psi (28 kPa) more air
pressure than the pressure recommended for
the standard tires on the tire label on the driver's
side of the center pillar , or up to the maximum
pressure shown on the tire sidewall whichever
is less.
Do not drive faster than 75 mph (120 km/h)
when your car is equipped with snow tires. These pressures were chosen to provide the
most satisfactory combination of ride comfort,
tire wear and stability under normal conditions.
Tire pressures should be checked at least
monthly. Proper tire inflation pressures should
be maintained for these reasons:
o Lower-than-recommended tire pressures
cause uneven tread wear and poor handling.
o Higher-than-recommended tire pressures
increase the chance of damage from im-
pacts and cause uneven tread wear.
CAUTION:Always observe the following:
o Check pressures when the tires are cold.
That is, after the car has been parked for
at least three hours and hasn't been
driven more than one mile or 1.6 km since
starting up.
o Check the pressure of your spare tire
each time you check the pressure of
other tires.
o Never overload your car. Be especially
careful about overloading if you equip
your car with a luggage rack or car top
carrier.
WARNING:o When driving on roads covered with
snow or ice, drive at less than 20 mph (30
km/h).
o Use the SAE "S" class or wire & plastic
chains.
o If you have noise caused by chains con-
tacting the body, retighten the chain to
avoid contact with the vehicle body.
o To prevent body damage, retighten the
chains after driving 0.3 ~ 0.6 miles.
Page 207 of 221
8- 4 CONSUMER INFORMATION & REPORTING SAFETY DEFECTS
I080A01A-AAT
TIRE TRACTION
Tire traction can be reduced if you drive on worn
tires, tires that are improperly inflated or on
slippery road surfaces. Tires should be re-
placed when tread wear indicators appear. To
reduce the possibility of losing control, slow
down whenever there is rain, snow or ice on the
road.
I070A01A-AATTIRE BALANCING
A tire that is out of balance may affect handling
and tire wear. The tires on your Hyundai were
balanced before the car was delivered but may
need balancing again during the years you own
the car.
Whenever a tire is dismounted for repair, it
should be rebalanced before being reinstalled
on the car.
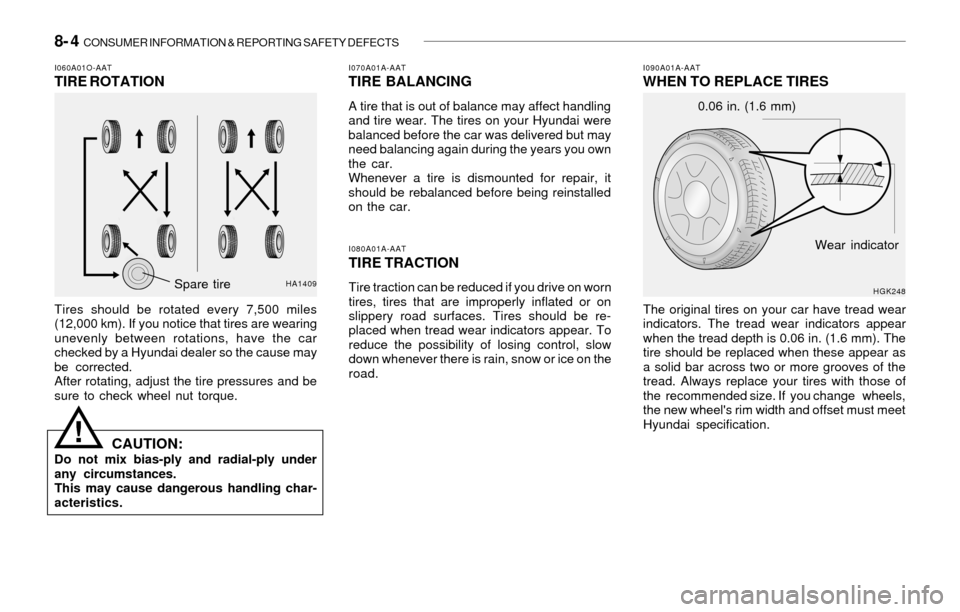
I090A01A-AATWHEN TO REPLACE TIRES
The original tires on your car have tread wear
indicators. The tread wear indicators appear
when the tread depth is 0.06 in. (1.6 mm). The
tire should be replaced when these appear as
a solid bar across two or more grooves of the
tread. Always replace your tires with those of
the recommended size. If you change wheels,
the new wheel's rim width and offset must meet
Hyundai specification.
HGK248
Wear indicator 0.06 in. (1.6 mm)
!
I060A01O-AATTIRE ROTATION
Tires should be rotated every 7,500 miles
(12,000 km). If you notice that tires are wearing
unevenly between rotations, have the car
checked by a Hyundai dealer so the cause may
be corrected.
After rotating, adjust the tire pressures and be
sure to check wheel nut torque.
CAUTION:Do not mix bias-ply and radial-ply under
any circumstances.
This may cause dangerous handling char-
acteristics.
HA1409Spare tire