2003 Hyundai Santa Fe audio
[x] Cancel search: audioPage 106 of 221
1- 94 FEATURES OF YOUR HYUNDAI
To adjust the fade between the front and rear
speakers push and release the AUDIO knob
until FADE appears on the display. Turn the
knob clockwise to move the sound to the front
speakers and counterclockwise to move the
sound to the rear speakers.
The middle position balances the sound be-
tween the speakers. To adjust the balance and
fade to the middle position, push the AUDIO
knob then push it again and hold it until you hear
one beep. The balance and fade will be adjusted
to the middle position and the display will show
the speaker balance.
To adjust all tone and speaker controls to the
middle position, push and hold the AUDIO knob
when no tone or speaker control is display ALL
with the level display in the middle position.
7. AUTO EQUALIZER
This feature allows you to choose bass and
treble equalization settings designed for coun-
try jazz, news, pop, rock and classical stations.
Each time you press the AUTO TONE button,
this feature will change to one of the preset
equalization settings previously listed.
To return the bass and treble to the custom
mode, push and release the AUDIO knob until
custom is displayed.
8. Tips About Your Audio System
Hearing damage form loud noise is almost
undetectable until it is too late. Your hearing can
adapt to higher volumes of sound. Sound that
seems normal can be loud and harmful to your
hearing. Take precautions by adjusting the
volume control on your radio to a safe sound
level before your hearing adapts to it.
To help avoid hearing loss or damage do the
following:
1. Adjust the volume knob to the lowest setting.
2. Increase volume slowly until you hear com-
fortably and clearly.
Page 108 of 221
1- 96 FEATURES OF YOUR HYUNDAI
D285D01O-AATPlaying a Cassette Tape
Your tape player is built to work best with tapes
that are up to 30 to 45 minutes long on each side.
Tapes longer than that are so thin they may not
work well in this player. The longer side with the
tape visible should face to the right. If the ignition
is on, but the radio is off, the tape can be inserted
and will begin playing. A tape symbol is shown
on the display whenever a tape is inserted. If you
hear nothing but a garbled sound, the tape may
not be in squarely. Press EJECT to remove the
tape and start over.
While the tape is playing, use the VOL, AUDIO
and SEEK controls just as you do for the radio.
The display will show TAPE and an arrow
showing which side of the tape is playing. You
can insert a tape when the ignition is off.
If an error appears on the display, see "Cas-
sette Tape Message" later in this section.
1. SEEK Button
SEEK
Press this pushbutton to go to the next selection
on the tape if you press pushbutton more than
once, the player will continue moving forward
through the tape. SEEK and a positive number
will appear on the display. Your tape must have
at least three seconds of silence between each
selection for next to work. The sound still mute
while seeking.
SEEK
Press this pushbutton to go to the previous
selection on the tape if the selection has been
playing for less than three seconds. If this
pushbutton is pressed and the current selection
had been playing for more than 13 seconds, it
will go to the beginning of the previous selection
or the beginning of the current selection, de-
pending upon the position on the tape. SEEK and
a negative number will appear on the display
while the cassette player is in the previous
mode. If this pushbutton is pressed additional
times or held, the radio will go to the displayed
number of previous selections up to 9. SEEK
and a negative number will appear on the dis-
play. Your tape must have at least three sec-
onds of silence between each selection for
previous to work. The sound will mute while
seeking.
2. REVERSE Button
Press this pushbutton to reverse the tape rap-
idly. Press it again to return to playing speed.
The radio will play the last selected station while
the tape reverses. The station frequency and
REV will appear on the display. You may select
stations during reverse operation by using
TUNE, SEEK or PRESET SCAN.
3. FORWARD Button
Press this pushbutton to advance quickly to
another part of the tape. Press this pushbutton
again to return to playing speed. The radio will
play the last selected station while the tape
advances. The station frequency and FWD will
appear on the display. You may select stations
during forward operation by using TUNE, SEEK
or PRESET SCAN.
4. SIDE Button
Press this pushbutton to play the other side of
the tape.
5. (Dolby)
Press this pushbutton to reduce background
noise. DOLBY B ON will appear on the display.
Press it again to turn Dolby B off. DOLBY B OFF
will appear on the display. Dolby Noise Reduc-
tion is manufactured under a license form Dolby
Laboratories Licensing Corporation. Dolby and
the double-D symbol are trademarks of Dolby
laboratories Licensing Corporation.
6. BAND Select Button
Press this button to listen to the radio when a
tape is playing. The tape will stop but remain in
the player.
Page 114 of 221
1- 102 FEATURES OF YOUR HYUNDAI
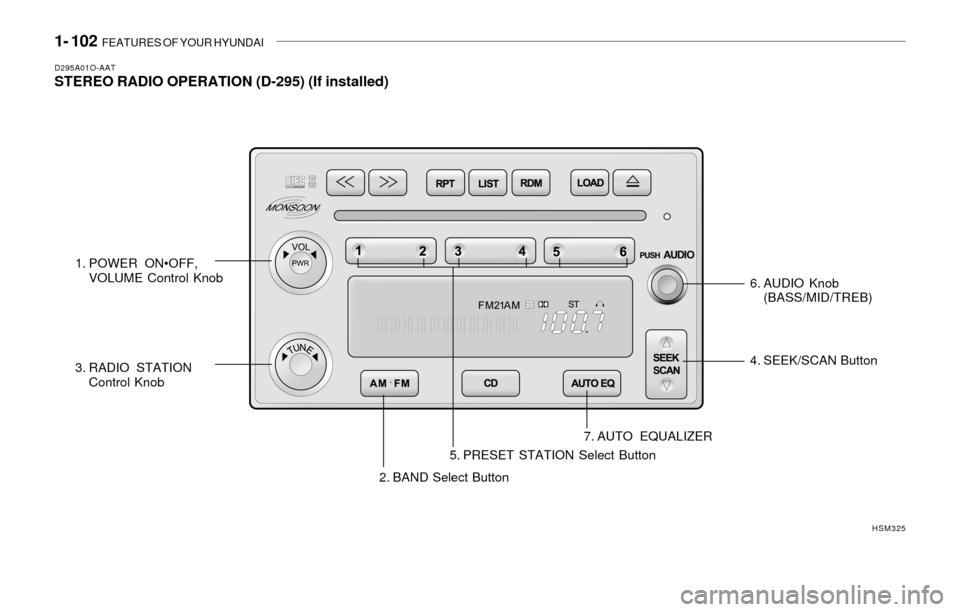
D295A01O-AATSTEREO RADIO OPERATION (D-295) (If installed)
2. BAND Select Button4. SEEK/SCAN Button
7. AUTO EQUALIZER
HSM325
1. POWER ON•OFF,
VOLUME Control Knob
3. RADIO STATION
Control Knob6. AUDIO Knob
(BASS/MID/TREB)
5. PRESET STATION Select Button
Page 115 of 221
FEATURES OF YOUR HYUNDAI 1- 103
D295B01O-AAT1. POWER ON
Press this knob to turn the system on and off.
VOLUME Control
To increase volume, turn the knob clockwise.
Turn it counterclockwise to decrease volume.
2. BAND Select Button
Press this button to switch between AM, FM1
and FM2. Then Display shows your selection.
3. RADIO STATION Control Knob
Turn this knob to select radio stations.
4. SEEK/SCAN Button
SEEK
Press the up or down arrow to go to the next
higher or lower station and stay there. The
sound will mute while seeking.
SCAN
Press and hold either SEEK/SCAN arrow for
two seconds until SCAN appears on the display
and you hear a beep. Use SCAN to listen to
stations for a few seconds. The radio will go to
a station, stop for a few seconds, then go to the
next station. Press either SEEK/SCAN arrow
again to stop scanning. If you press SEEK/
SCAN for more than four seconds, the radio will
change to preset scan mode. Then sound will
mute while scanning.
5. PRESET STATION Select Button
The six numbered pushbuttons let you return to
your favorite stations. You can set up to 18
stations (six AM, six FM1 and six FM2) by
performing the following steps:
1. Turn the radio on.
2. Press AM · FM to select the band.
3. Tune in the desired station.
4. Press AUTO EQ to select the equalization
that best suited type of station selected.
5. Press and hold one of the six numbered
buttons until you hear a beep. Whenever you
press that numbered button, the station you
set will return and the equalization that you
selected will also be automatically selected
for that button.
6. Repeat the above steps for each pushbutton.
PRESET SCAN
Press and hold either SEEK/SCAN arrow for
more than four seconds, PRESET SCAN will
appear on the display. You will hear a double
beep. Use PERSET SCAN to listen to each of
your preset stations for a few seconds. The
radio will go to a preset station stored on your
pushbuttons, stop for a few seconds, then go on
to the next preset stations. Press either SEEK/
SCAN arrow again to stop scanning presets.
6. AUDIO Knob
BASS
Press the AUDIO knob until BASS appears on
the display. Turn the knob to increase or de-
crease bass. When you use this control, the
radio's tone setting will switch to custom mode.
To set the bass to the middle position, select
BASS and press and hold the AUDIO knob. The
radio will produce one beep and set the display
level to zero. To set all tone and speaker
controls to the middle position, press and hold
the AUDIO knob when no tone or speaker
control is active. The radio will produce one
beep and CENTERED will appear on the dis-
play.
Page 116 of 221
1- 104 FEATURES OF YOUR HYUNDAI
MID
Press the AUDIO knob until MID appears on the
display. Turn the knob to increase or decrease
mid. When you use this control, the radio's tone
setting will switch to custom mode.
To set the mid to the middle position, select MID
and press and hold the AUDIO knob. The radio
will produce one beep and set the display level
to zero. To set all tone and speaker controls to
the middle position, press and hold the AUDIO
knob when no tone or speaker control is active.
Then radio will produce one beep and CEN-
TERED will appear on the display.
TREB
Press the AUDIO knob until TREB appears on
the display. Turn the knob to increase to de-
crease treble. When you use this control, the
radio's tone setting will switch to custom mode.
If a station is weak or noisy, you may want to
decrease the treble.
To set treble to the middle position, select TREB
and press and hold the AUDIO knob. The radio
will produce one beep and set the display level
to zero. To set all tone and speaker controls to
the middle position, press and hold the AUDIO
knob when no tone or speaker control is active.
The radio will produce one beep and CEN-
TERED will appear on the display.
7. AUTO EQUALIZER Button
This feature allows you to choose preset bass,
mid and treble equalization settings designed
for country, jazz, talk, pop, rock and classical
stations. The last setting will appear on the
display when you first press AUTO EQ. Each
time you press AUTO EQ, another setting will
appear on the display. Press AUTO EQ again
country disappear and CUSTOM will appear.
Tone control will return to the BASS, MID and
TREB. Also, if you alter BASS, MID, or TREB
while in an auto EQ setting, the radio will return
to CUSTOM. CUSTOM will appear on the dis-
play.
8. Adjusting the Speakers
BAL-FADE
The AUDIO knob adjusts balance and fade. To
adjust balance, press the AUDIO knob until BAL
appears on the display. Turn the knob to adjust
the sound to the left or right speakers. The
middle position balances the sound between the
speakers. To adjust fade, press and hold the
AUDIO knob until FAD appears on the display.
Turn the knob to adjust the sound to the front or
rear speakers. The middle position balances
the sound between the speakers.To set the balance and fade to the middle
position, select balance or fade and press and
hold the AUDIO knob.
The radio will beep once and will set the display
level to the middle position, To set all tone and
speaker controls to the middle position, press
and hold the AUDIO knob when tone or speaker
controls are not active. The radio will produce
one beep and CENTERED will appear on the
display.
Page 122 of 221
1- 110 FEATURES OF YOUR HYUNDAI
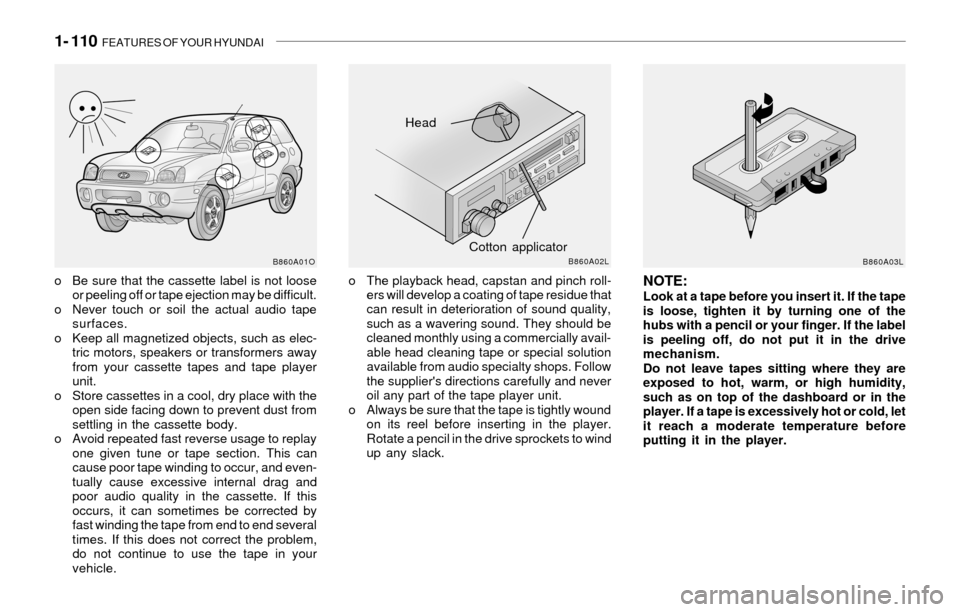
o Be sure that the cassette label is not loose
or peeling off or tape ejection may be difficult.
o Never touch or soil the actual audio tape
surfaces.
o Keep all magnetized objects, such as elec-
tric motors, speakers or transformers away
from your cassette tapes and tape player
unit.
o Store cassettes in a cool, dry place with the
open side facing down to prevent dust from
settling in the cassette body.
o Avoid repeated fast reverse usage to replay
one given tune or tape section. This can
cause poor tape winding to occur, and even-
tually cause excessive internal drag and
poor audio quality in the cassette. If this
occurs, it can sometimes be corrected by
fast winding the tape from end to end several
times. If this does not correct the problem,
do not continue to use the tape in your
vehicle.NOTE:Look at a tape before you insert it. If the tape
is loose, tighten it by turning one of the
hubs with a pencil or your finger. If the label
is peeling off, do not put it in the drive
mechanism.
Do not leave tapes sitting where they are
exposed to hot, warm, or high humidity,
such as on top of the dashboard or in the
player. If a tape is excessively hot or cold, let
it reach a moderate temperature before
putting it in the player.
Head
Cotton applicator
B860A01OB860A02LB860A03L
o The playback head, capstan and pinch roll-
ers will develop a coating of tape residue that
can result in deterioration of sound quality,
such as a wavering sound. They should be
cleaned monthly using a commercially avail-
able head cleaning tape or special solution
available from audio specialty shops. Follow
the supplier's directions carefully and never
oil any part of the tape player unit.
o Always be sure that the tape is tightly wound
on its reel before inserting in the player.
Rotate a pencil in the drive sprockets to wind
up any slack.
Page 217 of 221
10- 2 INDEX
A
Air bag ...............................................................................................1-29
Air Cleaner Filter ...............................................................................6-12
Air Conditioning
Care..............................................................................................6-17
Operation............................................................................ 1-76, 6-17
Switch...........................................................................................1-75
Antenna ..........................................................................................1-111
Ashtray..............................................................................................1-49
Audio System
Cassete tape player operation (D-285) ......................................1-95
Compact disc player operation (H260) .......................................1-89
Compact disc player operation (D-285) ......................................1-99
Compact disc player operation (D-295) ...................................1-105
Stereo radio operation (H260) .....................................................1-86
Stereo radio operation (D-285) ...................................................1-92
Stereo radio operation (D-295) ................................................1-102
B
Battery..................................................................................... 2-18, 6-21
Brake
Anti-lock brake system ................................................................2-10
Brake traction control system (BTCS) ........................................2-11
Checking the brakes ....................................................................6-15
Fluid ..............................................................................................6-15
Pedal clearance ...........................................................................6-19
Pedal free-play .............................................................................6-19
Practices......................................................................................2-15
Breaking-In your New Hyundai .......................................................... 1-3C
Calendar............................................................................................1-47
Care of Cassette Tapes ................................................................1-109
Care of Disc ...................................................................................1-109
Cargo Security Screen .....................................................................1-60
Catalytic Converter ............................................................................. 7-3
Child-Protector Rear Door Lock ......................................................... 1-6
Child Restraint System .....................................................................1-23
Installing a Child Restraint Seat with the
"Tether Anchorage" System .....................................................1-25
Securing the Child Restraint Seat with the "ISOFIX" System ....1-25
Cigarette Lighter ................................................................................1-48
Clock.................................................................................................1-47
Clutch
Checking fluid ...............................................................................6-16
Pedal free-play .............................................................................6-18
Combination Light
Auto light .......................................................................................1-44
Headlight flasher ..........................................................................1-44
Headlight switch ...........................................................................1-43
High-beam switch ........................................................................1-44
Lane change signal ......................................................................1-43
Parking light auto cut ....................................................................1-43
Turn signal operation ...................................................................1-43
Consumer Information ........................................................................ 8-6
Cooling Fans .....................................................................................6-22
Corrosion protection
Cleaning the interior ....................................................................... 4-4
Protecting your Hyundai from corrosion ....................................... 4-2
Washing and waxing ...................................................................... 4-3
Cruise Control ...................................................................................1-66