2003 Hyundai Santa Fe ECU
[x] Cancel search: ECUPage 38 of 221
1- 26 FEATURES OF YOUR HYUNDAI
!
!
WARNING:If the child restraint seat is not anchored
properly, the risk of a child being seriously
injured or killed in a collision greatly in-
creases. The ISOFIX anchors are located between the
seatback and the seat cushion of the rear seat
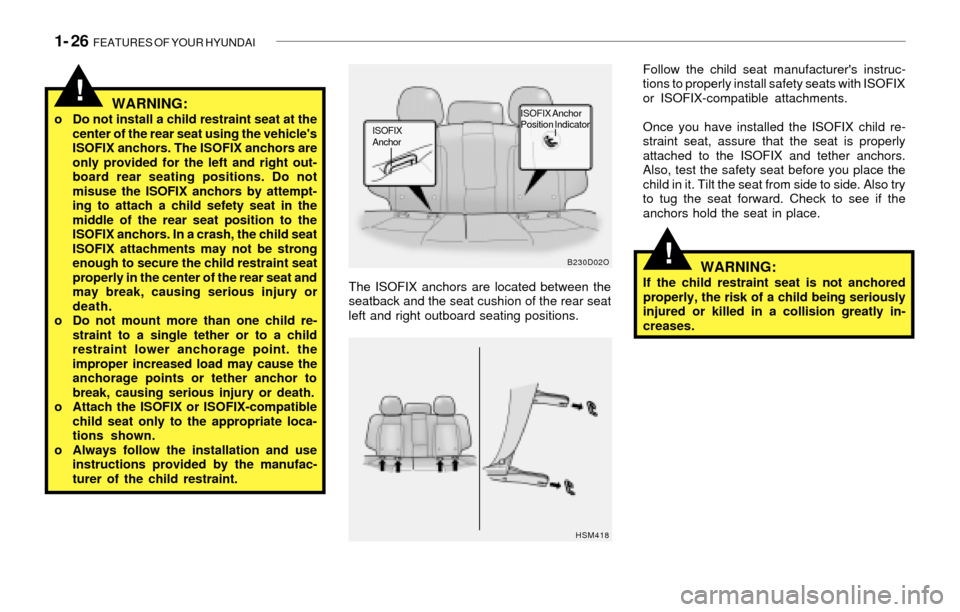
left and right outboard seating positions.
B230D02O
ISOFIX
Anchor
ISOFIX Anchor
Position Indicator
Follow the child seat manufacturer's instruc-
tions to properly install safety seats with ISOFIX
or ISOFIX-compatible attachments.
Once you have installed the ISOFIX child re-
straint seat, assure that the seat is properly
attached to the ISOFIX and tether anchors.
Also, test the safety seat before you place the
child in it. Tilt the seat from side to side. Also try
to tug the seat forward. Check to see if the
anchors hold the seat in place.
HSM418
WARNING:o Do not install a child restraint seat at the
center of the rear seat using the vehicle's
ISOFIX anchors. The ISOFIX anchors are
only provided for the left and right out-
board rear seating positions. Do not
misuse the ISOFIX anchors by attempt-
ing to attach a child sefety seat in the
middle of the rear seat position to the
ISOFIX anchors. In a crash, the child seat
ISOFIX attachments may not be strong
enough to secure the child restraint seat
properly in the center of the rear seat and
may break, causing serious injury or
death.
o Do not mount more than one child re-
straint to a single tether or to a child
restraint lower anchorage point. the
improper increased load may cause the
anchorage points or tether anchor to
break, causing serious injury or death.
o Attach the ISOFIX or ISOFIX-compatible
child seat only to the appropriate loca-
tions shown.
o Always follow the installation and use
instructions provided by the manufac-
turer of the child restraint.
Page 39 of 221
FEATURES OF YOUR HYUNDAI 1- 27
!
B230F01A-AATInstallation on Rear Seat Center Posi-
tion
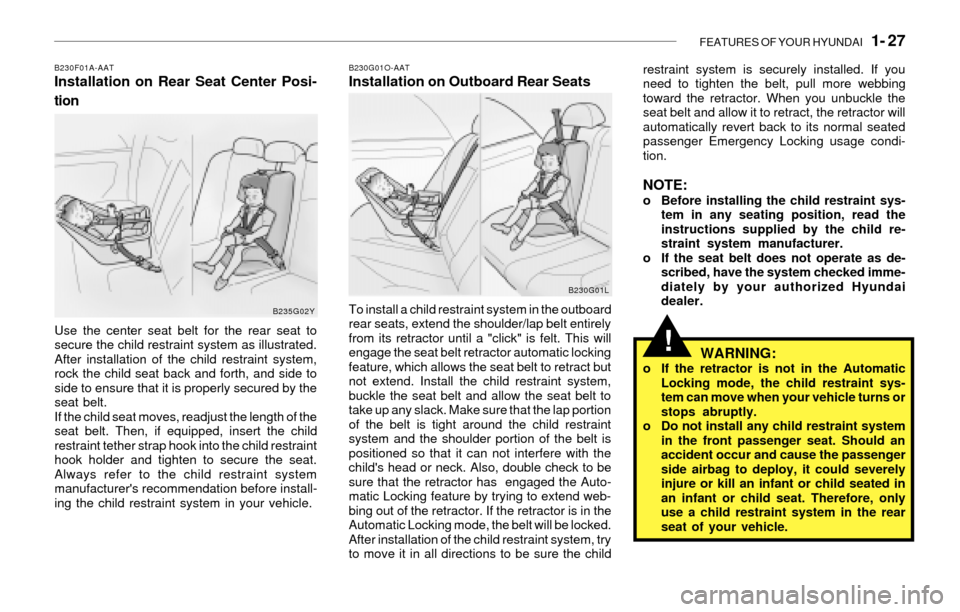
Use the center seat belt for the rear seat to
secure the child restraint system as illustrated.
After installation of the child restraint system,
rock the child seat back and forth, and side to
side to ensure that it is properly secured by the
seat belt.
If the child seat moves, readjust the length of the
seat belt. Then, if equipped, insert the child
restraint tether strap hook into the child restraint
hook holder and tighten to secure the seat.
Always refer to the child restraint system
manufacturer's recommendation before install-
ing the child restraint system in your vehicle.
B230G01O-AATInstallation on Outboard Rear Seats
B235G02Y
WARNING:o If the retractor is not in the Automatic
Locking mode, the child restraint sys-
tem can move when your vehicle turns or
stops abruptly.
o Do not install any child restraint system
in the front passenger seat. Should an
accident occur and cause the passenger
side airbag to deploy, it could severely
injure or kill an infant or child seated in
an infant or child seat. Therefore, only
use a child restraint system in the rear
seat of your vehicle. To install a child restraint system in the outboard
rear seats, extend the shoulder/lap belt entirely
from its retractor until a "click" is felt. This will
engage the seat belt retractor automatic locking
feature, which allows the seat belt to retract but
not extend. Install the child restraint system,
buckle the seat belt and allow the seat belt to
take up any slack. Make sure that the lap portion
of the belt is tight around the child restraint
system and the shoulder portion of the belt is
positioned so that it can not interfere with the
child's head or neck. Also, double check to be
sure that the retractor has engaged the Auto-
matic Locking feature by trying to extend web-
bing out of the retractor. If the retractor is in the
Automatic Locking mode, the belt will be locked.
After installation of the child restraint system, try
to move it in all directions to be sure the childrestraint system is securely installed. If you
need to tighten the belt, pull more webbing
toward the retractor. When you unbuckle the
seat belt and allow it to retract, the retractor will
automatically revert back to its normal seated
passenger Emergency Locking usage condi-
tion.
NOTE:o Before installing the child restraint sys-
tem in any seating position, read the
instructions supplied by the child re-
straint system manufacturer.
o If the seat belt does not operate as de-
scribed, have the system checked imme-
diately by your authorized Hyundai
dealer.
B230G01L
Page 70 of 221
1- 58 FEATURES OF YOUR HYUNDAI
Gate Operator Programming & Cana-
dian Programming
During programming, your handheld transmit-
ter may automatically stop transmitting.
Continue to press and hold the HomeLink button
while you press and repress ("cycle") your
handheld transmitter every two seconds until
the frequency signal has been learned. The
indicator light will flash slowly at first and then
rapidly upon successful programming.
Accessories
For more information on HomeLink and
HomeLink-compatible products, or to purchase
HomeLink accessories, call 1-800-355-3515
or visit www.homeink.com.
Operating HomeLink
Simply press the appropriate HomeLink button
to activate the trained product (garage door,
security system, entry door lock, estate gate,
lighting, etc.). The original handheld transmit-
ters may also be used at any time.
Erasing Programmed Buttons
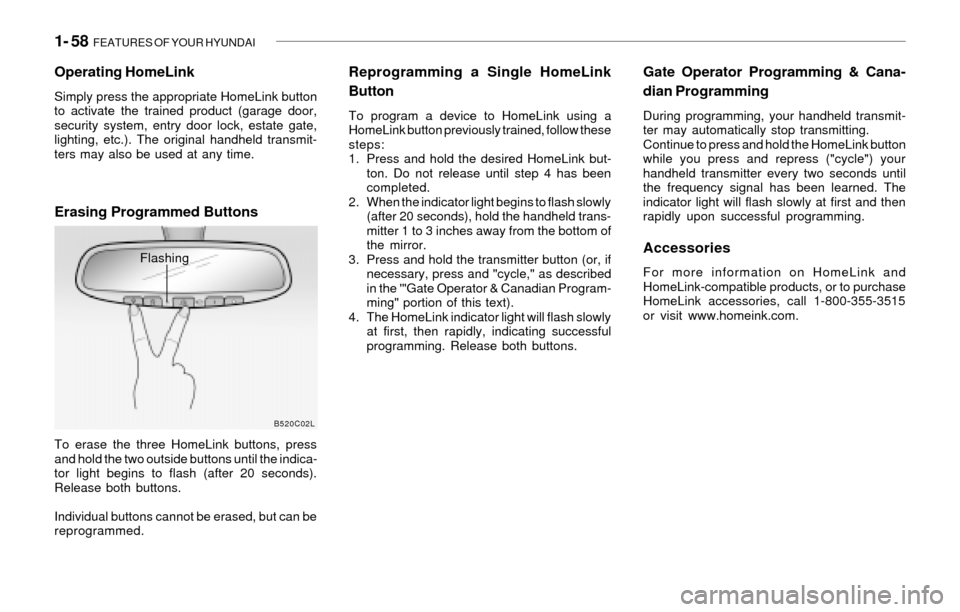
To erase the three HomeLink buttons, press
and hold the two outside buttons until the indica-
tor light begins to flash (after 20 seconds).
Release both buttons.
Individual buttons cannot be erased, but can be
reprogrammed.
Reprogramming a Single HomeLink
Button
To program a device to HomeLink using a
HomeLink button previously trained, follow these
steps:
1. Press and hold the desired HomeLink but-
ton. Do not release until step 4 has been
completed.
2. When the indicator light begins to flash slowly
(after 20 seconds), hold the handheld trans-
mitter 1 to 3 inches away from the bottom of
the mirror.
3. Press and hold the transmitter button (or, if
necessary, press and "cycle," as described
in the '"Gate Operator & Canadian Program-
ming" portion of this text).
4. The HomeLink indicator light will flash slowly
at first, then rapidly, indicating successful
programming. Release both buttons.
B520C02L
Flashing
Page 71 of 221
FEATURES OF YOUR HYUNDAI 1- 59
!
B530A01A-AATPARKING BRAKE
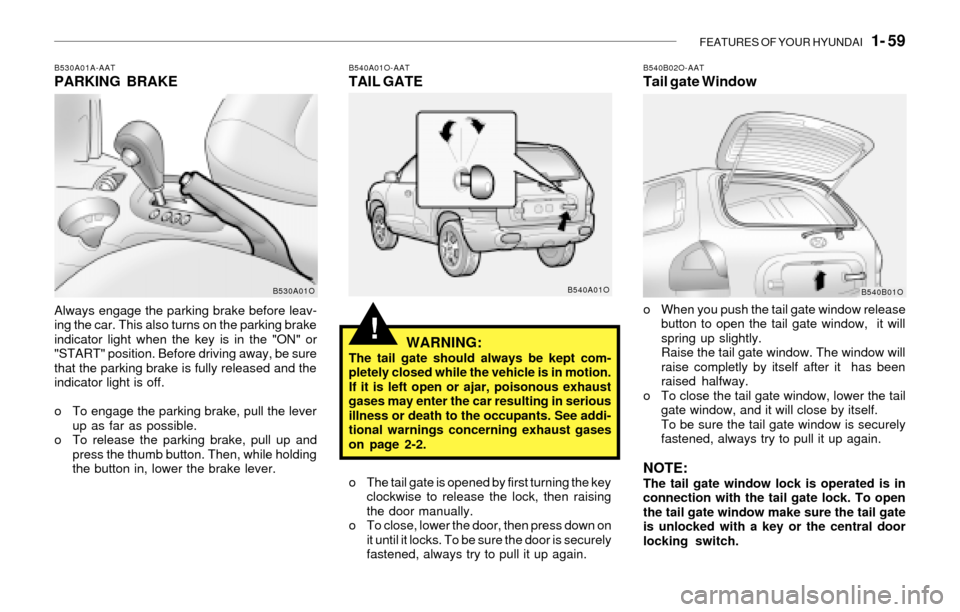
Always engage the parking brake before leav-
ing the car. This also turns on the parking brake
indicator light when the key is in the "ON" or
"START" position. Before driving away, be sure
that the parking brake is fully released and the
indicator light is off.
o To engage the parking brake, pull the lever
up as far as possible.
o To release the parking brake, pull up and
press the thumb button. Then, while holding
the button in, lower the brake lever.
B540A01O-AATTAIL GATE
WARNING:
The tail gate should always be kept com-
pletely closed while the vehicle is in motion.
If it is left open or ajar, poisonous exhaust
gases may enter the car resulting in serious
illness or death to the occupants. See addi-
tional warnings concerning exhaust gases
on page 2-2.
o The tail gate is opened by first turning the key
clockwise to release the lock, then raising
the door manually.
o To close, lower the door, then press down on
it until it locks. To be sure the door is securely
fastened, always try to pull it up again.
B530A01OB540A01O
B540B02O-AATTail gate Window
o When you push the tail gate window release
button to open the tail gate window, it will
spring up slightly.
Raise the tail gate window. The window will
raise completly by itself after it has been
raised halfway.
o To close the tail gate window, lower the tail
gate window, and it will close by itself.
To be sure the tail gate window is securely
fastened, always try to pull it up again.
NOTE:The tail gate window lock is operated is in
connection with the tail gate lock. To open
the tail gate window make sure the tail gate
is unlocked with a key or the central door
locking switch.
B540B01O
Page 72 of 221
1- 60 FEATURES OF YOUR HYUNDAI
!
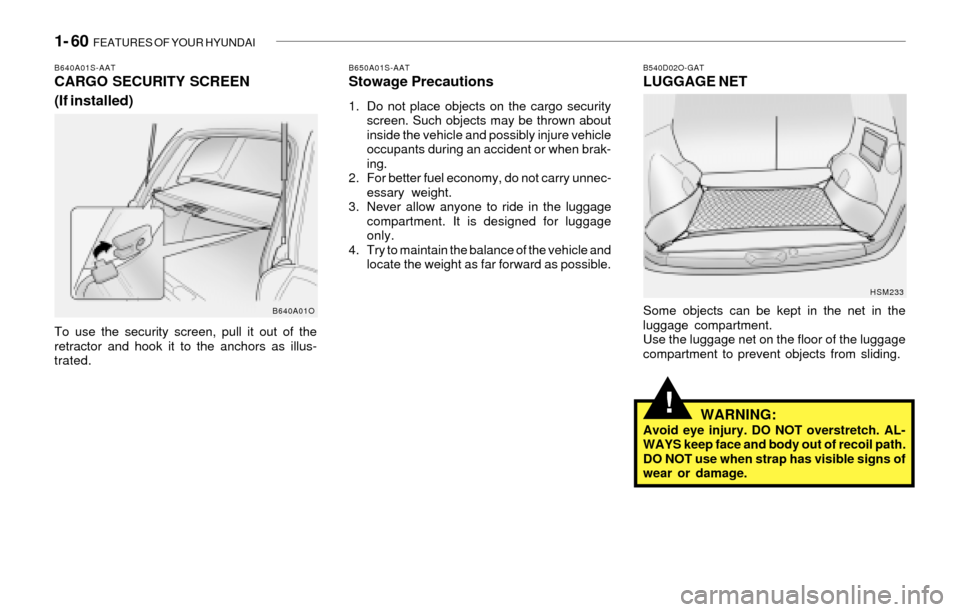
B540D02O-GATLUGGAGE NET
Some objects can be kept in the net in the
luggage compartment.
Use the luggage net on the floor of the luggage
compartment to prevent objects from sliding.
HSM233
WARNING:Avoid eye injury. DO NOT overstretch. AL-
WAYS keep face and body out of recoil path.
DO NOT use when strap has visible signs of
wear or damage.
B640A01S-AATCARGO SECURITY SCREEN
(If installed)
B640A01O
To use the security screen, pull it out of the
retractor and hook it to the anchors as illus-
trated.
B650A01S-AATStowage Precautions
1. Do not place objects on the cargo security
screen. Such objects may be thrown about
inside the vehicle and possibly injure vehicle
occupants during an accident or when brak-
ing.
2. For better fuel economy, do not carry unnec-
essary weight.
3. Never allow anyone to ride in the luggage
compartment. It is designed for luggage
only.
4. Try to maintain the balance of the vehicle and
locate the weight as far forward as possible.
Page 73 of 221
FEATURES OF YOUR HYUNDAI 1- 61
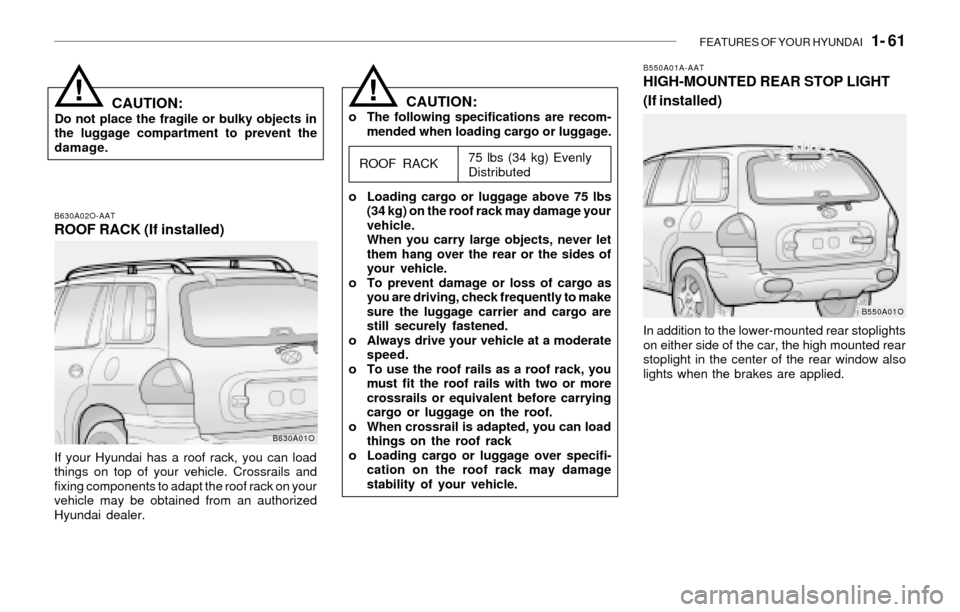
B630A02O-AATROOF RACK (If installed)
If your Hyundai has a roof rack, you can load
things on top of your vehicle. Crossrails and
fixing components to adapt the roof rack on your
vehicle may be obtained from an authorized
Hyundai dealer.
B630A01O
CAUTION:o The following specifications are recom-
mended when loading cargo or luggage.
75 lbs (34 kg) Evenly
Distributed
o Loading cargo or luggage above 75 lbs
(34 kg) on the roof rack may damage your
vehicle.
When you carry large objects, never let
them hang over the rear or the sides of
your vehicle.
o To prevent damage or loss of cargo as
you are driving, check frequently to make
sure the luggage carrier and cargo are
still securely fastened.
o Always drive your vehicle at a moderate
speed.
o To use the roof rails as a roof rack, you
must fit the roof rails with two or more
crossrails or equivalent before carrying
cargo or luggage on the roof.
o When crossrail is adapted, you can load
things on the roof rack
o Loading cargo or luggage over specifi-
cation on the roof rack may damage
stability of your vehicle.
ROOF RACK
!CAUTION:Do not place the fragile or bulky objects in
the luggage compartment to prevent the
damage.
!
B550A01A-AATHIGH-MOUNTED REAR STOP LIGHT
(If installed)
In addition to the lower-mounted rear stoplights
on either side of the car, the high mounted rear
stoplight in the center of the rear window also
lights when the brakes are applied.
B550A01O
Page 75 of 221
FEATURES OF YOUR HYUNDAI 1- 63
!
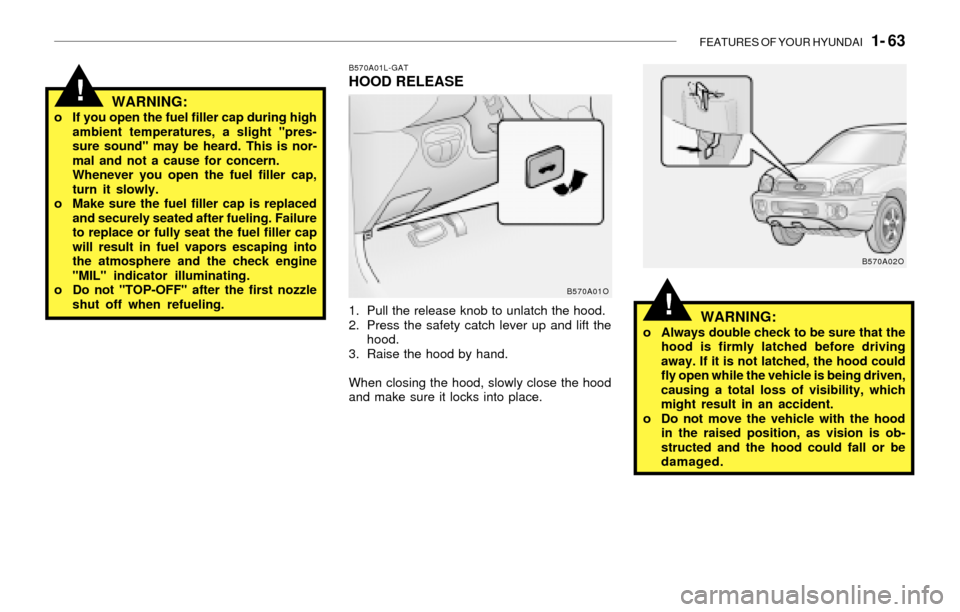
B570A01L-GATHOOD RELEASE
1. Pull the release knob to unlatch the hood.
2. Press the safety catch lever up and lift the
hood.
3. Raise the hood by hand.
When closing the hood, slowly close the hood
and make sure it locks into place.
WARNING:o If you open the fuel filler cap during high
ambient temperatures, a slight "pres-
sure sound" may be heard. This is nor-
mal and not a cause for concern.
Whenever you open the fuel filler cap,
turn it slowly.
o Make sure the fuel filler cap is replaced
and securely seated after fueling. Failure
to replace or fully seat the fuel filler cap
will result in fuel vapors escaping into
the atmosphere and the check engine
"MIL" indicator illuminating.
o Do not "TOP-OFF" after the first nozzle
shut off when refueling.
B570A01O
!WARNING:o Always double check to be sure that the
hood is firmly latched before driving
away. If it is not latched, the hood could
fly open while the vehicle is being driven,
causing a total loss of visibility, which
might result in an accident.
o Do not move the vehicle with the hood
in the raised position, as vision is ob-
structed and the hood could fall or be
damaged.
B570A02O
Page 125 of 221
DRIVING YOUR HYUNDAI 2- 3
!!WARNING:o The 2WD Santa Fe is not designed for
off-road use. The 4WD Santa Fe is de-
signed primarily for use on paved roads.
However, occasional use in off-highway
conditions such as established unpaved
roads and non-challenging off-road
trails is allowed. The 4WD Santa Fe is not
designed for blazing new trails, chal-
lenging off-road conditions, or unpaved
hill climbing. Exceeding the conditions
that were intended for the vehicle's pri-
mary design may result in injury or death.
o Utility vehicle has a significantly higher
collision rate than other type of vehicles.
o Utility vehicle have higher ground clear-
ance and a narrower track to make them
capable of performing in a wide variety
of off-road applications. Specific design
characteristics give them a higher center
of gravitiy than ordinary cars. An advan-
tage of the higher ground clearance is a
better view of the road allowing you to
anticipate problem. They are not de-
signed for cornering at the same speeds
as conventional 2-wheel drive vehicles
any more than low-slung sports cars are
designed to perform satisfactorily un-
der off-road conditions. If at all possible,
avoid sharp turns or abrupt maneuvers.
As with other vehicles of this type, fail-
ure to operate this vehicle correctly may
result in loss of control or vehicle rollover.
C020A01A-AATBEFORE STARTING THE ENGINE
Before you start the engine, you should always:
1. Look around the vehicle to be sure there are
no flat tires, puddles of oil, water or other
indications of possible trouble.
2. After entering the car, check to be sure the
parking brake is engaged.
3. Check that all windows, and lights are clean.
4. Check that the interior and exterior mirrors
are clean and in position.
5. Check your seat, seatback and headrest to
be sure they are in their proper positions.
6. Lock all the doors.
7. Fasten your seat belt and be sure that all
other occupants have fastened theirs.
8. Turn off all lights and accessories that are
not needed.
9. When you turn the ignition switch to "ON",
check that all appropriate warning lights are
operating and that you have sufficient fuel.
10.Check the operation of warning lights and all
bulbs when key is in the "ON" position.
C030A01E-AATCOMBINATION IGNITION SWITCH
To Start the Engine
o If your Hyundai is equipped with a manual
transaxle, place the shift lever in neutral and
depress the clutch pedal fully.
o If your Hyundai has an automatic transaxle,
place the shift lever in "P" (park).
o To start the engine, insert the ignition key and
turn it to the "START" position. Release it as
soon as the engine starts. Do not hold the
key in the "START" position for more that 15
seconds.
NOTE:o For safety, the engine will not start if the
clutch pedal is not depressed fully
(Manual Transaxle) or the shift lever is
not in "P" or "N" Position (Automatic
Transaxle).
o The ignition key cannot be turned from
"ACC" position to "LOCK" position un-
less the shift lever is in the "P" (Park)
position or the negative battery terminal
is disconnected from the battery. To
remove the key, always confirm that the
shift lever is securely positioned in "P"
(Park) (For Automatic Transaxle)
o For additional information about start-
ing, see page 2-5.
WARNING:o In a collision crash, an unbelted person
is significantly more likely to die than a
person wearing a seatbelt.