2003 Hyundai Santa Fe ECO mode
[x] Cancel search: ECO modePage 92 of 221
1- 80 FEATURES OF YOUR HYUNDAI
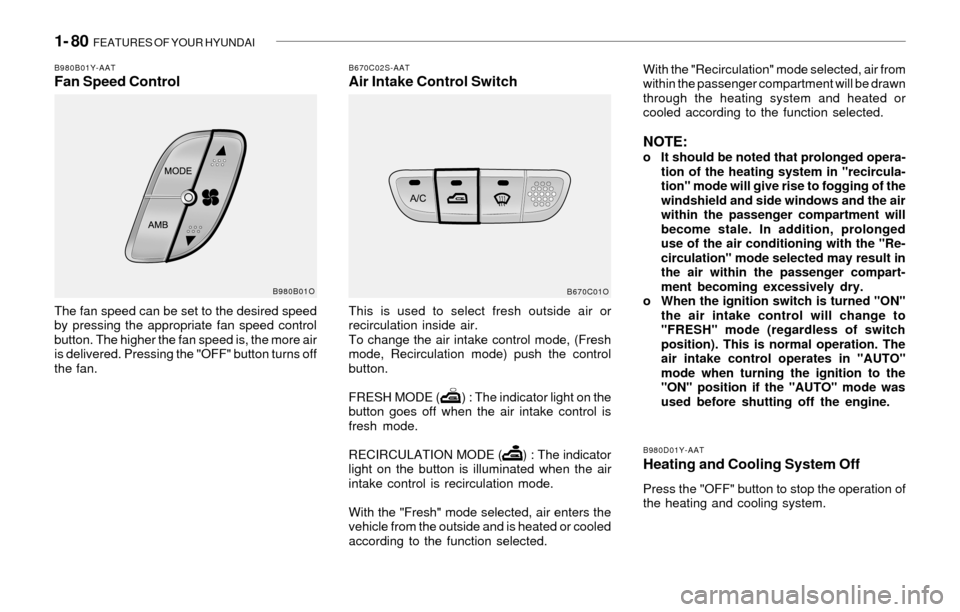
B980B01Y-AATFan Speed Control
The fan speed can be set to the desired speed
by pressing the appropriate fan speed control
button. The higher the fan speed is, the more air
is delivered. Pressing the "OFF" button turns off
the fan.
B670C02S-AATAir Intake Control SwitchWith the "Recirculation" mode selected, air from
within the passenger compartment will be drawn
through the heating system and heated or
cooled according to the function selected.
NOTE:o It should be noted that prolonged opera-
tion of the heating system in "recircula-
tion" mode will give rise to fogging of the
windshield and side windows and the air
within the passenger compartment will
become stale. In addition, prolonged
use of the air conditioning with the "Re-
circulation" mode selected may result in
the air within the passenger compart-
ment becoming excessively dry.
o When the ignition switch is turned "ON"
the air intake control will change to
"FRESH" mode (regardless of switch
position). This is normal operation. The
air intake control operates in "AUTO"
mode when turning the ignition to the
"ON" position if the "AUTO" mode was
used before shutting off the engine. This is used to select fresh outside air or
recirculation inside air.
To change the air intake control mode, (Fresh
mode, Recirculation mode) push the control
button.
FRESH MODE ( ) : The indicator light on the
button goes off when the air intake control is
fresh mode.
RECIRCULATION MODE ( ) : The indicator
light on the button is illuminated when the air
intake control is recirculation mode.
With the "Fresh" mode selected, air enters the
vehicle from the outside and is heated or cooled
according to the function selected.
B980D01Y-AAT
Heating and Cooling System Off
Press the "OFF" button to stop the operation of
the heating and cooling system.
B670C01O B980B01O
Page 99 of 221
FEATURES OF YOUR HYUNDAI 1- 87
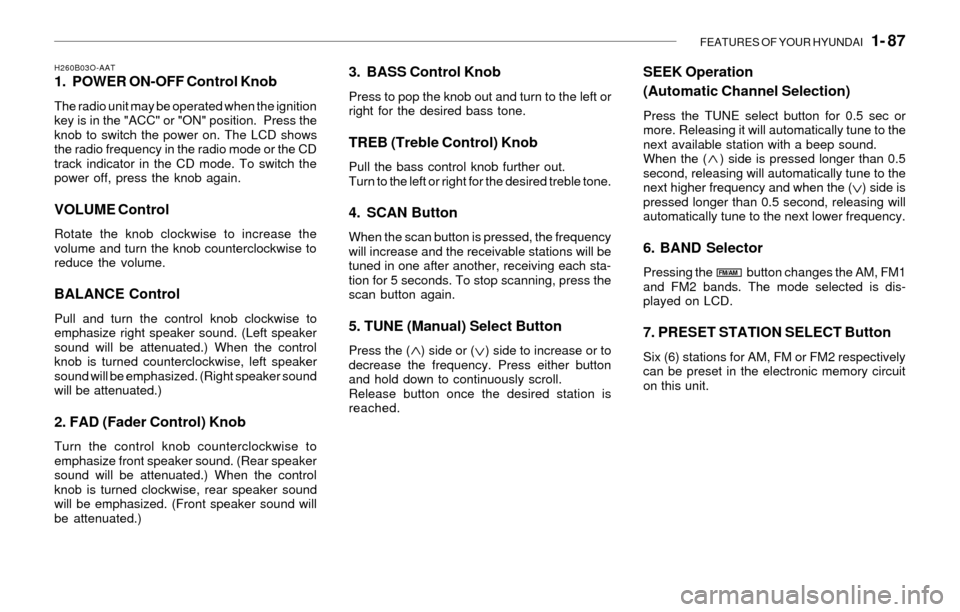
H260B03O-AAT1. POWER ON-OFF Control Knob
The radio unit may be operated when the ignition
key is in the "ACC" or "ON" position. Press the
knob to switch the power on. The LCD shows
the radio frequency in the radio mode or the CD
track indicator in the CD mode. To switch the
power off, press the knob again.
VOLUME Control
Rotate the knob clockwise to increase the
volume and turn the knob counterclockwise to
reduce the volume.
BALANCE Control
Pull and turn the control knob clockwise to
emphasize right speaker sound. (Left speaker
sound will be attenuated.) When the control
knob is turned counterclockwise, left speaker
sound will be emphasized. (Right speaker sound
will be attenuated.)
2. FAD (Fader Control) Knob
Turn the control knob counterclockwise to
emphasize front speaker sound. (Rear speaker
sound will be attenuated.) When the control
knob is turned clockwise, rear speaker sound
will be emphasized. (Front speaker sound will
be attenuated.)
3. BASS Control Knob
Press to pop the knob out and turn to the left or
right for the desired bass tone.
TREB (Treble Control) Knob
Pull the bass control knob further out.
Turn to the left or right for the desired treble tone.
4. SCAN Button
When the scan button is pressed, the frequency
will increase and the receivable stations will be
tuned in one after another, receiving each sta-
tion for 5 seconds. To stop scanning, press the
scan button again.
5. TUNE (Manual) Select Button
Press the ( ) side or ( ) side to increase or to
decrease the frequency. Press either button
and hold down to continuously scroll.
Release button once the desired station is
reached.
SEEK Operation
(Automatic Channel Selection)
Press the TUNE select button for 0.5 sec or
more. Releasing it will automatically tune to the
next available station with a beep sound.
When the ( ) side is pressed longer than 0.5
second, releasing will automatically tune to the
next higher frequency and when the ( ) side is
pressed longer than 0.5 second, releasing will
automatically tune to the next lower frequency.
6. BAND Selector
Pressing the button changes the AM, FM1
and FM2 bands. The mode selected is dis-
played on LCD.
7. PRESET STATION SELECT Button
Six (6) stations for AM, FM or FM2 respectively
can be preset in the electronic memory circuit
on this unit.
FM/AM
Page 105 of 221
FEATURES OF YOUR HYUNDAI 1- 93
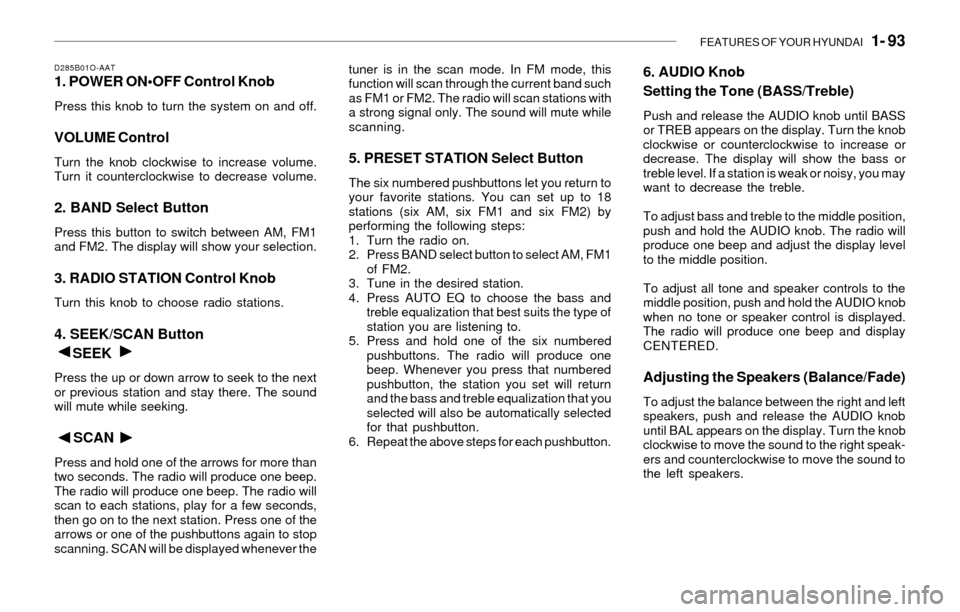
D285B01O-AAT1. POWER ON•OFF Control Knob
Press this knob to turn the system on and off.
VOLUME Control
Turn the knob clockwise to increase volume.
Turn it counterclockwise to decrease volume.
2. BAND Select Button
Press this button to switch between AM, FM1
and FM2. The display will show your selection.
3. RADIO STATION Control Knob
Turn this knob to choose radio stations.
4. SEEK/SCAN Button
SEEK
Press the up or down arrow to seek to the next
or previous station and stay there. The sound
will mute while seeking.
SCAN
Press and hold one of the arrows for more than
two seconds. The radio will produce one beep.
The radio will produce one beep. The radio will
scan to each stations, play for a few seconds,
then go on to the next station. Press one of the
arrows or one of the pushbuttons again to stop
scanning. SCAN will be displayed whenever thetuner is in the scan mode. In FM mode, this
function will scan through the current band such
as FM1 or FM2. The radio will scan stations with
a strong signal only. The sound will mute while
scanning.
5. PRESET STATION Select Button
The six numbered pushbuttons let you return to
your favorite stations. You can set up to 18
stations (six AM, six FM1 and six FM2) by
performing the following steps:
1. Turn the radio on.
2. Press BAND select button to select AM, FM1
of FM2.
3. Tune in the desired station.
4. Press AUTO EQ to choose the bass and
treble equalization that best suits the type of
station you are listening to.
5. Press and hold one of the six numbered
pushbuttons. The radio will produce one
beep. Whenever you press that numbered
pushbutton, the station you set will return
and the bass and treble equalization that you
selected will also be automatically selected
for that pushbutton.
6. Repeat the above steps for each pushbutton.
6. AUDIO Knob
Setting the Tone (BASS/Treble)
Push and release the AUDIO knob until BASS
or TREB appears on the display. Turn the knob
clockwise or counterclockwise to increase or
decrease. The display will show the bass or
treble level. If a station is weak or noisy, you may
want to decrease the treble.
To adjust bass and treble to the middle position,
push and hold the AUDIO knob. The radio will
produce one beep and adjust the display level
to the middle position.
To adjust all tone and speaker controls to the
middle position, push and hold the AUDIO knob
when no tone or speaker control is displayed.
The radio will produce one beep and display
CENTERED.
Adjusting the Speakers (Balance/Fade)
To adjust the balance between the right and left
speakers, push and release the AUDIO knob
until BAL appears on the display. Turn the knob
clockwise to move the sound to the right speak-
ers and counterclockwise to move the sound to
the left speakers.
Page 108 of 221
1- 96 FEATURES OF YOUR HYUNDAI
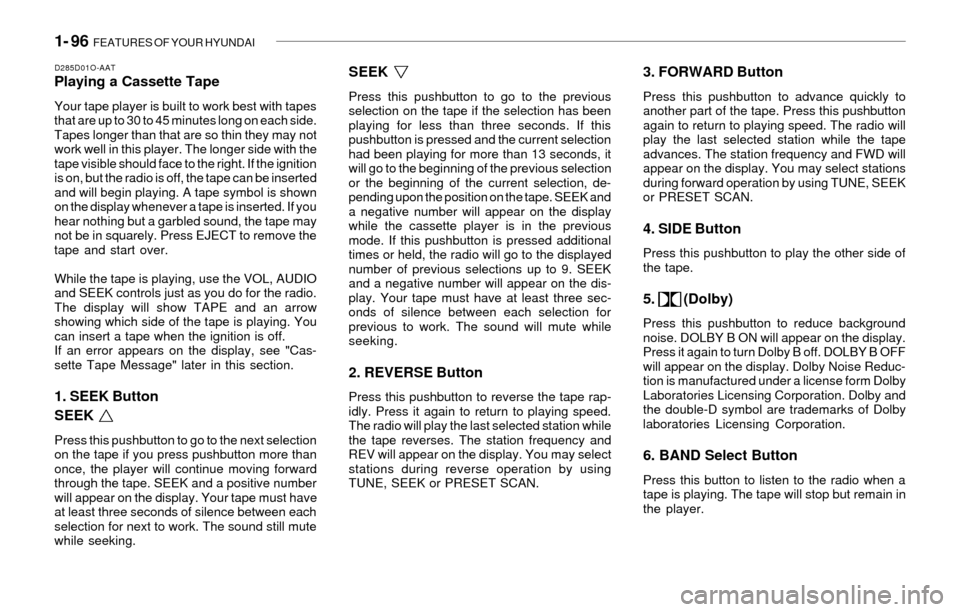
D285D01O-AATPlaying a Cassette Tape
Your tape player is built to work best with tapes
that are up to 30 to 45 minutes long on each side.
Tapes longer than that are so thin they may not
work well in this player. The longer side with the
tape visible should face to the right. If the ignition
is on, but the radio is off, the tape can be inserted
and will begin playing. A tape symbol is shown
on the display whenever a tape is inserted. If you
hear nothing but a garbled sound, the tape may
not be in squarely. Press EJECT to remove the
tape and start over.
While the tape is playing, use the VOL, AUDIO
and SEEK controls just as you do for the radio.
The display will show TAPE and an arrow
showing which side of the tape is playing. You
can insert a tape when the ignition is off.
If an error appears on the display, see "Cas-
sette Tape Message" later in this section.
1. SEEK Button
SEEK
Press this pushbutton to go to the next selection
on the tape if you press pushbutton more than
once, the player will continue moving forward
through the tape. SEEK and a positive number
will appear on the display. Your tape must have
at least three seconds of silence between each
selection for next to work. The sound still mute
while seeking.
SEEK
Press this pushbutton to go to the previous
selection on the tape if the selection has been
playing for less than three seconds. If this
pushbutton is pressed and the current selection
had been playing for more than 13 seconds, it
will go to the beginning of the previous selection
or the beginning of the current selection, de-
pending upon the position on the tape. SEEK and
a negative number will appear on the display
while the cassette player is in the previous
mode. If this pushbutton is pressed additional
times or held, the radio will go to the displayed
number of previous selections up to 9. SEEK
and a negative number will appear on the dis-
play. Your tape must have at least three sec-
onds of silence between each selection for
previous to work. The sound will mute while
seeking.
2. REVERSE Button
Press this pushbutton to reverse the tape rap-
idly. Press it again to return to playing speed.
The radio will play the last selected station while
the tape reverses. The station frequency and
REV will appear on the display. You may select
stations during reverse operation by using
TUNE, SEEK or PRESET SCAN.
3. FORWARD Button
Press this pushbutton to advance quickly to
another part of the tape. Press this pushbutton
again to return to playing speed. The radio will
play the last selected station while the tape
advances. The station frequency and FWD will
appear on the display. You may select stations
during forward operation by using TUNE, SEEK
or PRESET SCAN.
4. SIDE Button
Press this pushbutton to play the other side of
the tape.
5. (Dolby)
Press this pushbutton to reduce background
noise. DOLBY B ON will appear on the display.
Press it again to turn Dolby B off. DOLBY B OFF
will appear on the display. Dolby Noise Reduc-
tion is manufactured under a license form Dolby
Laboratories Licensing Corporation. Dolby and
the double-D symbol are trademarks of Dolby
laboratories Licensing Corporation.
6. BAND Select Button
Press this button to listen to the radio when a
tape is playing. The tape will stop but remain in
the player.
Page 115 of 221
FEATURES OF YOUR HYUNDAI 1- 103
D295B01O-AAT1. POWER ON
Press this knob to turn the system on and off.
VOLUME Control
To increase volume, turn the knob clockwise.
Turn it counterclockwise to decrease volume.
2. BAND Select Button
Press this button to switch between AM, FM1
and FM2. Then Display shows your selection.
3. RADIO STATION Control Knob
Turn this knob to select radio stations.
4. SEEK/SCAN Button
SEEK
Press the up or down arrow to go to the next
higher or lower station and stay there. The
sound will mute while seeking.
SCAN
Press and hold either SEEK/SCAN arrow for
two seconds until SCAN appears on the display
and you hear a beep. Use SCAN to listen to
stations for a few seconds. The radio will go to
a station, stop for a few seconds, then go to the
next station. Press either SEEK/SCAN arrow
again to stop scanning. If you press SEEK/
SCAN for more than four seconds, the radio will
change to preset scan mode. Then sound will
mute while scanning.
5. PRESET STATION Select Button
The six numbered pushbuttons let you return to
your favorite stations. You can set up to 18
stations (six AM, six FM1 and six FM2) by
performing the following steps:
1. Turn the radio on.
2. Press AM · FM to select the band.
3. Tune in the desired station.
4. Press AUTO EQ to select the equalization
that best suited type of station selected.
5. Press and hold one of the six numbered
buttons until you hear a beep. Whenever you
press that numbered button, the station you
set will return and the equalization that you
selected will also be automatically selected
for that button.
6. Repeat the above steps for each pushbutton.
PRESET SCAN
Press and hold either SEEK/SCAN arrow for
more than four seconds, PRESET SCAN will
appear on the display. You will hear a double
beep. Use PERSET SCAN to listen to each of
your preset stations for a few seconds. The
radio will go to a preset station stored on your
pushbuttons, stop for a few seconds, then go on
to the next preset stations. Press either SEEK/
SCAN arrow again to stop scanning presets.
6. AUDIO Knob
BASS
Press the AUDIO knob until BASS appears on
the display. Turn the knob to increase or de-
crease bass. When you use this control, the
radio's tone setting will switch to custom mode.
To set the bass to the middle position, select
BASS and press and hold the AUDIO knob. The
radio will produce one beep and set the display
level to zero. To set all tone and speaker
controls to the middle position, press and hold
the AUDIO knob when no tone or speaker
control is active. The radio will produce one
beep and CENTERED will appear on the dis-
play.
Page 120 of 221
1- 108 FEATURES OF YOUR HYUNDAI
9. BAND Select Button
Press this button to play the radio when a disc
is in the player.
10. Using Song List Mode
The integrated 6-disc CD changer has a feature
called song list. This feature is capable of saving
20 track selections.
To save tracks into SONG LIST perform the
following steps:
1. The disc player must be on with at least one
disc loaded. See "LOAD/EJECT" previously
for more information.
2. The disc changer must not be in song list
mode. S-LIST should not appear in the dis-
play. If S-LIST is present, press SONG LIST
to turn it off.
3. Select the desired disc by pressing the
numbered pushbutton and then use the
SEEK SCAN up arrow button to locate the
track that you want to save. The track will
begin to play.
4. Press and hold LIST for two or more sec-
onds to save the track into memory. When
LIST is pressed a beep will be heard imme-
diately. After two seconds of pressing LIST
continuously, two beeps will sound, to con-
firm that the track has been saved.
5. Repeat Steps 3 and 4 for saving other
selections.To play the song list, press LIST. One beep will
be heard and SLIST will appear on the display.
The recorded tracks will begin to play in the
order that they were saved.
You may seek through the song list by using the
SEEK SCAN arrows. Seeking past the last
saved track will return you to the first saved
track.
To delete tracks from SONG LIST perform the
following steps:
1. The disc player must be turned on.
2. Press SONG LIST to turn song list on. S-
LIST will appear on the display.
3. Press the SEEK SCAN arrows to select the
desired track to be deleted.
4. Press and hold the SONG LIST button for
two seconds. When pressing SONG LIST
one beep will be heard immediately. After two
seconds of pressing the SONG LIST button
continuously, two beeps will be heard, to
confirm that the track had been deleted.
5. To delete entire lists, press and hold LIST
button for > 4 seconds when pressing list,
one beep will be heard immediately. After two
seconds of pressing the LIST button con-
tinuously, two beeps will be heard. After 4
seconds, a beep would be heard to confirm
that all the tracks had been deleted and
display will show SLIST_EMPTY.
Page 129 of 221
DRIVING YOUR HYUNDAI 2- 7
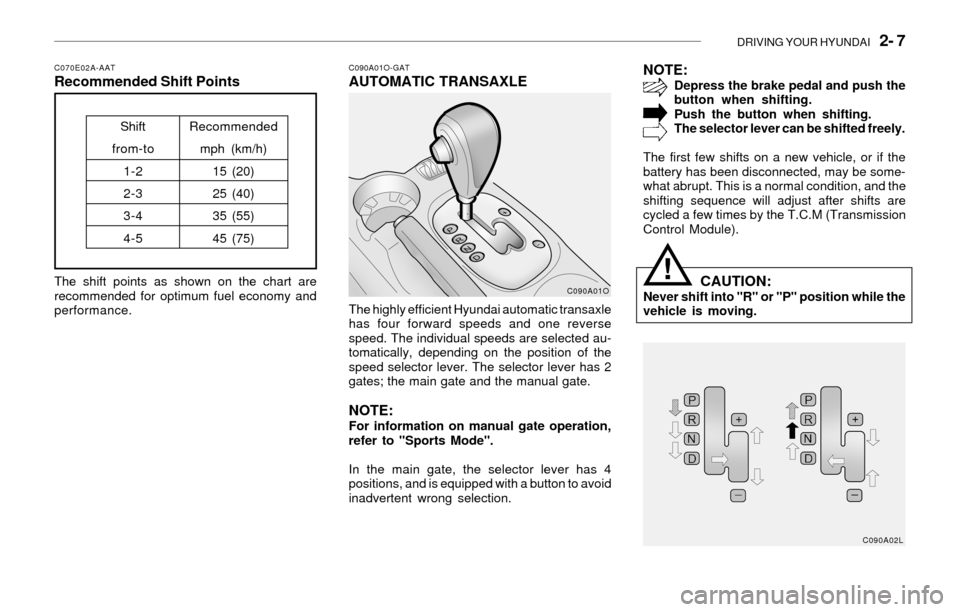
C070E02A-AATRecommended Shift Points
The shift points as shown on the chart are
recommended for optimum fuel economy and
performance.
Shift
from-to
1-2
2-3
3-4
4-5Recommended
mph (km/h)
15 (20)
25 (40)
35 (55)
45 (75)
C090A01O-GATAUTOMATIC TRANSAXLE
The highly efficient Hyundai automatic transaxle
has four forward speeds and one reverse
speed. The individual speeds are selected au-
tomatically, depending on the position of the
speed selector lever. The selector lever has 2
gates; the main gate and the manual gate.
NOTE:For information on manual gate operation,
refer to "Sports Mode".
In the main gate, the selector lever has 4
positions, and is equipped with a button to avoid
inadvertent wrong selection.
NOTE:Depress the brake pedal and push the
button when shifting.
Push the button when shifting.
The selector lever can be shifted freely.
The first few shifts on a new vehicle, or if the
battery has been disconnected, may be some-
what abrupt. This is a normal condition, and the
shifting sequence will adjust after shifts are
cycled a few times by the T.C.M (Transmission
Control Module).
CAUTION:Never shift into "R" or "P" position while the
vehicle is moving.C090A01O
C090A02L!
Page 130 of 221
2- 8 DRIVING YOUR HYUNDAI
!
C090E01O-AAT
o D(Drive):
Use for normal driving. The transaxle will auto-
matically shift through a four gear sequence.
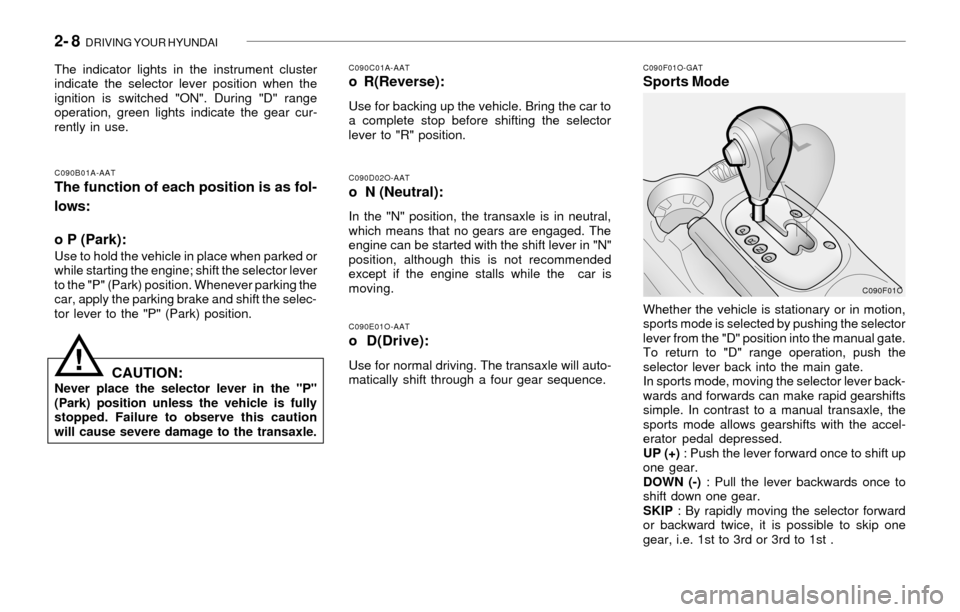
C090F01O-GATSports Mode
C090D02O-AATo N (Neutral):
In the "N" position, the transaxle is in neutral,
which means that no gears are engaged. The
engine can be started with the shift lever in "N"
position, although this is not recommended
except if the engine stalls while the car is
moving.
C090B01A-AAT
The function of each position is as fol-
lows:
o P (Park):
Use to hold the vehicle in place when parked or
while starting the engine; shift the selector lever
to the "P" (Park) position. Whenever parking the
car, apply the parking brake and shift the selec-
tor lever to the "P" (Park) position.
C090C01A-AATo R(Reverse):
Use for backing up the vehicle. Bring the car to
a complete stop before shifting the selector
lever to "R" position. The indicator lights in the instrument cluster
indicate the selector lever position when the
ignition is switched "ON". During "D" range
operation, green lights indicate the gear cur-
rently in use.
CAUTION:Never place the selector lever in the "P"
(Park) position unless the vehicle is fully
stopped. Failure to observe this caution
will cause severe damage to the transaxle.Whether the vehicle is stationary or in motion,
sports mode is selected by pushing the selector
lever from the "D" position into the manual gate.
To return to "D" range operation, push the
selector lever back into the main gate.
In sports mode, moving the selector lever back-
wards and forwards can make rapid gearshifts
simple. In contrast to a manual transaxle, the
sports mode allows gearshifts with the accel-
erator pedal depressed.
UP (+) : Push the lever forward once to shift up
one gear.
DOWN (-) : Pull the lever backwards once to
shift down one gear.
SKIP : By rapidly moving the selector forward
or backward twice, it is possible to skip one
gear, i.e. 1st to 3rd or 3rd to 1st .
C090F01O