2003 Hyundai Grandeur tire type
[x] Cancel search: tire typePage 148 of 235

2- 16 DRIVING YOUR HYUNDAI
C160F01A-AAT Check Spark Plugs and Ignition System Inspect your spark plugs as described in Section 6 and replace them if neces-sary. Also check all ignition wiring and components to be sure they are not cracked, worn or damaged in any way.
C160C01A-AAT Use High Quality Ethylene Glycol Coolant Your Hyundai is delivered with high quality ethylene glycol coolant in the cooling system. It is the only type of coolant that should be used because ithelps prevent corrosion in the cooling system, lubricates the water pump and prevents freezing. Be sure to replaceor replenish your coolant in accor- dance with the maintenance schedule in Section 5. Before winter, have yourcoolant tested to assure that its freez- ing point is sufficient for the tempera- tures anticipated during the winter. C160D01A-AAT Check Battery and Cables Winter puts additional burdens on the battery system. Visually inspect thebattery and cables as described in Section 6. The level of charge in your battery can be checked by your Hyun-dai dealer or a service station. C160E01A-AAT Change to "Winter Weight" Oil if Necessary In some climates it is recommended that a lower viscosity "winter weight" oil be used during cold weather. SeeSection 9 for recommendations. If you aren't sure what weight oil you should use, consult your Hyundai dealer.
C160A01A-AAT WINTER DRIVING The more severe weather conditions of winter result in greater wear andother problems. To minimize the prob- lems of winter driving, you should fol- low these suggestions: C160B01A-GAT Snowy or Icy Conditions To drive your vehicle in deep snow, it may be necessary to use snow tires or to install tire chains on your tires. If snow tires are needed, it is necessaryto select tires equivalent in size and type of the original equipment tires. Failure to do so may adversely affectthe safety and handling of your car. Furthermore, speeding, rapid accel- eration, sudden brake applications, andsharp turns are potentially very haz- ardous practices. During deceleration, use engine brak-ing to the fullest extent. Sudden brake applications on snowy or icy roads may cause skids to occur. You need tokeep sufficient distance between the vehicle in front and your vehicle. Also, apply the brake gently. It should be noted that installing tire chains on the tire will provide a greater driving force, but will not prevent side skids. NOTE: Tire chains are not legal in all prov- inces. Check province laws beforefitting tire chains.
Page 149 of 235

DRIVING YOUR HYUNDAI 2- 17
C160G01A-GAT To Keep Locks from Freezing To keep the locks from freezing, squirt an approved de-icer fluid or glycerineinto the key opening. If a lock is cov- ered with ice, squirt it with an approved de-icing fluid to remove the ice. If thelock is frozen internally, you may be able to thaw it out by using a heated key. Handle the heated key with careto avoid injury. NOTE: The proper temperature for using the immobilizer key is from -40°C to80°C. If you heat the immobilizer key over 80°C to open the frozen lock, it may cause damage to thetransponder in its head. C160I01A-AAT Don't Let Your Parking Brake Freeze Under some conditions your parking brake can freeze in the engaged posi- tion. This is most likely to happenwhen there is an accumulation of snow or ice around or near the rear brakes or if the brakes are wet. If there is a riskthe parking brake may freeze, apply it only temporarily while you put the gear selector lever in "P" (automatic) or infirst or reverse gear (manual transaxle) and block the rear wheels so the car cannot roll. Then release the parkingbrake.
C160H01A-AAT Use Approved Anti-Freeze in WindowWasher System To keep the water in the window washer system from freezing, add an approved anti-freeze solution in accordance withinstructions on the container. Window washer anti-freeze is available from Hyundai dealers and most auto partsoutlets. Do not use engine coolant or other types of anti-freeze as these may damage the finish.
C160K01A-AAT Carry Emergency Equipment Depending on the severity of the weather where you drive your car, you should carry appropriate emergency equipment. Some of the items youmay want to carry include tire chains, tow straps or chains, flashlight, emer- gency flares, sand, a shovel, jumpercables, a window scraper, gloves, ground cloth, coveralls, a blanket, etc.
C160J01A-AAT Don't Let Ice and Snow Accumu- late Underneath Under some conditions, snow and ice can build up under the fenders and interfere with the steering. When driv-ing in severe winter conditions where this may happen, you should periodi- cally check underneath the car to besure the movement of the front wheels and the steering components is not obstructed.
Page 150 of 235

2- 18 DRIVING YOUR HYUNDAI
C190B01S-AAT Trailer Hitches Select the proper hitch and ball combi- nation, making sure that it's location is compatible with that of the trailer or vehicle being towed. Use a quality non-equalizing hitch whichdistributes the tongue load uniformly throughout the chassis. The hitch should be bolted securely to the car and installed by a qualified technician. DO NOT USE A HITCHDESIGNED FOR TEMPORARY IN- STALLATION AND NEVER USE ONE THAT ATTACHES ONLY TO THEBUMPER.
C180A01A-AAT USE OF LIGHTS Check your lights regularly for correct operation and always keep them clean.When driving during the day in condi- tions of poor visibility, it is helpful to drive with headlights on low beam.This enables you to be seen as well as to see. C190A01A-GAT TRAILER OR VEHICLE TOWING If you are considering towing with your car, you should first check with your Province Department of Motor Vehicles to determine their legal requirements.Since laws vary from province to prov- ince the requirements for towing trail- ers, cars, or other types of vehicles orapparatus may differ. Ask your Hyundai dealer for further details before towing.
CAUTION:
Do not do any towing with your carduring its first 2,000 km (1,200 miles) in order to allow the engine to prop-erly break in. Failure to heed this caution may result in serious en- gine or transaxle damage.
!
C170A01A-AAT HIGH SPEED MOTORING Pre-Trip Inspections 1. Tires: Adjust the tire inflation pressures to specification. Low tire inflation pres-sures will result in overheating and possible failure of the tires. Avoid using worn or damaged tireswhich may result in reduced traction or tire failure. NOTE: Never exceed the maximum tire in- flation pressure shown on the tires. 2. Fuel, engine coolant and engine oil: High speed travel consumes more fuel than urban motoring. Do not forget tocheck both engine coolant and engine oil. 3. Drive belt: A loose or damaged drive belt may result in overheating of the engine.
Page 206 of 235
DO-IT-YOURSELF MAINTENANCE 6- 25
Before performing aiming adjustment,
make sure of the following.
1. Keep all tires inflated to the correct
pressure.
2. Place the vehicle on level ground
and press the front bumper & rear bumper down several times. Place the vehicle at a distance of 3 m (118 in.) from the test wall.
3. See that the vehicle is unloaded (except for full levels of coolant,engine oil and fuel, and spare tire,jack, and tools). Have the driver or equivalent weight placed in driver's seat.
4. Clean the head light lenses and
turn on the headlights (low beam).
5. Open the hood.
6. Draw the vertical line (through the center of each headlight) and the horizontal line (through the center of each headlight) on the aimingscreen. And then, draw a parallel line at 30 mm (1.18 in.) under the horizontal line.
G290B02L-GAT
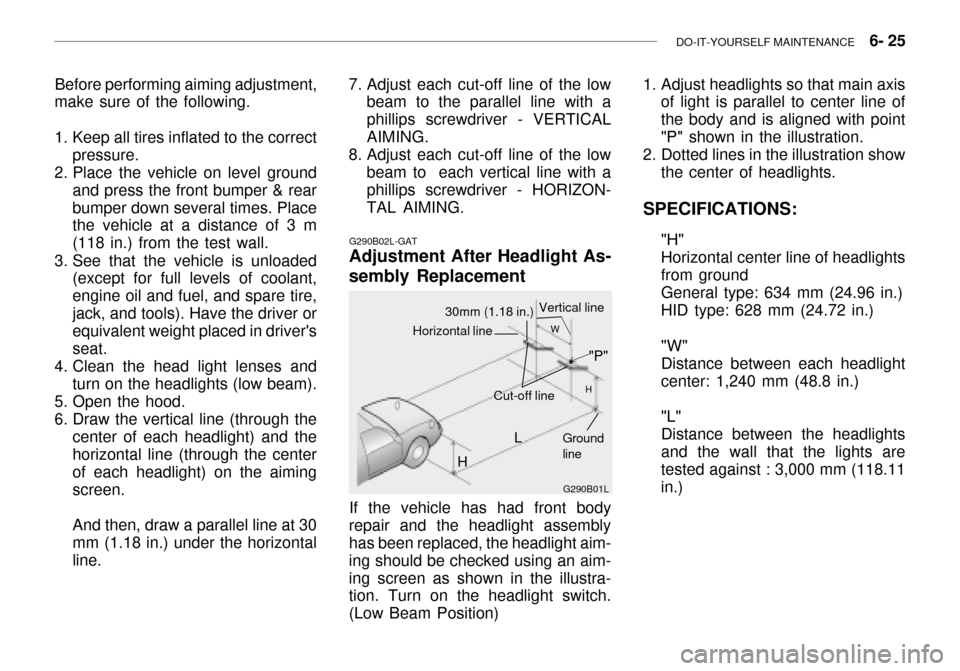
Adjustment After Headlight As- sembly Replacement
G290B01L
LW
H
H Cut-off line
Ground line
If the vehicle has had front body
repair and the headlight assembly has been replaced, the headlight aim- ing should be checked using an aim-ing screen as shown in the illustra- tion. Turn on the headlight switch. (Low Beam Position)
"P"
Horizontal line
30mm (1.18 in.) Vertical line
7. Adjust each cut-off line of the low
beam to the parallel line with a phillips screwdriver - VERTICALAIMING.
8. Adjust each cut-off line of the low
beam to each vertical line with a phillips screwdriver - HORIZON- TAL AIMING. 1. Adjust headlights so that main axis
of light is parallel to center line ofthe body and is aligned with point"P" shown in the illustration.
2. Dotted lines in the illustration show the center of headlights.
SPECIFICATIONS: "H"Horizontal center line of headlightsfrom groundGeneral type: 634 mm (24.96 in.) HID type: 628 mm (24.72 in.) "W" Distance between each headlightcenter: 1,240 mm (48.8 in.) "L" Distance between the headlightsand the wall that the lights aretested against : 3,000 mm (118.11 in.)
Page 226 of 235

9- 2 VEHICLE SPECIFICATIONS
3.0 V6
J010A02L-GAT MEASUREMENT
4,875 (191.8) 1,800 (70.86)
1,420 (55.9)
2,750 (108.2) 1,540 (60.6)
1,530 (60.23)
Overall lengthOverall widthOverall height Wheel base Wheel tread
Front
Rear
Type Wheel free play Rack strokeOil pump type Rack and pinion0 ~ 30 mm (0 ~ 1.18 in.) 146 mm (5.74 in.) Vane type
J060A01L-GAT FUEL SYSTEM
J020A01L-GAT POWER STEERING
Fuel tank capacity 70 Liter J030A03L-GAT TIRE
205/65 R15 94V 205/60 R16 96V
StandardOption
J050A01L-GAT BRAKE
Dual hydraulic with brake booster Ventilated discSolid disc Cable operated on rear wheel
Type Front brake typeRear brake type Parking brake
Item Battery
Alternator 120A (13.5V)
2.5 V6
110A (13.5V)
J040A02L-GAT ELECTRICAL
MF 68AH (MF)
3.5 V6
mm (in.)