2003 Hyundai Grandeur spare tire
[x] Cancel search: spare tirePage 153 of 235

DRIVING YOUR HYUNDAI 2- 21
C190F01Y-GAT Trailer or Vehicle Towing Tips
1. Before towing, check hitch and
safety chain connections as well as proper operation of the trailer run- ning lights, brake lights, and turn signals.
2. Always drive your vehicle at a mod- erate speed (Less than 100 km/h)
3. Trailer towing requires more fuel than normal conditions.
4. To maintain engine braking effi-
ciency and electrical charging per-formance, do not use fifth gear (manual transaxle).
5. Always secure items in the trailer to
prevent load shift while driving.
6. Check the condition and air pres-
sure of all tires on the trailer and your car. Low tire pressure can seriously affect the handling. Also check the spare tire. 10.During your trip, check occasion-
ally to be sure that the load issecure, and that the lights and anytrailer brakes are still working.
11.Avoid jerky starts, sudden accel-
eration or sudden stops.
12.Avoid sharp turns and rapid lane changes.
13.Avoid holding the brake pedal down too long or too frequently. This could cause the brakes to overheat, re- sulting in reduced braking efficien-cy.
14.When going down a hill, shift into a
lower gear and use the engine brak-ing effect. When ascending a long grade, downshift the transaxle to a lowergear and reduce speed to reduce chances of engine overloading and/ or overheating.
15.If you have to stop while going uphill, do not hold the vehicle inplace by pressing on the accelera-tor. This can cause the automatic transaxle to overheat. Use the park- ing brake or footbrake.
7. The vehicle/trailer combination is
more affected by crosswind andbuffeting.When being passed by a large ve- hicle, keep a constant speed and steer straight ahead. If there is toomuch wind buffeting, slow down to get out of the other vehicle's air turbulence.
8. When parking your car and trailer, especially on a hill, be sure to followall the normal precautions. Turnyour front wheel into the curb, set the parking brake firmly, and put the transaxle in 1st or Reverse(manual) or Park (automatic). In addition, place wheel chocks at each of the trailer's tires.
9. If the trailer has electric brakes, start your vehicle and trailer mov-ing, and then apply the trailer brakecontroller by hand to be sure the brakes are working. This lets you check your electrical connection atthe same time.
Page 155 of 235

3. WHAT TO DO IN AN EMERGENCYIf the Engine Will not Start .............................................................. 3-2
Jump Starting .................................................................................. 3-2
If the Engine Overheats .................................................................. 3-4
Spare Tire ....................................................................................... 3-5
If You Have a Flat Tire .................................................................... 3-5
If Your Car Must Be Towed .......................................................... 3-10
Emergency Towing ....................................................................... 3-12
If You Lose Your Keys .................................................................. 3-12
3
Page 159 of 235
WHAT TO DO IN AN EMERGENCY 3- 5
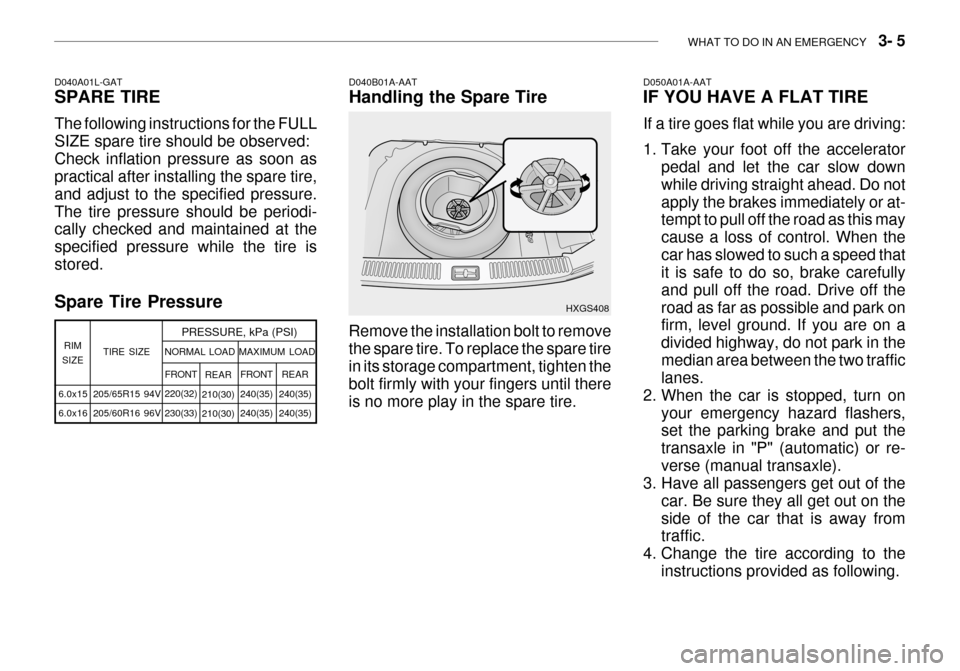
Spare Tire Pressure D040B01A-AAT Handling the Spare Tire Remove the installation bolt to remove the spare tire. To replace the spare tire in its storage compartment, tighten the bolt firmly with your fingers until thereis no more play in the spare tire. D050A01A-AAT IF YOU HAVE A FLAT TIRE If a tire goes flat while you are driving:
1. Take your foot off the accelerator
pedal and let the car slow down while driving straight ahead. Do notapply the brakes immediately or at- tempt to pull off the road as this may cause a loss of control. When thecar has slowed to such a speed that it is safe to do so, brake carefully and pull off the road. Drive off theroad as far as possible and park on firm, level ground. If you are on a divided highway, do not park in themedian area between the two traffic lanes.
2. When the car is stopped, turn on
your emergency hazard flashers,set the parking brake and put the transaxle in "P" (automatic) or re-verse (manual transaxle).
3. Have all passengers get out of the
car. Be sure they all get out on theside of the car that is away from traffic.
4. Change the tire according to the
instructions provided as following.
HXGS408
D040A01L-GAT SPARE TIRE The following instructions for the FULL SIZE spare tire should be observed:Check inflation pressure as soon as practical after installing the spare tire, and adjust to the specified pressure.The tire pressure should be periodi- cally checked and maintained at the specified pressure while the tire isstored.
6.0x15 6.0x16 TIRE SIZE
RIM
SIZE PRESSURE, kPa (PSI)
205/65R15 94V 205/60R16 96V REAR
210(30) 210(30) FRONT
240(35)240(35)
NORMAL LOAD MAXIMUM LOAD
REAR
240(35)240(35)
FRONT
220(32)230(33)
Page 161 of 235
WHAT TO DO IN AN EMERGENCY 3- 7
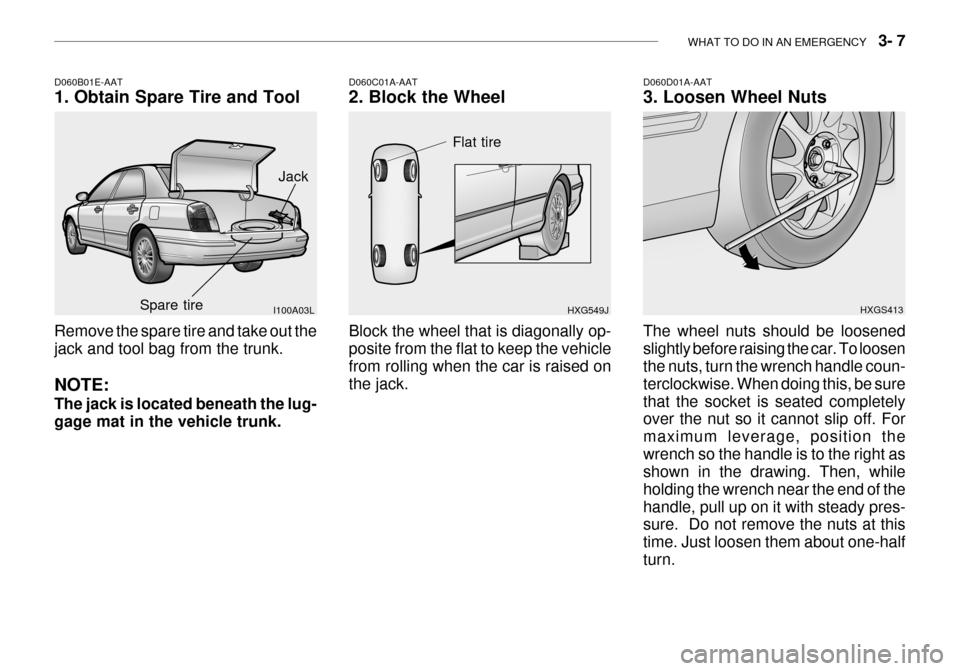
Remove the spare tire and take out the jack and tool bag from the trunk. NOTE: The jack is located beneath the lug- gage mat in the vehicle trunk.
D060B01E-AAT 1. Obtain Spare Tire and Tool
I100A03L
D060C01A-AAT 2. Block the Wheel Block the wheel that is diagonally op- posite from the flat to keep the vehicle from rolling when the car is raised on the jack.HXG549JD060D01A-AAT 3. Loosen Wheel Nuts
HXGS413
The wheel nuts should be loosened slightly before raising the car. To loosen the nuts, turn the wrench handle coun- terclockwise. When doing this, be surethat the socket is seated completely over the nut so it cannot slip off. For maximum leverage, position thewrench so the handle is to the right as shown in the drawing. Then, while holding the wrench near the end of thehandle, pull up on it with steady pres- sure. Do not remove the nuts at this time. Just loosen them about one-halfturn.
Jack
Spare tire
Flat tire
Page 162 of 235
3- 8 WHAT TO DO IN AN EMERGENCY
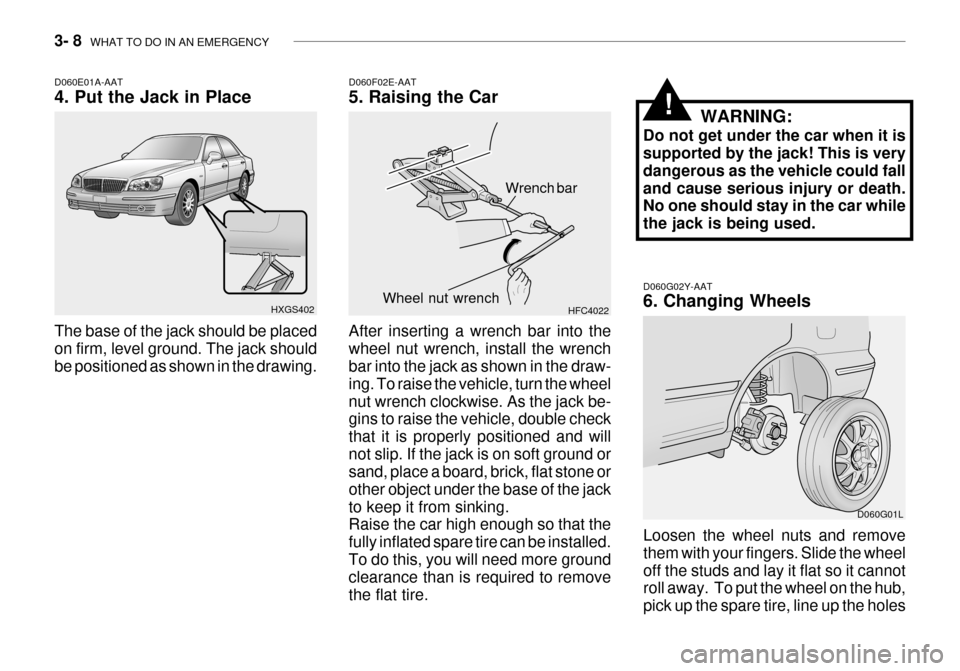
D060G02Y-AAT 6. Changing Wheels
Loosen the wheel nuts and remove them with your fingers. Slide the wheeloff the studs and lay it flat so it cannot roll away. To put the wheel on the hub, pick up the spare tire, line up the holes D060G01L
D060F02E-AAT 5. Raising the Car After inserting a wrench bar into the wheel nut wrench, install the wrench bar into the jack as shown in the draw- ing. To raise the vehicle, turn the wheelnut wrench clockwise. As the jack be- gins to raise the vehicle, double check that it is properly positioned and willnot slip. If the jack is on soft ground or sand, place a board, brick, flat stone or other object under the base of the jackto keep it from sinking. Raise the car high enough so that the fully inflated spare tire can be installed.To do this, you will need more ground clearance than is required to remove the flat tire.
HFC4022
Wrench bar
Wheel nut wrench
D060E01A-AAT 4. Put the Jack in Place The base of the jack should be placed on firm, level ground. The jack should be positioned as shown in the drawing. HXGS402 WARNING:
Do not get under the car when it issupported by the jack! This is very dangerous as the vehicle could falland cause serious injury or death. No one should stay in the car while the jack is being used.
!
Page 186 of 235

DO-IT-YOURSELF MAINTENANCE 6- 5
G020A02A-AAT
GENERAL CHECKS Engine Compartment
The following should be checked regu- larly:
o Engine oil level and condition
o Transaxle fluid level and condition
o Brake fluid level
o Clutch fluid level
o Coolant level
o Windshield washer fluid level
o Accessory drive belt condition
o Coolant hose condition
o Fluid leaks (on or below compo- nents)
o Power steering fluid level and con-
dition
o Battery condition
o Air filter condition G020C01A-AAT Vehicle Interior The following should be checked each time when the vehicle is driven:
o Lights operation
o Windshield wiper operation
o Horn operation
o Defroster, heater system operation
(and air conditioning, if installed)
o Steering operation and condition
o Mirror condition and operation
o Turn signal operation
o Accelerator pedal operation
o Brake operation, including parking brake
o Manual transaxle operation, includ- ing clutch operation
o Automatic transaxle operation, in- cluding "Park" mechanism opera-tion
o Seat control condition and opera- tion
o Seat belt condition and operation
o Sunvisor operation If you notice anything that does not operate correctly or appears to befunctioning incorrectly, inspect it care- fully and seek assistance from your Hyundai dealer if service is needed.
G020B01A-AAT
Vehicle Exterior
The following should be checked
monthly:
o Overall appearance and condition
o Wheel condition and wheel nut torgue
o Exhaust system condition
o Light condition and operation
o Windshield glass condition
o Wiper blade condition
o Paint condition and body corrosion
o Fluid leaks
o Door and hood lock condition
o Tire pressure and condition (including spare tire)
Page 206 of 235
DO-IT-YOURSELF MAINTENANCE 6- 25
Before performing aiming adjustment,
make sure of the following.
1. Keep all tires inflated to the correct
pressure.
2. Place the vehicle on level ground
and press the front bumper & rear bumper down several times. Place the vehicle at a distance of 3 m (118 in.) from the test wall.
3. See that the vehicle is unloaded (except for full levels of coolant,engine oil and fuel, and spare tire,jack, and tools). Have the driver or equivalent weight placed in driver's seat.
4. Clean the head light lenses and
turn on the headlights (low beam).
5. Open the hood.
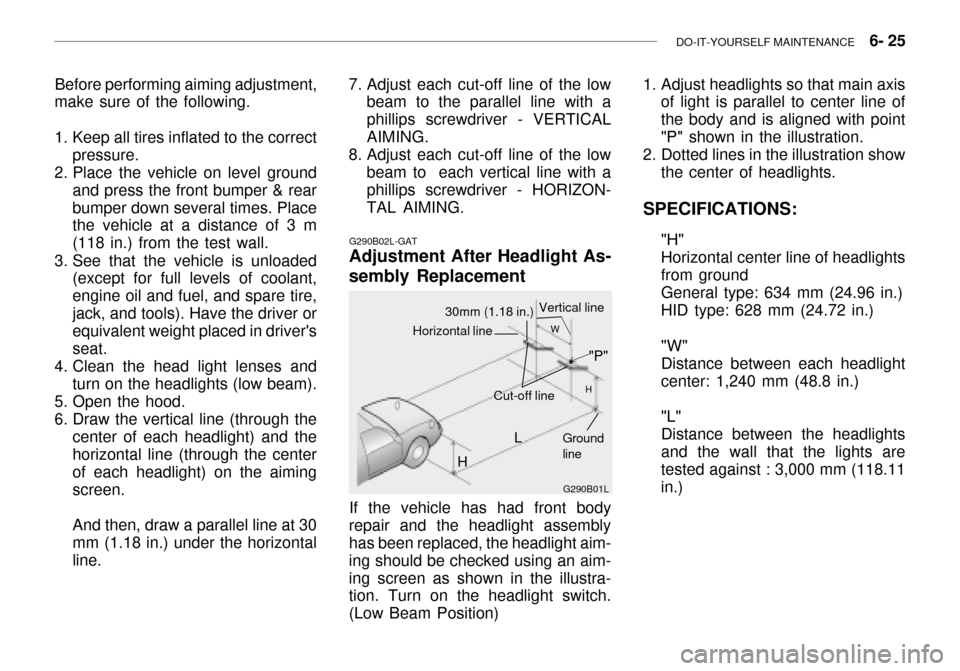
6. Draw the vertical line (through the center of each headlight) and the horizontal line (through the center of each headlight) on the aimingscreen. And then, draw a parallel line at 30 mm (1.18 in.) under the horizontal line.
G290B02L-GAT
Adjustment After Headlight As- sembly Replacement
G290B01L
LW
H
H Cut-off line
Ground line
If the vehicle has had front body
repair and the headlight assembly has been replaced, the headlight aim- ing should be checked using an aim-ing screen as shown in the illustra- tion. Turn on the headlight switch. (Low Beam Position)
"P"
Horizontal line
30mm (1.18 in.) Vertical line
7. Adjust each cut-off line of the low
beam to the parallel line with a phillips screwdriver - VERTICALAIMING.
8. Adjust each cut-off line of the low
beam to each vertical line with a phillips screwdriver - HORIZON- TAL AIMING. 1. Adjust headlights so that main axis
of light is parallel to center line ofthe body and is aligned with point"P" shown in the illustration.
2. Dotted lines in the illustration show the center of headlights.
SPECIFICATIONS: "H"Horizontal center line of headlightsfrom groundGeneral type: 634 mm (24.96 in.) HID type: 628 mm (24.72 in.) "W" Distance between each headlightcenter: 1,240 mm (48.8 in.) "L" Distance between the headlightsand the wall that the lights aretested against : 3,000 mm (118.11 in.)
Page 220 of 235

8. CONSUMER INFORMATIONVehicle Identification Number (VIN) .............................................. 8-2
Engine Number .............................................................................. 8-2
Recommended Inflation Pressures ................................................ 8-2
Snow Tires ...................................................................................... 8-3
Tire Chains ..................................................................................... 8-4
Tire Rotation ................................................................................... 8-4
Tire Balancing ................................................................................. 8-4
Tire Traction ................................................................................... 8-5
When to Replace Tires .................................................................. 8-5
Spare Tire and Tools ..................................................................... 8-5
8