2003 Hyundai Accent oil change
[x] Cancel search: oil changePage 98 of 186

2- 2 DRIVING YOUR HYUNDAI
C010A01A-AAT
WARNING: ENGINE EXHAUST CAN BE DANGEROUS!
Engine exhaust fumes can be extremely dangerous. If, at any time, you smell exhaust fumes inside the vehicle, open the windows
immediately.
o Do not inhale exhaust fumes.
Exhaust fumes contain carbon monoxide, a colorless, odorless gas that can cause unconsciousness and death by asphyxiation.
o Be sure the exhaust system does not leak.
The exhaust system should be checked whenever the vehicle is raised to change the oil or for any other purpose. If you hear a
change in the sound of the exhaust or if you drive over something that strikes the underneath side of the car, have the exhaust
system checked as soon as possible by your Hyundai dealer.
o Do not run the engine in an enclosed area.
Letting the engine idle in your garage, even with the garage door open, is a hazardous practice. Never run the engine in your garage
any longer than it takes to start the engine and back the car out.
o Avoid idling the engine for prolonged periods with people inside the car.
If it is necessary to idle the engine for a prolonged period with people inside the car, be sure to do so only in an open area with
the air intake set at "Fresh" and fan operating at one of the higher speeds so fresh air is drawn into the interior.
If you must drive with the trunk lid / tail gate open because you are carrying objects that make this necessary:
1. Close all windows.
2. Open side vents.
3. Set the air intake control at "Fresh", the air flow control at "Floor" or "Face" and the fan at one of the higher speeds.
To assure proper operation of the ventilation system, be sure the ventilation air intakes located just in front of the windshield are
kept clear of snow, ice, leaves or other obstructions.
!
Page 108 of 186

2- 12 DRIVING YOUR HYUNDAI
C160A01A-AAT
WINTER DRIVING
The more severe weather conditions of winter
result in greater wear and other problems. To
minimize the problems of winter driving, you
should follow these suggestions:
C160B01A-AATSnowy or Icy Conditions
To drive your vehicle in deep snow, it may be
necessary to use snow tires or to install tire
chains on your tires. If snow tires are needed, it
is necessary to select tires equivalent in size
and type to the original equipment tires. Failure
to do so may adversely affect the safety and
handling of your car. Furthermore, speeding,
rapid acceleration, sudden brake applications,
and sharp turns are potentially very hazardous
practices.
During deceleration, use engine braking to the
fullest extent. Sudden brake applications on
snowy or icy roads may cause skids to occur.
You need to keep sufficient distance between
the vehicle in operation in front and your vehicle.
Also, apply the brake gently. It should be noted
that installing tire chains on the tire will provide
a greater driving force, but will not prevent side
skids.
NOTE:Tire chains are not legal in all states. Check
state laws before fitting tire chains.
C160D01A-AATCheck Battery and Cables
Winter puts additional burdens on the battery
system. Visually inspect the battery and cables
as described in Section 6. The level of charge in
your battery can be checked by your Hyundai
dealer or a service station.
C160E01A-AAT
Change to "Winter Weight" Oil if
Necessary
In some climates it is recommended that a lower
viscosity "winter weight" oil be used during cold
weather. See Section 9 for recommendations. If
you aren't sure what weight oil you should use,
consult your Hyundai dealer.
C160C01A-AATUse High Quality Ethylene Glycol
Coolant
Your Hyundai is delivered with high quality eth-
ylene glycol coolant in the cooling system. It is
the only type of coolant that should be used
because it helps prevent corrosion in the cooling
system, lubricates the water pump and prevents
freezing. Be sure to replace or replenish your
coolant in accordance with the maintenance
schedule in Section 5. Before winter, have your
coolant tested to assure that its freezing point is
sufficient for the temperatures anticipated dur-
ing the winter. o Don't "lug" or "over-rev" the engine. Lugging
is driving too slowly in too high a gear result-
ing in the engine bucking. If this happens,
shift to a lower gear. Over-revving is racing
the engine beyond its safe limit. This can be
avoided by shifting at the recommended
speeds.
o Use your air conditioning sparingly. The air
conditioning system is operated by engine
power so your fuel economy is reduced
when you use it.
C150A01A-AAT
SMOOTH CORNERING
Avoid braking or gear changing in corners, es-
pecially when roads are wet. Ideally, corners
should always be taken under gentle accelera-
tion. If you follow these suggestions, tire wear
will be held to a minimum.
Page 134 of 186

VEHICLE MAINTENANCE REQUIREMENTS 5- 7
F060D01A-AATo Fuel lines, fuel hoses and
connections
Check the fuel lines, fuel hoses and connec-
tions for leakage and damage. Have a trained
techincian, replace any damaged or leaking
parts immediately.
F060C01A-AAT
o Fuel filter
A clogged filter can limit the speed at which the
vehicle may be driven, damage the emission
system and cause hard starting. If an excessive
amount of foreign matter accumulates in the fuel
tank, the filter may require replacement more
frequently.
After installing a new filter, run the engine for
several minutes, and check for leaks at the
connections.
Fuel filters should be installed by trained techni-
cians.
F060M01A-AAT
o Engine oil and filter
The engine oil and filter should be changed at
the intervals specified in the maintenance sched-
ule. If the car is being driven in severe condi-
tions, more frequent oil and filter changes are
required.
F060A01A-AATEXPLANATION OF SCHEDULED MAIN-
TENANCE ITEMS
F060H01A-AATo Air cleaner filter
A Genuine Hyundai air cleaner filter is recom-
mended when the filter is replaced.
F060G01A-AATo Vapor hose and fuel filler cap
The vapor hose and fuel filler cap should be
inspected at those intervals specified in the
maintenance schedule. Make sure that a new
vapor hose or fuel filler cap is correctly re-
placed.
F060F01A-AAT
o Vacuum, crankcase ventilation
hoses
Inspect the surface of hoses for evidence of
heat and/or mechanical damage. Hard and brittle
rubber, cracking, tears, cuts, abrasions, and
excessive swelling indicate deterioration. Par-
ticular attention should be paid to examine those
hose surfaces nearest to high heat sources,
such as the exhaust manifold.
Inspect the hose routing to assure that the
hoses do not come in contact with any heat
source, sharp edges or moving component which
might cause heat damage or mechanical wear.
Inspect all hose connections, such as clamps
and couplings, to make sure they are secure,
and that no leaks are present. Hoses
should be replaced immediately if there is any
evidence of deterioration or damage.
F060B01A-AAT
o Drive belts
Inspect all drive belts for evidence of cuts,
cracks, excessive wear or oil saturation and
replace if necessary. Drive belts should be
checked periodically for proper tension and ad-
justed as necessary.
F060J01A-AAT
o Spark plugs
Make sure to install new spark plugs of the
correct heat range.
Page 135 of 186

5- 8 VEHICLE MAINTENANCE REQUIREMENTS
F070H01A-AATo Rear brake drums/linings,
parking brake
Check the rear brake drums and linings for
scoring, burning, leaking fluid, broken parts, and
excessive wear. Inspect the parking brake sys-
tem including the parking brake lever and cables.
For detailed service procedures, refer to the
Shop Manual.
F070F01A-AAT
o Brake hoses and lines
Visually check for proper installation, chafing,
cracks, deterioration and any leakage. Replace
any deteriorated or damaged parts immediately.
F070G02A-AATo Brake fluid
Check brake fluid level in the brake fluid reser-
voir. The level should be between "MIN" and
"MAX" marks on the side of the reservoir. Use
only hydraulic brake fluid conforming to DOT 3
or DOT 4.
F070E04A-AATo Automatic Transaxle Fluid
The fluid level should be in the "HOT" range of
the dipstick, after the engine and transaxle are
at normal operating temperature. Check the
automatic transaxle fluid level with the engine
running and the transaxle in neutral, with the
parking brake properly applied. Use HYUNDAI
GENUINE ATF, DIAMOND ATF SP-III or SK
ATF SP-III when adding or changing fluid.
F070K01A-AAT
o Exhaust pipe and muffler
Visually inspect the exhaust pipes, muffler and
hangers for cracks, deterioration, or damage.
Start the engine and listen carefully for any
exhaust gas leakage. Tighten connections or
replace parts as necessary.
F070J01A-AAT
o Brake pads, calipers and rotors
Check the pads for excessive wear, discs for
run out and wear, and calipers for fluid leakage.F070D01A-AAT
o Manual transaxle oil
Inspect the manual transaxle oil according to
the maintenance schedule.
NOTE:If the oil level is low, check for possible leaks
before adding oil. Do not overfill.
F060E01A-AAT
o Timing belt
Inspect all parts related to the timing belt for
damage and deformation. Replace any dam-
aged parts immediately.
F070C01A-AATo Coolant
The coolant should be changed at the
intervals specified in the maintenance schedule.
Page 141 of 186

DO-IT-YOURSELF MAINTENANCE 6- 5
!
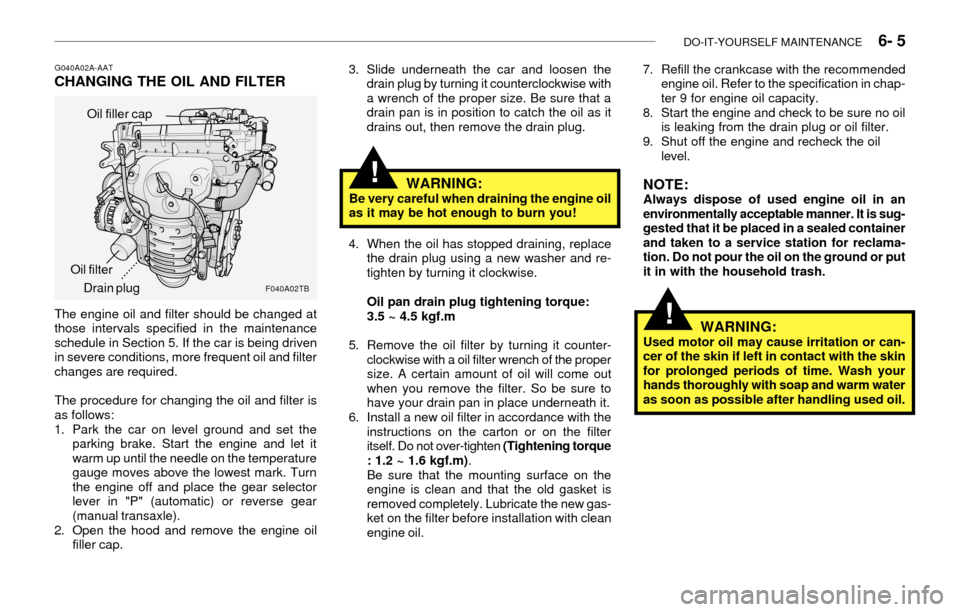
G040A02A-AATCHANGING THE OIL AND FILTER3. Slide underneath the car and loosen the
drain plug by turning it counterclockwise with
a wrench of the proper size. Be sure that a
drain pan is in position to catch the oil as it
drains out, then remove the drain plug.
F040A02TB
Oil filler cap
Drain plug Oil filter
.........
WARNING:Be very careful when draining the engine oil
as it may be hot enough to burn you!
4. When the oil has stopped draining, replace
the drain plug using a new washer and re-
tighten by turning it clockwise.
Oil pan drain plug tightening torque:
3.5 ~ 4.5 kgf.m
5. Remove the oil filter by turning it counter-
clockwise with a oil filter wrench of the proper
size. A certain amount of oil will come out
when you remove the filter. So be sure to
have your drain pan in place underneath it.
6. Install a new oil filter in accordance with the
instructions on the carton or on the filter
itself. Do not over-tighten (Tightening torque
: 1.2 ~ 1.6 kgf.m).
Be sure that the mounting surface on the
engine is clean and that the old gasket is
removed completely. Lubricate the new gas-
ket on the filter before installation with clean
engine oil.
!
7. Refill the crankcase with the recommended
engine oil. Refer to the specification in chap-
ter 9 for engine oil capacity.
8. Start the engine and check to be sure no oil
is leaking from the drain plug or oil filter.
9. Shut off the engine and recheck the oil
level.
NOTE:Always dispose of used engine oil in an
environmentally acceptable manner. It is sug-
gested that it be placed in a sealed container
and taken to a service station for reclama-
tion. Do not pour the oil on the ground or put
it in with the household trash.
The engine oil and filter should be changed at
those intervals specified in the maintenance
schedule in Section 5. If the car is being driven
in severe conditions, more frequent oil and filter
changes are required.
The procedure for changing the oil and filter is
as follows:
1. Park the car on level ground and set the
parking brake. Start the engine and let it
warm up until the needle on the temperature
gauge moves above the lowest mark. Turn
the engine off and place the gear selector
lever in "P" (automatic) or reverse gear
(manual transaxle).
2. Open the hood and remove the engine oil
filler cap.
WARNING:Used motor oil may cause irritation or can-
cer of the skin if left in contact with the skin
for prolonged periods of time. Wash your
hands thoroughly with soap and warm water
as soon as possible after handling used oil.
Page 158 of 186

6- 22 DO-IT-YOURSELF MAINTENANCE
SPECIFICATIONS:
"H";
Horizontal center line of headlights from
ground : 25.8 in. (656 mm)
"W";
Distance between each headlight center :
42.4 in. (1,078 mm)
"L";
Distance between the headlights and the
wall that the lights are tested against:s 118
in. (3,000 mm).
!
G260A02A-AATREPLACEMENT OF LIGHT BULBS
Before attempting to replace a light bulb, be sure
the switch is turned to the "OFF" position.
The next paragraph shows how to reach the
light bulbs so they may be changed. Be sure to
replace the burned-out bulb with one of the
same number and wattage rating.
See page 6-27 for the wattage descriptions
CAUTION:Keep the lamps out of contact with petro-
leum products, such as oil, gasoline, etc.
G290B02A-AATAdjustment After Headlight Assembly
Replacement
If the vehicle has had front body repair and the
headlight assembly has been replaced, the head-
light aiming should be checked using an aiming
screen as shown in the illustration. Turn on the
headlight switch. (Low Beam Position)
1. Adjust headlights so that main axis of light is
parallel to center line of the body and is
aligned with point "P" shown in the illustra-
tion.
2. Dotted lines in the illustration show the cen-
ter of headlights.
G290B01A-1
HGround
line Horizontal line
0.55 in. (14mm)0.8 in. (21mm)Vertical line
L
W
H
Cut-off line"P"