Page 82 of 392
Push the lever up to lock the
steering wheel in that position.
Make sure you have securely
locked the steering wheel in place
by trying to move it up and down.
To adjust the steering wheel upward
or downward: Push the lever under the steering
column all the way down.
Move the steering wheel to the
desired position, making sure the
wheel points toward your chest,
not toward your f ace. Make sure
you can see the instrument panel
gauges and the indicator lights.
Make any steering wheel adjustment
bef ore you start driving.
3.
4.
1.
2.
See page f or important saf ety inf ormation about how to properlyposition the steering wheel. 18
Controls Near the Steering Wheel
Inst rument s and Cont rols
Steering Wheel A djustment
78
Adjusting the steering wheel
position while driving may
cause you to lose control of the
vehicle and be seriously injured
inacrash.
Adjust the steering wheel only
when the vehicle is stopped.
Page 88 of 392

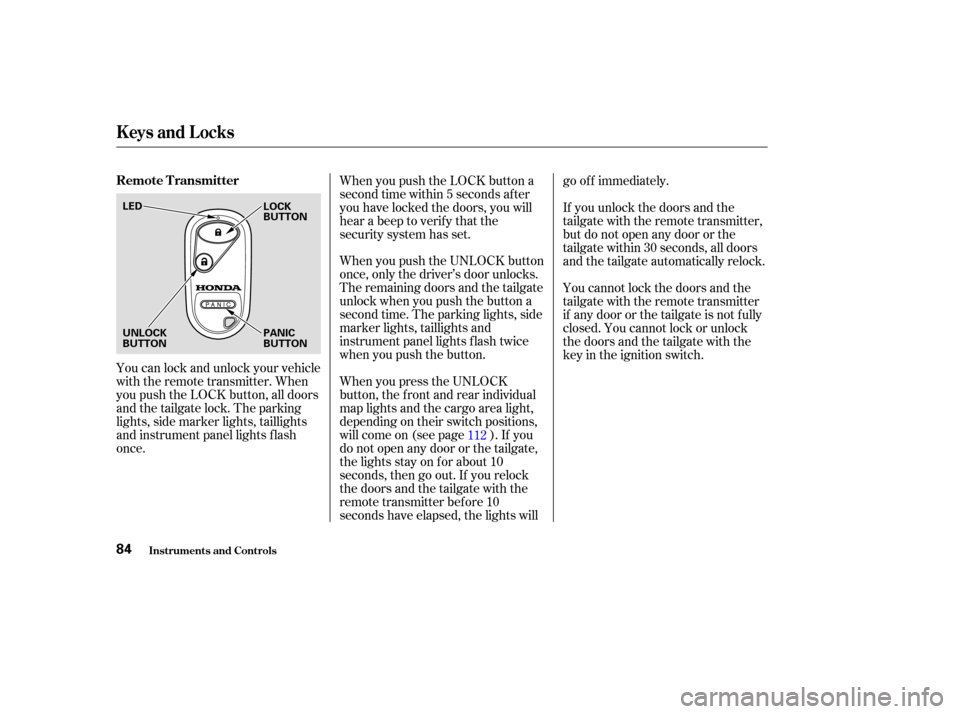
You can lock and unlock your vehicle
with the remote transmitter. When
you push the LOCK button, all doors
and the tailgate lock. The parking
lights, side marker lights, taillights
and instrument panel lights f lash
once.When you push the LOCK button a
second time within 5 seconds after
you have locked the doors, you will
hear a beep to verify that the
security system has set.
When you push the UNLOCK button
once, only the driver’s door unlocks.
The remaining doors and the tailgate
unlock when you push the button a
second time. The parking lights, side
marker lights, taillights and
instrument panel lights f lash twice
when you push the button.
When you press the UNLOCK
button, the f ront and rear individual
map lights and the cargo area light,
depending on their switch positions,
will come on (see page ). If you
do not open any door or the tailgate,
the lights stay on for about 10
seconds, then go out. If you relock
thedoorsandthetailgatewiththe
remote transmitter before 10
seconds have elapsed, the lights willgo of f immediately.
If you unlock the doors and the
tailgate with the remote transmitter,
but do not open any door or the
tailgate within 30 seconds, all doors
and the tailgate automatically relock.
You cannot lock the doors and the
tailgate with the remote transmitter
if any door or the tailgate is not f ully
closed. You cannot lock or unlock
thedoorsandthetailgatewiththe
key in the ignition switch.
112
Keys and Locks
Inst rument s and Cont rols
Remote Transmitter
84
LED LOCK
BUTTON
UNLOCK
BUTTON PANIC
BUTTON
Page 98 of 392

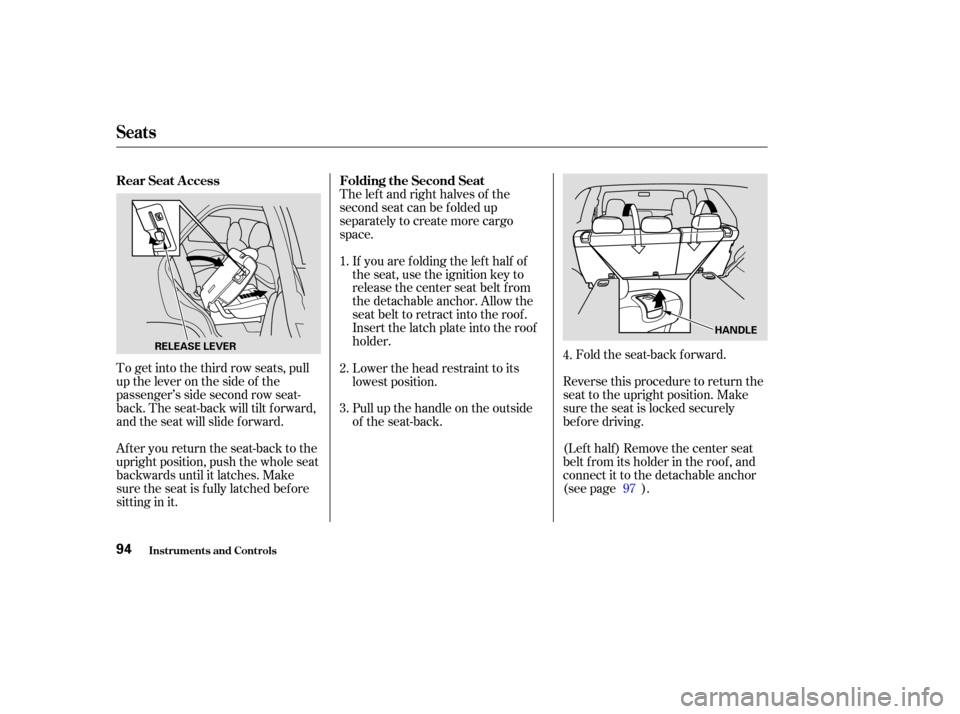
To get into the third row seats, pull
uptheleveronthesideof the
passenger’s side second row seat-
back. The seat-back will tilt f orward,
and the seat will slide f orward.
After you return the seat-back to the
upright position, push the whole seat
backwards until it latches. Make
sure the seat is f ully latched bef ore
sitting in it.The lef t and right halves of the
second seat can be f olded up
separately to create more cargo
space.
If you are f olding the lef t half of
the seat, use the ignition key to
release the center seat belt from
the detachable anchor. Allow the
seat belt to retract into the roof.
Insert the latch plate into the roof
holder. Fold the seat-back forward.
Reverse this procedure to return the
seat to the upright position. Make
sure the seat is locked securely
bef ore driving.
(Lef t half ) Remove the center seat
belt f rom its holder in the roof , and
connect it to the detachable anchor
(see page ).
Pull up the handle on the outside
of the seat-back. Lower the head restraint to its
lowest position.
2.
3. 1.
4.
97
Rear Seat A ccess
Folding the Second Seat
Seats
Inst rument s and Cont rols94
HANDLE
RELEASE LEVER
Page 100 of 392
Unlock the seat-back by pulling
the handle. Push the seat-back
forward.Make sure you clip the small latch
plate of each outer shoulder belt to
the seat belt webbing whenever the
third seat is f olded.
Reverse this procedure to return the
seat to the upright position. Make
sure the seat is locked securely
bef ore driving.
Reinstall the head restraints.
Reconnect the seat belts to the
detachable anchors.
Make sure all items in the cargo area
are secured. Loose items can f ly
f orward and cause injury if you have
to brake hard. See
on page .
4.
225
Seats
Inst rument s and Cont rols
Carrying Cargo
96
HANDLE
Page 101 of 392

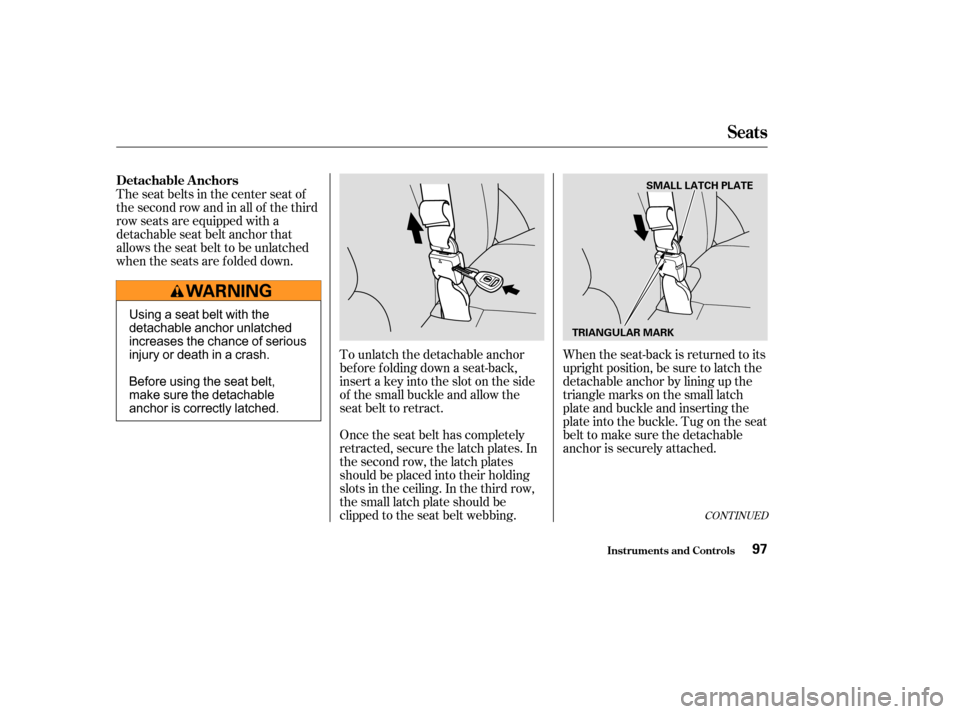
When the seat-back is returned to its
upright position, be sure to latch the
detachable anchor by lining up the
triangle marks on the small latch
plate and buckle and inserting the
plate into the buckle. Tug on the seat
belt to make sure the detachable
anchor is securely attached.
To unlatch the detachable anchor
before folding down a seat-back,
insert a key into the slot on the side
of the small buckle and allow the
seat belt to retract.
Once the seat belt has completely
retracted, secure the latch plates. In
the second row, the latch plates
should be placed into their holding
slots in the ceiling. In the third row,
the small latch plate should be
clipped to the seat belt webbing.
The seat belts in the center seat of
thesecondrowandinallof thethird
row seats are equipped with a
detachable seat belt anchor that
allows the seat belt to be unlatched
when the seats are f olded down.
CONT INUED
Detachable A nchors
Seats
Inst rument s and Cont rols97
SMALL LATCH PLATE
TRIANGULAR MARK
Using a seat belt with the
detachable anchor unlatched
increases the chance of serious
injury or death in a crash.
Before using the seat belt,
make sure the detachable
anchor is correctly latched.
Page 111 of 392
The hooks on the f loor of the cargo
area enable you to tie down items
stored in the back. Make sure all
stored items are secured bef ore
driving.
To open the console compartment,
pull up on the lever and lif t the lid.
To close, lower the lid and push it
down until it latches.
You can store a cellular phone, a
small notepad, and business cards in
the front of the console
compartment. To open the f ront
door of the console compartment,
pull up the lever, and pivot the door
forward.
Console Compartment
Cargo Hooks
Console Compart ment , Cargo Hooks
Inst rument s and Cont rols107
Page 121 of 392

.....................
Heating and Cooling .118
.........
What Each Control Does . 118
............
How to Use the System . 122
..........
To Turn Everything Of f . 127
...............
Climate Control System . 128
(EX model) .......
Fully-automatic Operation . 130
.......
Semi-automatic Operation . 131
Sunlight Sensor/ ............
Temperature Sensor . 134
...........................
Rear A/C Unit .135
.......................
Audio System (LX) .137
AM/FM/CD ........................
Audio System .137
.................
Operating the Radio . 137
.................
Adjusting the Sound . 141
..............................
Digital Clock .142
............
Audio System Lighting . 143
.........
Operating the CD Player . 143
.....
Operating the CD Changer . 145
....
CD Player Error Indications . 147
CD Changer Error .............................
Indications .148
Operating the Cassette .....................................
Player .149
............
Tape Search Functions . 151.......................
Audio System (EX) .153
AM/FM/Cassette/CD Audio ....................................
System .153
.................
Operating the Radio . 154
.................
Adjusting the Sound . 158
..............................
Digital Clock .159
............
Audio System Lighting . 159
Operating the Cassette .....................................
Player .160
............
Tape Search Functions . 162
.........
Operating the CD Player . 163
.....
Operating the CD Changer . 165
....
CD Player Error Indications . 166
CD Changer Error .............................
Indications .167
Audio System (Optional on U.S. ..............................
EX model) .168
AM/FM/Cassette/CD/DVD ........................
Audio System .168
.................
Operating the Radio . 170
.................
Adjusting the Sound . 174
..............................
Digital Clock .175
............
Audio System Lighting . 175
....................
Radio Frequencies . 176
........................
Radio Reception .176 Operating the Cassette
.....................................
Player .178
Caring f or the Cassette .....................................
Player .181
.........
Operating the CD Player . 182
.....
Operating the CD Changer . 184
.......
Protecting Compact Discs . 185
....
CD Player Error Indications . 186
CD Changer Error .............................
Indications .187
...........
Remote Audio Controls . 188
.......................
Thef t Protection .189
........
Rear Entertainment System . 190
............................
Security System .206
...............................
Cruise Control .207
HomeLink Universal ................................
Transceiver .210
Comf ort and Convenience Features
Comf ort and Convenience Feat ures117
Page 210 of 392

Once the security system is set,
opening any door (without using the
key or the remote transmitter), or
the hood, will cause it to alarm. It
also alarms if the radio is removed
f rom the dashboard or the wiring is
cut.Do not attempt to alter this system
or add other devices to it. The security system will not set if
the hood, tailgate, or any door is not
f ully closed. If the system will not set,
check the Door and Tailgate Open
Monitor on the instrument panel
(see page ) to see if the doors and
tailgate are f ully closed. Since it is
notpartofthemonitordisplay,
manually check the hood.
The security system helps to protect
your vehicle and valuables f rom thef t.
The horn sounds and a combination
of headlights, parking lights, side
marker lights, and taillights f lash if
someone attempts to break into your
vehicleorremovetheradio.This
alarm continues f or two minutes,
then the system resets. To reset an
alarming system before the two
minutes have elapsed, unlock the
driver’s f ront door with the key or
the remote transmitter.
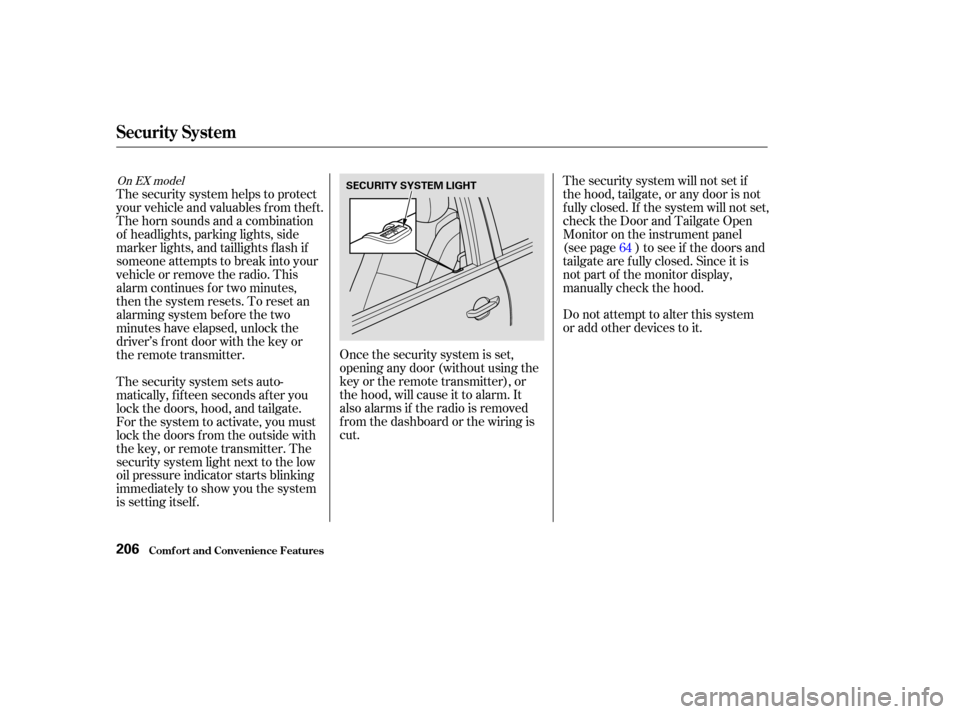
The security system sets auto-
matically, f if teen seconds af ter you
lock the doors, hood, and tailgate.
For the system to activate, you must
lock the doors f rom the outside with
the key, or remote transmitter. The
security system light next to the low
oil pressure indicator starts blinking
immediately to show you the system
is setting itself . 64
On EX model
Security System
Comf ort and Convenience Feat ures206
SECURITY SYSTEM LIGHT