Page 170 of 392
If you see an error indication in the
display while operating the CD
player,findthecauseinthechartto
the right. If you cannot clear the
error indication, take the vehicle to
your Honda dealer.Indication Cause
Solution
FOCUS Error
Mechanical Error, or a
DVD has been loaded in
the CD player
High TemperaturePress the EJECT button and pull out the disc.
Check if the disc is inserted correctly in the CD
player.
Make sure the disc is not scratched or damaged.
Press the EJECT button and pull out the disc.
Check the disc for damage or deformation.
If the CD cannot be pulled out, or the error
indication does not disappear after the disc is
ejected, see your Honda dealer.
Do not try to force the disc out of the player.
Will disappear when the temperature returns to
normal.
CD Player Error Indications
Audio System
Comf ort and Convenience Feat ures166
Page 173 of 392
This system also has a rear
entertainment system that allows the
rear passengers to listen through
wireless headhones to dif f erent
programming than the f ront seat
occupants. A built-in DVD player
allows the rear passengers to watch
DVDs or video CDs. To operate this
part of the system, ref er to Rear
Entertainment System on page .
The f ront control panel has two
displays. The lef t display shows the
inf ormation f or the f ront part of the
system.
When the rear system is on, the
right display shows the inf ormation
f or the rear part of the system.190
Audio System
Comf ort and Convenience Feat ures169
FRONT SYSTEM DISPLAY
REAR SYSTEM DISPLAY
Page 179 of 392

�µ
�´
Select BAL or FAD by pressing the
TUNE knob. Adjust the Balance or
Fader to your liking by turning the
TUNE knob.
The displayed number shows you
the current setting.
When the adjustment level reaches
the center, you will see ‘‘ ’’.
The system will automatically return
the display to the selected audio
mode about f ive seconds af ter you
stop adjusting a mode with the
TUNE knob.
You can use the instrument panel
brightness control knob to adjust the
illumination of the audio system (see
page ). The audio system
illuminates when the parking lights
are on, even if the radio is turned of f .
The right display usually shows the
time when the ignition is in
ACCESSORY (I) or ON (II). It
shows the operation mode of the
radio, cassette player, CD player, or
rear entertainment system when you
operate them, then goes back to the
time display af ter f ive seconds.
To set the clock, press and hold the
SET (TUNE) button until the
numbers f lash. Change the hours by
pressing the H ( ) button until the
numbers advance to the desired time.
Change the minutes by pressing the
M ( ) button until the numbers
advance to the desired time. When
you are f inished, press the SET
button again.
C
73
Audio System
Comf ort and Convenience Feat ures
A udio System L ighting
Digital Clock
175
Page 182 of 392
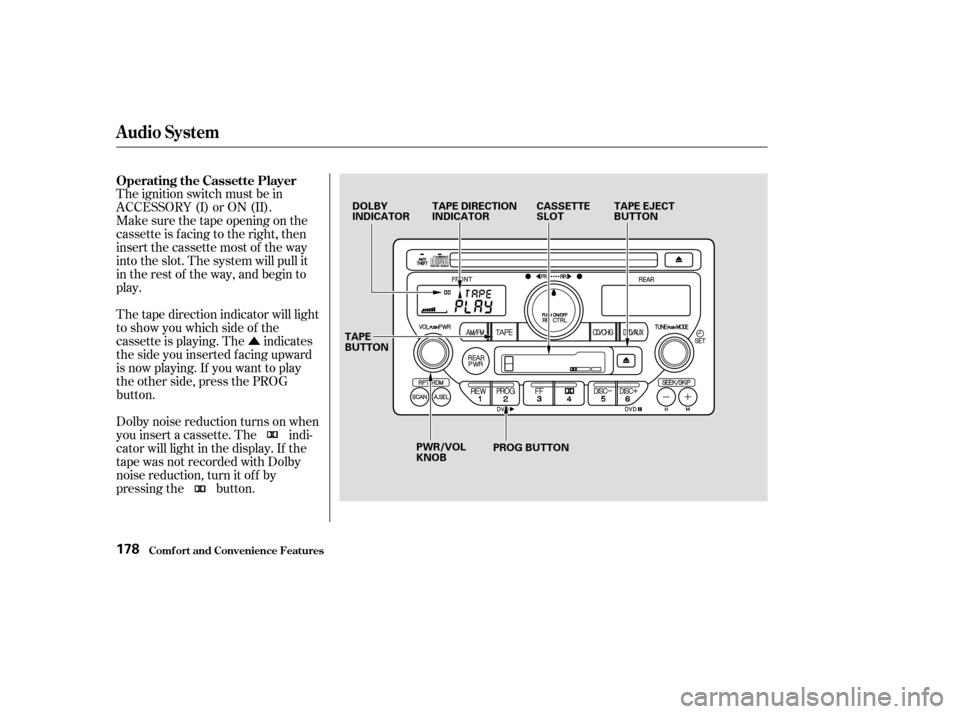
�Û
The ignition switch must be in
ACCESSORY (I) or ON (II).
Make sure the tape opening on the
cassette is facing to the right, then
insert the cassette most of the way
into the slot. The system will pull it
in the rest of the way, and begin to
play.
Dolby noise reduction turns on when
you insert a cassette. The indi-
cator will light in the display. If the
tape was not recorded with Dolby
noise reduction, turn it of f by
pressing the button. The tape direction indicator will light
to show you which side of the
cassette is playing. The indicates
thesideyouinsertedfacingupward
is now playing. If you want to play
the other side, press the PROG
button. Operating the Cassette Player
Audio System
Comf ort and Convenience Feat ures178
DOLBY
INDICATOR
TAPE DIRECTION
INDICATOR CASSETTE
SLOTTAPE EJECT
BUTTON
PWR/VOL
KNOB PROG BUTTON
TAPE
BUTTON
Page 183 of 392
Noise reduction remains of f until you
turn it on by pressing the button
again.
When the system reaches the end of
the tape, it will automatically reverse
direction and play the other side. If
you want to remove the cassette
f rom the drive, press the EJECT
button.
You can remove the cassette with
the ignition switch in any position,
even if the audio system is turned of f .
If you turn the system of f while a
tape is playing, either with the PWR/
VOL knob or by turning of f the
ignition, the cassette will remain in
the drive. When you turn the system
back on, the tape will begin playing
where it lef t of f .To switch to the radio, CD player, or
CD changer, press the AM/FM or
CD/CHG button. To change back to
the cassette player, press the TAPE
button.
Audio System
Comf ort and Convenience Feat ures179
PWR/VOL
KNOB
AM/FM
BUTTONCASSETTE SLOT
TAPE
EJECT
BUTTON
RPT
BUTTON
REW
BUTTONPLAY/PROG BUTTON FF BUTTON CD/CHG BUTTON
SEEK BUTTONS
Page 185 of 392

The cassette player picks up dirt and
oxides f rom the tape. This contami-
nation builds up over time and
causes the sound quality to degrade.
To prevent this, you should clean the
player af ter every 30 hours of use.
Your dealer has a cleaning kit
available.
If you do not clean the cassette
player regularly, it may eventually
become impossible to remove the
contamination with a normal
cleaning kit.Use 100-minute or shorter cassettes.
Cassettes longer than that use
thinner tape that may break or jam
the drive.
Look at the cassette before you
insert it. If the tape is loose, tighten
it by turning a hub with a pencil or
your f inger.
When they are not in use, store
cassettes in their cases to protect
them f rom dust and moisture. Never
place cassettes where they will be
exposed to direct sunlight, high heat,
or high humidity. If a cassette is
exposed to extreme heat or cold, let
it reach a moderate temperature
bef ore inserting it in the player.
Never try to insert f oreign objects
into the cassette player.
If the label is peeling of f , remove it
from the cassette or it could cause
the cassette to jam in the player.
Never try to insert a warped or
damaged cassette in the player.
Caring f or the Cassette Player
Audio System
Comf ort and Convenience Feat ures181
Page 186 of 392
You operate the CD player with the
same controls used f or the radio.
With the ignition switch in
ACCESSORY (I) or ON (II), insert
the disc into the CD slot. Push the
disc in half way, the drive will pull it
in the rest of the way and begin to
play. The number of the track that is
playing is shown in the display.
You can also play 3-inch (8-cm) discs
without using an adapter ring. Play
only standard round discs. Odd-
shaped CDs may jam in the drive or
cause other problems.
For best results when using CD-R
discs, use only high quality discs
labeled f or audio use. When
recording a CD-R, the recording
must be closed in order f or the disc
to be used by CD players. CD-RW
discs will not work in this unit.
Comf ort and Convenience Feat ures
Operating the CD Player
Audio System
182
PWR/VOL
KNOBCD SLOT
CD EJECT
BUTTON
RPT
BUTTON RDM
BUTTON
CD BUTTON
SKIP BUTTONS
Page 187 of 392

�µ�µ
�´
�µ
�´ �µ
When the system reaches the end of
the disc, it will return to the begin-
ning and play that disc again.
You can switch to the radio while a
CD is playing by pressing the AM/
FM button. Press the CD button to
return to playing the CD. The CD
will begin playing where it lef t of f .
If you turn the system of f while a CD
is playing, either with the PWR/VOL
knob or by turning off the ignition,
the disc will stay in the drive. When
youturnthesystembackon,theCD
will begin playing where it lef t of f .
Press the eject button to remove the
disc f rom the drive.
If you eject the disc, but do not
remove it from the slot, the system
will automatically reload the disc
af ter 15 seconds and put the CD
player in pause mode. To begin
playing the disc, press the CD button. To activate the Repeat
f eature, press and release the RPT
button. You will see RPT in the
display. The system continuously
replays the current track. Press the
RPT button again to turn it off.
This feature,
when activated, plays the tracks on
the CD in random order, rather than
in the order they are recorded on the
CD. To activate Random Play, press
and release the A. SEL/RDM button.
You will see RDM in the display. The
system will then select and play
tracks randomly. This continues
until you deactivate Random Play by
pressing A. SEL/RDM again.
You can use the SEEK/SKIP buttons
while a disc is playing to select
passages and change tracks.
To move rapidly within a track, press
and hold the SEEK/SKIP button.
Press the button to move
f orward. You will see CUE in the
display. Press the button to
move backward. You will see REW
displayed. Release the button when
the system reaches the point you
want.
Each time you press and release the
SEEK/SKIP button, the
system skips f orward to the
beginning of the next track. Press
and release the button to skip
backward to the beginning of the
current track. Press it again to skip
to the beginning of the previous
track.
Audio System
Comf ort and Convenience Feat ures
REPEAT
RANDOM PLAY
183


 or ON (II), insert
the disc into the CD slot. Push the
disc in half way, the drive will")