Page 357 of 415
Open the tailgate.Take the tools out of the storage
compartment.The spare tire is stored under the
f loor between the f irst and second
row of seats. If the f ront seats are
adjusted to the rear-most position,
move the seats forward slightly
and adjust the seat-backs to an
upright position (see page ).
Lift up the center table (see page
).
Turn the jack’s end bracket
counterclockwise to loosen it, then
remove the jack.
Remove the cargo net.
Thetoolsandjackarebehinda
cover in the cargo area on the
driver’s side. Remove the cover by
turning the handle
counterclockwise, then pulling out
the cover.
3.
4.
5.
6.7.
130 110
Changing a Flat T ire
T aking Care of t he Unexpect ed354
COVER
Page 358 of 415
CONT INUED
Open either of the rear sliding
doors. Pull the f loor carpet up by
lif ting up on the edge, then raise
the f loor lid by pulling up on the
handle. To keep the f loor carpet
and lid out of the way, pull out the
hook on the back of the f loor lid
and attach it into the seat-back
handle on the driver’s seat.Remove the spare tire basket.
Unscrew the wing bolt and take
the spare tire out of its well. After
you have removed the spare tire,
screw this wing bolt back into
place.
Loosen the f ive wheel nuts 1/2
turn with the wheel wrench. If you are changing a rear tire,
close the sliding door. Then turn
of f the sliding door MAIN switch.
8.
9.
11.
12.
10.On EX and EX-L models
On EX and EX-L models
Changing a Flat T ire
T aking Care of t he Unexpect ed355
HOOK
HANDLESPARE TIRE
BASKET
SPARE TIRE WING BOLT WHEEL NUTS
Page 359 of 415
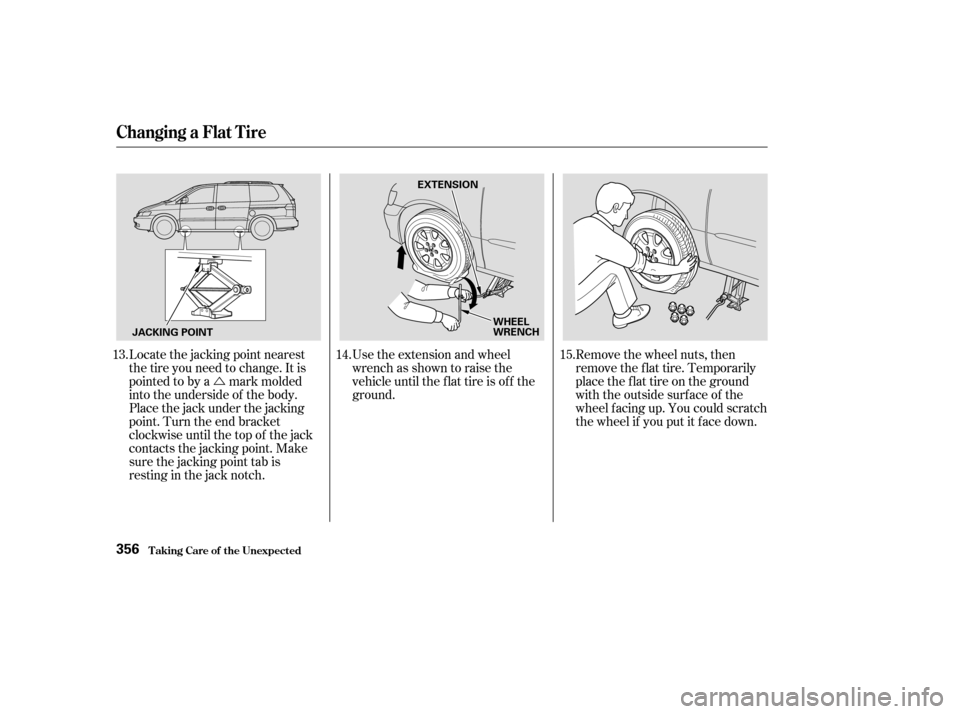
�ÚUse the extension and wheel
wrench as shown to raise the
vehicle until the f lat tire is of f the
ground. Remove the wheel nuts, then
remove the f lat tire. Temporarily
place the f lat tire on the ground
with the outside surface of the
wheel f acing up. You could scratch
the wheel if you put it f ace down.
Locate the jacking point nearest
thetireyouneedtochange.Itis
pointed to by a mark molded
into the underside of the body.
Place the jack under the jacking
point. Turn the end bracket
clockwise until the top of the jack
contacts the jacking point. Make
sure the jacking point tab is
restinginthejacknotch.
13.
14. 15.
Changing a Flat T ire
T aking Care of t he Unexpect ed356
JACKING POINT EXTENSION
WHEEL
WRENCH
Page 360 of 415
Put on the spare tire. Put the
wheel nuts back on f inger-tight,
then tighten them in a crisscross
pattern with the wheel wrench
until the wheel is f irmly against
the hub. Do not try to tighten
them f ully.
Bef ore mounting the spare tire,
wipeanydirtoff themounting
surface of the wheel and hub with
a clean cloth. Wipe the hub
carefully,itmaybehotfrom
driving.
Do not attempt to forcibly pry the
wheel cover of f with a screwdriver or
other tool. The wheel cover cannot
be removed without f irst removing
the wheel nuts. 16.
17.
CONT INUED
On LX model
Changing a Flat T ire
T aking Care of t he Unexpect ed357
WHEEL
COVER
HUB
Page 361 of 415
Tighten the wheel nuts securely in
the same crisscross pattern. Have
the wheel nut torque checked at
the nearest automotive service
f acility.
Tighten the wheel nuts to:
Lower the vehicle to the ground
and remove the jack.
Put the flat tire in the supplied
vinyl bag. This bag is stored in the
rear compartment on the driver’s
side panel in the third row. Knot
the top of the vinyl bag.
18.
19.
20.
Changing a Flat T ire
T aking Care of t he Unexpect ed358
80 lbf·ft (108 N·m , 11 kgf·m)
Page 362 of 415
CONT INUED
You will f ind a u-shaped slit on the
carpet behind the seat bottom of
the third seat. Pull up the carpet at
theslitandremovetheplastic
screw with a coin.
When the third seat is not f olded,
the f lat tire is secured behind the
third seat.
Remove the bracket and the wing
bolt f rom the spare tire lid by
unscrewing the bracket mounting
bolt.
Turn on the sliding door MAIN
switch so you can open the door.
21.
22.
Storing the f lat tire behind the thirdseat
On EX and EX-L models
Changing a Flat T ire
T aking Care of t he Unexpect ed359
BRACKET MOUNTING BOLT WING BOLT
BRACKET
MOUNTING
BOLT
BRACKET PLASTIC
SCREW
BRACKET
Page 363 of 415
Storing the Flat Tire on the Floor
When the third seat is f olded, the
f lat tire is secured to the f loor on
topof thefoldedseat.Pullupthe
carpet on the attachment point and
remove the plastic screw as
described in the previous
procedure.
Remove the wing bolt from the
bracket that is attached to the
spare tire lid.
Install the flat tire on the bracket
with the inside of the wheel facing
toward you. Put the tire mounting
wing bolt in the attachment point
through one of the f ive wheel nut
holes and the bracket as shown.
Poke holes in the vinyl bag. Secure
the f lat tire by tightening the wing
bolt.
Adjust the seat-back of the third
seat to the upright position (see
page ). Install the bracket and
the bracket mounting bolt to the
attachment point as shown, and
tighten the bolt. Make sure the
bracket is securely locked.
23.
111
Changing a Flat T ire
T aking Care of t he Unexpect ed360
BRACKET
TIRE MOUNTING WING BOLT
Page 364 of 415
.
Store th")
Unclip the hook f rom the seat
back handle on the driver’s seat
and lower the f loor lid and the
carpet.
Make sure to adjust the f ront
seats properly bef ore you start
driving (see page ).
Store the jack in its holder. Turn
the jack’s end bracket clockwise to
lock it in place. Store the tools.
Replace the cover.
Close the tailgate.
Store the plastic screw in the spare
tire well.
Store the wheel cover in the spare
tire well. Make sure it will not get
scratched or damaged.
Storethesparetirebasketinthe
spare tire well.
Place the flat tire face down on the
attachment point. Put the tire
mountingwingboltinthe
attachment point through one of
the f ive wheel nut holes as shown.
Poke holes in the vinyl bag. Secure
the f lat tire by tightening the wing
bolt. 24.
25.
26.
27.
110On LX modelOn EX and EX-L models
Changing a Flat T ire
T aking Care of t he Unexpect ed361
TIRE MOUNTING WING BOLT
ATTACHMENT POINT
Loose items can fly around the
interiorinacrashandcould
seriously injure the occupants.
Store the wheel, jack, and tools
securely before driving.