Page 67 of 338

This section gives inf ormation about
the controls and displays that
contribute to the daily operation of
your Honda. All the essential
controls are within easy reach............................
Control Locations .64
...............................
Indicator Lights .65
.............................................
Gauges .72
...............................
Speedometer .72 .................................
Tachometer .72
..............
Odometer/Trip Meter . 73
..................................
Fuel Gauge .73
...................
Temperature Gauge . 74
Controls Near the Steering .......................................
Wheel .75
...................................
Headlights .76
............
Daytime Running Lights . 77
....
Instrument Panel Brightness . 77
................................
Turn Signals .77
.....................
Windshield Wipers .78
..................
Windshield Washers . 79
Rear Window Wiper and .....................................
Washer .80
..........................
Hazard Warning .81
.............
Rear Window Def ogger . 81
......
Steering Wheel Adjustment . 82
...............................
Keys and Locks .83
..............................................
Keys .83
....................
Immobilizer System . 84
............................
Ignition Switch .85
......................
Power Door Locks .87
..................................
Rear Doors .88
............................................
Hatch .89
........................................
Tailgate .90
....................................
Glove Box .91 .................................................
Seats .92
.............
Front Seat Adjustments . 92
Driver’s Seat Height ..............................
Adjustment .93
................
Driver’s Seat Armrest . 93
..........................
Head Restraints .94
........................
Rear Seat Access .95
.......
Rear Seat-back Adjustment . 96
..........
Reclining the Front Seats . 97
...............
Folding the Rear Seats . 99
........
Removing the Rear Seats . 101
............................
Power Windows .103
...............................
Rear Windows .105
...........................................
Mirrors .106
..
Adjusting the Power Mirrors . 106
..........................................
Skylight .107
.........................
Beverage Holders .110
...............................
Parking Brake .111
...............................
Ceiling Pocket .112
.......................................
Coin Tray .112
............
Accessory Power Sockets . 113
...............................
Interior Lights .114
..............................
Ceiling Light .114
...................................
Spotlights .114
......................
Cargo Area Light .115
................
Ignition Switch Light . 115
Instruments and Controls
Inst rument s and Cont rols63
Page 68 of 338
Control L ocations
Inst rument s and Cont rols64
POWER DOOR LOCK SWITCHMIRROR CONTROLS AUDIO SYSTEM
PARKING BRAKE
A/T model is shown. HOOD RELEASE
HANDLE POWER WINDOW
SWITCHES
HEATING/COOLING
CONTROLS
(P.87)
(P.103)
(P.160)
(P.118)(P.126,
137)
(P.106)
(P.111)
Page 69 of 338
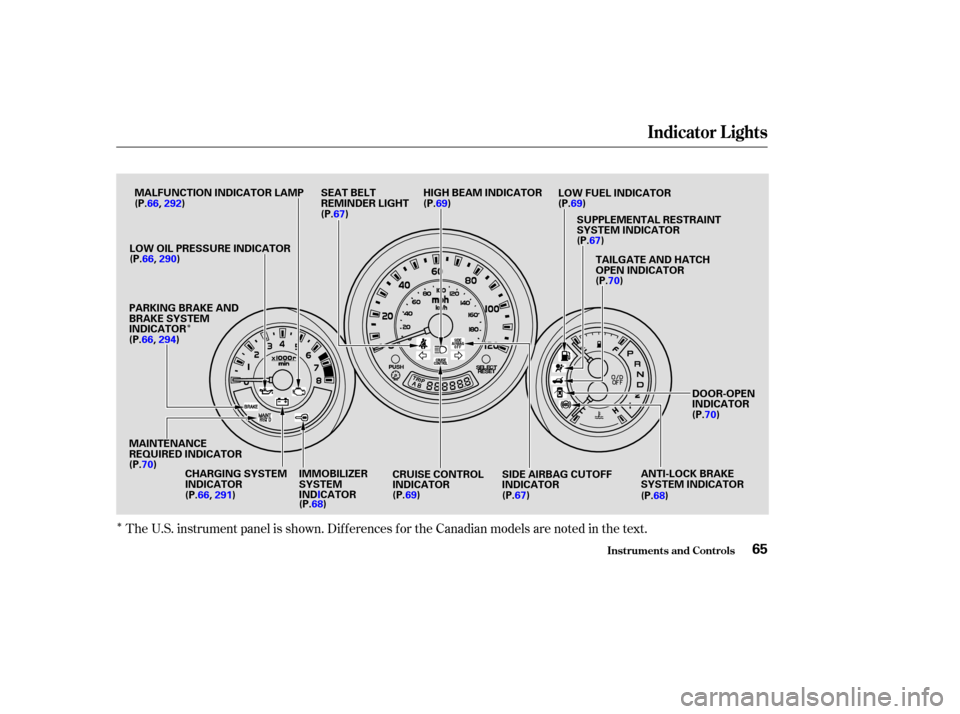
�Î
�Î
The U.S. instrument panel is shown. Dif f erences f or the Canadian models are noted in the text.
Indicator L ights
Inst rument s and Cont rols65
IMMOBILIZER
SYSTEM
INDICATOR
(P.68)
MAINTENANCE
REQUIRED INDICATOR
(P.70) (P.67)
DOOR-OPEN
INDICATOR
(P.70)
CRUISE CONTROL
INDICATOR (P. 69) SIDE AIRBAG CUTOFF
INDICATOR
(P.67)
LOW OIL PRESSURE INDICATOR
PARKING BRAKE AND
BRAKE SYSTEM
INDICATOR
CHARGING SYSTEM
INDICATOR
(P.66,
290)
(P.66, 291) (P.69) LOW FUEL INDICATOR
HIGH BEAM INDICATOR
SEAT BELT
REMINDER LIGHT
(P.67)TAILGATE AND HATCH
OPEN INDICATOR
(P.70)
SUPPLEMENTAL RESTRAINT
SYSTEM INDICATOR
(P.69)
MALFUNCTION INDICATOR LAMP
ANTI-LOCK BRAKE
SYSTEM INDICATOR
(P.68)
(P.66,
292)
(P.66, 294)
Page 87 of 338

These keys contain electronic
circuits that are activated by the
Immobilizer System. They will not
work to start the engine if the
circuits are damaged.Protect the keys f rom direct
sunlight, high temperature, and
high humidity.
The keys do not contain batteries.
Do not try to take them apart. Keep the keys away f rom liquids.
If they get wet, dry them
immediately with a sof t cloth. Donotdropthekeysorsetheavy
objects on them.
Your vehicle comes with two master
keys and a valet key. When replacing keys, use only
Honda-approved key blanks. The valet key works only in the
ignition and the door locks. You can
keep the glove box and hatch locked
when you leave your vehicle and the
valet key at a parking f acility.
Youshouldhavereceivedakey
number tag with your set of keys.
You will need this number if you
ever have to get a lost key replaced.
Keep the tag stored in a saf e place.
When replacing keys, use only
Honda-approved key blanks.
The master key fits all the locks on
your vehicle:
Ignition
Doors
GloveBox
Hatch Keys
Keys and Locks
Inst rument s and Cont rols83
KEY
NUMBER
TAG MASTER
KEYS
(Black)
VALET
KEY
(Gray)
Page 90 of 338
 when you let go of
the key.
You will hear a reminder beeper if
you leave the key in the ignition
switch in the LOC")
�µ
�µ
�µ Use this position
only to start the engine. The switch
returns to ON (II) when you let go of
the key.
You will hear a reminder beeper if
you leave the key in the ignition
switch in the LOCK (0) or
ACCESSORY (I) position and open
the driver’s door. Remove the key to
turn of f the beeper. The engine will not start if the
Immobilizer System does not
recognize the key’s coding (see page ).
If the f ront wheels are turned, the
anti-thef t lock may sometimes make
it difficult to turn the key from
LOCK to ACCESSORY. Firmly turn
the steering wheel to the lef t or to
the right as you turn the key.
In this position,
you can operate the audio system
and the accessory power sockets.
This is the normal key
position when driving. All f eatures
and accessories on the vehicle are
usable. Several of the lights on the
instrument panel come on as a test
when you turn the ignition switch
f rom ACCESSORY to ON. 84
ST A RT (III)
A CCESSORY (I)
ON (II)
Keys and Locks
Inst rument s and Cont rols86
Removing the key from the
ignition switch while driving
locks the steering. This can
cause you to lose control.
Remove the key from the
ignition switch only when
parked.
Page 91 of 338
The f ront doors can be locked and
unlocked f rom the outside with the
key.
The master door lock switch on the
driver’s door locks and unlocks all of
the doors and the hatch. Push the
switch down to lock all of the doors
and the hatch, and up to unlock them. To lock the f ront passenger’s door
when getting out the vehicle, push
the lock tab down and close the door.
To lock the driver’s door, remove the
key f rom the ignition switch, pull the
outside door handle and push the
locktabdownorpushthemaster
switch down. Release the handle,
then close the door.
Each f ront door has a lock tab at the
top of the door. When you push
down the lock tab on the driver’s
door, all doors and the hatch lock.
Pulling up the lock tab on the driver’s
door unlocks only that door. The
locktabonthefrontpassenger’s
door only locks and unlocks that
door.
CONT INUED
Power Door L ocks
Keys and Locks
Inst rument s and Cont rols87
MASTER DOOR LOCK SWITCH
Page 92 of 338
All doors and the hatch lock when
youpushdownthelocktabonthe
driver’s door, or lock the driver’s
door from the outside with the key.
Only the driver’s door unlocks when
you use the key or the lock tab. To
unlock the f ront passenger’s door,
use the master door lock switch or
the lock tab on the f ront passenger’s
door.The Element has no center pillars
between front and rear seats, and
the rear doors pivot at the rear.
The rear door handle is located in
the rear door edge. The rear door
canbeopenedonlywhenthefront
door is open. Pull the handle to open
the rear door.
To close the doors when both f ront
and rear doors are open, close the
rear door first, then the front door.
The f ront door cannot be latched
without f irst closing the rear door.
Closing the rear door on the f ront
door will damage both doors.
Keys and Locks
Inst rument s and Cont rols
Rear Doors
88
Page 93 of 338
CONT INUED
You can lock or unlock the hatch in
any of these ways:Useyourmasterkeytolockand
unlock the hatch.
Turnthekeyclockwisetolockthe
hatch, and counterclockwise to
unlock it. Lock the hatch by pushing down
the lock tab on the driver’s door
(see page ), or by using the
master key in the driver’s door
lock.
Lock or unlock the hatch with the
master door lock switch.
With the hatch unlocked, open it by
pulling the handle and lif ting up.
To close the hatch, lower it, then
press down on the back edge.
When both the hatch and tailgate are
open, the hatch cannot be latched
without f irst closing the tailgate.
87
Keys and Locks
Inst rument s and Cont rols
Hatch
89