Page 129 of 374
The cargo area light has a three-
position switch. In the OFF position,
the light does not come on. In the
center position, the light comes on
when you open the tailgate or the
hatch glass. In the ON position, the
light stays on continuously.The ignition switch light comes on
when you unlock the driver’s door,
and f ades out about 30 seconds af ter
you close the door.
Interior Lights
Inst rument s and Cont rols
Cargo A rea L ight
Ignition Switch L ight
125
ON
OFF IGNITION SWITCH LIGHT
TAILGATE/HATCH GLASS ACTIVATED
Page 135 of 374

CONT INUED
Turn the temperature control dial
all the way to the lef t.
Make sure the A/C is of f .
Select and Fresh Air mode.
Set the f an to the desired speed.
The outside air intakes f or the
heating and cooling system are at
the base of the windshield. Keep
these clear of leaves and other
debris.
It is best to leave the system in Fresh
Air mode under almost all conditions.
Keeping the system in Recirculation
mode, particularly with the A/C of f ,
can cause the windows to fog up.
Switch to Recirculation mode when
you are driving through smoky or
dusty conditions, then switch back to
Fresh Air mode when the condition
clears. This section covers how to set up the
system controls f or ventilation,
heating, cooling, dehumidif ying, and
def rosting.
The engine must be running f or the
heater and air conditioning to
generate hot and cold air. The heater
uses engine coolant to warm the air.
If the engine is cold, it will be several
minutes bef ore you f eel warm air
coming from the system.
The air conditioning does not rely on
engine temperature.
The f low-through ventilation system
draws in outside air, circulates it
through the interior, then exhausts it
through vents near the tailgate.1.
2.
3.
Heating and Cooling
Comf ort and Convenience Feat ures
Vent ilat ion
How to Use the System
131
FAN CONTROL
DIAL
TEMPERATURE
CONTROL DIAL MODE CONTROL
DIAL
RECIRCULATION
BUTTON AIR CONDITIONING
(A/C) BUTTON
Page 197 of 374
�Î
�Î
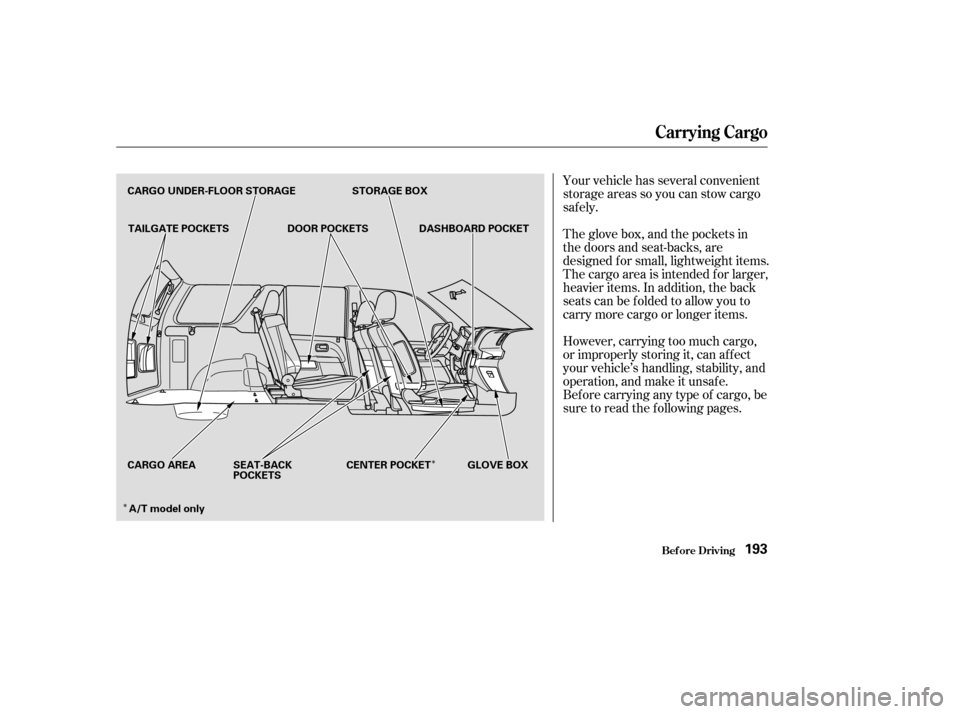
Your vehicle has several convenient
storage areas so you can stow cargo
saf ely.
However, carrying too much cargo,
or improperly storing it, can af f ect
your vehicle’s handling, stability, and
operation, and make it unsaf e.
Bef ore carrying any type of cargo, be
sure to read the f ollowing pages. The glove box, and the pockets in
the doors and seat-backs, are
designed f or small, lightweight items.
The cargo area is intended f or larger,
heavier items. In addition, the back
seats can be folded to allow you to
carry more cargo or longer items.
Carrying Cargo
Bef ore Driving193
CARGO UNDER-FLOOR STORAGE TAILGATE POCKETS DOOR POCKETSSTORAGE BOX
DASHBOARD POCKET
CARGO AREA SEAT-BACK POCKETS CENTER POCKET GLOVE BOX
A/T model only
Page 199 of 374

Distribute cargo evenly on the
f loor of the cargo area, placing the
heaviest items on the bottom and
as far forward as possible. Tie
down items that could be thrown
about the vehicle during a crash or
sudden stop.
If you carry large items that
prevent you f rom closing the
tailgate or the hatch glass, exhaust
gas can enter the passenger area.
To avoid the possibility of, f ollow the
instructions on page . If you can carry any items on a
roof rack,besurethetotalweight
of the rack and the items does not
exceed the maximum allowable
weight. Please contact your Honda
dealer f or f urther inf ormation.
If you use an accessory roof rack,
the roof rack weight limit may be
lower. Ref er to the inf ormation that
came with your roof rack.
To secure cargo, use the f our f loor
hooks in the cargo area. Make sure
all stored items are secured before
driving.
60
CONT INUED
Carrying Cargo in the Cargo A rea
or on a Roof Rack
carbon
monoxide poisoning
Carrying Cargo
Bef ore Driving195
HOOKS
Page 200 of 374
Store only small, lightweight items in
the pockets on the back of the
tailgate.
To secure cargo, use the f our f loor
hooks in the cargo area. Make sure
all stored items are secured before
driving.
Carrying Cargo
Bef ore Driving
T ailgat e Pocket s
196
TAILGATE POCKETS
TAILGATE POCKETS
Page 203 of 374

Youshoulddothefollowingchecks
and adjustments every day bef ore
you drive your vehicle.Make sure all windows, mirrors,
and outside lights are clean and
unobstructed. Remove f rost, snow,
or ice. Check the adjustment of the seat
(see page ).
Check the adjustment of the
inside and outside mirrors (see
page ).
Check the adjustment of the
steering wheel (see page ).
Fasten your seat belt. Check that
your passengers have f astened
their seat belts (see page ).Turn the ignition switch ON (II).
Check the indicator lights in the
instrument panel.
Start the engine (see page ).
Check the gauges and indicator
lights in the instrument panel (see
page ).
Visually check the tires. If a tire
looks low, use a gauge to check its
pressure.
Check that any items you may be
carrying with you inside are stored
properly or f astened down
securely. Make sure the doors are securely
closed and locked.
Check that the hood, tailgate and
hatch glass are f ully closed.
1.
2.
3.
4. 5.
6.
7.
8.
9.
10.
11.
12.
97
114 83
17 200
65
Driving
Preparing to Drive
199
Page 214 of 374

�µ
Always use the parking brake when
you park your vehicle. The indicator
on the instrument panel shows that
the parking brake is not f ully
released; it does not indicate that the
parking brake is f irmly set. Make
sure the parking brake is set f irmly
or your vehicle may roll if it is
parked on an incline.
If your vehicle has an automatic
transmission, set the parking brake
bef ore you put the transmission in
Park. This keeps the vehicle f rom
moving and putting pressure on the
parking mechanism in the
transmission making it easier to
move the shift lever out of Park
when you want to drive away. If the vehicle is f acing uphill, turn
the f ront wheels away f rom the curb.
If you have a manual transmission,
putitinfirstgear.
If the vehicle is f acing downhill, turn
the f ront wheels toward the curb. If
you have a manual transmission, put
it in reverse gear.
Make sure the parking brake is f ully
released bef ore driving away.
Driving with the parking brake
partially set can overheat or damage
the rear brakes.
Make sure the moonroof and the
windows are closed.
Lock the doors and the tailgate
with the key or the remote
transmitter.
Make sure the hatch glass is
closed securely. Place any packages, valuables, etc.,
in the cargo area or take them
with you. Turn of f the lights.
Never park over dry leaves, tall
grass, or other f lammable
materials. The three way catalytic
converter gets very hot, and could
cause these materials to catch on
fire.
Parking T ips
Driving
Parking
210
Page 294 of 374
Open the tailgate. Place a cloth on
the edge of the cover. Remove the
covers by caref ully prying on the
edge with a small f lat-tipped
screwdriver.Use a Phillips-head screwdriver to
remove the taillight assembly
mounting screw under each cover.
Determine which of the f our bulbs
is burned out: stop/taillight, back-
up light, turn signal, or side
marker.
Remove the socket by turning it
one-quarter turn counterclockwise.
Pull the taillight assembly out of
the rear pillar.
1.
2.
3.4.
5.
Lights
Maint enance
Replacing Rear Bulbs
290
BULBS
SCREW
COVER