Page 50 of 374
Your vehicle has three tether
anchorage points on the ceiling near
the tailgate opening f or securing a
tether-style child seat to the vehicle.Remove the head restraint where
you want to place the child seat.
You can remove the head restraint in
each outside position by pressing the
release button. The head restraint in
the center position can be removed
by pulling it up (see page ).
The tether anchorage points are
located under plastic covers. Select
the anchorage point you want to use,
and remove the cover with a small
f lat-tipped screwdriver or f ingernail
f ile.
Since a tether can provide additional
security, we recommend using a
tether whenever one is required or
available. 99
Using Child Seats with T ethers
Protecting Children
Driver and Passenger Saf ety46
COVER
TETHER ANCHORAGE POINT
Page 51 of 374
Make sure the removed head
restraints are secured in the cargo
area. Reinstall the head restraints
when the child seat is removed.Attach the tether strap hook to the
tether anchorage point as shown in
the illustration, then tighten the
strap according to the child seat
maker’s instructions. Make sure the
strap is not twisted.Your vehicle is equipped with
LATCH (Lower Anchors and
Tethers for Children) at the outer
rear seats. The lower anchors are
located between the seat-back and
seat bottom and are to be used only
with a child seat designed f or use
with LATCH.
The exact location of each lower
anchor is marked with a small circle
above the lower anchor point.
CONT INUED
Driver and Passenger Saf ety
Protecting Children
Using L A T CH
47
TETHER ANCHORAGE POINT
TETHER STRAP HOOK LOWER ANCHORSMARKS
Page 53 of 374
Remove the head restraint (see
page ).
Make sure the removed head
restraints are secured in the cargo
area. Reinstall the head restraints
when the child seat is removed. Attach the tether strap hook to the
tether anchorage point, and
tighten the strap according to the
child seat maker’s instructions.
Make sure the strap is not twisted.
Push and pull the child seat
f orward and f rom side to side to
verif y that it is secure enough to
stay upright during normal driving
maneuvers.This symbol on rear or f orward
f acing child seats or booster
cushions indicates the presence of
LATCH compatible hardware.
5.
6.
7.
99
Protecting Children
Driver and Passenger Saf ety
L ower Universal Anchorage
System Symbol
49
TETHER ANCHORAGE POINT
TETHER STRAP HOOK
Page 55 of 374

The seat belts in all seating positions
except the driver’s have an additional
locking mechanism that must be
activated to secure a child seat. (See
pages and f or instructions on
how to secure child seats with this
type of seat belt.)
If the shoulder part of the belt is
pulled all the way out, the locking
mechanism will activate. The belt
will retract, but it will not allow the
passenger to move f reely.
To deactivate the locking
mechanism, unlatch the buckle and
let the seat belt f ully retract. To
ref asten the belt, pull it out only as
f ar as needed.
See page f or instructions on how
to wear the lap/shoulder belt
properly.The lap/shoulder belt in the center
seating position on the rear seat is
equipped with a detachable anchor
that has two parts: a small latch plate
and an anchor buckle.
The detachable anchor should
normaly be latched whenever the
seat-backs are in an upright position.
For more inf ormation about the
detachable anchor (see page ).
35
39
17 108
Additional Inf ormation About Your Seat Belts
Driver and Passenger Saf ety51
DETACHABLE ANCHOR
Page 60 of 374
If you ever have a moderate to
severe side impact, the sensors will
detect rapid deceleration and signal
the control unit to instantly inf late
either the driver’s or the passenger’s
side airbag.
Only one airbag will deploy during a
side impact. If the impact is on the
passenger’s side, the passenger’s
side airbag will deploy even if there
is no passenger.To get the best protection f rom the
side airbags, front seat occupants
should wear their seat belts and sit
upright and well back in their seats.
Your vehicle is equipped with side
airbags f or the driver and a f ront
seat passenger. The airbags are
stored in the outer edges of the f ront
seat-backs, and both are marked
‘‘SIDE AIRBAG.’’
Standard on EX model in the U.S., and EX and EX-L models in Canada
Additional Inf ormation About Your Airbags
Driver and Passenger Saf ety
How Your Side A irbags Work
56
Page 67 of 374

This section gives inf ormation about
the controls and displays that
contribute to the daily operation of
your Honda. All the essential
controls are within easy reach............................
Control Locations .64
...............................
Indicator Lights .65
.............................................
Gauges .72
...............................
Speedometer .72
.................................
Tachometer .72
..............
Odometer/Trip Meter . 73
Outside Temperature ..................................
Indicator .73
..................................
Fuel Gauge .74
...................
Temperature Gauge . 74
Controls Near the Steering .......................................
Wheel .75
...................................
Headlights .76 ............
Daytime Running Lights . 77
....
Instrument Panel Brightness . 77
................................
Turn Signals .77
.....................
Windshield Wipers .78
..................
Windshield Washers . 79
Rear Window Wiper and .....................................
Washer .80
..........................
Hazard Warning .81
.............
Rear Window Def ogger . 81
.............................
Parking Brake .82
......
Steering Wheel Adjustment . 83
...............................
Keys and Locks .84
..............................................
Keys .84
....................
Immobilizer System . 85
............................
Ignition Switch .86
......................
Power Door Locks .88
...................
Remote Transmitter . 89
..............
Childproof Door Locks . 93
........................................
Tailgate .93
....................................
Glove Box .96
.................................................
Seats .97
.............
Front Seat Adjustments . 97
Driver’s Seat Height ..............................
Adjustment .98
...................
FrontSeatArmrests . 98
..........................
Head Restraints .99 ............
Rear Seat Adjustments . 100
....................
Rear Seat Armrest .101
........
Reclining the Front Seats . 102
.............
Folding the Rear Seats . 104
...................
Detachable Anchor . 108
..................................
Seat Heaters .109
............................
Power Windows .110
.......................................
Moonroof .113
...........................................
Mirrors .114
..
Adjusting the Power Mirrors . 114
..................................
Center Table .115
.........................
Beverage Holders .116
.................................
Built-in Table .117
...............................
Center Pocket .119
...................................
Storage Box .119
.............................
Driver’s Pocket .120
.......................................
Coin Tray .120
........................
Sunglasses Holder .121
............
Accessory Power Sockets . 122
........................
Dashboard Pocket .123
...............................
Interior Lights .124
..............................
Ceiling Light .124
...................................
Spotlights .124
......................
Cargo Area Light .125
................
Ignition Switch Light . 125
Instruments and Controls
Inst rument s and Cont rols63
Page 101 of 374
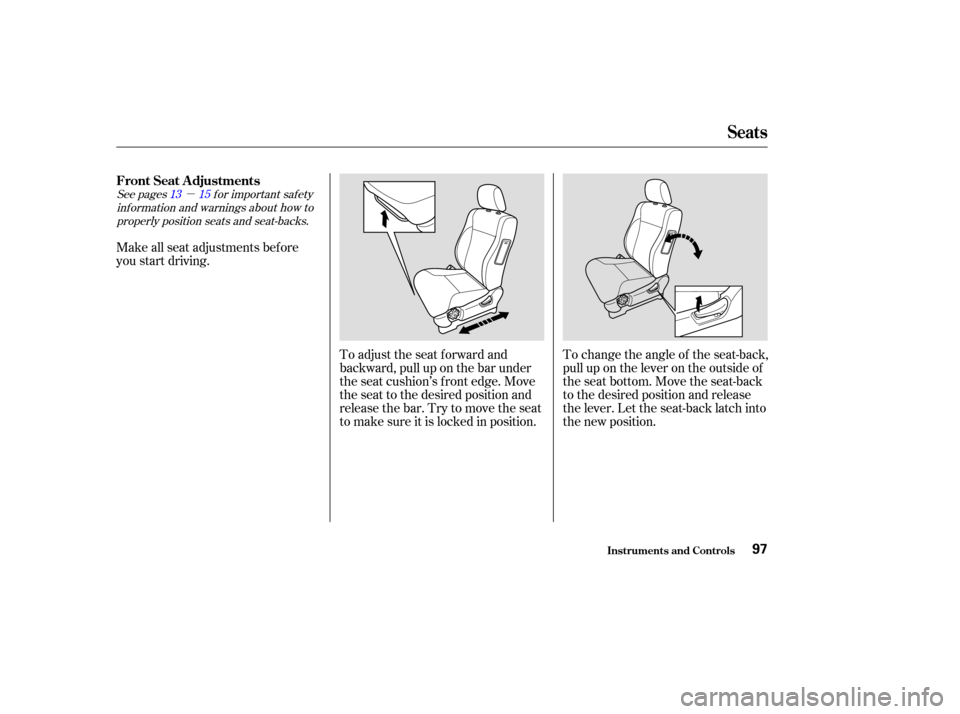
�µ
See pages f or important saf ety
inf ormation and warnings about how toproperly position seats and seat-backs. 13 15
Make all seat adjustments bef ore
you start driving.
To change the angle of the seat-back,
pull up on the lever on the outside of
the seat bottom. Move the seat-back
to the desired position and release
the lever. Let the seat-back latch into
the new position.
To adjust the seat forward and
backward, pull up on the bar under
the seat cushion’s f ront edge. Move
the seat to the desired position and
releasethebar.Trytomovetheseat
to make sure it is locked in position.
FrontSeatAdjustments
Seats
Inst rument s and Cont rols97
Page 102 of 374
To adjust the height of the driver’s
seat, turn the dial on the outside of
theseatbottom.Eachfrontseathasanarmreston
thesideof theseat-back.Touseit,
pivotitdown.Only on vehicles with an automatic
transmission
Driver’s Seat Height Adjustment Front Seat Armrests
Inst rument s and Cont rols
Seats
98


.
Make sure the removed head
restraints are secured in the cargo
area. Reinstall the head restraints
when the child seat is removed. Attach the tether strap hook t")