Page 161 of 374
�µIf you are
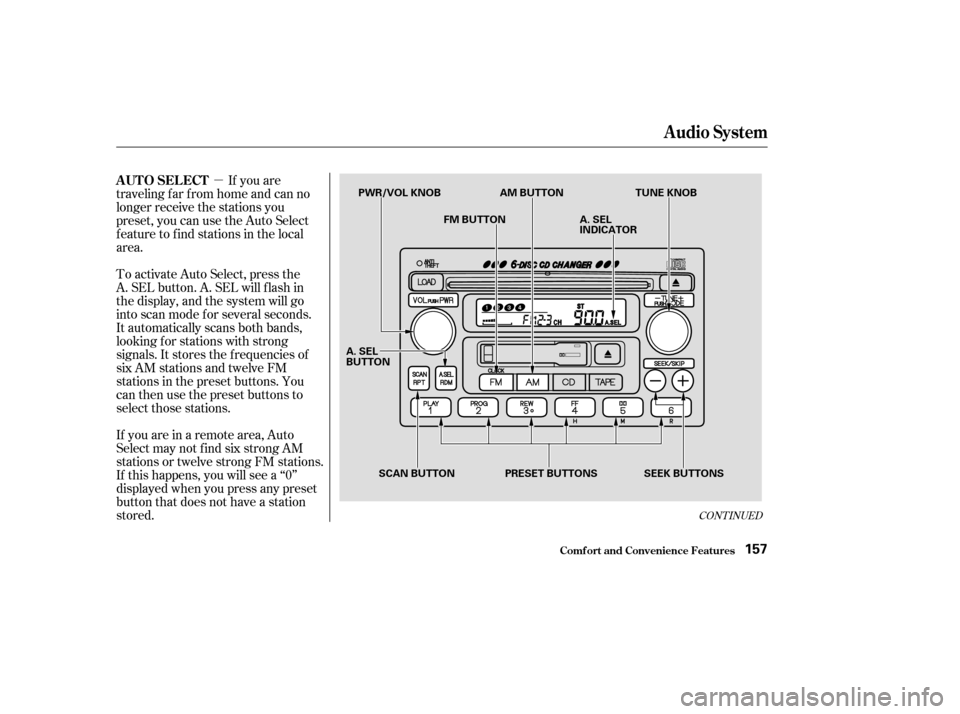
traveling far from home and can no
longer receive the stations you
preset, you can use the Auto Select
feature to find stations in the local
area.
To activate Auto Select, press the
A. SEL button. A. SEL will f lash in
the display, and the system will go
into scan mode f or several seconds.
It automatically scans both bands,
looking f or stations with strong
signals. It stores the f requencies of
six AM stations and twelve FM
stations in the preset buttons. You
can then use the preset buttons to
select those stations.
If you are in a remote area, Auto
Select may not f ind six strong AM
stations or twelve strong FM stations.
If this happens, you will see a ‘‘0’’
displayed when you press any preset
button that does not have a station
stored.
CONT INUED
Audio System
Comf ort and Convenience Feat ures
AUTO SELECT
157
PWR/VOL KNOB
FM BUTTON A. SEL
INDICATOR
A. SEL
BUTTON SCAN BUTTON PRESET BUTTONS SEEK BUTTONS TUNE KNOB
AM BUTTON
Page 162 of 374
If you do not like the stations Auto
Select has stored, you can store
other f requencies in the preset
buttons. Use the TUNE, SEEK, or
SCAN f unction to f ind the desired
f requencies, then store them in the
selected preset buttons as described
previously.
Auto Select does not erase the
f requencies that you preset pre-
viously. When you return home, turn
of f Auto Select by pressing the
A. SEL button. The preset buttons
will then select the f requencies you
originally set.
Audio System
Comf ort and Convenience Feat ures158
PWR/VOL KNOBFM BUTTON A. SEL
INDICATOR
A. SEL
BUTTON SCAN BUTTON PRESET BUTTONS SEEK BUTTONS AM BUTTON
TUNE KNOB
Page 167 of 374
Press and hold the H (Preset 4)
button until the hour advances to the
desired time.
Press and hold the M (Preset 5)
button until the minutes advance to
the desired time.
Press the CLOCK (FM) button again
to enter the set time.For example:1:06 would RESET to 1:00
1:52 would RESET to 2:00 If your vehicle’s battery is
disconnected or goes dead, the time
setting will be lost. To set the time
again, follow the setting procedure.
To set the time, press the CLOCK
(FM) button until you hear a beep.
The displayed time begins to blink.
You can quickly set the time to the
nearest hour. If the displayed time is
bef ore the half hour, the clock is set
back to the previous hour by
pressing the CLOCK (FM) button
until you hear a beep, then pressing
the R (Preset 6) button. If the
displayed time is af ter the half hour,
the clock is set forward to the
beginning of the next hour.
Audio System
Comf ort and Convenience Feat ures163
CLOCK BUTTON H BUTTON M BUTTON R BUTTON
Page 175 of 374
You can also load a CD into an empty
position while a CD is playing by
pressing the appropriate preset
button. Select an empty position (the
disc number indicator is of f ), and
press the preset button f or that
position (1 to 6). The system will
stop playing the current CD and start
the loading sequence. It will then
play the CD just loaded. If you press the LOAD button while
a CD is playing, the system will stop
playing that CD and start the loading
sequence. It will then play the CD
just loaded.
CONT INUED
Audio System
Comf ort and Convenience Feat ures171
LOAD BUTTONDISC NUMBER
CD SLOT CD LOADED INDICATOR
AM
BUTTON
FM
BUTTON PRESET BUTTONS TAPE BUTTON
Page 176 of 374

�µ�µ
�µ
�Ó
�Ó
�Ó
�Ó
�´
�µ
�´
�µ
When that disc ends, the next disc in
the CD changer is loaded and played.
Af ter the last disc f inishes, the
system returns to disc 1.
To select a dif f erent disc, press the
appropriate Preset button (1 6). If
youselectanemptypositioninthe
CD changer, the system will go into
the loading sequence (see page ).
You can use the SKIP buttons while
a disc is playing to select passages
and change tracks. To activate the Repeat
f eature, press and release the RPT
button. You will see RPT in the
display as a reminder. The system
continuously replays the current
track. Press the RPT button again to
turn it off. Pressing either of the
SKIP buttons also turns off the
repeat feature.
This feature,
when activated, plays the tracks
within a CD in random order, rather
than in the order they are recorded
on the CD. To activate Random Play,
press the RDM button. You will see
RDM in the display. The system will
then select and play tracks randomly.
This continues until you deactivate
RandomPlaybypressingtheRDM
button again, or you select a
dif f erent CD with a preset button.
Each time you press the button
and release it, the system skips
f orward to the beginning of the next
track. Press and release the
buttontoskipbackwardtothe
beginning of the current track. Press
and release it again to skip to the
beginning of the previous track.
Select the CD changer by pressing
the CD button. You will see ‘‘CD’’ in
the display. The system will begin
playing the last selected disc in the
CD changer. You will see the disc
and track numbers displayed.
To move rapidly within a track, press
and hold the appropriate SKIP
button. Press the button to move
f orward. You will see CUE displayed.
To move backward, press the
button. You will see REW displayed.
Release the button when the system
reaches the point you want.
170
Operat ionREPEAT
RANDOM PLAY
Audio System
Comf ort and Convenience Feat ures172
Page 177 of 374
To take the system out of CD mode,
press the AM or FM button, or insert
a cassette in the player. If a tape is
already in the cassette player, press
the TAPE button. When you return
to CD mode by pressing the CD
button, play will continue at the same
point that it left off.
If you turn the system of f while a CD
is playing, either with the PWR/VOL
knob or the ignition switch, play will
continue at the same point when you
turn it back on.
CONT INUED
Audio System
Comf ort and Convenience Feat ures173
PWR/VOL KNOB RDM INDICATOR RPT INDICATORFM
BUTTONAM
BUTTONCD
BUTTON
RDM
BUTTON RPT BUTTON PRESET BUTTONS SKIP
BUTTONS
TAPE BUTTON
Page 178 of 374
If you do not remove the disc f rom
the slot, the system will reload the
disc af ter 15 seconds and put the CD
changer in pause mode. To begin
playing the disc, press the CD button.
To remove a different CD from the
changer,firstselectitwiththe
appropriate preset button. When that
CD begins playing, press the eject
button. To remove the disc that is currently
playing, press the Eject button. You
will see ‘‘EJEC’’ in the display. When
you remove the disc f rom the slot,
the system automatically begins the
Load sequence so you can load
another CD in that position. If you do
not load another CD, the system
goes back to the time display. If you
selected radio or tape mode bef ore
removing the disc, the system
selects the previous mode (AM, FM,
or Tape).
Removing CDs f rom t he Changer
Comf ort and Convenience Feat ures
Audio System
174
CD SLOTCD EJECT BUTTON
CD BUTTON
Page 182 of 374

You will have to store your favorite
stations in the Preset buttons after
the system begins working. Your
original settings were lost when
power was disconnected.
If your vehicle’s battery is discon-
nected or goes dead, or the radio
f use is removed, the audio system
will disable itself . If this happens,
youwillsee‘‘ ’’inthe
frequencydisplaythenexttimeyou
turn on the system. Use the Preset
buttons to enter the five-digit code. If
it is entered correctly, the radio will
start playing.
If you make a mistake entering the
code, do not start over or try to
correct your mistake. Complete the
f ive-digit sequence, then enter the
correct code. You have ten tries to
enter the correct code. If you are
unsuccessful in ten attempts, you
must then leave the system on for
one hour bef ore trying again.
Your vehicle’s audio system will
disable itself if it is disconnected
f rom electrical power f or any reason.
To make it work again, the user
must enter a specif ic f ive-digit code
in the Preset buttons. Because there
are hundreds of number
combinations possible f rom f ive
digits, making the system work
without knowing the exact code is
nearly impossible.
Youshouldhavereceivedacardthat
lists your audio system’s code
number and serial number. It is best
tostorethiscardinasafeplaceat
home. In addition, you should write
the audio system’s serial number in
this Owner’s Manual. If you should
happen to lose the card, you must
obtain the code number f rom your
Honda dealer. To do this, you will
need the system’s serial number. Thef t Protection
Audio System
Comf ort and Convenience Feat ures178


button until the hour advances to the
desired time.
Press and hold the M (Preset 5)
button until the minutes advance to
the desired time.
Press the CLOCK (FM) button ag")
, and
press the preset butto")

