Page 85 of 374
Push the button between the center
air vents to turn on the hazard
warning lights (f our-way f lashers).
This causes all f our outside turn
signals and both indicators in the
instrument panel to f lash. Use the
hazard warning lights if you need to
park in a dangerous area near heavy
traf f ic, or if your vehicle is disabled.The rear window def ogger will clear
fog, frost, and thin ice from the
window. Push the def ogger button to
turn it on and of f . The light in the
button lights to show the def ogger is
on.Make sure the rear window is clear
and you have good visibility bef ore
starting to drive.
Thedefoggerwiresontheinsideof
the rear window can be accidentally
damaged. When cleaning the glass,
always wipe side to side.
Controls Near the Steering Wheel
Inst rument s and Cont rols
Hazard Warning
Rear Window Def ogger
81
Page 101 of 374
�µ
See pages f or important saf ety
inf ormation and warnings about how toproperly position seats and seat-backs. 13 15
Make all seat adjustments bef ore
you start driving.
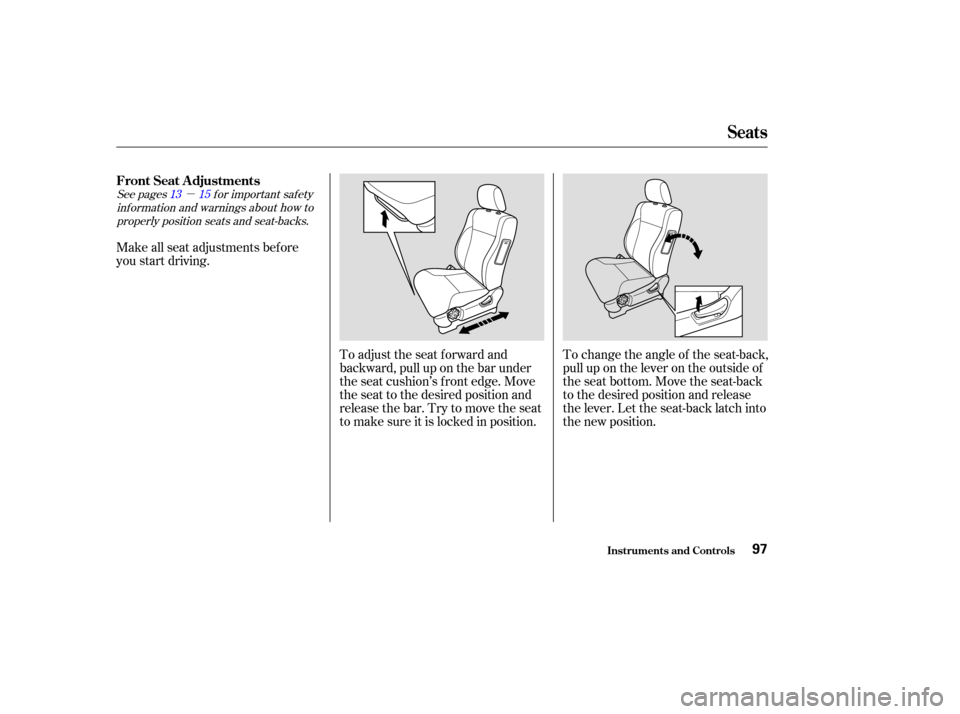
To change the angle of the seat-back,
pull up on the lever on the outside of
the seat bottom. Move the seat-back
to the desired position and release
the lever. Let the seat-back latch into
the new position.
To adjust the seat forward and
backward, pull up on the bar under
the seat cushion’s f ront edge. Move
the seat to the desired position and
releasethebar.Trytomovetheseat
to make sure it is locked in position.
FrontSeatAdjustments
Seats
Inst rument s and Cont rols97
Page 103 of 374

See page f or important saf etyinf ormation and a warning about how toproperly position the head restraints. 16
Your vehicle is equipped with head
restraints in all seating positions.
The head restraints help protect you
and your passengers f rom whiplash
and other injuries. They are most
ef f ective when you adjust them so
the back of the occupant’s head rests
against the center of the restraint. A
taller person should adjust the
restraint as high as possible.
The head restraints in the f ront and
rear outboard seating positions
adjust f or height. You need both
hands to adjust the restraint. Do not
attempt to adjust it while driving. To
raise it, pull upward. To lower the
restraint, push the release button
sideways and push the restraint
down.To remove a f ront head restraint or a
head restraint in one of the rear
outboard seating positions f or
cleaning or repair, pull it up as f ar as
it will go. Push the release button,
then pull the restraint out of the seat-
back.
To remove the rear center head
restraint, pull it up and out of the
seat-back.
Head Restraints
Seats
Inst rument s and Cont rols99
REAR CENTER
RELEASE BUTTON
Page 104 of 374
�µ
See pages f or important saf ety
inf ormation and warnings about how toproperly position seats and seat-backs. 13 15
Make all seat adjustments bef ore
you start driving.
The seat position and seat-back
angle of the lef t and right sides of
the rear seat can be adjusted
separately.
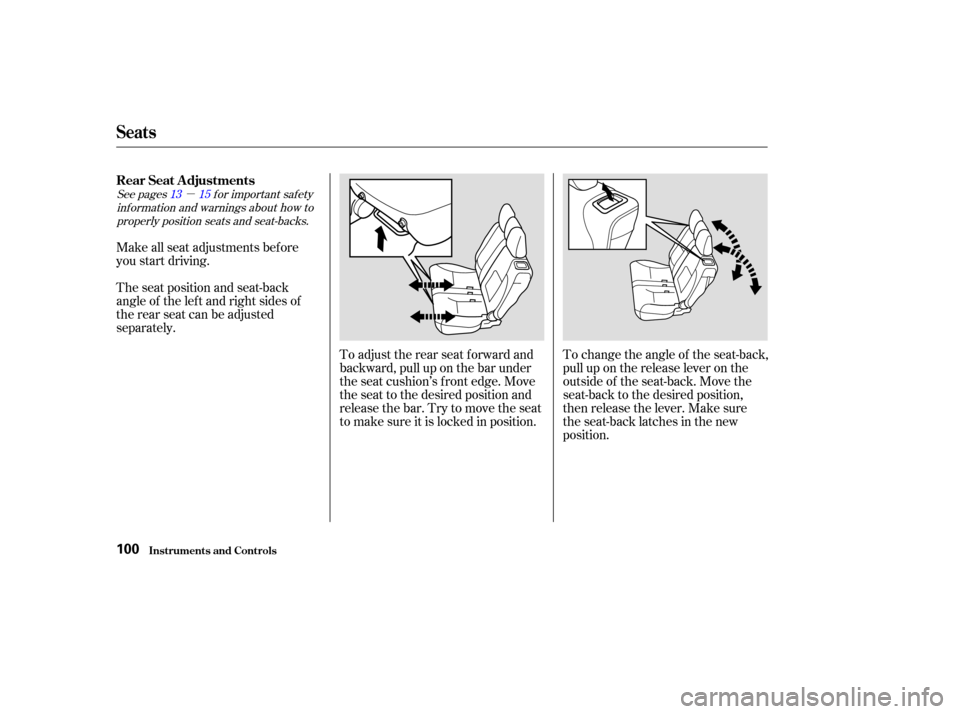
To adjust the rear seat f orward and
backward, pull up on the bar under
the seat cushion’s f ront edge. Move
the seat to the desired position and
releasethebar.Trytomovetheseat
to make sure it is locked in position.To change the angle of the seat-back,
pull up on the release lever on the
outside of the seat-back. Move the
seat-back to the desired position,
then release the lever. Make sure
the seat-back latches in the new
position.
Seats
Inst rument s and Cont rols
Rear Seat Adjustments
100
Page 220 of 374
�µCheck your tires
f requently f or wear and proper
pressure. Both are important in
preventing ‘‘hydroplaning’’ (loss of
traction on a wet surface). In the
winter, mount snow tires on all f our
wheels f or the best handling.
Watch road conditions caref ully,
they can change f rom moment to
moment. Wet leaves can be as slip-
pery as ice. ‘‘Clear’’ roads can have
patches of ice. Driving conditions
can be very hazardous when the
outside temperature is near f reezing.
The road surf ace can become
covered with areas of water puddles
mixed with areas of ice, so your
traction can change without warning.
Be caref ul when downshif ting. If
traction is low, you can lock up the
drive wheels f or a moment and cause
askid. Be very cautious when passing, or
beingpassedbyothervehicles.The
spray f rom large vehicles reduces
your visibility, and the wind buf f eting
can cause you to lose control.
Traction
Driving in Bad Weather
Driving216
Page 273 of 374
Check the battery terminals for
corrosion (a white or yellowish
powder). To remove it, cover the
terminals with a solution of baking
soda and water. It will bubble up and
turn brown. When this stops, wash it
of f with plain water. Dry of f the
battery with a cloth or paper towel.
Coat the terminals with grease to
help prevent f uture corrosion.
Check the battery condition by
looking at the test indicator window
on the battery. The label on the
battery explains the test indicator’s
colors.
Check the condition of your vehicle’s
battery monthly. You should check
the color of the test indicator window,
and f or corrosion on the terminals.
Battery posts,
terminals, and related accessories
contain lead and lead compounds.
CONT INUED
Battery
Maint enance
WARNING:
Wash hands af ter handling.
269
TEST INDICATOR WINDOW
Page 312 of 374
If you have a f lat tire while driving,
stop in a saf e place to change it.
Stopping in traf f ic or on the shoulder
of a busy road is dangerous. Drive
slowly along the shoulder until you
gettoanexitoranareatostopthat
is far away from the traffic lanes.Park the vehicle on f irm, level and
non-slippery ground away f rom
traffic. Put the transmission in
Park (automatic) or Reverse
(manual). Apply the parking brake.
Turn on the hazard warning lights,
and turn the ignition switch to
LOCK (0). Have all the
passengers get out of the vehicle
while you change the tire. If you are towing a trailer, unhitch
the trailer.Open the tailgate.
1.
2. 3.
T aking Care of t he Unexpect ed
Changing a Flat T ire
308
JACK SPARE TIRE
The vehicle can easily roll off
the jack, seriously injuring
anyone underneath.
Follow the directions for
changing a tire exactly, and
never get under the vehicle
when it is supported only by the
jack.
Page 323 of 374

If the headlights dim noticeably or
go out when you try to start the
engine, either the battery is dis-
charged or the connections are
corroded. Check the condition of the
battery and terminal connections
(see page ). You can then try
jump starting the vehicle from a
booster battery (see page ).In this case, the starter motor’s
speed sounds normal, or even f aster
than normal, when you turn the
ignition switch to START (III), but
the engine does not run.
Are you using the proper starting
procedure? Ref er to on page . There may be an electrical
problem, such as no power to the
f uel pump. Check all the f uses
(see page ).
If youfindnothingwrong,youwill
need a qualif ied technician to f ind
the problem. See on page .
Your vehicle has the Immobilizer
System. You should use a
properly-coded master or valet key
to start the engine (see page ).
A key that is not properly coded
will cause the immobilizer system
indicator in the dash panel to blink
rapidly. Do you have f uel? Turn the
ignition switch to ON (II) for a
minute and watch the f uel gauge.
The low f uel level warning light
may not be working, so you were
not reminded to f ill the tank.
269
320
200 331
337
85
T he Starter Operates Normally
Starting the
Engine Emergency
Towing
If Your Engine Won’t Start
T aking Care of t he Unexpect ed319
.
This causes all f our outside turn
signals and both indicators in the
instrument panel to f las")

. To remove it, cover the
terminals with a solution of baking
soda and water. It will bubble up and
turn brown. When this stops,")
