2003 HONDA CIVIC bumper
[x] Cancel search: bumperPage 11 of 1139

Towing
lf the vehicle needs to be towed, call a professional
towing service. Never tow the vehicle behind another
vehicle with just a rope or chain. lt is very dangerous.
Emergency Towing
There are three popular methods of towing a vehicle.
Flat-bed Equipment The operator loads the vehicle
on the back of a truck. This is the best way of
transporting the vehicle.
To accommodate flat-bed equipment. the vehicle is
equipped with towing hooks (A)and tie down hooks {B).
The towing hook can be used with a winch to pull the
vehicle onto the truck, and the tie down hooks slots can
be used to secure the vehicle to truck.
1-9
Wheel Lift Equipment The tow truck uses two
pivoting arms that go under the tires (front or rear) and
lifts them off the ground. The other two wheels remain
on the ground. This is an acceptable way of towing the
vehicle.
Sling-type Equipment The tow truck uses metal
cables with hooks on the ends. These hooks go around
parts of the frame or suspension and the cables lift that
end of the vehicle off the ground. The vehicle's
suspension and body can be seriously damaged if this
method of towing is attemPted.
lf the vehicle cannot be transported by flat-bed, it
should be towed with the front wheels off the ground lf
due to damage, the vehicle must be towed with the
front wheels on the ground, do the following:
. Release the parking brake.. shift the transmission in Neutral.
It is best to tow the vehicle no farther than 50 miles (80
km), and keep the speed below 35 mph (55 km/h).
. lmproper towing preparation will damage the
transmission. Follow the above procedure exactly. lf
you cannot shift the transmission, the vehicle must
be transDorted on a flat-bed.. Trying to lift or tow the vehicle by the bumpers will
cause serious damage, The bumpers are not
designed to support the vehicle's weight.
Page 64 of 1139

l\-Alternator Replacement
1. Make sure you have the anti-theft code for the radio,
then write down the frequencies for the radio'spreset buttons,
2. Disconnect the negative cable from the battery first,
then disconnect the positive cable.
3. Remove the front bumper (see page 20-85).
4. Remove the right side headlight (see page 22-79).
5. Remove the reserve tank from the bracket.
6. Remove the drive belt (see page 4-26).
7. Remove the three bolts securing the alternator.
8 x 1.25 mm22 N.n 12.2 kgl.m,
Disconnect the alternator connector (A) and BLK
wire (B) from the alternator.
8 N.m10.8 kgf.m,6lbf.ft)
\
6
'I 1.
9.
10.
13.
14.
Remove the alternator.
Installthe alternator and drive belt in the reverse
order of removal.
Connect the positive cable and negative cable to
the battery.
Enter the anti-theft code for the radio, then enter
the customer's radio station presets.
Set the clock.
Perform the engine control module {ECM) idle learn
procedure (see page 11-139).
tt.
4-29
Page 200 of 1139

Cooling System
Radiator and Fans Replacement
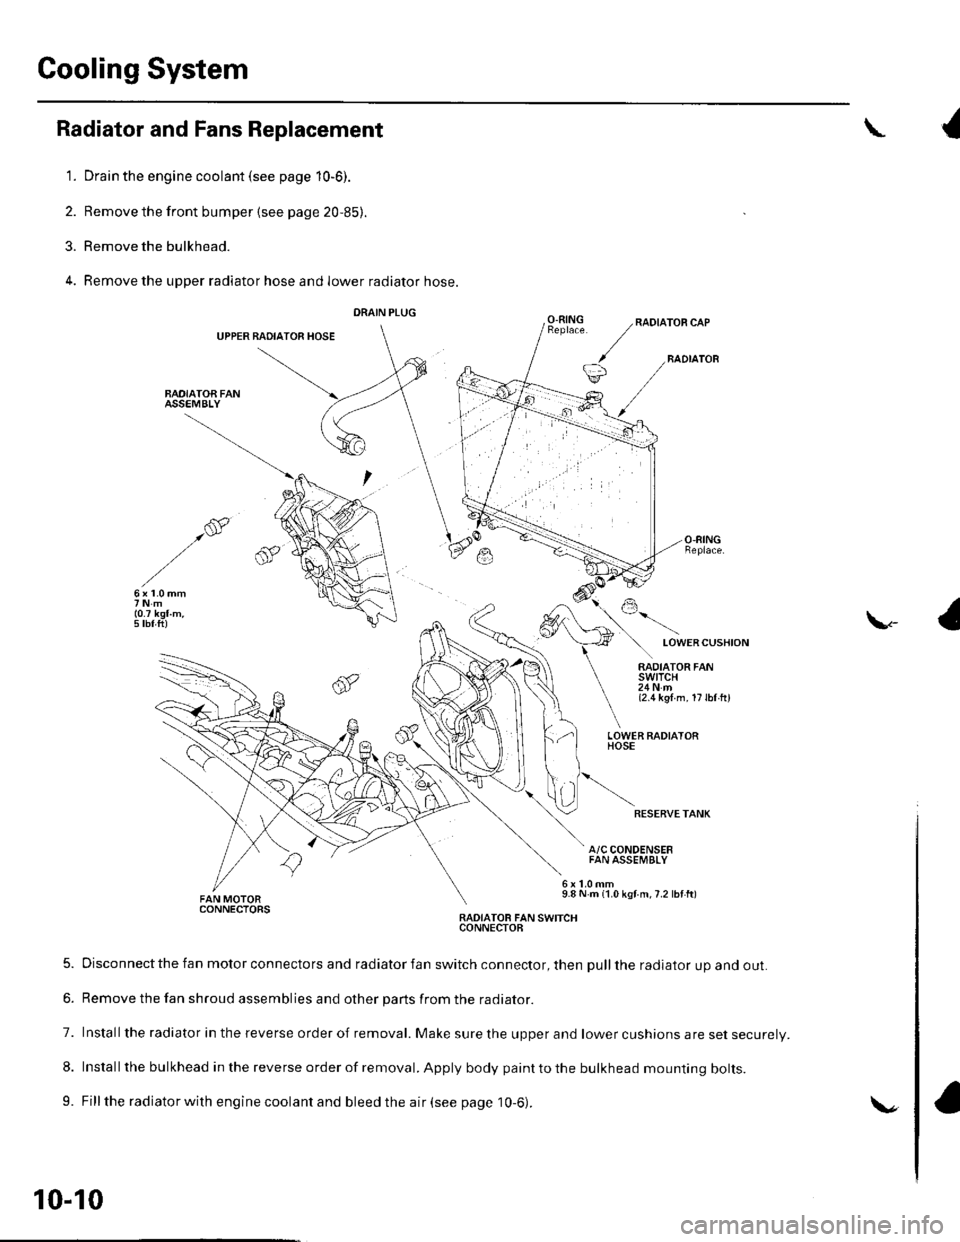
1. Drain the engine coolant (see page 10-6).
2. Remove the front bumper {see page 20,85).
3. Remove the bulkhead.
4. Remove the upper radiator hose and lower radiator hose.
DRAIN PLUG
UPPER BADIATOR HOSE
BAOIATOA FANASSEMBLY
{
O.RINGRADIATOR CAP
BADIATOB
LOWERCUSHION
\-
RADIATOR FANswtTcH24Nm{2.1t kgl m. 17lbl hl
LOWER FADIATORHOSE
RESERVETANK
A/C CONDENSERFAN ASSEMBLY
9.8 N m {1.0 kgf m,7.2 lbf ft)CONNECTORSRADIATOB FAN SWITCHCONNECTOB
5. Disconnect the fan motor connectors and radiator fan switch connector, then pull the radiator up and out.
6. Remove the fan shroud assemblies and other parts from the radiator.
7. Installthe radiator in the reverse order of removal. Make sure the upper and lower cushions are set securelV.
8. Install the bulkhead in the reverse order of removal. Apply body paint to the bulkhead mounting bolts.
9. Fill the radiator with engine coolant and bleed the air (see page 10-6).
10-10
\.
Page 654 of 1139

Body
DoorsComponent Location Index ...........Door Panel Removal/lnstallation .....,..........Door Outer Handle ReplacementDoor Latch ReplacementDoor Glass and RegulatorReplacementDoor Sash Trim Replacement .......................
Door Glass Outer WeatherstripReplacement
Door Weatherstrip Beplacement
Door Glass Adjustment .................................Door Position Adjustment .............................Door Striker Adiustment ................................MirrorsComponent Location Index ...........................Power Mirror Replacement ...........................Mirror Holder Replacement ...........................Rearview Mirror Rep1acement ......................
GlassComponent Location Index ...........................Windshield Replacement
Bear Window Rep1acement ...........................
Ouarter Glass Replacement ..........................MoonroofComponent Location Index ...........................Symptom Troubleshooting Index
Glass Height Adjustment ...............................
Glass ReplacementWind Def lector 8ep1acement ........................Drain Channel Rep1acement ..........................Sunshade Replacement .................................Motor ReplacementFrame and Drain Tube Replacement ............Drain Channel Slider and Cable AssemblyReplacementLimit Switch Adjustment ...............................Closino Force and ODenina Draq Check ......lnterioi TrimComponent Location Index ...........................Trim Removal/lnstallation DoorArea ..........Trim Removal/lnstallation-Rear Side AreaTrim Removal/lnstallation-Cargo Floor AreaTrim Removal/lnstallation-Hatch Area .........Headliner Removal/lnstallation* Carpet Rep1acement .......................................ConsolesConsoles, Front and RearRemova l/lnsta llationFront Console Disassembly/Reassembly .....
20-220,420-620-7
20-920 t0
20- 10
20-1120-1120-1220 13
20-1420-1520-1520-16
20 1120-1920-2520-29
20,3520-3620-3720-3120-3820 3920-4020-4120,42
20 4420-4620,44
20-4920 50
20-51
DashboardInstrument Panel Removal/lnstallation ........Driver's Dashboard Lower CoverRemovat InstallationDriver's Dashboard Under CoverRemova t Insta llation
Oriver's Pocket Removal/lnstallation ............Shift Lever Trim Removal/lnstallation ..........Center Panel Removal/lnstallation ...............Passenger's Dashboard Lower CoverRemova l/lnsta llat ionx Glove Box Removal/lnstallationDashboard Side VentRemoval/lnstallation .................................. 20-64Beverage Holder Removal/lnstallation ........ 20-64Driver'sTray Removal/lnstallation ............... 20-65Passenger's Tray Removal/lnstallation ........ 20 65* Dashboard Removal/lnstallation .................. 20-66Steerinq Hanqer Beam Reolacement ........... 20-68Seats "
Component Location Index ........................... 20-10* Front Seat Removal/lnstallation ................... 20-11* Front Seat Disassembly/Reassembly-Driver's .................................. 20-73* Front Seat Disassembly/Reassembly-Passenger's ........................... 20-74* Front Seat Cover Replacement ..................... 2O-75Rear Seat Removal/1nsta11ation ..................... 20-80Rear Seat-back Latch Replacement .............. 20-81Rear Seat-backStriker Replacement ............ 20-81
20-59
20-59
Rear Seat-back Cover Replacement ............. 20-82Rear Seat Cushion Cover Replacement ....... 20.84BumpersFront Bumper Removal/lnstallation .............Rear Bumoer Removal/lnstallation ...............HoodAdjustmentHood Seal ReplacementHood Insulator Rep1acement .........................Hatch
20-6020,6020 6120-62
20-63
20-63
20,8520-86
20-4720,8820,89
20-5220-5320-5420-55
20-5720-58
Adjustment ................... 20-90Hatch Suppon Strut Replacement ................ 20-91Hatch WeatherstriD Reo1acement ................. 20-92
Fuel Fill DoorAdiustment ................... 20-93Exterior TrimFront Grille Replacement ..............Cowl Covers Replac"rn""t .. . .....................A pillar Corner Trim Replacement ................Roof lMolding Replacement ...........................Rear License Trim ReplacementHatch Spoiler 8ep1acement ...........................Emblem Rep1acement .........................
20-9420-9520-9620-9720,9820-9920-100
Page 739 of 1139

Bumpers
Front Bumper RemovaUlnstallation
NOTE:. Have an assistant help you when removing and installing the front bumper.. Take care not to scratch the front bumper and body.. Put on gloves to protect your hands.
'L Remove the front bumper as shown.
2. Installthe bumper in the reverse order of removal, and note these items:
. Make sure both front side marker light connectors are plugged in properly.
. Make sure the front bumper engages the hooks of the side spacers and upper beams on both sides securely.
. Replace any damaged clips.
Fastener Locations
A),Screw, 2
{D[]
>:Bolt.4 D>:Clip,7 E >:Clip,2
f'h-64k/- *S =$t
B >: Screw,2 C
ABSORBER
SIDE SPACER
UPPER BEAM
LEFT FRONT SIDE MARKERLIGHT CONNECTOR
BUMPER
FRONT INNERFENDER
FEONT BUMPER
AEClI
6x9.8
FRONT AIR SPOILER
AIR SPOILERPLATE1.0 mmN.m (1.0 kgt.m,7.2 lbf.ft)
'*D ;e3
e
ti-\
SPOILER
PLATE
20-85
Page 740 of 1139

Bumpers
Rear Bumper RemovaUlnstallation
NOTE:' Have an assistant help you when removing and installing the rear bumper.. Take care not to scratch the rear bumper and body.. When prying with a flat-tip screwdriver, wrap it with protective tape to prevent damage.. Put on gloves to protect your hands.
L Remove the rear bumDer as shown.
2. Installthe bumper in the reverse order of removal, and note these items:
. Make sure both rear side marker light connectors are plugged in properly.'Makesuretherearbumperengagesthehooksofthesidespacers,sidebrackets,andupperbracketsonboth
sides securely.. Make sure the upper spacers of the rear bumper engage the clips on the body securely.. Replace any damaged clips.
: Screw, 2
XJ
) : Clip,
?ri)
\sI
Fastener Locations
A>:Bolt,2 B
/h-
\-P-
) : Screw, 2
ffiI"-ut ^*
c>
SIDE BRACKET
UPPER SPACER
UPPER BRACKET
\
SIDE SPACER
:r
'-
A
AD
LEFT REAR SIDE MARKERLIGHT CONNECTOR
,6 x 1.0 mm/ 9.eN.n,/ 11.0 kgl m,./ 1.2tbt.ttl
a
\
CAP
REAR BUMPER
20-86
Page 748 of 1139

Exterior Trim
2.
Front Grille Replacement
1.
3.
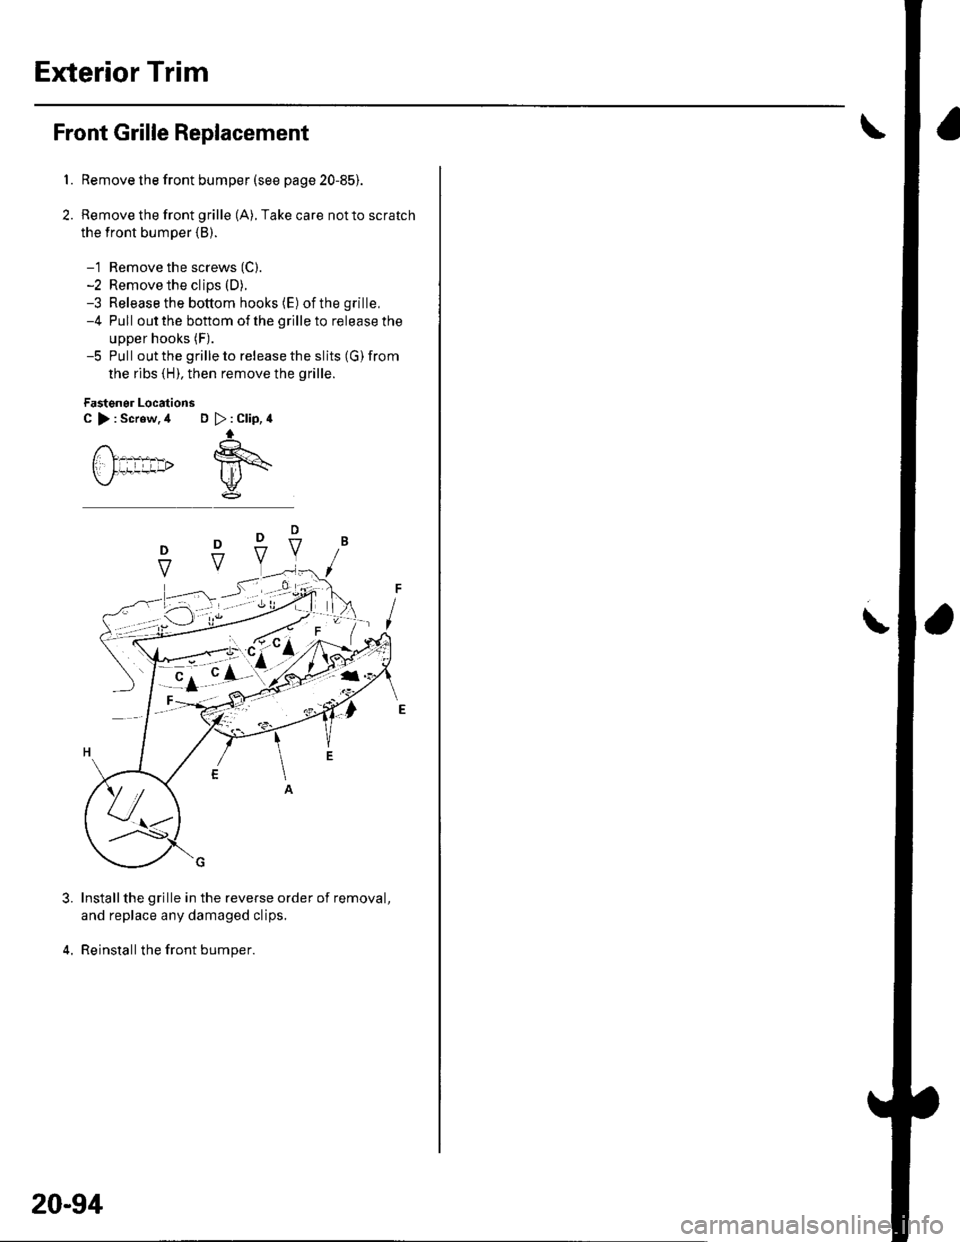
Remove the front bumper (see page 20-85).
Remove the front grille (A), Take care not to scratch
the front bumper (B).
-1 Remove the screws (C).
-2 Remove the clips (D).
-3 Release the bottom hooks (E) ofthe grille,-4 Pull out the boftom of the grille to release the
upper hooks (F).
-5 Pull out the grille to release the slits (G)from
the ribs {H), then remove the grille.
FastqnEr Locations
C >:Screw.4 D
Installthe grille in the reverse order of removal,
and replace any damaged clips.
Reinstall the front bumper.
) : Clip, 4ll
-S---:
i")
F
20-94
\
Page 754 of 1139

Exterior Trim
Emblem Replacement
NOTE: When removing the emblem, take care not to scratch the body.
1. To remove the front "H" emblem and front type emblem, remove the front bumper (see page 20-85)
2. Clean the bonding surface with a sponge dampened in alcohol. After cleaning, keep oil, grease, and water from
getting on the surface.
3. Apply the emblem, where shown.
. When installing the side i-VTEC emblem on the body, align the application tape with the edge of the wheel arch,
then press the emblem into place, and remove the application tape.. '03 model: When installing the LEV emblem on the quarter glass, align the application tape with the edge of the
black ceramic and alignment mark on the quarter glass, then press the emblem into place, and remove the
application tape.
FRONT TYPE EMBLEM
FBONT "H" EMBLEM
FRONT "H" EMBLEM BASEFBONT GRILLE
PUSH NUTS
i
SCREWS
FRONT Si EMBLEM PLATE
PINS
20-100
FRONT GRILLEFRONT GRILLE