Page 6 of 317
Your Car at a Glance
3
HEADLIGHTS/TURN SIGNALS
(P.75, 78)
CRUISE CONTROL
MASTER SWITCH
(P. 139)
REAR WINDOW
DEFOGGER
(P. 81)
MIRROR CONTROLS
(P. 99) (P.82)
TILT ADJUSTMENT
(P.140 )
CRUISE CONTROL SWITCHES (P.
111)
ECON BUTTON
(P.
80)
HAZARD WARNING LIGHTS
(P. 78, 80)
WINDSHIELD WIPERS/WASHERS
Page 60 of 317

This section gives inf ormation about
the controls and displays that
contribute to the daily operation of
your Honda. All the essential
controls are within easy reach............................
Control Locations .58 ...............................
Indicator Lights .59
.............................................
Gauges .67
...............................
Speedometer .69
.................................
Tachometer .69
...............
Odometer/Trip Meter . 69
.................
Current Fuel Mileage . 70
................................
Trip Mileage .70
Turning Of f the Mileage .....................................
Display .71
..................................
Fuel Gauge .71
...................
Temperature Gauge . 71
..................
Battery Level Gauge . 72
................
Charge/Assist Gauge . 73
Controls Near the Steering .......................................
Wheel .74
...................................
Headlights .75
............
Daytime Running Lights . 76
....
Instrument Panel Brightness . 77
................................
Turn Signals .78
.....................
Windshield Wipers .78
..................
Windshield Washers . 80
..........................
Hazard Warning .80
.............
Rear Window Def ogger . 81
......
Steering Wheel Adjustment . 82
...............................
Keys and Locks .83
..............................................
Keys .83 ....................
Immobilizer System . 84
............................
Ignition Switch .86
......................
Power Door Locks .87
...................
Remote Transmitter . 89
..............
Childproof Door Locks . 92
...........................................
Trunk .92
........
Emergency Trunk Opener . 93
............................
Seat Adjustments .94
.............
Front Seat Adjustments . 94
................
Driver’s Seat Armrest . 95
..........................
Head Restraints .96
..............................
Power Windows .97
.............................................
Mirrors .99
....
Adjusting the Power Mirrors . 99
...............................
Parking Brake .100
......................................
Glove Box .101
...........................
Beverage Holder .102
.................
Console Compartment . 102
........................................
Coin Box .103
...............................
Center Pocket .103
.............
Accessory Power Socket . 103
...............................
Interior Lights .104
..............................
Ceiling Light .104
...................................
Spotlights .104
................
Ignition Switch Light . 105
Instruments and Controls
Inst rument s and Cont rols57
Page 61 of 317
Control L ocations
Inst rument s and Cont rols58
CRUISE CONTROL
(P.139)
POWER DOOR LOCK
SWITCH
(P. 87)
REAR WINDOW
DEFOGGER (P. 81)
POWER WINDOW
SWITCHES
(P. 97)
FUEL FILL DOOR RELEASE
(P.145)
TRUNK RELEASE
(P. 92) (P.
146)
HOOD RELEASE
HANDLE
(P.
140)
CRUISE CONTROL (P.
123 )
DIGITAL CLOCK (P.
118 )
AUDIO SYSTEM
MIRROR
CONTROLS
HEATING/COOLING CONTROLS
(P. 108)
(P. 99)
Page 77 of 317
�Î�Î
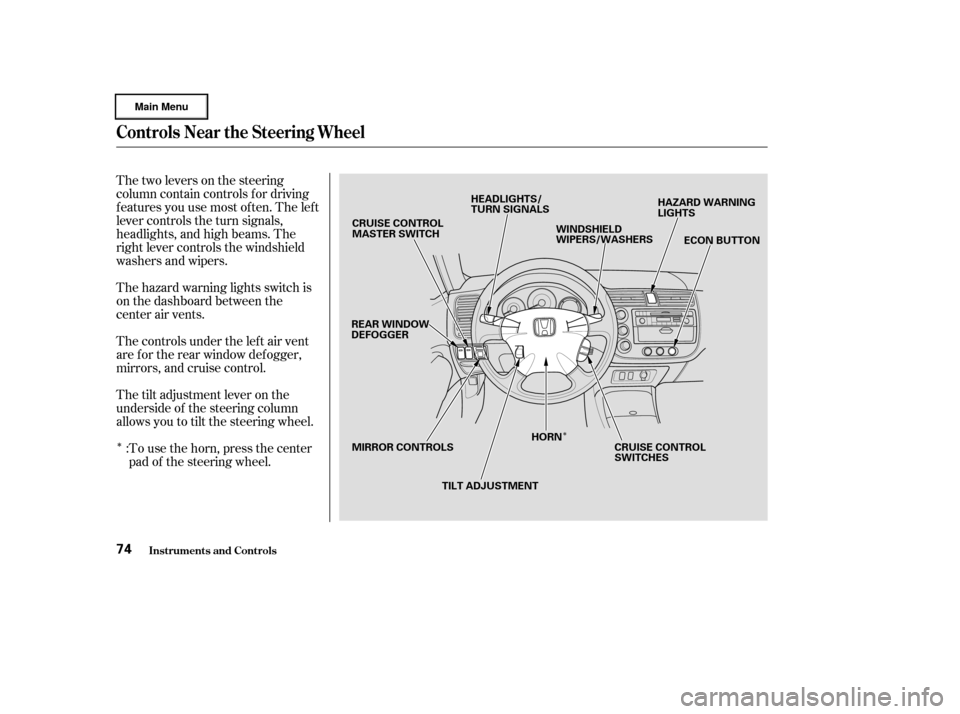
Thetwoleversonthesteering
column contain controls f or driving
f eatures you use most of ten. The lef t
lever controls the turn signals,
headlights, and high beams. The
right lever controls the windshield
washers and wipers.
The hazard warning lights switch is
on the dashboard between the
center air vents.
The controls under the lef t air vent
are f or the rear window def ogger,
mirrors, and cruise control.
The tilt adjustment lever on the
underside of the steering column
allows you to tilt the steering wheel.To use the horn, press the center
pad of the steering wheel.
:
Controls Near the Steering Wheel
Inst rument s and Cont rols74
CRUISE CONTROL
MASTER SWITCH
REAR WINDOW
DEFOGGER
MIRROR CONTROLS TILT ADJUSTMENTHORN
CRUISE CONTROL
SWITCHESECON BUTTON
HAZARD WARNING
LIGHTS
WINDSHIELD
WIPERS/WASHERS
HEADLIGHTS/
TURN SIGNALS
Page 102 of 317
Push the appropriate edge of the
adjustment switch to move the
mirrorright,left,up,ordown.
When you f inish, move the
selector switch to the center (off)
position. This turns of f the
adjustment switch so you can’t
move a mirror out of position by
accidentally bumping the switch.
Keeptheinsideandoutsidemirrors
clean and adjusted f or best visibility.
Be sure to adjust the mirrors bef ore
you start driving.
The inside mirror has day and night
positions. The night position reduces
glare f rom headlights behind you.
Flip the tab on the bottom edge of
the mirror to select the day or night
position.
Adjust the outside mirrors with the
adjustment switch on the lef t side of
the dashboard:
Turn the ignition switch ON (II).
Move the selector switch to L
(driver’s side) or R (passenger’s
side). 3.
4.
1.
2.
CONT INUED
Adjusting the Power Mirrors
Mirrors
Inst rument s and Cont rols99
SELECTOR SWITCH
ADJUSTMENT SWITCH
TAB
Page 103 of 317
To apply the parking brake, pull the
lever up f ully. To release it, pull up
slightly, push the button, and lower
the lever. The parking brake light on
the instrument panel should go out
when the parking brake is f ully
released (see page ).
The outside mirrors are heated to re-
move fog and frost. With the ignition
switchON(II),turnontheheaters
by pressing the button. The light in
the button comes on as a reminder.
Press the button again to turn the
heaters off.
62On Canadian model
Parking Brake
Mirrors, Parking Brake
Inst rument s and Cont rols100
PARKING BRAKE LEVER
Driving the car with the parking brake
applied can damage the rear brakes
and axles.
Page 163 of 317

Make sure all windows, mirrors,
and outside lights are clean and
unobstructed. Remove f rost, snow,
or ice.
Check that the hood and trunk are
f ully closed.Make sure the doors are securely
closed and locked. Check that any items you may be
carrying with you inside are stored
properly or f astened down
securely.
Visually check the tires. If a tire
looks low, use a gauge to check its
pressure. Check the adjustment of the seat
(see page ).
Check the adjustment of the
inside and outside mirrors (see
page ).
Check the adjustment of the
steering wheel (see page ).Turn the ignition switch ON (II).
Check the indicator lights in the
instrument panel.
Start the engine (see page ).
Check the gauges and indicator
lights in the instrument panel (see
page ). Fasten your seat belt. Check that
your passengers have f astened
their seat belts (see page ).
Youshoulddothefollowingchecks
and adjustments every day bef ore
you drive your car.
1.
2.
3. 4.
9.
10.
8. 7. 6. 5. 11.
12. 16
59
94
99 82 161
Preparing to Drive
Driving160
Page 284 of 317
�µ�µ
�Î �Î
�Î
�Î
�Î
No. Amps. No.
Circuits Protected Amps. Circuits Protected
1
2
3
4
5
15 A
20 A
(10 A) 10 A 6
7
8
9
10
11
12
13
14
15
16
17
18
19
20
21
22
23
24
25
26
Ignition Coil IN
LAF Heater
(Daytime running lights )
FI-ECU
Not Used 7.5 A
7.5 A
15 A
7.5 A
7.5 A
(7.5 A) 10 A
10 A
(10 A) 7.5 A 15 A
15 A
7.5 A 20 A
7.5 A 20 A
20 A
20 A
20 A
7.5 A Power Window Relay
Not Used
Accessory, Radio
Ignition Coil EX
Meter
ABS
(Daytime running lights )
SRS
Remote Control Mirrors
(SCTY )
IMA
Fuel Pump
Accessory Power Socket
Turn Signal Lights
Front Wiper
STS (Steering Switch)
Front Right Power Window
Front Left Power Window
Rear Lef t Power Window
Rear Right Power Window
Cooling Fan Relay
1 : On Canadian models
2 : Optional Security System
1
2
Fuses
T aking Care of t he Unexpect ed281
INTERIOR FUSE BOX

CRUISE CONTROL
MASTER SWITCH
(P. 139)
REAR WINDOW
DEFOGGER
(P. 81)
MIRROR CONTROLS
(P. 99) (P.82)
TILT ADJUSTMENT
(P.140 )
CRUISE CONTROL SWIT")

POWER DOOR LOCK
SWITCH
(P. 87)
REAR WINDOW
DEFOGGER (P. 81)
POWER WINDOW
SWITCHES
(P. 97)
FUEL FILL DOOR RELEASE
(P.145)
TRUNK R")

position. This turns of f the
adjustment switc")

