Page 235 of 302

If you are changing the bulb on
the driver’s side, start the engine,
turn the steering wheel all the way
to the right, and turn off the
engine. If you are changing the
bulb on the passenger’s side, turn
the steering wheel to the left.
Reinstall the power steering
reservoir.
(Driver’s side)
Push the electrical connector onto
the tabs of the new bulb. Make
sure it locks in place.
Turn on the headlights to test the
new bulb.
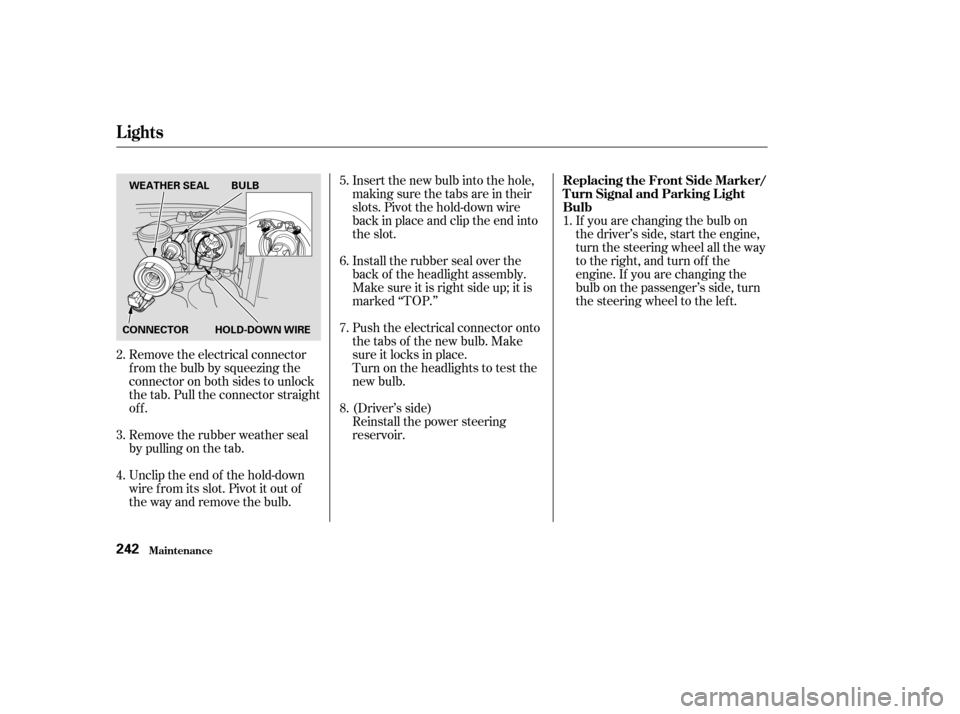
Insert the new bulb into the hole,
making sure the tabs are in their
slots. Pivot the hold-down wire
back in place and clip the end into
the slot.
Install the rubber seal over the
back of the headlight assembly.
Make sure it is right side up; it is
marked ‘‘TOP.’’
Unclip the end of the hold-down
wire f rom its slot. Pivot it out of
the way and remove the bulb.
Remove the rubber weather seal
by pulling on the tab.
Remove the electrical connector
f rom the bulb by squeezing the
connector on both sides to unlock
the tab. Pull the connector straight
off.
3. 4. 5. 6. 7. 8.
1.
2. Replacing the Front Side Marker/
Turn Signal and Parking L ightBulb
Lights
Maint enance242
WEATHER SEAL BULB
CONNECTOR HOLD-DOWN WIRE
�����—�����—�����y�
�������������y���
�(���%�������y���������y
Page 236 of 302
Use a f lat-tipped screwdriver to
remove the holding clip f rom the
inner f ender.
Pull the inner f ender cover back.Remove the socket from the
headlight assembly by turning it
one-quarter turn counterclockwise.
Pull the bulb straight out of its
socket.
Push the new bulb straight into
the socket until it bottoms.Insert the socket back into the
headlight assembly. Turn it
clockwise to lock it in place.
Testthelightstomakesurethe
new bulb is working.
Put the inner f ender cover in place.
Install the holding clip. Lock it in
place by pushing on the center.
3.
2.
4. 5.6.7. 8.
Lights
Maint enance243
HOLDING CLIP
BULBS
SOCKETS
�����—�����—�����y�
�������������y���
�(���%�������y���������y
Page 237 of 302
Open the trunk. Determine which of the two bulbsis burned out: stop/taillight/side
marker light or turn signal light.Pull the bulb straight out of its
socket.
Push the new bulb straight into
the socket until it bottoms.
Reinstall the socket into the light
assembly by turning it clockwise
until it locks.
Testthelightstomakesurethe
new bulb is working.
Remove the socket by turning it
one-quarter turn counterclockwise. Reinstall the trunk lining. Make
sure it is installed under the edge
of the trunk seal.
Remove the screw in the center of
the fastener on the side of the
trunk lining. Pull the lining back. Put the f astener into the hole on
the side of the trunk lining.
Reinstall the screw.
1.
2. 3.4. 5. 6. 7. 8.
Replacing Rear Bulbs
(in Fenders)
Lights
Maint enance244
FASTENER
�����—�����—�����y�
�������������y���
�(���%�������y���������y
Page 238 of 302
Remove the socket f rom the light
assembly by squeezing the tabs on
both sides of the socket.
Pull the bulb straight out of its
socket. Push the new bulb in until
it bottoms in the socket.
Reinstall the socket. Turn it
clockwise until it locks. Make sure
the new bulb is working.
Open the trunk and remove the
socket f rom the light assembly by
turning it one-quarter turn counter-
clockwise.
Push the new bulb straight into
the socket until it bottoms.
Pull the bulb straight out of its
socket.
2.
1.
3.
2.
1.
CONT INUED
Replacing a Rear L icense PlateBulb
Replacing a High-mount Brake
Light Bulb
Lights
Maint enance245
SOCKET
BULB
BULB
SOCKET
�����—�����—�����y�
������
��
�
�y���
�(���%�������y���������y
Page 239 of 302
Put the light assembly back into
the hole, right side f irst. Push on
the lef t side until it snaps into
place.
Pull the bulb straight out of the
holder. Push the new bulb straight
into the holder until it bottoms.
Remove the trunk light assembly
by using a small f lat-tipped
screwdriver to pry caref ully on the
lef t edge of the assembly.
Turn on the parking lights and
check that the new bulb is
working.
Reinstall the socket back in place
by pushing it in until it latches.
2. 3.
1.
3.4.
Replacing the T runk L ight Bulb
Lights
Maint enance246
BULB
�����—�����—�����y�
������
������y���
�(���%�������y���������y
Page 240 of 302
Removethelensbycarefully
prying on the edge of the lens in
the middle with a f ingernail f ile or
a small f lat-tip screwdriver. Do not
pry on the edge of the housing
around the lens.
Although the ceiling light and
spotlights come apart the same way,
theydonotusethesametypeofbulbs.
Remove the bulb by pulling it
straight out of its metal tabs.
Push the new bulb into the metal
tabs. Snap the lens back in place.
Spotlights:
Pry on the edge between the lenses.
2. 3.
1.
On LX models
Replacing Bulbs in the Interior
Lights
Lights
Maint enance247
CEILING LIGHT FRONT CEILING LIGHT
U.S.: EX, Canada: Si LXSPOTLIGHTS
BULB SOCKETS SOCKETS
BULBS
BULBS
�����—�����—�����y�
������
������y���
�(���%�������y���������y
Page 250 of 302

If you have a f lat tire while driving,
stop in a saf e place to change it.
Stopping in traf f ic or on the shoulder
of a busy road is dangerous. Drive
slowly along the shoulder until you
gettoanexitoranareatostopthat
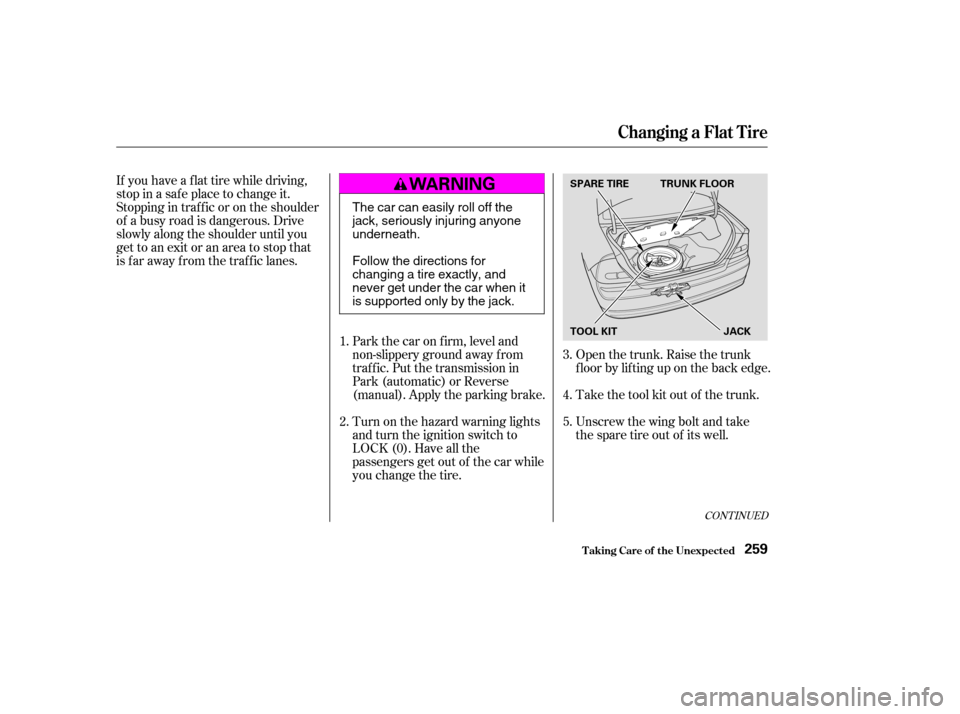
is far away from the traffic lanes.Open the trunk. Raise the trunk
f loor by lif ting up on the back edge.
Take the tool kit out of the trunk.
Unscrew the wing bolt and take
the spare tire out of its well.
Park the car on f irm, level and
non-slippery ground away f rom
traffic. Put the transmission in
Park (automatic) or Reverse
(manual). Apply the parking brake.
Turn on the hazard warning lights
and turn the ignition switch to
LOCK (0). Have all the
passengers get out of the car while
you change the tire.
5.
4.
3.
2.
1.
CONT INUED
Changing a Flat T ire
T aking Care of t he Unexpect ed259
SPARE TIRE TRUNK FLOOR
TOOL KIT JACK
The car can easily roll off the
jack, seriously injuring anyoneunderneath.
Follow the directions for
changing a tire exactly, and
never get under the car when it
is supported only by the jack.
�����—�����—�����y�
�������������y���
�(���%�������y���������y
Page 256 of 302

Diagnosing why your engine won’t
start f alls into two areas, depending
on what you hear when you turn the
key to START (III):When you turn the ignition switch to
START (III), you do not hear the
normal noise of the engine trying to
start. You may hear a clicking sound
or series of clicks, or nothing at all.
Check these things:
You hear nothing, or almost
nothing. The engine’s starter
motor does not operate at all, or
operates very slowly.
You can hear the starter motor
operating normally, or the starter
motor sounds like it is spinning
f aster than normal, but the engine
does not start up and run. Check the transmission interlock.
If you have a manual transmission,
the clutch pedal must be pushed
all the way to the f loor or the
starter will not operate. With an
automatic transmission, it must be
in Park or Neutral.
Turn the ignition switch to ON (II).
Turn on the headlights and check
their brightness. If the headlights
are very dim or don’t light at all,
the battery is discharged. See
on page . Turn the ignition switch to START
(III). If the headlights do not dim,
check the condition of the f uses. If
the f uses are OK, there is proba-
bly something wrong with the
electrical circuit f or the ignition
switch or starter motor. You will
need a qualif ied technician to
determine the problem. (See
on page .)
If the headlights dim noticeably or
go out when you try to start the
engine, either the battery is dis-
charged or the connections are
corroded. Check the condition of
the battery and terminal connec-
tions (see page ). You can
then try jump starting the car from
a booster battery (see page ).
267 283
224 267
Nothing Happens or the Starter
Motor Operates Very Slowly
Jump Starting Emergency T owing
If Your Engine Won’t Start
T aking Care of t he Unexpect ed265
�����—�����—�����y�
���������
���y���
�(���%�������y���������y