Page 203 of 302

�µ
�´ �´ �µ
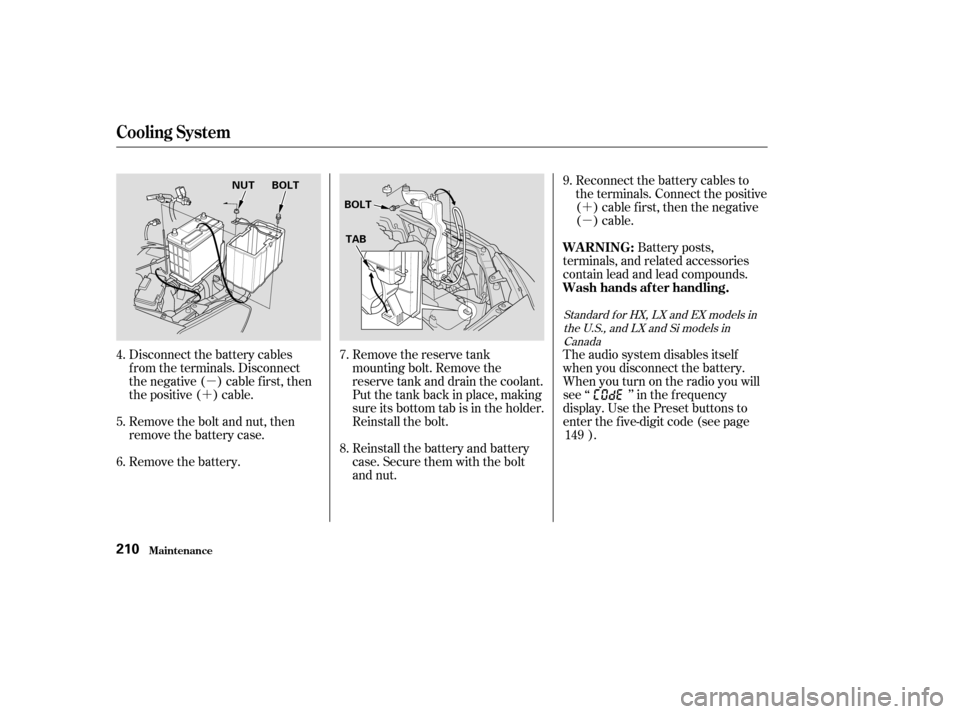
Disconnect the battery cables
f rom the terminals. Disconnect
the negative ( ) cable first, then
the positive ( ) cable.
Remove the bolt and nut, then
remove the battery case. Remove the reserve tank
mounting bolt. Remove the
reserve tank and drain the coolant.
Put the tank back in place, making
sure its bottom tab is in the holder.
Reinstall the bolt.
Reinstall the battery and battery
case. Secure them with the bolt
and nut.Reconnect the battery cables to
the terminals. Connect the positive
( ) cable f irst, then the negative
()cable.
Battery posts,
terminals, and related accessories
contain lead and lead compounds.
Remove the battery. The audio system disables itself
when you disconnect the battery.
Whenyouturnontheradioyouwill
see ‘‘ ’’ in the f requency
display. Use the Preset buttons to
enter the f ive-digit code (see page
).
4. 6. 7.
5. 8.9.
149
Standard f or HX, LX and EX models in the U.S., and LX and Si models inCanada
Cooling Syst em
Maint enance
WARNING:
Wash hands af ter handling.
210
NUT BOLT
BOLT
TAB
�����—�����—�����y�
�������������y���
�(���%�������y�����
���y
Page 204 of 302
Tightening torque:
When the coolant stops draining,
tightenthedrainpluginthe
bottom of the radiator. Apply non-
hardening sealant to the drain bolt
threads, put a new washer on the
drain bolt, and reinstall the drain
bolt in the engine block. Tighten it
securely.
Pour Honda All Season
Antif reeze/Coolant Type 2 into
the radiator up to the base of the
f iller neck. This coolant is a
mixture of 50 percent antif reeze
and 50 percent water. Pre-mixing
is not required.The cooling system capacity is:
10.
11.
CONT INUED
With 5-speed manual transmission:With automatic transmission:With automatic transmission (CVT):
Cooling Syst em
Maint enance211
Fill up to here
FILLER NECK
58 lbf·ft (78 N·m , 8.0 kgf·m)
1.03 US gal (3.9
)
1.00 US gal (3.8
)
1.00 US gal (3.8
)
�����—�����—�����y�
�������������y���
�(���%�������y�����
���y
Page 207 of 302
Check the f luid level with the engine
at normal operating temperature.Remove the dipstick (yellow loop)
f rom the transmission and wipe it
with a clean cloth.
Insert the dipstick all the way into
the transmission securely as
shown in the illustration.Remove the dipstick and check
the f luid level. It should be
between the upper and lower
marks.
Park the car on level ground. Shut
of f the engine. For accurate
results, wait at least 60 seconds,
andnomorethan90seconds,
af ter shutting of f the engine to
check the f luid level. 3. 4.
1. 2.
Automatic Transmission
T ransmission Fluid
Maint enance214
DIPSTICK (A/T)
LOWER MARK
UPPER MARK
DIPSTICK (CVT)
DIPSTICK (A/T)
�����—�����—�����y�
���������
���y���
�(���%�������y�����
���y
Page 208 of 302

Insert the dipstick all the way back
into the transmission securely as
shown in the illustration.
The transmission should be drained
and ref illed with new f luid according
to the time and distance recommen-
dations in the maintenance schedule.
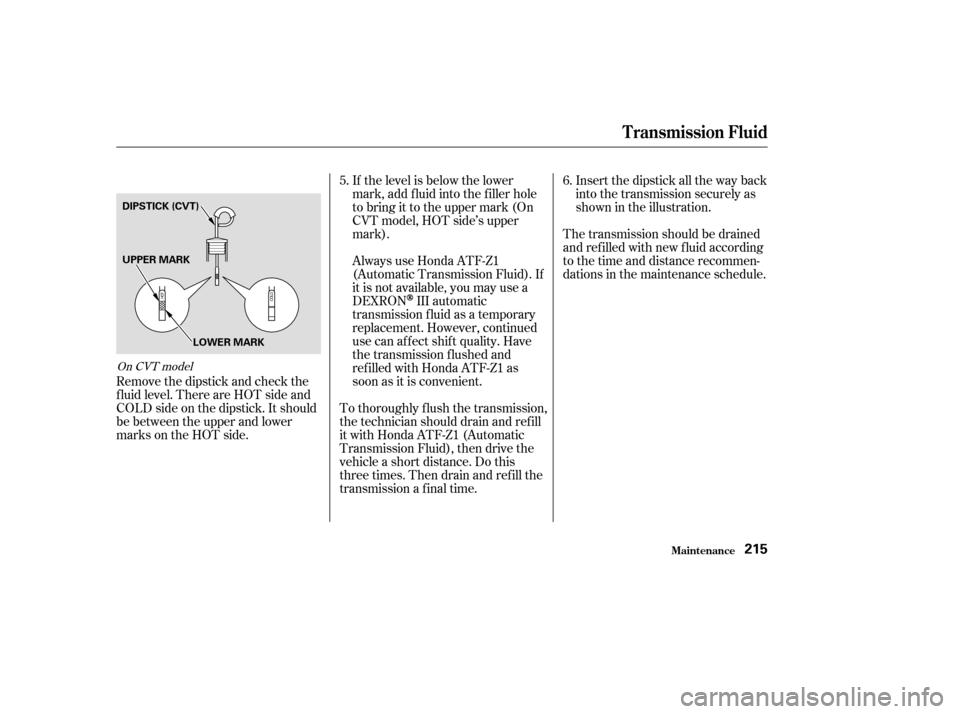
If the level is below the lower
mark, add f luid into the f iller hole
to bring it to the upper mark (On
CVT model, HOT side’s upper
mark).
Always use Honda ATF-Z1
(Automatic Transmission Fluid). If
it is not available, you may use a
DEXRON
III automatic
transmission f luid as a temporary
replacement. However, continued
use can affect shift quality. Have
the transmission f lushed and
ref illed with Honda ATF-Z1 as
soon as it is convenient.
To thoroughly f lush the transmission,
the technician should drain and ref ill
it with Honda ATF-Z1 (Automatic
Transmission Fluid), then drive the
vehicle a short distance. Do this
three times. Then drain and ref ill the
transmission a f inal time.
Remove the dipstick and check the
f luid level. There are HOT side and
COLD side on the dipstick. It should
be between the upper and lower
marks on the HOT side. 5.
6.
On CVT model
T ransmission Fluid
Maint enance215
UPPER MARK
DIPSTICK (CVT)
LOWER MARK
�����—�����—�
���y�
�������������y���
�(���%�������y�����
���y
Page 209 of 302

Check the f luid level in the reser-
voirs monthly. There are up to two
reservoirs, depending on the model.
They are:
The brake f luid should be replaced
accordingtothetimeanddistance
recommendations in the mainte-
nance schedule.Brake f luid reservoir (all models)
Clutch f luid reservoir
(manual transmission only)
Check the f luid level with the
transmission at normal operating
temperature and the car sitting on
level ground. Remove the
transmission f iller bolt and caref ully
f eel inside the bolt hole with your
f inger. The f luid level should be up
to the edge of the bolt hole. If it is
not, add Honda Manual Transmis-
sion Fluid (MTF) until it starts to
run out of the hole. Reinstall the
f iller bolt and tighten it securely. If Honda MTF is not available, you
may use an SAE 10W-30 or 10W-40
viscosity motor oil with the API
Certif ication seal that says ‘‘FOR
GASOLINE ENGINES’’ as a
temporary replacement. However,
motor oil does not contain the proper
additives and continued use can
cause stiffer shifting. Replace as
soon as it is convenient.
The transmission should be drained
and ref illed with new f luid according
to the time and distance recommen-
dations in the maintenance schedule.
5-speed Manual Transmission
T ransmission Fluid
Maint enance216
FILLER BOLT
Correct Level
�����—�����—�����y�
�������������y���
�(���%�������y�����
���y
Page 246 of 302

Clean the windows, inside and out,
with a commercially-available glass
cleaner. You can also use a mixture
of one part white vinegar to ten parts
water. This will remove the haze that
builds up on the inside of the
windows. Use a sof t cloth or paper
towels to clean all glass and clear
plastic surf aces. If you use a liquid air f reshener,make sure you f asten it securely so it
does not spill as you drive.
If you want to use an air f reshener/
deodorizer in the interior of your car,
it is best to use a solid type. Some
liquid air f resheners contain chemi-
cals that may cause parts of the
interior trim and f abric to crack or
discolor.
Windows A ir Fresheners
Interior Care
Appearance Care254
The rear window def ogger and
antenna wires are bonded to the inside
of the glass. Wiping vigorously up-and-
down can dislodge and break these
wires. When cleaning the rear window,
use gentle pressure and wipe side-to-
side.
�����—�����—�����y�
�������������y���
�(���%�������y���������y
Page 254 of 302
Tighten the wheel nuts securely in
the same crisscross pattern. Have
the wheel nut torque checked at
the nearest automotive service
f acility.
Tighten the wheel nuts to:Place the flat tire face down in the
spare tire well.
Remove the spacer cone f rom the
wing bolt, turn it over, and put it
back on the bolt.
Secure the f lat tire by screwing
the wing bolt back into its hole.
Remove the center cap before
storing the f lat tire in the trunk
well.
15. 16. 17.
18. 19.
CONT INUED
On HX and EX models in the U.S., Simodel in Canada
Changing a Flat T ire
T aking Care of t he Unexpect ed263
WING BOLT SPACER CONE
80 lbf·ft (108 N·m , 11 kgf·m)
�����—�����—�����y�
�������������y���
�(���%�������y���������y
Page 255 of 302
Store the jack in the trunk with the
end bracket on the lef t side. Turn
the jack’s end bracket to lock it in
place. Store the tool kit.
Store the wheel cover in the trunk.
Make sure it does not get
scratched or damaged.
Lower the trunk f loor, then close
the trunk lid.
20.
21.
22.
Changing a Flat T ire
T aking Care of t he Unexpect ed264
Loose items can fly around the
interior in a crash and could
seriously injure the occupants.
Store the wheel, jack, and tools
securely before driving.
�����—�����—�����y�
�������������y���
�(���%�������y���������y