Page 58 of 302
�Î�ÎCONT INUED
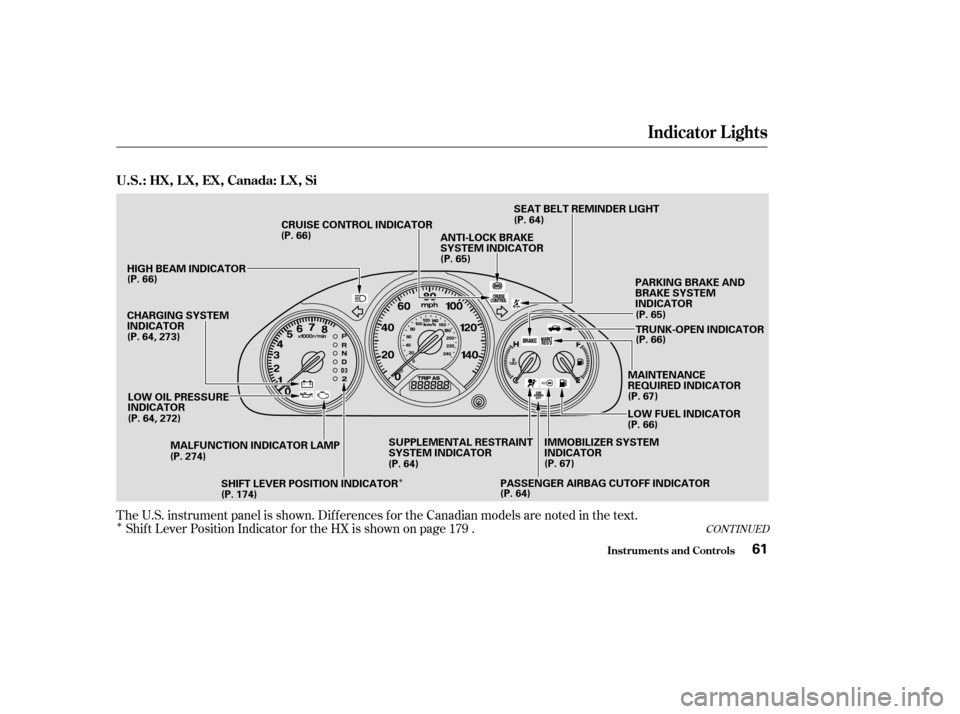
The U.S. instrument panel is shown. Dif f erences f or the Canadian models are noted in the
text.
Shif t Lever Position Indicator f or the HX is shown on page 179 .
Indicator L ights
Inst rument s and Cont rols
U.S.:HX,LX,EX,Canada:LX,Si
61
(P. 64) (P. 67)IMMOBILIZER SYSTEM
INDICATOR (P. 65)
(P. 65)
(P. 66)
MAINTENANCE
REQUIRED INDICATOR
(P. 67)
(P. 66)
SUPPLEMENTAL RESTRAINT
SYSTEM INDICATOR (P. 64)
HIGH BEAM INDICATOR
(P. 66)
CHARGING SYSTEM
INDICATOR
LOW OIL PRESSURE
INDICATOR MALFUNCTION INDICATOR LAMP CRUISE CONTROL INDICATOR
(P. 66) SEAT BELT REMINDER LIGHT
TRUNK-OPEN INDICATOR
ANTI-LOCK BRAKE
SYSTEM INDICATOR
(P. 64)
(P. 174) LOW FUEL INDICATORPARKING BRAKE AND
BRAKE SYSTEM
INDICATOR
SHIFT LEVER POSITION INDICATOR
(P. 64, 273)
(P. 64, 272) (P. 274) PASSENGER AIRBAG CUTOFF INDICATOR
�����—�����—�����y�
����
�
������y���
�(���%�������y���������y
Page 62 of 302
. It
is a reminder to check the parking
brake. Driving with the parking
brake not f ully released can
da")
This light has two f unctions:This indicator comes on when you
turn the ignition switch ON (II). It
is a reminder to check the parking
brake. Driving with the parking
brake not f ully released can
damage the brakes and tires.
If the indicator remains lit after
you have f ully released the
parking brake while the engine is
running, or if it comes on while
driving, it can indicate a problem
in the brake system. For complete
inf ormation, see page . This indicator lights when you turn
the ignition switch to ON (II) with
the headlight switch of f and the
parking brake set. It should go of f if
youturnontheheadlightsorrelease
the parking brake. If it comes on at
any other time, it means there is a
problem with the DRL. There may
also be a problem with the high
beam headlights.
This light normally comes on f or a
f ew seconds when you turn the
ignition switch ON (II), and when
the ignition switch is turned to
START (III). If this light comes on at
any other time, there is a problem in
theABS.If thishappens,takethe
cartoyourdealertohaveitchecked.
With the light on, your car still has
normal braking ability but no anti-
lock. For complete inf ormation, see
page .
1. 2.
186
275
Canadian models only
Only on models equipped with ABS (see
page ) 184
CONT INUED
Parking Brake
and Brake
System
Indicator ‘‘Daytime Running
Lights’’ Indicator
Anti-lock Brake System
(A BS) Indicator
Indicator L ights
Inst rument s and Cont rols65
U.S. Canada
�����—�����—�����y�
����
����
���y���
�(���%�������y���������y
Page 64 of 302
. It will then go of f if
you have inserted a properly-coded
ignition key. If it is not a properly-
coded key,")
�µ
This indicator comes on f or a f ew
seconds when you turn the ignition
switch ON (II). It will then go of f if
you have inserted a properly-coded
ignition key. If it is not a properly-
coded key, the indicator will blink
and the engine will not start (see
page ).
This indicator also blinks several
times when you turn the ignition
switch f rom ON (II) to ACCESSORY
(I) or LOCK (0). This indicator reminds you that it is
time to take your car in for
scheduled maintenance.
For the f irst 8,000 miles (12,800 km)
af ter the Maintenance Required
Indicator is reset, it will come on f or
two seconds when you turn the
ignition switch to ON (II).Between 8,000 miles (12,800 km)
and 10,000 miles (16,000 km) this
indicator will light f or two seconds
when you f irst turn the ignition
switch to ON (II), and then flash for
ten seconds.
If you exceed 10,000 miles (16,000
km) without having the scheduled
maintenance perf ormed, this
indicator will remain on as a constant
reminder.
Ref er to the Maintenance Schedules
f or Normal and Severe Driving
Conditions on pages .
81 194 198
CONT INUED
Immobilizer System
Indicator
Maintenance Required
Indicator
Indicator L ights
Inst rument s and Cont rols67
�����—�����—�����y�
����
��������y���
�(���%�������y���������y
Page 70 of 302

The rotating switch on the lef t lever
controls the lights. Turning this
switch to the ‘‘ ’’ position turns
on the parking lights, taillights,
instrument panel lights, side-marker
lights, and rear license plate lights.
Turning the switch to the ‘‘ ’’
position turns on the headlights.To change f rom low beams to high
beams, push the turn signal lever
f orward until you hear a click. The
blue high beam indicator will light
(see page ). To return to low
beams, pull the turn signal lever
back.
If you leave the lights on with the
ignition switch in ACCESSORY (I)
or LOCK (0), you will hear a
reminder tone when you open the
driver’s door.
To f lash the high beams, pull the
turn signal lever back lightly, then
release it. The high beams will come
on and go of f . The high beams will
stay on f or as long as you hold the
lever back, no matter what position
the headlight switch is in.
66
Headlights
Controls Near the Steering Wheel
Inst rument s and Cont rols73
�����—�����—�����y�
����
��������y���
�(���%�������y���������y
Page 76 of 302
Push the lever up to lock the
steering wheel in that position.
Make sure you have securely
locked the steering wheel in place
by trying to move it up and down.
Move the steering wheel to the
desired position, making sure the
wheel points toward your chest,
not toward your f ace. Make sure
you can see the instrument panel
gauges and the indicator lights.
Push the lever under the steering
column all the way down.
To adjust the steering wheel upward
or downward:
Make any steering wheel adjustment
bef ore you start driving.
1.4.
3.
2.
See page f or important saf ety inf ormation about how to properlyposition the steering wheel. 17
Inst rument s and Cont rols
Controls Near the Steering Wheel
Steering Wheel A djustment
79
Adjusting the steering wheel
position while driving may
cause you to lose control of the
car and be seriously injured in acrash.
Adjust the steering wheel only
when the car is stopped.
�����—�����—�����y�
����
��������y���
�(���%�������y���������y
Page 77 of 302

Your car comes with two master
keys and a valet key.
The master key fits all the locks on
your car:
Ignition
Doors
Trunk
Trunk release handle
Rear seat trunk accessYoushouldhavereceivedakey
number plate with your set of keys.
You will need this key number if you
ever have to get a lost key replaced.
Keep the plate stored in a saf e place.
When replacing keys, use only
Honda-approved key blanks.
The valet key works only in the
ignition and the door locks. You can
keep the trunk, trunk release handle
and rear seat trunk access locked
when you leave your car and the
valet key at a parking f acility. (See
Trunk, page .)
These keys contain electronic
circuits that are activated by the
Immobilizer System. They will not
work to start the engine if the
circuits are damaged.
Protect the keys f rom direct
sunlight, high temperature, and
high humidity.
Donotdropthekeysorsetheavy
objects on them.
Keep the keys away f rom liquids.
If they get wet, dry them immedi-
ately with a soft cloth.
The keys do not contain batteries.
Do not try to take them apart.
Some models also come with two
remote transmitters; see page for
an explanation of their operation. 85
88
Inst rument s and Cont rols
Keys
Remote Transmitter
Keys and Locks
80
KEY
NUMBER
PLATE
MASTER
KEYS (Black)
VALET
KEY (Gray)
�����—�����—�����y�
����
��������y���
�(���%�������y���������y
Page 78 of 302

CONT INUED
The Immobilizer System protects
your car f rom thef t. A properly-
coded master or valet key must be
used in the ignition switch f or the
engine to start. If an improperly-
coded key (or other device) is used,
the engine’s f uel system is disabled.
When you turn the ignition switch to
ON (II), the Immobilizer System
indicator should come on f or a f ew
seconds, then go out. If the indicator
starts to blink, it means the system
does not recognize the coding of the
key. Turn the ignition switch to
LOCK (0), remove the key, reinsert
it, and turn the switch to ON (II)
again.The system may not recognize your
key’s coding if another immobilizer
key or other metal object is near the
ignition switch when you insert the
key. To make sure the system
recognizes the key code:
Do not keep other immobilizer
keys on the same key ring.
Use a plastic or leather key f ob,
not metal.
Keep other keys away f rom your
car’s key and the ignition switch
while trying to start the engine.
If the system repeatedly does not
recognize the coding of your key,
contact your Honda dealer. The Immobilizer System indicator
will also blink several times when
you turn the ignition switch f rom ON
(II) to ACCESSORY (I) or LOCK (0).
Do not attempt to alter this system
or add other devices to it. Electrical
problems could result that may make
your car undriveable.
If you have lost your key and you
cannot start the engine, contact your
Honda dealer.
Keys and Locks
Inst rument s and Cont rols
Immobilizer System
81
�����—�����—�����y�
����
��������y���
�(���%�������y���������y
Page 79 of 302
 This devicemay not cause harmf ul interf erence, and (2) this dev")
�µAs required by the FCC:This device complies with Part 15 of theFCC rules. Operation is subject to thef ollowing two conditions: (1) This devicemay not cause harmf ul interf erence, and (2) this device must accept anyinterf erence received, including
interf erence that may cause undesiredoperation.
Changes or modif ications not expresslyapproved by the party responsible f or
compliance could void the user’sauthority to operate the equipment.
This device complies with IndustryCanada Standard RSS-210.Operation is subject to the f ollowing twoconditions: (1) this device may not cause
interf erence, and (2) this device mustaccept any interf erence that may causeundesired operation of the device.
The ignition switch is on the right
side of the steering column. It has
f our positions:
LOCK(0)
ACCESSORY (I)
ON (II)
START (III) You can insert or
remove the key only in this position.
To switch f rom ACCESSORY to
LOCK, you must push the key in
slightly as you turn it. If your car has
an automatic transmission, the shif t
lever must also be in Park. The anti-
thef t lock will lock the steering
column when you remove the key.
If the f ront wheels are turned, the
anti-thef t lock may sometimes make
it difficult to turn the key from
LOCK to ACCESSORY. Firmly turn
the steering wheel to the lef t or to
the right as you turn the key.
Keys and Locks
Inst rument s and Cont rols
Ignition Switch L OCK (0)
82
�����—�����—�����y�
����
��������y���
�(���%�������y���������y