Page 77 of 302

Your car comes with two master
keys and a valet key.
The master key fits all the locks on
your car:
Ignition
Doors
Trunk
Trunk release handle
Rear seat trunk accessYoushouldhavereceivedakey
number plate with your set of keys.
You will need this key number if you
ever have to get a lost key replaced.
Keep the plate stored in a saf e place.
When replacing keys, use only
Honda-approved key blanks.
The valet key works only in the
ignition and the door locks. You can
keep the trunk, trunk release handle
and rear seat trunk access locked
when you leave your car and the
valet key at a parking f acility. (See
Trunk, page .)
These keys contain electronic
circuits that are activated by the
Immobilizer System. They will not
work to start the engine if the
circuits are damaged.
Protect the keys f rom direct
sunlight, high temperature, and
high humidity.
Donotdropthekeysorsetheavy
objects on them.
Keep the keys away f rom liquids.
If they get wet, dry them immedi-
ately with a soft cloth.
The keys do not contain batteries.
Do not try to take them apart.
Some models also come with two
remote transmitters; see page for
an explanation of their operation. 85
88
Inst rument s and Cont rols
Keys
Remote Transmitter
Keys and Locks
80
KEY
NUMBER
PLATE
MASTER
KEYS (Black)
VALET
KEY (Gray)
�����—�����—�����y�
����
��������y���
�(���%�������y���������y
Page 85 of 302
 This devicemay not cause harmf ul interf erence, and (2) this device")
As required by the FCC:This device complies with Part 15 of theFCC rules. Operation is subject to thef ollowing two conditions: (1) This devicemay not cause harmf ul interf erence, and (2) this device must accept anyinterf erence received, including
interf erence that may cause undesiredoperation.
Changes or modif ications not expresslyapproved by the party responsible f or
compliance could void the user’sauthority to operate the equipment.
This device complies with IndustryCanada Standard RSS-210.Operation is subject to the f ollowing twoconditions: (1) this device may not cause
interf erence, and (2) this device mustaccept any interf erence that may causeundesired operation of the device.
To close the trunk, press down on
the trunk lid.
See page f or cargo loading and
weight limit inf ormation. Keep the
trunk lid closed at all times while
driving to avoid damaging the lid,
and to prevent exhaust gas from
getting into the interior. See on page .
Youcanopenthetrunkintwoways:
Pull the trunk release handle to
the lef t of the driver’s seat.
Usethemasterkeytoopenthe
trunk lock. The valet key does not
work in this lock. 55
165
Keys and Locks
Inst rument s and Cont rols
Trunk
Carbon
Monoxide Hazard
88
TRUNK RELEASE HANDLE MASTER KEY
�����—�����—�����y�
����
��������y���
�(���%�������y�������
�y
Page 86 of 302
To protect items in the trunk when
you need to give the key to someone
else, lock the trunk release handle
with the master key and give the
other person the valet key.Parents should decide if their
children should be shown how to use
this feature.
For more inf ormation about child
saf ety, see page .
As a saf ety f eature, your car has a
release lever on the trunk latch so
the trunk can be opened f rom the
inside.
To open the trunk, push the release
lever to the lef t. 25
Keys and Locks
Inst rument s and Cont rols
Emergency T runk Opener
89
MASTER KEY
�����—�����—�����y�
����
����
���y���
�(���%�������y���������y
Page 91 of 302
When storing cargo, you can move
therearcentershoulderbeltoutof
the way by removing the belt f rom
the guide.
To f old down either side of the seat-
back f rom inside the car, insert the
master key in the lock on the rear
shelf. To fold down the driver’s side,
turn the key clockwise, pull down the
top of the seat-back, then release the
key. To f old down the passenger’s
side, turn the key counterclockwise
and perf orm the same procedure.
The back of the rear seat folds down
to give you direct access to the trunk.
Each side f olds down separately.
With only half the seat f olded, you
can still carry a passenger in the rear
seat. The seat-back can be released
f rom inside the car or inside the
trunk.
Folding Rear Seat
Inst rument s and Cont rols94
GUIDE
CENTER SHOULDER BELT
�����—�����—�����y�
����
��������y���
�(���%�������y���������y
Page 92 of 302
To release the seat-back from inside
the trunk, pull the release under the
trunk panel. Push the seat-back
down, then let go of the release.
To lock the seat-back upright, push it
f irmly against the trunk panel. Make
sure it is latched in place by pulling
on the top of the seat.Make sure all rear shoulder belts are
positioned in f ront of the rear seat-
back whenever the seat-back is in its
upright position.
Do not put any heavy items on the
seat-back when it is folded.
Make sure all items in the trunk, or
items extending through the opening
into the back seat, are secured.
Looseitemscanflyforwardand
cause injury if you have to brake
hard. See on page
.
Never drive with the seat-back
f olded down and the trunk lid open.
See on
page . 165
55 Carrying Cargo
Carbon Monoxide Hazard
Folding Rear Seat
Inst rument s and Cont rols95
RELEASE Pull Pull
�����—�����—�����y�
����
��������y���
�(���%�������y���������y
Page 123 of 302

�µ�´
A trunk-mounted Compact Disc
changer is available from your dealer.
It holds up to six discs, providing
several hours of continuous
entertainment. You operate the CD
changer with the same controls used
for the radio.
To operate the CD changer or player,
the ignition must be in ACCESSORY
(I) or ON (II) and the audio system
must be on.
Your dealer also has an accessory in-
dash single CD player available that
is operated by the radio controls. To
operate this unit, use the instructions
(except f or those relating to multiple
discs) in this section.
For best results when using CD-R
discs, use only high quality discs
labeled f or audio use. When
recording a CD-R, the recording
must be closed in order f or the disc
to be used by CD players. CD-RW
discs will not work in this unit.
CONT INUED
Operating the Optional CD
Player/Changer
Audio System
Comf ort and Convenience Feat ures127
RDM BUTTON
RPT BUTTON
CD/TAPE BUTTON
AM/FM BUTTON
PWR/VOL KNOB SEEK/SKIP BAR DISC BUTTON
DISC BUTTON
RDM INDICATOR
RPT INDICATOR
�����—�����—�����y�
�������������y���
�(���%�������y���
�����y
Page 137 of 302

�´�µ�´
�µ
Load the desired CDs in the
magazine and load the magazine in
the changer according to the
instructions that came with the unit.
Play only standard round discs. Odd-
shaped CDs may jam in the drive or
cause other problems. If youejectthediscinthein-dash
CD while it is playing, the system
will automatically switch to the CD
changer and begin play where it lef t
of f . If there are no CDs in the
changer, the display will f lash. You
will have to select another mode
(AM or FM) with the button.
A trunk-mounted Compact Disc
changer is available from your dealer.
It holds up to six discs, providing
several hours of continuous
entertainment. You operate this CD
changer with the same controls used
f or the in-dash CD player.
If you load a CD in the in-dash player
while the changer is playing a CD,
the system will stop the changer and
begin playing the in-dash CD. To
select the changer again, press the
CD button. Play will begin where it
left off. Use the CD button to switch
between the player and the changer.
To select a dif f erent disc, press the
DISC (Preset 6) or DISC
(Preset 5) button. The next disc in
the changer is loaded and played
when you press the DISC button.
DISC loads and plays the previous
disc. If you select an empty slot in
the magazine, the changer will, af ter
f inding that slot empty, try to load
the CD in the next slot. This
continues until it f inds a CD to load
and play.
To select the CD changer, press the
CD button. The disc and track
numbers will be displayed.
For best results when using CD-R
discs, use only high quality discs
labeled f or audio use. When
recording a CD-R, the recording
must be closed in order f or the disc
to be used by CD players. CD-RW
discs will not work in this unit. When you switch back to CD mode,
the system selects the same unit (in-
dash or changer) that was playing
when you switched out of CD mode.
To use the SKIP, REPEAT, and
RANDOM f unctions, ref er to the in-
dash player operating instructions.
Audio System
Comf ort and Convenience Feat ures
Operating the CD Changer
(Optional)
141
�����—�����—�����y�
�������������y���
�(���%�������y���
�����y
Page 160 of 302
�Î�Î
�Î �Î
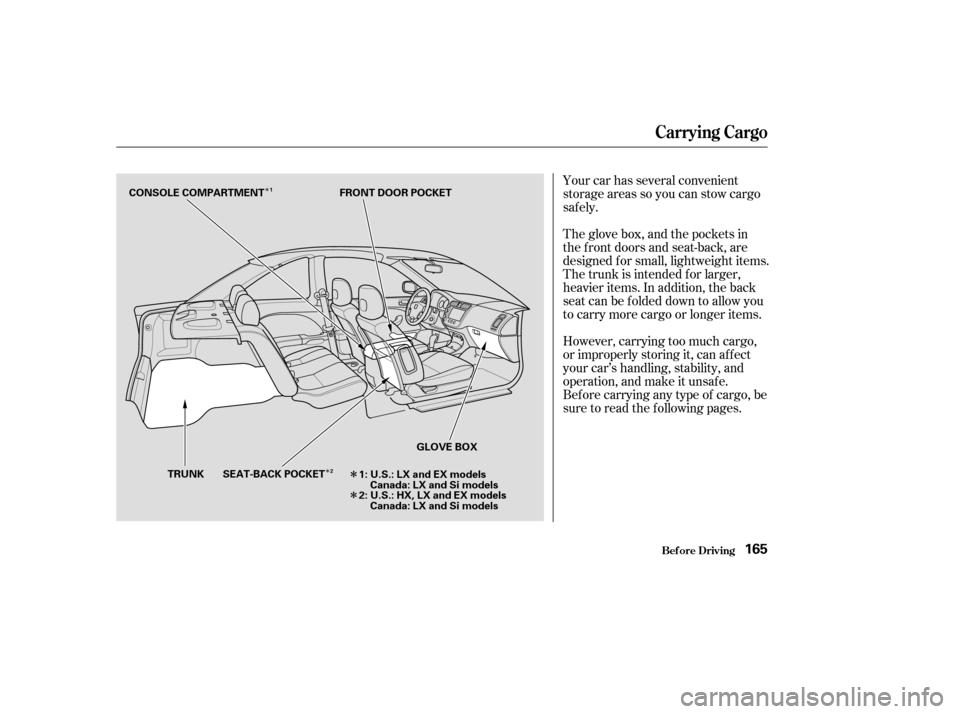
Your car has several convenient
storage areas so you can stow cargo
saf ely.
However, carrying too much cargo,
or improperly storing it, can af f ect
your car’s handling, stability, and
operation, and make it unsaf e.
Bef ore carrying any type of cargo, be
sure to read the f ollowing pages.
The glove box, and the pockets in
the front doors and seat-back, are
designed f or small, lightweight items.
The trunk is intended f or larger,
heavier items. In addition, the back
seatcanbefoldeddowntoallowyou
to carry more cargo or longer items.
Carrying Cargo
Bef ore Driving165
TRUNK
CONSOLE COMPARTMENT FRONT DOOR POCKET
GLOVE BOX
SEAT-BACK POCKET 1: U.S.: LX and EX models
Canada: LX and Si models
2: U.S.: HX, LX and EX models Canada: LX and Si models
1
2
�����—�����—�����y�
���������
���y���
�(���%�������y���
�����y