Page 18 of 302

Carrying hard or sharp
objects on your lap, or driving with
a pipe or other sharp objects in
your mouth, can result in injuries
if your f ront airbag inf lates.
Any object
attached to or placed on the covers
marked ‘‘SRS AIRBAG’’ in the
center of the steering wheel and
on top of the dashboard could
interf ere with the proper operation
of the airbags. Or, if the airbags
inf late, the objects could be
propelled inside the car and hurt
someone. If a side airbag
inflates,acupholderorotherhard
object attached on or near the
door could be propelled inside the
car and hurt someone.
If your
hands or arms are close to the
airbag cover in the center of the
steering wheel or on top of the
dashboard, they could be injured if
the front airbag inflates.
Protecting Adults
Driver and Passenger Saf ety
Do not place hard or sharp object s
bet ween yourself and a f rontairbag.
Do not at t ach or place object s onthe f ront airbag covers. On models wit h side airbags, do
not at t ach hard object s on or neara f ront door.
K eep your hands and arms awayf rom t he airbag covers.
20
�����—�����—�����y�
�������������y���
�(���%�������y���������y
Page 47 of 302
 includes:Two f ront airbags. The driver’s
airbag is stored in the center of
the steering wheel; the f ront
passenger’sairbagisstoredinthe
dashboard. Both")
Your Supplemental Restraint System
(SRS) includes:Two f ront airbags. The driver’s
airbag is stored in the center of
the steering wheel; the f ront
passenger’sairbagisstoredinthe
dashboard. Both are marked ‘‘SRS
AIRBAG.’’
If you ever have a moderate to
severe f rontal collision, the sensors
will detect the vehicle’s rapid
deceleration. If the rate of
deceleration is high enough, the
control unit will instantly inf late the
f ront airbags.
A sophisticated electronic system
that continually monitors and
records inf ormation about the
sensors, the control unit, the
airbag activators, and driver and
passenger seat belt use when the
ignition is ON (II).
Sensors that can detect a
moderate to severe frontal
collision.
Automatic seat belt tensioners
(see page ).
An indicator light on the
instrument panel that alerts you to
a possible problem with the
system (see page ).
Emergency backup power in case
your car’s electrical system is
disconnected in a crash.
46
52
CONT INUED
SRS Components
How Your Front A irbags Work
Additional Inf ormation About Your Airbags
Driver and Passenger Saf ety49
�����—�����—�����y�
�������������y���
�(���%�������y���������y
Page 69 of 302
�Î�Î
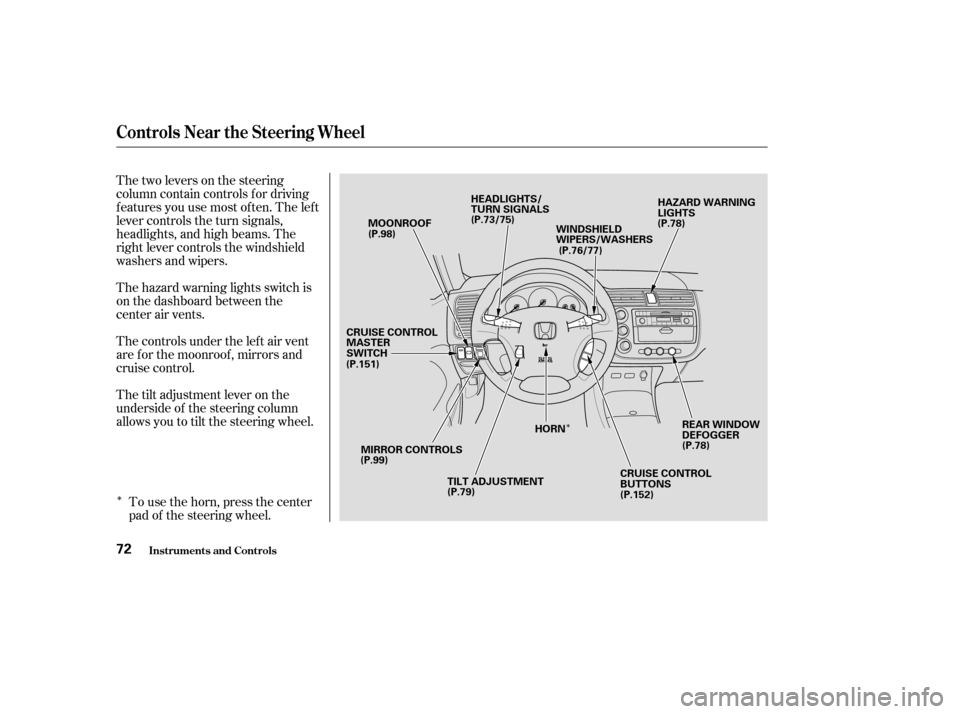
Thetwoleversonthesteering
column contain controls f or driving
f eatures you use most of ten. The lef t
lever controls the turn signals,
headlights, and high beams. The
right lever controls the windshield
washers and wipers.
The hazard warning lights switch is
on the dashboard between the
center air vents.
The controls under the lef t air vent
are f or the moonroof , mirrors and
cruise control.
The tilt adjustment lever on the
underside of the steering column
allows you to tilt the steering wheel.
To use the horn, press the center
pad of the steering wheel.
Controls Near the Steering Wheel
Inst rument s and Cont rols72
HEADLIGHTS/
TURN SIGNALS
(P.73/75)
MOONROOF
(P.98)
CRUISE CONTROL
MASTER
SWITCH
(P.151)
(P.99)MIRROR CONTROLS
TILT ADJUSTMENT
(P.79) HORN
CRUISE CONTROL
BUTTONS
(P.152)(P.78)
REAR WINDOW
DEFOGGER
(P.78)
HAZARD WARNING
LIGHTS
WINDSHIELD
WIPERS/WASHERS (P.76/77)
�����—�����—�����y�
����
��������y���
�(���%�������y���������y
Page 70 of 302

The rotating switch on the lef t lever
controls the lights. Turning this
switch to the ‘‘ ’’ position turns
on the parking lights, taillights,
instrument panel lights, side-marker
lights, and rear license plate lights.
Turning the switch to the ‘‘ ’’
position turns on the headlights.To change f rom low beams to high
beams, push the turn signal lever
f orward until you hear a click. The
blue high beam indicator will light
(see page ). To return to low
beams, pull the turn signal lever
back.
If you leave the lights on with the
ignition switch in ACCESSORY (I)
or LOCK (0), you will hear a
reminder tone when you open the
driver’s door.
To f lash the high beams, pull the
turn signal lever back lightly, then
release it. The high beams will come
on and go of f . The high beams will
stay on f or as long as you hold the
lever back, no matter what position
the headlight switch is in.
66
Headlights
Controls Near the Steering Wheel
Inst rument s and Cont rols73
�����—�����—�����y�
����
��������y���
�(���%�������y���������y
Page 71 of 302
Canadian models only
With the headlight switch off, the
high beam headlights come on with
reduced brightness when you turn
the ignition switch to ON (II) and
release the parking brake. They
remain on until you turn the ignition
of f , even if you set the parking brake.
The headlights revert to normal
operation when you turn them on
with the switch.Turntheknobontheleftsideof the
instrument panel to adjust the
brightness of the instrument panel
lights.Turn the Select/Reset knob on the
right side of the instrument panel to
adjust the brightness of the
instrument panel lights.
Instrument Panel Brightness
Daytime Running L ights
Controls Near the Steering Wheel
Inst rument s and Cont rols74
SELECT/RESET KNOB
KNOB All models except DX
DX models
�����—�����—�����y�
����
��������y���
�(���%�������y���������y
Page 72 of 302

Signal a turn or lane change with this
lever. Push down on the lever to
signal a lef t turn, and up to signal a
right turn. If you push it up or down
all the way, the turn signal continues
to blink even when you release the
lever. It shuts off automatically as
you complete the turn.
Turn the Select/Reset knob to adjust
the instrument panel brightness.
There are six brightness levels.
When you turn the knob, the
odometer/trip meter display
changes to circles that show you the
current level. You will hear a tone
when you reach the maximum or
minimum brightness. The display
returns to the odometer/trip meter
values f ive seconds af ter you stop
adjusting the knob.
The instrument panel dims when the
parking lights or headlights are
turned on. Adjust the brightness to
the desired level with the headlight
switch of f , and also with the
headlight switch on. Both settings
will remain at those levels until you
change them.
To reduce glare at night, the instru-
ment panel illumination dims when
you turn the light switch to or
. Turning the Select/Reset
knob f ully to the right will return the
instrument panel to the brightness
adjusted with the headlight switch
of f and a tone will sound.
CONT INUED
Turn Signals
Controls Near the Steering Wheel
Inst rument s and Cont rols75
�����—�����—�����y�
����
��������y���
�(���%�������y���������y
Page 73 of 302
To signal a lane change, push lightly
on the turn signal lever in the proper
direction and hold it. The lever will
return to the center position as soon
as you release it.In intermittent, the wipers operate
every f ew seconds. In low speed and
high speed, the wipers run continu-
ously.
This lever controls the windshield
wipers and washers. It has five
positions: MIST: mist
OFF: off
INT: intermittent
LO: low speed
HI: high speed
To select a position, push the lever
up or down.
On DX, HX, and LX models in the U.S.
Controls Near the Steering Wheel
Inst rument s and Cont rols
Windshield Wipers
76
�����—�����—�����y�
����
��������y���
�(���%�������y���������y
Page 74 of 302
To operate the wipers in mist mode,
push the control lever up f rom the
OFF position. The wipers run at high
speed until you release the lever.
This gives you a quick way to clear
the windshield.To clean the windshield, pull back on
the wiper control lever. The washers
spray until you release the lever.
The wipers run at low speed while
you’re pulling the lever, then
complete one more sweep of the
windshield af ter you release it.
In intermittent, you can vary how
of ten the wipers sweep the
windshield by turning the INT TIME
ring on the right lever. In low speed
and high speed, the wipers run
continuously.On EX model in the U.S., and Si model
in Canada
Windshield Washers
Controls Near the Steering Wheel
Inst rument s and Cont rols77
INT TIME RING
�����—�����—�����y�
����
����
���y���
�(���%�������y���������y
 and
release the parking brake. They
remain on")

