Page 191 of 395
 �Û
The tape direction indicator will light
to show you which side of the
cassette is playing. The indicates
thesideyouinsertedfacingupward
is now playing. If you want to play
the other side, push the")
�Û
The tape direction indicator will light
to show you which side of the
cassette is playing. The indicates
thesideyouinsertedfacingupward
is now playing. If you want to play
the other side, push the AUDIO
DISPLAY button to change to the
audio display, and touch the PROG
icon. Dolby noise reduction turns on when
you insert a cassette. If the tape was
not recorded with Dolby noise reduc-
tion, push the AUDIO DISPLAY
button to change to the audio display,
and turn it of f by touching the NR
icon on the display.
Noise reduction remains of f until you
turn it on by pressing the icon again.
When the system reaches the end of
the tape, it will automatically reverse
direction and play the other side. If
you want to remove the cassette
from the drive, press the eject button
on the cassette player.If you turn the system of f while a
tape is playing, either with the PWR/
VOL knob or by turning of f the
ignition, the cassette will remain in
the drive. When you turn the system
back on, the cassette player will be in
pause mode. To begin playing, push
the AUDIO DISPLAY button to
change to the audio display, and
touch the PROG icon.
To switch to the radio or CD player
while a tape is playing, press the
AM/FM, or CD/AUX button. To
change back to the cassette player,
push the CD/AUX button.
Audio System
Comf ort and Convenience Feat ures188
Page 195 of 395
�Û�Ý
�´�µ
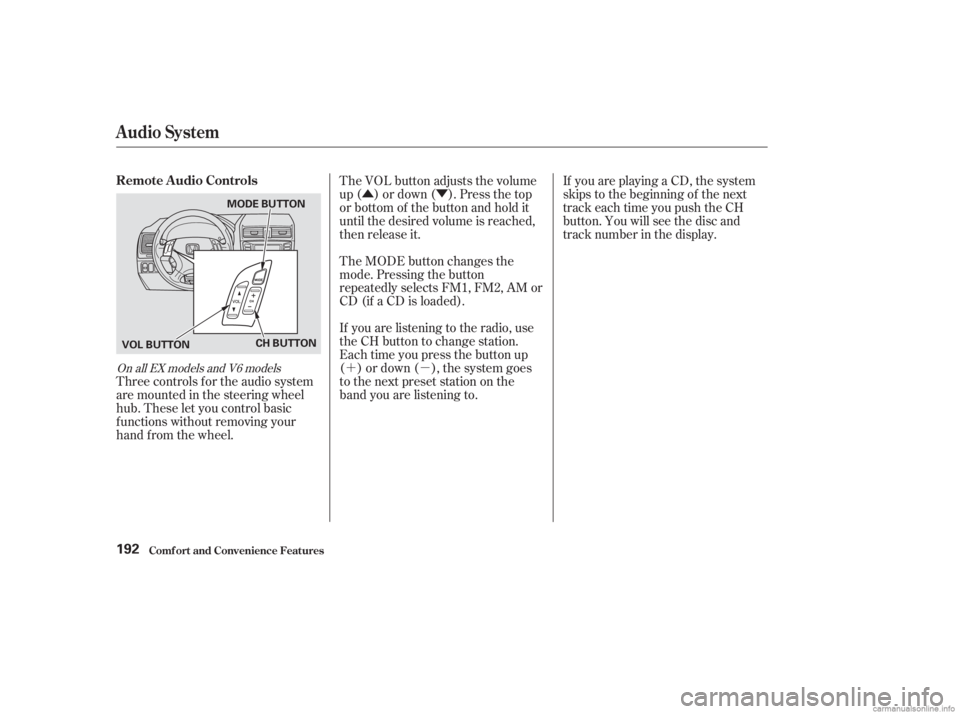
Three controls f or the audio system
are mounted in the steering wheel
hub. These let you control basic
f unctions without removing your
hand f rom the wheel. The VOL button adjusts the volume
up ( ) or down ( ). Press the top
or bottom of the button and hold it
until the desired volume is reached,
then release it.
If youareplayingaCD,thesystem
skips to the beginning of the next
track each time you push the CH
button. You will see the disc and
track number in the display.
The MODE button changes the
mode. Pressing the button
repeatedly selects FM1, FM2, AM or
CD (if a CD is loaded).
If you are listening to the radio, use
the CH button to change station.
Each time you press the button up
()ordown(),thesystemgoes
to the next preset station on the
band you are listening to.
On all EX models and V6 models
Remote Audio Controls
Audio System
Comf ort and Convenience Feat ures192
CH BUTTON
VOL BUTTON MODE BUTTON
Page 196 of 395
 �µ
Your car’s audio system will disable
itself if it is disconnected f rom
electrical power f or any reason. To
make it work again, the user must
enter a specif ic code using the preset
bars or the")
�µ
Your car’s audio system will disable
itself if it is disconnected f rom
electrical power f or any reason. To
make it work again, the user must
enter a specif ic code using the preset
bars or the TUNE knob. Because
there are hundreds of number
combinations possible, making the
system work without knowing the
exact code is nearly impossible.
Youshouldhavereceivedacardthat
lists your audio system’s code
number and serial number. It is best
tostorethiscardinasafeplaceat
home. In addition, you should write
the audio system’s serial number in
this Owner’s Manual. If you should
happen to lose the card, you must
obtain the code number f rom your
Honda dealer. To do this, you will
need the system’s serial number. When all the digits in the code are
entered correctly, the radio will start
playing.
If you make a mistake entering the
code, do not start over or try to
correct your mistake. Complete the
sequence, then enter the correct
code. You have ten tries to enter the
correct code. If you are unsuccessf ul
in ten attempts, you must then leave
the system on f or one hour bef ore
trying again.
If your car’s battery is disconnected
or goes dead, or the radio f use is
removed, the audio system will
disable itself . If this happens, you
will see ‘‘ ’’/‘‘ ’’ in the
frequencydisplaythenexttimeyou
turn on the system. Use the preset
buttons to enter the code.
If your car is equipped with a
navigation system, press and release
the TUNE knob; the number ‘‘0’’
appears on the display.
If ‘‘0’’ is the f irst digit in your code,
press and release the TUNE knob
to store it.
If ‘‘0’’ is not the f irst digit in your
code, turn the TUNE knob lef t or
right until the f irst digit is
displayed. Press and release the
TUNE knob to store it. Enter the
remaining digits the same way. You will have to store your favorite
stations on each side of the preset
bars (1 6) af ter the system begins
working. Your original settings were
lost when power was disconnected.
On EX and EX-V6 models
Thef t Protection
Audio System
Comf ort and Convenience Feat ures193
Page 197 of 395
 With the system set, you can still
open the trunk with the master key
or the remote transmitter without
triggering the alarm. The alarm will
sound if the trunk lock is f orced, or
the trunk is opened")
With the system set, you can still
open the trunk with the master key
or the remote transmitter without
triggering the alarm. The alarm will
sound if the trunk lock is f orced, or
the trunk is opened with the trunk
release handle.
Do not attempt to alter this system
or add other devices to it. The security system will not set if
the hood, trunk, or any door is not
f ully closed. If the system will not set,
check the Door Monitor on the
instrument panel (see page ), to
see if the doors and trunk are f ully
closed. Since it is not part of the
monitor display, manually check the
hood.
The security system helps to protect
your car and valuables f rom thef t.
The horn sounds and a combination
of headlights, parking lights, side
marker lights and taillights f lashes if
someone attempts to break into your
carorremovetheradio.Thisalarm
continues f or two minutes, then the
system resets. To reset an alarming
system bef ore the two minutes have
elapsed, unlock either f ront door
with the key or the remote
transmitter.
The security system automatically
sets 15 seconds after you lock the
doors, hood, and trunk. For the
system to activate, you must lock the
doors f rom the outside with the key,
lock tab, door lock switch, or remote
transmitter. The security system
light on the instrument panel starts
blinking immediately to show you
the system is setting itself.
Once the security system is set,
opening any door (without using the
key or the remote transmitter), the
hood, or the trunk will cause it to
sound. It also sounds if the radio is
removed f rom the dashboard or the
wiring is cut.
60On EX, all V6, and Canadian LX-G
models
Security System
Comf ort and Convenience Feat ures194
SECURITY SYSTEM LIGHT
Page 215 of 395
 Be sure electronic accessories do
not overload electrical circuits
(see page ).
Have the installer contact your
Honda dealer f or assistance bef ore
installing any electronic accessory.
If possible, h")
Be sure electronic accessories do
not overload electrical circuits
(see page ).
Have the installer contact your
Honda dealer f or assistance bef ore
installing any electronic accessory.
If possible, have your dealer inspect
the f inal installation. Bef ore installing any accessory:
Modif ying your car, or installing
some non-Honda accessories, can
make your car unsaf e. Bef ore you
make any modif ications or add any
accessories,besuretoreadthe
f ollowing inf ormation.
Your dealer has genuine Honda
accessories that allow you to
personalize your car. These
accessories have been designed and
approved f or your car, and are
covered by warranty.
Non-Honda accessories are usually
designed f or universal applications.
Although aftermarket accessories
may f it on your car, they may not
meet f actory specif ications, and
could adversely af f ect your car’s
handling and stability. (See
‘‘Modif ications’’ on page f or
additional information.)
However, if electronic accessories
are improperly installed, or exceed
your car’s electrical system capacity,
they can interfere with the operationof your car, or even cause the
airbags to deploy.
Make sure the accessory does not
obscure any lights, or interf ere
with proper car operation or
perf ormance.
When properly installed, cellular
phones, alarms, two-way radios, and
low-powered audio systems should
not interf ere with your car’s
computer-controlled systems, such
as the SRS and anti-lock brake
system.
213 353
A ccessories
A ccessories and Modif ications
Bef ore Driving212
Improper accessories or
modifications can affect your
car’s handling, stability, and
performance, and cause a
crash in which you can be hurt
or killed.
Follow all instructions in this
owner’s manual regarding
accessories and modifications.
Page 351 of 395
By eliminating as much of the
electrical load as possible, you can
drive several miles (kilometers)
before the battery is too discharged
to keep the engine running. Drive to
a service station or garage where
you can get technical assistance.
Immediately turn of f all electrical
accessories: radio, heater, A/C, rear
def ogger, cruise control, etc. Try not
to use other electrically-operated
controls such as the power windows.
Keep the engine running and take
extra care not to stall it. Starting the
engine will discharge the battery
rapidly.
This indicator should come on when
the ignition switch is ON (II), and go
out af ter the engine starts. If it
comes on brightly when the engine
is running, it indicates that the
charging system has stopped
charging the battery.
T aking Care of t he Unexpect ed
Charging System Indicator
348
CHARGING SYSTEM INDICATOR
Page 358 of 395
 CONT INUED
If the replacement fuse of the
same rating blows in a short time,
there is probably a serious
electrical problem in your car.
Leave the blown fuse in that
circuit and have your car checked")
CONT INUED
If the replacement fuse of the
same rating blows in a short time,
there is probably a serious
electrical problem in your car.
Leave the blown fuse in that
circuit and have your car checked
by a qualif ied mechanic.
If you cannot drive the car without
f ixing the problem, and you do not
have a spare fuse, take a fuse of the
same rating or a lower rating f rom
one of the other circuits. Make sure
youcandowithoutthatcircuit
temporarily (such as the accessory
power socket or radio). If you replace the blown f use with a
spare f use that has a lower rating, it
might blow out again. This does not
indicate anything wrong. Replace the
f use with one of the correct rating as
soon as you can.
Look f or a burned wire inside the
f use. If it is burned, replace it with
oneof thesparefusesof thesame
rating or lower.
Check the smaller f uses in the
under-hood f use box and all the
fuses in the interior fuse box by
pulling out each f use with the f use
puller provided in the under-hood
fuse box. 5.
6.
4.
Fuses
T aking Care of t he Unexpect ed355
BLOWN
FUSE PULLER
Replacing a f use with one that has a
higher rating greatly increases the
chances of damaging the electrical
system. If you do not have a replace-
ment f use with the proper rating f or the
circuit, install one with a lower rating.
Page 360 of 395
�µ�µ
�µ
�Î
�ÎNo.
No. No. Amps.
Amps. Amps. Circuits Protected
Circuits Protected
Circuits Protected
: On Canadian models
13
14
15
16
17
18
19
20
21
22
23
24
25
26
27
28
29
30
31
32
33
1
2
3
4
5
6 7
8
9
10
11
12 10 A
20 A
15 A
7.5 A 30 A
(15 A)
15 A
(10 A) 15 A
10 A
7.5 A (20 A)
(20 A)
(20 A)
(20 A)
(20 A)
15 A
15 A
7.5 A
7.5 A 10 A
7.5 A 20 A
20 A
20 A
20 A
(20 A)
7.5 A
7.5 A
7.5 A Driver’s Power Seat Slide
Heated Seat
Driver’s Power Seat Recline
IG ACG
IG Fuel Pump
IG Washer
IG Meter
IG SRS
IGP (PGM-FI ECU)
Lef t Rear Power Window
Right Rear Power Window
Right Front Power Window
Driver’s Power Window
Moonroof
Not Used
IG HAC
Not Used
ACC
HAC OP
Back-Up Lights
Door Lock
Front Accessory Sockets
IG OPDS
IG Wiper
Not Used
DrivebyWire
Ignition Coil
Day Light
Laf Heater
Radio
Interior LightPassenger’s Power Seat Recline
Passenger’s Power Seat Slide
Fuses
T aking Care of t he Unexpect ed357
INTERIOR FUSE BOX
 By eliminating as much of the
electrical load as possible, you can
drive several miles (kilometers)
before the battery is too discharged
to keep the engine running. Drive to
a service station or garag")
