Page 59 of 395
Inst rument s and Cont rols
Control L ocations
56
MIRROR CONTROLS
DOOR LOCK SWITCH
POWER WINDOW
SWITCHESHOOD RELEASE
HANDLE
(P.79)
(P.96) AUDIO SYSTEM
DIGITAL CLOCK
(P.101)
(P.206) (P.139,
156,174)
HEATING/COOLING
CONTROLS
(P.112)
TRUNK RELEASE HANDLE/
FUEL FILL DOOR RELEASE (P.134,
150,169)
(P.84/ 204) (P.
72)
HAZARD WARNING
LIGHTS
Page 63 of 395
 The appropriate light comes on in
this display if the trunk or any door
is not closed tightly.
All the lights in the monitor display
come on f or a f ew seconds when you
turn the ignition switch to ON")
The appropriate light comes on in
this display if the trunk or any door
is not closed tightly.
All the lights in the monitor display
come on f or a f ew seconds when you
turn the ignition switch to ON (II).The lef t or right turn signal light
blinks when you signal a lane change
or turn. If the light does not blink or
blinks rapidly, it usually means one
of the turn signal bulbs is burned out
(see page ). Replace the bulb as
soon as possible, since other drivers
cannot see that you are signaling.
WhenyouturnontheHazard
Warning switch, both turn signal
lights blink. All turn signals on the
outside of the car should f lash.
This indicator normally comes on f or
a f ew seconds when you turn the
ignition switch to ON (II). If it comes
on and stays on when the Traction
Control System (TCS) is on, there is
a problem with the TCS. For more
inf ormation on the TCS, see page
.
232 315
On all V6 models
Indicator L ights
Inst rument s and Cont rols
Traction Control System
(T CS) Indicator
Door Monitor
T urn Signal and
Hazard Warning
Indicators
60
Page 70 of 395
�Î
�Î
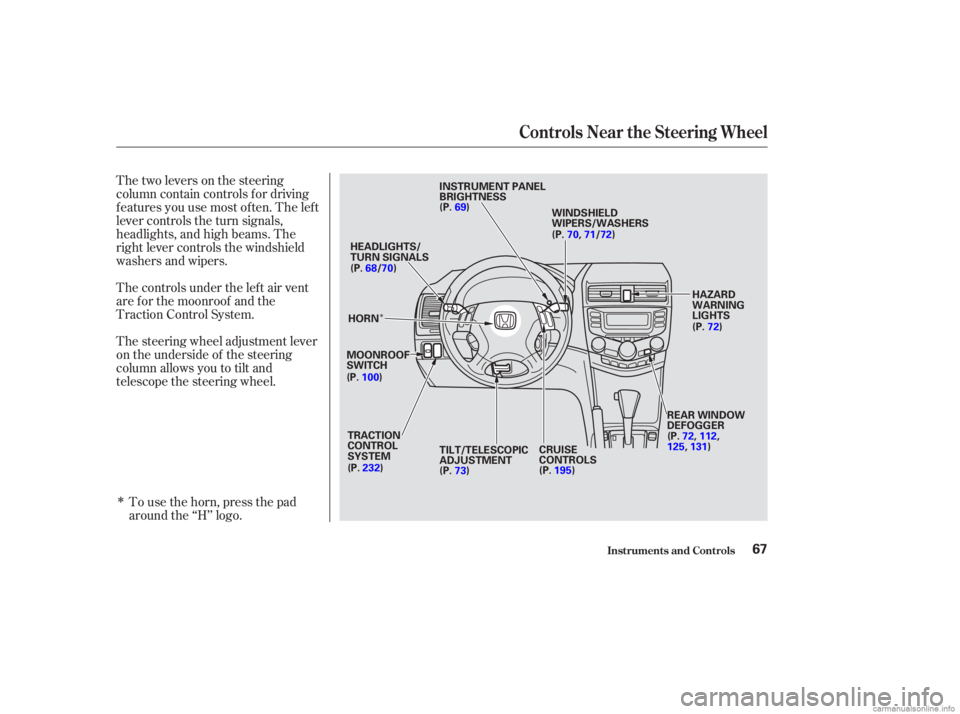
Thetwoleversonthesteering
column contain controls f or driving
f eatures you use most of ten. The lef t
lever controls the turn signals,
headlights, and high beams. The
right lever controls the windshield
washers and wipers.To use the horn, press the pad
around the ‘‘H’’ logo.
The controls under the lef t air vent
are f or the moonroof and the
Traction Control System.
The steering wheel adjustment lever
on the underside of the steering
column allows you to tilt and
telescope the steering wheel.
Inst rument s and Cont rols
Controls Near the Steering Wheel
67
INSTRUMENT PANEL
BRIGHTNESS
WINDSHIELD
WIPERS/WASHERS
HAZARD
WARNING
LIGHTS
REAR WINDOW
DEFOGGER
CRUISE
CONTROLS
TRACTION
CONTROL
SYSTEM
MOONROOF
SWITCH HEADLIGHTS/
TURN SIGNALS
(P.
69)
(P.72)
(P. 73)
(P.
68/ 70)
(P. 100)
(P. 232) (P.
70, 71/72)
(P. 195)
TILT/TELESCOPIC
ADJUSTMENT (P.
72, 112,
125, 131)
HORN
Page 75 of 395
 To clean the windshield, pull back on
the wiper control lever. The washers
spray until you release the lever. The
wipers run at low speed while you’re
pulling the lever, then complete one
more sweep")
To clean the windshield, pull back on
the wiper control lever. The washers
spray until you release the lever. The
wipers run at low speed while you’re
pulling the lever, then complete one
more sweep of the windshield af ter
you release it.Push the button between the center
vents to turn on the hazard warning
lights (f our-way f lashers). This
causes all f our outside turn signals
and both turn indicators in the
instrument panel to f lash. Use the
hazard warning lights if you need to
park in a dangerous area near heavy
traf f ic, or if your car is disabled.The rear window def ogger will clear
fog, frost, and thin ice from the
window. Push the def ogger button to
turn it on and of f . The light above
the button lights to show the
def ogger is on. It also shuts of f when
you turn off the ignition. You have to
turn it on again when you restart the
car.
Windshield Washers
Hazard WarningRear Window Def ogger
Controls Near the Steering Wheel
Inst rument s and Cont rols72
Manual A/C type shown
Page 90 of 395
 �µTo change the angle of the seat-back,
pull up on the lever on the outside of
the seat bottom. Move the seat-back
to the desired position and release
the lever. Let the seat-back latch into
the new")
�µTo change the angle of the seat-back,
pull up on the lever on the outside of
the seat bottom. Move the seat-back
to the desired position and release
the lever. Let the seat-back latch into
the new position.
To adjust the seat forward and
backward, pull up on the lever under
the seat cushion’s f ront edge. Move
the seat to the desired position and
releasethelever.Trytomovethe
seat to make sure it is locked in
position. Adjust the seat bef ore you start
driving.
The 4-cylinder EX models without
leather interior have a power seat
bottom height adjustment. All other
seat adjustments in these models are
manual. All V6 models, and the 4-cylinder EX
model with leather interior have a
power adjustable driver’s seat.
The DX and LX models in the U.S.
have manual seat adjustments (see
next column).
The f ront passenger’s seat in all
4-cylinder models, and the LX-V6
models adjusts manually. The EX-V6 model also has a power
adjustable passenger’s seat (See
page ).
91See pages f or important saf ety
inf ormation and warnings about how toproperly position seats and seat-backs. 13 14
FrontSeatAdjustments
Seat A djustments
Inst rument s and Cont rols87
Page 92 of 395
�µ
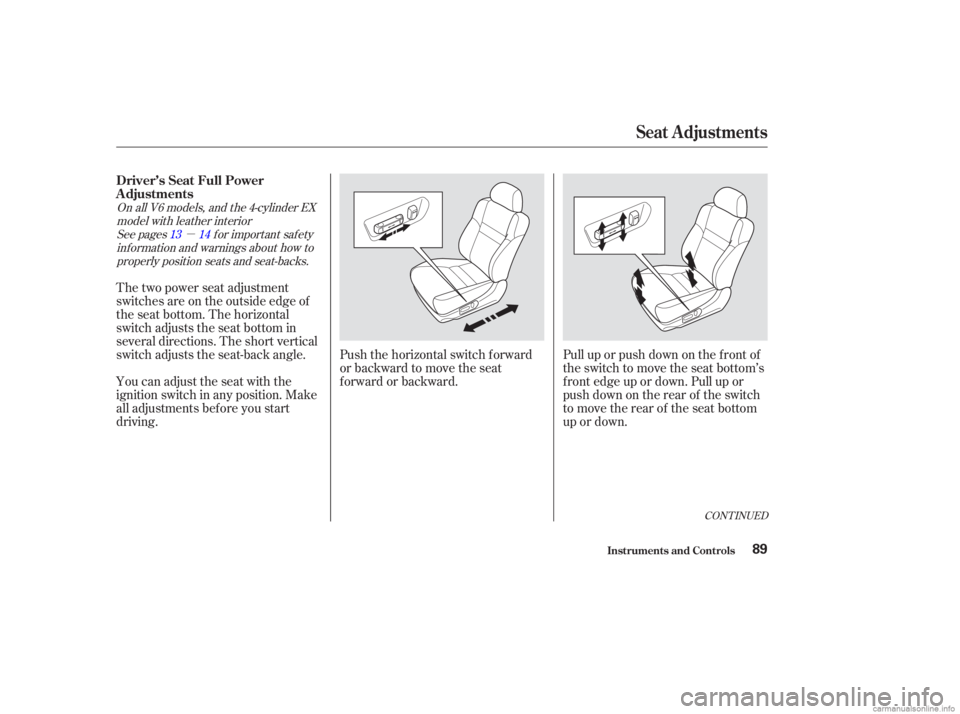
Pull up or push down on the f ront of
the switch to move the seat bottom’s
f ront edge up or down. Pull up or
push down on the rear of the switch
to move the rear of the seat bottom
up or down.
Push the horizontal switch forward
or backward to move the seat
forward or backward.
You can adjust the seat with the
ignition switch in any position. Make
all adjustments bef ore you start
driving. The two power seat adjustment
switches are on the outside edge of
the seat bottom. The horizontal
switch adjusts the seat bottom in
several directions. The short vertical
switch adjusts the seat-back angle.
See pages f or important saf ety
inf ormation and warnings about how toproperly position seats and seat-backs. 13 14
On all V6 models, and the 4-cylinder EX
model with leather interior
CONT INUED
Driver’s Seat Full Power
Adjustments
Seat A djustments
Inst rument s and Cont rols89
Page 94 of 395
 The seat adjustment switches are on
the outside edge of the seat bottom.
Push the long horizontal switch
forward or backward to move the
seat bottom in that direction.
Adjust the seat-back angle by
pu")
The seat adjustment switches are on
the outside edge of the seat bottom.
Push the long horizontal switch
forward or backward to move the
seat bottom in that direction.
Adjust the seat-back angle by
pushing the vertical switch in the
direction you want to move.The f ront head restraints help
protect you and your passenger f rom
whiplash and other injuries. They are
most ef f ective when you adjust them
so the back of the occupant’s head
rests against the center of the
restraint. A taller person should
adjust the restraint as high as
possible.
The f ront head restraints adjust f or
height. You need both hands to
adjust the restraint. Do not attempt
to adjust it while driving. To raise it,
pull upward. To lower the restraint,
push the release button sideways
and push the restraint down.
To remove a head restraint f or
cleaning or repair, pull it up as f ar as
it will go. Push the release button
and pull the restraint out of the seat-
back.
See page f or important saf ety
inf ormation and a warning about how toproperly position the head restraints. 15
On EX-V6 model
Front Passenger’s Seat
Adjustments Head Restraints
Seat A djustments
Inst rument s and Cont rols91
RELEASE BUTTON
Page 239 of 395
 �µ�µBeing able to see
clearly in all directions and being
visible to other drivers are important
in all weather conditions. This is
more dif f icult in bad weather. To be
seen more clearly during da")
�µ�µBeing able to see
clearly in all directions and being
visible to other drivers are important
in all weather conditions. This is
more dif f icult in bad weather. To be
seen more clearly during daylight
hours, turn on your headlights. Check your tires
f requently f or wear and proper
pressure. Both are important in
preventing ‘‘hydroplaning’’ (loss of
traction on a wet surface). In the
winter, mount snow tires on all f our
wheels f or the best handling.
Watch road conditions caref ully,
they can change f rom moment to
moment. Wet leaves can be as slip-
pery as ice. ‘‘Clear’’ roads can have
patches of ice. Driving conditions
can be very hazardous when the
outside temperature is near f reezing.
The road surf ace can become
covered with areas of water puddles
mixed with areas of ice, so your
traction can change without warning.
Be caref ul when downshif ting. If
traction is low, you can lock up the
drive wheels f or a moment and cause
askid. Be very cautious when passing, or
beingpassedbyothervehicles.The
spray f rom large vehicles reduces
your visibility, and the wind buf f eting
can cause you to lose control.
Inspect your windshield wipers and
washers f requently. Keep the wind-
shield washer reservoir f ull of the
proper f luid. Have the windshield
wiper blades replaced if they start to
streak the windshield or leave parts
unwiped. Use the def roster and air
conditioning to keep the windows
f rom f ogging up on the inside (see
pages and ).
131
125
Visibility
Traction
Driving
Driving in Bad Weather
236
 Inst rument s and Cont rols
Control L ocations
56
MIRROR CONTROLS
DOOR LOCK SWITCH
POWER WINDOW
SWITCHESHOOD RELEASE
HANDLE
(P.79)
(P.96) AUDIO SYSTEM
DIGITAL CLOCK
(P.101)
(P.206) (P.139,
156,174)
HE")