Page 22 of 395
Each time you have a check-up, ask
your doctor if it’s okay f or you to
drive.
Remember to keep the lap portion of
the belt as low as possible across
your hips. Pregnant women should also sit
upright and as f ar back as possible
f rom the steering wheel or
dashboard. This will reduce the risk
of injuries to both the mother and
her unborn child that can be caused
by a crash or an inf lating airbag.
Remember, to get the best
protection f rom your car’s airbags
and other safety features, you must
sit properly and wear your seat belt
properly.
Because protecting the mother is the
best way to protect her unborn child,
a pregnant woman should always
wear a seat belt whenever she drives
or rides in a car.
Protecting Adults
Advice f or Pregnant Women
Driver and Passenger Saf ety19
Page 23 of 395
 If they do, they
could be very seriously injured in a
crash.
Devices intended to improve
occupant comf ort or reposition the
shoulder part of a seat belt can
severely compromise the
protective capabil")
If they do, they
could be very seriously injured in a
crash.
Devices intended to improve
occupant comf ort or reposition the
shoulder part of a seat belt can
severely compromise the
protective capability of the seat
belt and increase the chance of
serious injury in a crash. Carrying hard or sharp
objects on your lap, or driving with
a pipe or other sharp objects in
your mouth, can result in injuries
if your f ront airbag inf lates.
Any object
attached to or placed on the covers
marked ‘‘SRS AIRBAG’’ in the
center of the steering wheel and
on top of the dashboard could
interf ere with the proper operation
of the airbags. Or, if the airbags
inf late, the objects could be
propelled inside the car and hurt
someone. If a side airbag or a side
curtain airbag inf lates, a cup
holder or other hard object
attached on or near the door could
be propelled inside the car and
hurt someone.
If your
hands or arms are close to the
airbag cover in the center of the
steering wheel or on top of the
dashboard, they could be injured if
the front airbag inflates.
Protecting Adults
Driver and Passenger Saf ety
Additional Saf ety Precautions
T wo people should never use t he
same seat belt .
Do not put any accessories on seatbelts. Do not place hard or sharp object s
bet ween yourself and a f rontairbag.
Do not at t ach or place object s onthe f ront airbag covers. On models wit h side airbags or
side curtain airbags, do not attachhard object s on or near a f rontdoor.
K eep your hands and arms awayf rom t he airbag covers.
20
Page 48 of 395
 Your Supplemental Restraint System
(SRS) includes:Two f ront airbags. The driver’s
airbag is stored in the center of
the steering wheel; the f ront
passenger’sairbagisstoredinthe
dashboard. Both a")
Your Supplemental Restraint System
(SRS) includes:Two f ront airbags. The driver’s
airbag is stored in the center of
the steering wheel; the f ront
passenger’sairbagisstoredinthe
dashboard. Both are marked ‘‘SRS
AIRBAG.’’
Emergency backup power in case
your car’s electrical system is
disconnected in a crash. An indicator light on the
instrument panel that alerts you to
a possible problem with the
system (see page ). A sophisticated electronic system
that continually monitors and
records inf ormation about the
sensors, the control unit, the
airbag activators, and driver and
passenger seat belt use when the
ignition is ON (II).
Automatic seat belt tensioners
that tighten the front seat belts
during a moderate to severe
f rontal collision.
Sensors that can detect a
moderate to severe frontal
collision. Your car is equipped with dual-stage,
dual-threshold airbags to help reduce
the chance of airbag-caused injuries.
48
CONT INUED
SRS Components
How Your Front A irbags Work
Driver and Passenger Saf ety
Additional Inf ormation About Your Airbags
45
Page 58 of 395
 This section gives inf ormation about
the controls and displays that
contribute to the daily operation of
your Honda. All the essential
controls are within easy reach............................
Contr")
This section gives inf ormation about
the controls and displays that
contribute to the daily operation of
your Honda. All the essential
controls are within easy reach............................
Control Locations .56
...............................
Indicator Lights .57
.............................................
Gauges .63
...............................
Speedometer .63
.................................
Tachometer .63
Odometer/Outside ...........
Temperature Indicator . 63
.....................................
Odometer .63
...................................
Trip Meter .64
...................
Temperature Gauge . 64
..................................
Fuel Gauge .65
Maintenance Required ...................................
Indicator .65
Controls Near the Steering .......................................
Wheel .67
...................................
Headlights .68
Automatic Lighting Off .....................................
Feature .69 ............
Daytime Running Lights . 69
....
Instrument Panel Brightness . 69
................................
Turn Signals .70
.....................
Windshield Wipers .70
..................
Windshield Washers . 72
..........................
Hazard Warning .72
.............
Rear Window Def ogger . 72
......
Steering Wheel Adjustment . 73
...............................
Keys and Locks .74
..............................................
Keys .74
....................
Immobilizer System . 76
............................
Ignition Switch .77
..................................
Door Locks .78
...................
Remote Transmitter . 80
..............
Childproof Door Locks . 84
...........................................
Trunk .84
........
Emergency Trunk Opener . 85
....................................
Glove Box .86
............................
Seat Adjustments .87
.............
Front Seat Adjustments . 87
Driver’s Seat Manual Height ..............................
Adjustment .88
Driver’s Seat Power Height ..............................
Adjustment .88
Driver’s Seat Full Power ............................
Adjustments .89 ...........
Driver’s Lumbar Support . 90
Front Passenger’s Seat ............................
Adjustments .91
..........................
Head Restraints .91
.......................
Folding Rear Seat .92
.................
Rear Head Restraints . 93
......................
Rear Seat Armrest .93
....................................
Seat Heaters .95
..............................
Power Windows .96
Power Window Control ...............................
Operations .99
.......................................
Moonroof .100
...........................................
Mirrors .101
..
Adjusting the Power Mirrors . 101
...............................
Parking Brake .102
.................
Console Compartment . 103
..........................................
Armrest .103
.........................
Beverage Holders .104
.........................
Center CD Pocket .105
...................................
Coin Pocket .105
........................................
Sun Visor .106
................................
Vanity Mirror .106
........................
Sunglasses Holder .107
............
Accessory Power Sockets . 107
...............................
Interior Lights .108
Instruments and Controls
Inst rument s and Cont rols55
Page 70 of 395
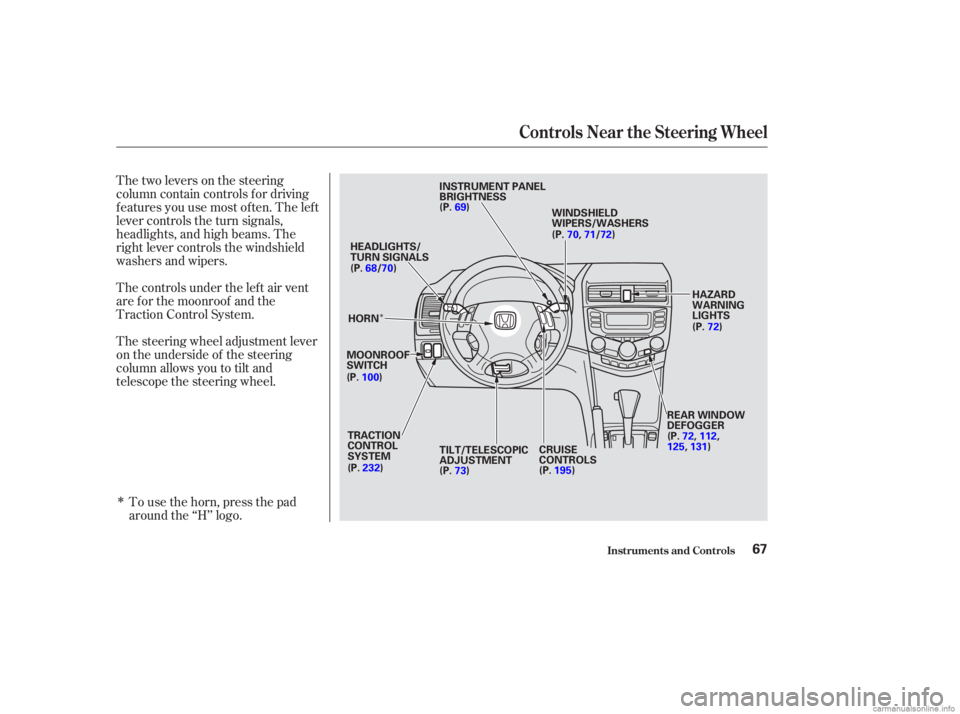
�Î
�Î
Thetwoleversonthesteering
column contain controls f or driving
f eatures you use most of ten. The lef t
lever controls the turn signals,
headlights, and high beams. The
right lever controls the windshield
washers and wipers.To use the horn, press the pad
around the ‘‘H’’ logo.
The controls under the lef t air vent
are f or the moonroof and the
Traction Control System.
The steering wheel adjustment lever
on the underside of the steering
column allows you to tilt and
telescope the steering wheel.
Inst rument s and Cont rols
Controls Near the Steering Wheel
67
INSTRUMENT PANEL
BRIGHTNESS
WINDSHIELD
WIPERS/WASHERS
HAZARD
WARNING
LIGHTS
REAR WINDOW
DEFOGGER
CRUISE
CONTROLS
TRACTION
CONTROL
SYSTEM
MOONROOF
SWITCH HEADLIGHTS/
TURN SIGNALS
(P.
69)
(P.72)
(P. 73)
(P.
68/ 70)
(P. 100)
(P. 232) (P.
70, 71/72)
(P. 195)
TILT/TELESCOPIC
ADJUSTMENT (P.
72, 112,
125, 131)
HORN
Page 71 of 395
If you leave the lights on with the
ignition switch in ACCESSORY (I)
or LOCK (0), you will hear a
reminder chime when you open the
driver’s door.
To change f rom low beams to high
beams, push the turn signal lever
f orward until you hear a click. The
blue high beam indicator will light
(see page ). To return to low
beams, pull the turn signal lever
back.To f lash the high beams, pull the
turn signal lever back lightly, then
release it. The high beams will come
on and go of f .
The high beams will stay on f or as
long as you hold the lever back, no
matter what position the headlight
switch is in.
The rotating switch on the lef t lever
controls the lights. Turning this
switch to the ‘‘ ’’ position turns
on the parking lights, taillights,
instrument panel lights, and rear
license plate lights. Turning the
switch to the ‘‘ ’’ position turns
on the headlights.
62
Controls Near the Steering Wheel
Inst rument s and Cont rols
Headlights
68
Page 72 of 395
 The Select/Reset knob on the
instrument panel controls the
brightness of the instrument panel
lights. Turn the knob to adjust the
brightness.
The Automatic Lighting Of f f eature
turns of f the headli")
The Select/Reset knob on the
instrument panel controls the
brightness of the instrument panel
lights. Turn the knob to adjust the
brightness.
The Automatic Lighting Of f f eature
turns of f the headlights, parking
lights, taillights and license plate
light within 15 seconds of removing
the key from the ignition switch and
closing the driver’s door.
This feature activates if you leave
the headlight switch in the ‘‘ ’’
or ‘‘ ’’ position, remove the key,
open, then close the driver’s door.
If you remove the key f rom the
ignition switch with the headlight
switch on, but do not open the door
and get out, the lights will turn of f
af ter ten minutes.
The lights will turn on again when
you unlock or open the driver’s door.
If you unlock the door, but do not
open it within 15 seconds, the lights
will go off. With the driver’s door open, you will hear a lights-on
reminder chime.
With the headlight switch off, the
high beam headlights and the high
beam indicator come on with
reduced brightness when you turn
the ignition switch to ON (II) and
release the parking brake. They
remain on until you turn the ignition
of f , even if you set the parking brake.
The headlights revert to normal
operation when you turn them on
with the switch.
On all U.S. and Canadian models except
DX
Controls Near the Steering Wheel
Inst rument s and Cont rols
Automatic Lighting Of f Feature Instrument Panel Brightness
Daytime Running L ights
(Canadian Models)
69
Page 73 of 395
Signal a turn or lane change with this
lever. Push down on the lever to
signal a lef t turn, and up to signal a
right turn. If you push it up or down
all the way, the turn signal continues
to blink even when you release the
lever. It shuts off automatically as
you complete the turn.To signal a lane change, push lightly
on the turn signal lever in the proper
direction and hold it. The lever will
return to the center position as soon
as you release it.
This lever controls the windshield
wipers and washers. It has five
positions:MIST: mist
OFF: off
INT: intermittent
LO: low speed
HI: high speed
To select a position, push the lever
up or down.
T urn Signals
Windshield Wipers
Inst rument s and Cont rols
Controls Near the Steering Wheel
70
TURN SIGNAL LEVER
 Each time you have a check-up, ask
your doctor if it’s okay f or you to
drive.
Remember to keep the lap portion of
the belt as low as possible across
your hips. Pregnant women should also sit
uprigh")
 If you leave the lights on with the
ignition switch in ACCESSORY (I)
or LOCK (0), you will hear a
reminder chime when you open the
driver’s door.
To change f rom low beams to high
beams, push the tu")
 Signal a turn or lane change with this
lever. Push down on the lever to
signal a lef t turn, and up to signal a
right turn. If you push it up or down
all the way, the turn signal continues
to blink ev")