Page 177 of 380

CONT INUED
When you touch the TRACK SCAN
icon on the audio display or press the
SCAN button next to the display, the
f irst track of the current CD plays
about 10 seconds. You will see
TRACK SCAN in the display (or
SCAN in the upper display). To hear
the rest of the track, touch TRACK
SCAN or press SCAN again, within
10 seconds. If you don’t, the system
advances to the next track, plays
about 10 seconds of it, and continues
through the rest of the tracks the
same way.When you touch the DISC RPT icon
on the audio display, the system
continuously replays the current CD.
As a reminder, you will see DISC
REPEAT in the display (or D-RPT in
the upper display). To turn this
f eature of f , touch Disc RPT again.
When you touch the RANDOM icon
on the audio display, the system
plays the tracks of the current CD in
random order, rather than in the
order they were recorded. As a
reminder, you will see TRACK
RANDOM in the display (or RDM in
the upper display). To turn this
f eature of f , touch RANDOM again,
or select a dif f erent CD with one of
the disc icons.
When you touch the TRACK RPT
icon on the audio display, the system
continuously replays the current
track. As a reminder, you will see
TRACK REPEAT in the display (or
RPT in the upper display). To turn
this feature off, touch TRACK
REPEAT again.
When you touch the DISC SCAN
icon on the audio display, the f irst
track of the current CD plays about
10 seconds. You will see DISC SCAN
in the display (or D-SCAN in the
upper display). To hear the rest of
the CD, touch DISC SCAN again,
within 10 seconds. If you don’t, the
system advances to the next CD,
plays about 10 seconds of it, and
continues through the rest of the
CDs the same way.
Audio System
Comf ort and Convenience Feat ures
T rack Scan
Disc Repeat
Random Play
T rack Repeat
Disc Scan
181
�����—�����—�����y������
��������y���
�(�����������y���
�����y
Page 179 of 380
To remove the disc that is currently
playing, press the eject button. You
will see ‘‘EJEC’’ in the display. When
you remove the disc f rom the slot,
the system automatically begins the
load sequence so you can load
another CD in that position. If you do
not load another CD, af ter 15
seconds, the system selects the
previous mode (AM,/FM1, or FM2).
If you do not remove the disc f rom
the slot, the system will reload the
disc af ter 15 seconds and put the CD
changer in pause mode. To begin
playing the disc, press the CD button.
To remove a different CD from the
changer,firstselectitwiththe
appropriate disc icon or the DISC bar.
When that CD begins playing, press
the eject button.
CONT INUED
Removing CDs f rom t he Changer
Audio System
Comf ort and Convenience Feat ures183
CD
BUTTONDISC BAR
EJECT
BUTTON
�����—�����—�����y������
��������y���
�(�����������y���
�����y
Page 181 of 380
Indication
If you see an error indication in the
upper display while operating the CD
changer, f ind the cause in the chart
to the right. If you cannot clear the
error indication, take the car to your
Honda dealer. Solution
Cause
Press the CD eject button and pull out the CDs.
Check for an error indication. Insert the CDs
again. If the code does not disappear or the
CDs cannot be pulled out, consult your Hondadealer.
Press the CD eject button and pull out the CDs.
Check for an error indication. Insert the CDs
again. If the code does not disappear or the
CDs cannot be pulled out, consult your Hondadealer.
FOCUS Error
Mechanical Error
CD Changer Error Indications
Audio System
Comf ort and Convenience Feat ures185
�����—�����—�����y������
����
���y���
�(�����������y���
�����y
Page 183 of 380
�Î
�Î
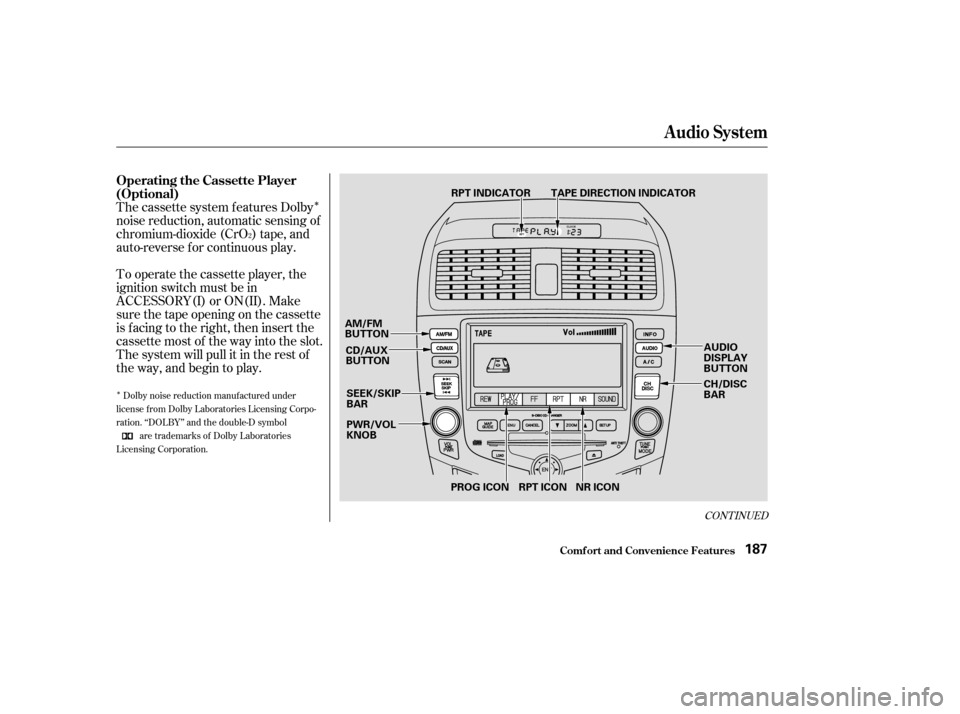
The cassette system f eatures Dolby
noise reduction, automatic sensing of
chromium-dioxide (CrO ) tape, and
auto-reverse f or continuous play.
To operate the cassette player, the
ignition switch must be in
ACCESSORY(I) or ON(II). Make
sure the tape opening on the cassette
is f acing to the right, then insert the
cassette most of the way into the slot.
The system will pull it in the rest of
the way, and begin to play.
2
Dolby noise reduction manuf actured under
license from Dolby Laboratories Licensing Corpo-
ration. ‘‘DOLBY’’ and the double-D symbol
are trademarks of Dolby Laboratories
Licensing Corporation.
CONT INUED
Operating the Cassette Player
(Optional)
Audio System
Comf ort and Convenience Feat ures187
PWR/VOL KNOB
CD/AUX
BUTTON TAPE DIRECTION INDICATOR
RPT INDICATOR
SEEK/SKIP
BAR
AM/FM
BUTTON
CH/DISC
BAR
RPT ICON NR ICON
PROG ICON AUDIO
DISPLAY
BUTTON
�����—�����—�����y������
������
�y���
�(�����������y���
�����y
Page 184 of 380

�Û
The tape direction indicator will light
to show you which side of the
cassette is playing. The indicates
thesideyouinsertedfacingupward
is now playing. If you want to play
the other side, push the AUDIO
DISPLAY button to change to the
audio display, and touch the PROG
icon. Dolby noise reduction turns on when
you insert a cassette. If the tape was
not recorded with Dolby noise reduc-
tion, push the AUDIO DISPLAY
button to change to the audio display,
and turn it of f by touching the NR
icon on the display.
Noise reduction remains of f until you
turn it on by pressing the icon again.
When the system reaches the end of
the tape, it will automatically reverse
direction and play the other side. If
you want to remove the cassette
from the drive, press the eject button
on the cassette player.If you turn the system of f while a
tape is playing, either with the PWR/
VOL knob or by turning of f the
ignition, the cassette will remain in
the drive. When you turn the system
back on, the cassette player will be in
pause mode. To begin playing, push
the AUDIO DISPLAY button to
change to the audio display, and
touch the PROG icon.
To switch to the radio or CD player
while a tape is playing, press the
AM/FM, or CD/AUX button. To
change back to the cassette player,
push the CD/AUX button.
Audio System
Comf ort and Convenience Feat ures188
�����—�����—�����y������
��������y���
�(�����������y���
���
�y
Page 185 of 380

�µ
�µ
�Û �Ý
With a cassette playing, you can use
the FF, REW, SKIP, or REPEAT
f unction to f ind a desired program.
The Skip f unction allows
youtofindthebeginningof asong
or passage. To activate SKIP, press
the SEEK/SKIP bar. Press the side to advance to the
beginning of the next song or
passage, or the side to return to
the beginning of the current song or
passage. FF or REW will be shown in
the upper display as the tape moves.
When the system reaches the
beginning of the next song or
passage (FF), or the beginning of
thecurrentone(REW),itgoesback
to PLAY mode.
Fast Forward and Re-
wind move the tape rapidly. To re-
wind the tape, push the upper side
( ) of the CH DISC bar. You will
seeREWinthedisplay.Tofastfor-
ward the tape, push the lower side
( ) of the CH DISC bar. You will
see FF displayed. Press either side of
the CH DISC bar or touch the PROG
icon in the audio display to take the
system out of rewind or f ast f orward.
When the system reaches the end of
the tape, it reverses direction and
begins to play.
CONT INUED
T ape Search Functions SK IP
FF/REW
Audio System
Comf ort and Convenience Feat ures189
�����—�����—�����y������
��������y���
�(�����������y���
�����y
Page 186 of 380
�µThe SKIP and REPEAT f unctions
use silent periods on the tape to f ind
the end of a song or passage. These
f eatures may not work to your
satisfaction if there is almost no gap
between selections, a high noise
level between selections, or a silent
period in the middle of a selection.
The Repeat f unction
continuously replays the current
song or passage. Press the AUDIO
DISPLAY button to change to the
audio display, and touch the RPT
icon in the display to activate it; you
will see RPT displayed in the upper
display as a reminder. When the
system reaches the end of the song
or passage currently playing, it will
automatically go into rewind. When
it senses the beginning of the same
song or passage, the system returns
to PLAY mode. It will continue to
repeat this same program until you
deactivate REPEAT by touching the
icon again.
Audio System
Comf ort and Convenience Feat ures
REPEAT
190
�����—�����—�����y������
��������y���
�(�����������y���
�����y
Page 187 of 380

The cassette player picks up dirt and
oxides f rom the tape. This contami-
nation builds up over time and
causes the sound quality to degrade.
To prevent this, you should clean the
player af ter every 30 hours of use.
Your dealer has a cleaning kit
available.
If you do not clean the cassette
player regularly, it may eventually
become impossible to remove the
contamination with a normal
cleaning kit.
Use 100-minute or shorter cassettes.
Cassettes longer than that use
thinner tape that may break or jam
the drive.Look at the cassette before you
insert it. If the tape is loose, tighten
it by turning a hub with a pencil or
your f inger.
If the label is peeling of f , remove it
from the cassette or it could cause
the cassette to jam in the player.
Never try to insert a warped or
damaged cassette in the player.
When they are not in use, store
cassettes in their cases to protect
them f rom dust and moisture. Never
place cassettes where they will be
exposed to direct sunlight, high heat,
or high humidity. If a cassette is
exposed to extreme heat or cold, let
it reach a moderate temperature
bef ore inserting it in the player.
Never try to insert f oreign objects
into the cassette player.If you see the error indication
‘‘ ’’ f lashing on the display,
press the TAPE eject button to
remove the cassette from the unit.
Make sure the tape is not damaged.
If the cassette will not eject or the
error indication stays on after the
cassette ejects, take the car to your
Honda dealer.
If you see the error indication
‘‘ ’’ on the upper display,
press the TAPE eject button to
remove the cassette from the unit.
Make sure the tape is not damaged.
If the cassette will not eject or the
error indication stays on after the
cassette ejects, take the car to your
Honda dealer.
On Audio system with Navigation
System
On Audio systems without Navigation
System and on DX and LX models
Caring f or the Cassette Player
Audio System
Comf ort and Convenience Feat ures191
�����—�����—�����y������
��������y���
�(�����������y���
�����y