Page 142 of 380
�Î
�Î
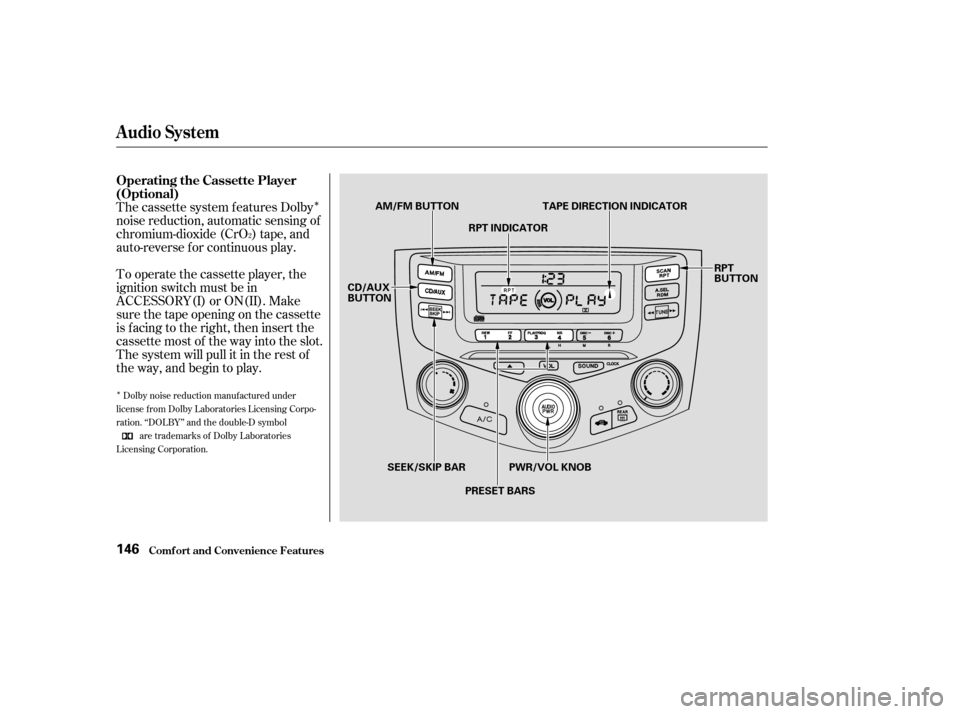
The cassette system f eatures Dolby
noise reduction, automatic sensing of
chromium-dioxide (CrO ) tape, and
auto-reverse f or continuous play.
To operate the cassette player, the
ignition switch must be in
ACCESSORY(I) or ON(II). Make
sure the tape opening on the cassette
is f acing to the right, then insert the
cassette most of the way into the slot.
The system will pull it in the rest of
the way, and begin to play.
2
Dolby noise reduction manuf actured under
license from Dolby Laboratories Licensing Corpo-
ration. ‘‘DOLBY’’ and the double-D symbol
are trademarks of Dolby Laboratories
Licensing Corporation.
Operating the Cassette Player
(Optional)
Audio System
Comf ort and Convenience Feat ures146
RPT
BUTTON
PWR/VOL KNOB
AM/FM BUTTON
CD/AUX
BUTTON TAPE DIRECTION INDICATOR
RPT INDICATOR
SEEK/SKIP BAR PRESET BARS
�����—�����—�����y������
����
���y���
�(�����������y���
�����y
Page 143 of 380

�Û
The tape direction indicator will light
to show you which side of the
cassette is playing. The indicates
thesideyouinsertedfacingupward
is now playing. If you want to play
the other side, press the Preset 3
(PLAY/PROG) side of the preset
bar. Dolby noise reduction turns on when
you insert a cassette. The indi-
cator will light in the display. If the
tape was not recorded with Dolby
noise reduction, turn it of f by
pressing the Preset 4 (NR) side of
the preset bar.
Noise reduction remains of f until you
turn it on by pressing the button
again.If you turn the system of f while a
tape is playing, either with the PWR/
VOL knob or by turning of f the
ignition, the cassette will remain in
the drive. When you turn the system
back on, the cassette player will be in
pause mode. To begin playing, press
thePreset3(PLAY/PROG)sideof
the preset bar.
To switch to the radio or CD player
while a tape is playing, press the
AM/FM, or CD/AUX button. To
change back to the cassette player,
push the CD/AUX button.
When the system reaches the end of
the tape, it will automatically reverse
direction and play the other side. If
you want to remove the cassette
from the drive, press the eject button
on the cassette player.
Audio System
Comf ort and Convenience Feat ures147
�����—�����—�����y������
��������y���
�(�����������y���
�����y
Page 147 of 380

�µ�µ
The band and f requency that the
radio was last tuned to is displayed.
To change bands, press the AM/FM
button. On the FM band, ST will be
displayed if the station is broadcast-
ing in stereo. Stereo reproduction on
AM is not available.
You can use any of f ive methods to
f ind radio stations on the selected
band: TUNE, SEEK, SCAN, AUTO
SELECT, and the preset bars.
The ignition switch must be in
ACCESSORY (I) or ON (II) to
operate the audio system. Turn the
system on by pressing the PWR/
VOL knob, or the AM or FM button.
Adjust the volume by turning the
knob.
Use the TUNE bar to tune
the radio to a desired f requency.
Push the on the TUNE bar to
tune to a higher f requency, or push
the to tune to a lower f requency.
Hold the bar down until the display
reaches the desired f requency. The SEEK f unction
searches the band for a station with
a strong signal. To activate it, press
the SEEK bar ( or ), then
release it. Depending on which side
of the SEEK bar you press, the
system scans upward or downward
f rom the current f requency. It stops
when it finds a station with a strong
signal.
CONT INUED
Operating the Radio T UNE SEEK
Audio System
Comf ort and Convenience Feat ures151
�����—�����—�����y������
��������y���
�(�����������y���
�����y
Page 152 of 380

For example:1:06 would RESET to 1:00.
1:52 would RESET to 2:00.
If your car’s battery is disconnected
or goes dead, the time setting will be
lost. To set the time again, f ollow the
setting procedure.
The audio system usually shows the
time when the ignition switch is in
ACCESSORY (I) or ON (II). It
shows the operation mode of the
radio, or CD changer when you
operate them, then goes back to the
time display af ter three seconds.
You can use the R (Preset 6) side of
the bar to quickly set the time to the
nearest hour. Press R while pressing
the SOUND button. If the displayed
time is before the half hour, pressing
Rsetstheclockbacktotheprevious
hour. If the displayed time is af ter
the half hour, pressing R sets the
clock f orward to the beginning of the
next hour.
To set the time, press and hold the
SOUND button until the audio
system beeps and the clock f lashes.
To set the hours, press and hold the
H (Preset 4) side of the bar until the
numbers advance to the desired time.
To set the minutes, press and hold
the M (Preset 5) side of the bar until
the numbers advance to the desired
time.
When you are f inished, press the
SOUND button again.
Digital Clock
Audio System
Comf ort and Convenience Feat ures156
DIGITAL CLOCK
SOUND BUTTON PRESET BARS
�����—�����—�����y������
��������y���
�(�����������y���
�����y
Page 153 of 380
Your Honda’s audio system has an
in-dash CD changer that holds up to
six discs, providing several hours of
continuous entertainment. You
operate this CD changer with the
same controls used f or the radio.
To load CDs or operate the CD
changer, the ignition switch must be
in ACCESSORY (I) or ON (II).
Load and play only standard round
discs. Odd-shaped CDs may jam in
the drive or cause other problems.
You cannot load and play 3-inch
(8-cm)discsinthissystem.
For best results when using CD-R
discs, use only high quality discs
labeled f or audio use. When
recording a CD-R, the recording
must be closed in order f or the disc
to be used by CD players. CD-RW
discs will not work in this unit.
CONT INUED
Operating the CD Changer
Audio System
Comf ort and Convenience Feat ures157
CD BUTTONEJECT
BUTTON
RPT BUTTON
DISC NUMBER
CD SLOT
LOAD BUTTON CD LOAD INDICATOR
�����—�����—�����y������
��������y���
�(�����������y���
�����y
Page 157 of 380
If you turn the system of f while a CD
is playing, either with the PWR
button or the ignition switch, play
will continue at the same point when
youturnitbackon.
To take the system out of CD mode,
press the AM/FM button. Each time
you press the AM/FM button, the
system will change to the next mode;
FM1, FM2 or AM. When you return
to CD mode by pressing the CD
button, play will continue at the same
point that it left off.
CONT INUED
Audio System
Comf ort and Convenience Feat ures161
AM/FM BUTTON
CD BUTTON PWR BUTTON
�����—�����—�����y������
��������y���
�(�����������y���
�����y
Page 159 of 380
For inf ormation on how to handle
and protect compact discs, see page.
In any mode, if you press the eject
button and hold it until you hear a
beep, the system will eject all of the
discs in the changer.
You can also eject discs when the
ignition switch is of f by pressing the
eject button. The disc that was last
selected is ejected f irst. You can
eject up to f ive discs, one at a time.
If you press the eject button while
listening to the radio, or with the
audio system turned of f , the disc
that was last selected is ejected.
Af ter that disc is ejected, pressing
the eject button again will eject the
next disc in numerical order. By
doing this six times, you can remove
all the CDs f rom the changer.
186
Protecting Compact Discs
Audio System
Comf ort and Convenience Feat ures163
�����—�����—�����y������
��������y���
�(�����������y���
�����y
Page 161 of 380
�Î
�Î
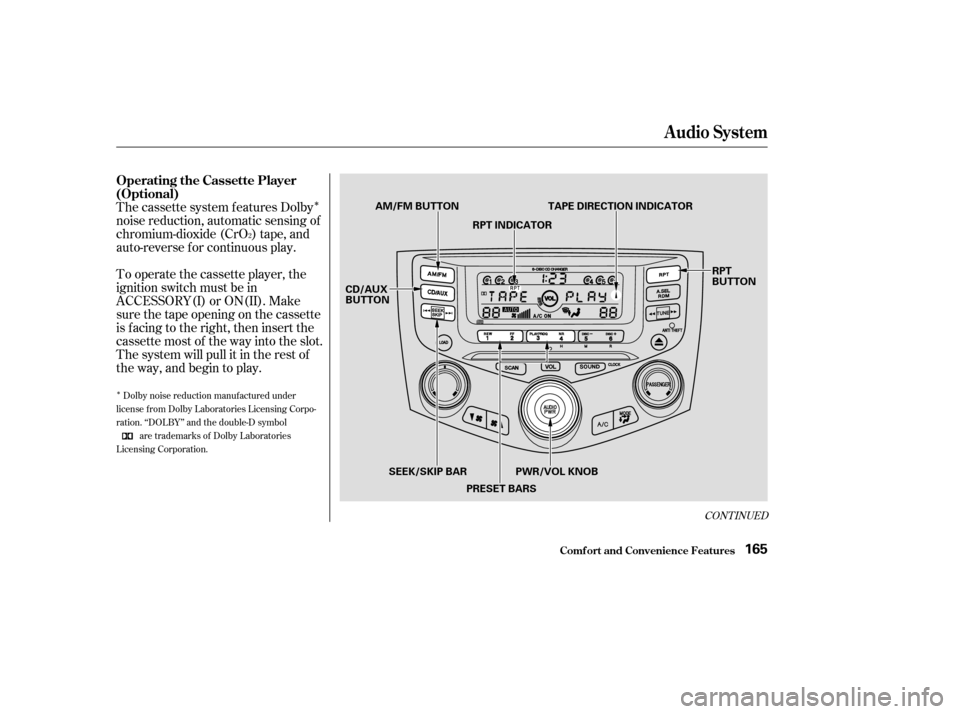
The cassette system f eatures Dolby
noise reduction, automatic sensing of
chromium-dioxide (CrO ) tape, and
auto-reverse f or continuous play.
To operate the cassette player, the
ignition switch must be in
ACCESSORY(I) or ON(II). Make
sure the tape opening on the cassette
is f acing to the right, then insert the
cassette most of the way into the slot.
The system will pull it in the rest of
the way, and begin to play.
2
Dolby noise reduction manuf actured under
license from Dolby Laboratories Licensing Corpo-
ration. ‘‘DOLBY’’ and the double-D symbol
are trademarks of Dolby Laboratories
Licensing Corporation.
CONT INUED
Operating the Cassette Player
(Optional)
Audio System
Comf ort and Convenience Feat ures165
RPT
BUTTON
CD/AUX
BUTTON AM/FM BUTTON TAPE DIRECTION INDICATOR
RPT INDICATOR
PWR/VOL KNOB
SEEK/SKIP BAR
PRESET BARS
�����—�����—�����y������
����
�
�y���
�(�����������y���
�����y