Page 338 of 429

Every time you check inf lation, you
should also examine the tires f or
damage, f oreign objects, and wear.
Youshouldlookfor:Bumps or bulges in the tread or
side of the tire. Replace the tire if
youfindeitherof theseconditions.
Cuts, splits, or cracks in the side
of the tire. Replace the tire if you
can see f abric or cord.
Excessive tread wear. In addition to proper inf lation,
correct wheel alignment helps to
decrease tire wear. If you f ind a tire
is worn unevenly, have your dealer
check the wheel alignment.
The tires were properly balanced by
the factory. They may need to be
rebalanced at some time bef ore they
are worn out. Have your dealer
check the tires if you f eel a consis-
tent vibration while driving. A tire
should always be rebalanced if it is
removed f rom the wheel f or repair.
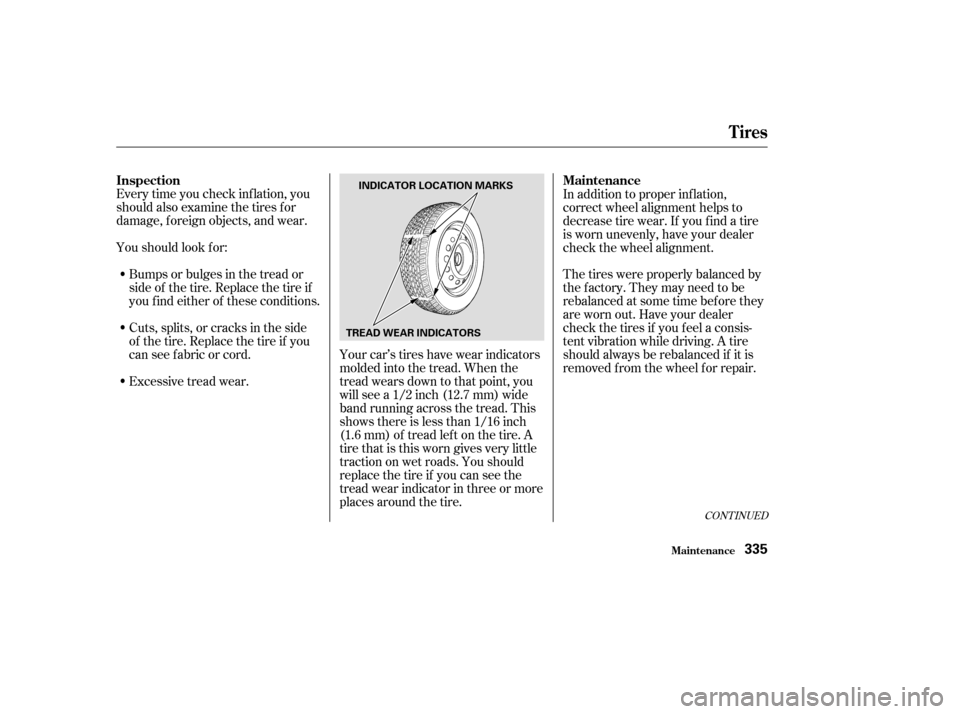
Your car’s tires have wear indicators
molded into the tread. When the
tread wears down to that point, you
will see a 1/2 inch (12.7 mm) wide
band running across the tread. This
shows there is less than 1/16 inch
(1.6 mm) of tread lef t on the tire. A
tire that is this worn gives very little
traction on wet roads. You should
replace the tire if you can see the
tread wear indicator in three or more
places around the tire.
CONT INUED
Inspection
Maintenance
Tires
Maint enance335
INDICATOR LOCATION MARKS
TREAD WEAR INDICATORS
Page 339 of 429

Make sure the installer balances the
wheels when you have new tires
installed. This increases riding
comf ort and tire lif e. Your car’s
original tires were dynamic or ‘‘spin’’
balanced at the f actory. For best
results, have the installer perf orm a
dynamic balance.When shopping f or replacement
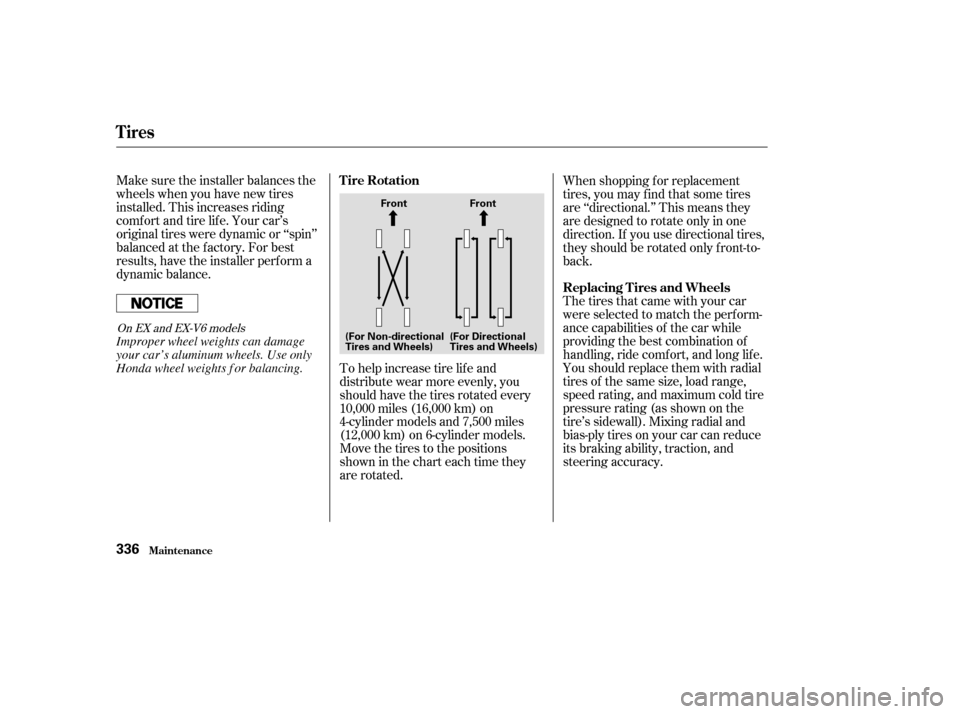
tires, you may find that some tires
are ‘‘directional.’’ This means they
are designed to rotate only in one
direction. If you use directional tires,
they should be rotated only front-to-
back.
The tires that came with your car
were selected to match the perform-
ance capabilities of the car while
providing the best combination of
handling, ride comf ort, and long lif e.
Youshouldreplacethemwithradial
tires of the same size, load range,
speed rating, and maximum cold tire
pressure rating (as shown on the
tire’s sidewall). Mixing radial and
bias-ply tires on your car can reduce
its braking ability, traction, and
steering accuracy.
To help increase tire lif e and
distribute wear more evenly, you
should have the tires rotated every
10,000 miles (16,000 km) on
4-cylinder models and 7,500 miles
(12,000 km) on 6-cylinder models.
Move the tires to the positions
showninthecharteachtimethey
are rotated.
On EX and EX-V6 models
Tire Rotation
Replacing T ires and Wheels
Tires
Maint enance336
(For Non-directional
Tires and Wheels)Front
(For Directional
Tires and Wheels)FrontImproper wheel weights can damage
your car’s aluminum wheels. Use only
Honda wheel weights f or balancing.
Page 340 of 429

It is best to replace all f our tires at
thesametime.If thatisnotpossible
or necessary, then replace the two
f ront tires or the two rear tires as a
pair. Replacing just one tire can
seriously af f ect your car’s handling.Tires:
TheABSworksbycomparingthe
speed of the wheels. When replacing
tires, use the same size originally
supplied with the car. Tire size and
construction can af f ect wheel speed
and may cause the system to work
inconsistently.
If you ever need to replace a wheel,
make sure the wheel’s specif ications
match those of the original wheel
that came on your car. Replacement
wheels are available at your Honda
dealer.
Wheels: See page f or inf ormation about
DOT Tire Quality Grading.
400
LX model
LX model EX, LX-V6 and EX-V6 with A/T modelsEX-V6 with M/T model EX-V6 with M/T model
EX, LX-V6 and EX-V6 with A/T models
Tires
Maint enance
Wheels and T ires
337
15x61/2JJ
16x61/2JJ
17x7JJ P205/65R15 92H
P205/60R16 91V
P215/50R17 93V
Installing improper tires on your
car can affect handling and
stability. This can cause a crash
in which you can be seriously
hurt or killed.
Always use the size and type of
tires recommended in this
owner’s manual.
Page 341 of 429

�´
Tires that are marked ‘‘M S’’ or
‘‘All Season’’ on the sidewall have an
all-weather tread design. They
should be suitable f or most winter
driving conditions. Tires without
these markings are designed f or
optimum traction in dry conditions.
They may not provide adequate
perf ormance in winter driving.
For the best perf ormance in snowy
or icy conditions, you should install
snow tires or tire chains. They may
be required by local laws under
certain conditions. If you mount snow tires on your
Honda, make sure they are radial
tires of the same size and load range
as the original tires. Mount snow
tiresonallfourwheelstobalance
your car’s handling in all weather
conditions. Keep in mind the traction
provided by snow tires on dry roads
may not be as high as your car’s
original equipment tires. You should
drive cautiously even when the roads
are clear. Check with the tire dealer
f or maximum speed recommenda-
tions.Mount snow chains on your tires
when required by driving conditions
or local laws. Install them only on the
f ront tires.
Because your car has limited tire
clearance, Honda strongly
recommends using the chains listed
below, made by Security Chain
Company (SCC).
Winter Driving
Snow T ires
T ire Chains
Tires
Maint enance338
Page 347 of 429
Use a f lat-tipped screwdriver to
remove the two holding clips f rom
the inner f ender.
Pull the inner f ender cover away
f rom the f ender and bumper.
If you are changing the bulb on
the passenger’s side, start the
engine, turn the steering wheel all
the way to the left, and turn off the
engine. If you are changing the
bulb on the driver’s side, turn the
steering wheel to the right.
Turn on the headlights to test the
new bulb.
(Passenger’s side)
Reinstall the air intake cover.
Reinstall the two fasteners and
secure them by pushing on the
heads until they lock.
3.
1. 2.
6.
7.
Lights
Maint enance
L ow Beam Headlight
344
HOLDING CLIPS
Page 349 of 429
If you are changing the bulb on
the passenger’s side, start the
engine, turn the steering wheel all
the way to the left, and turn off the
engine. If you are changing the
bulb on the driver’s side, turn the
steering wheel to the right.Use a f lat-tipped screwdriver to
remove the two holding clips f rom
the inner f ender.Pull the inner f ender cover away
f rom the f ender and bumper.
Remove the socket from the
headlight assembly by turning it
one-quarter turn counterclockwise.
1.
3.
2.
4.
Maint enance
Lights
Replacing a Front T urn Signal/
Parking/Side Marker Light Bulb
346
HOLDING CLIPS
Page 357 of 429

Block the rear wheels.
Fill the f uel tank.
Wash and dry the exterior
completely.
Cleantheinterior.Makesurethe
carpeting, floor mats, etc. are
completely dry.
If you need to park your car f or an
extended period (more than one
month), there are several things you
should do to prepare it f or storage.
Proper preparation helps prevent
deterioration and makes it easier to
get your car back on the road. If
possible, store your car indoors.
If the car is to be stored for a
longer period, it should be
supported on jackstands so the
tires are of f the ground.
Leave one window open slightly (if
the car is being stored indoors).
Disconnect the battery.
Support the f ront wiper blade
arms with a f olded towel or rag so
they do not touch the windshield.Coverthecarwitha‘‘breathable’’
cover, one made f rom a porous
material such as cotton.
Nonporous materials, such as
plastic sheeting, trap moisture,
which can damage the paint.
If possible, run the engine f or a
while periodically (pref erably once
amonth).
To minimize sticking, apply a
silicone spray lubricant to all door
and trunk seals. Also, apply a car
body wax to the painted surf aces
that mate with the door and trunk
seals.
Change the engine oil and f ilter
(see page ).
If you store your car f or 12 months
or longer, have your Honda dealer
perf orm the inspections called f or in
the 24 months maintenance schedule
(Normal Conditions) as soon as you
take it out of storage (see page ).
The replacements called f or in the
maintenance schedule are not
needed unless the car has actually
reached that time or mileage.
Leave the parking brake off. Put
the transmission in Reverse
(manual) or Park (automatic). 296
274
Maint enance
St oring Your Car
354
Page 358 of 429

Regular cleaning and polishing of
your Honda helps to keep it ‘‘new’’
looking. This section gives you
informationonhowtocleanyourcar
and preserve its appearance: the
paint, brightwork, wheels and
interior. Also included are several
things you can do to help prevent
corrosion..................................
Exterior Care .356
.....................................
Washing .356
.......................................
Waxing .357
....................
Aluminum Wheels .357
..........................
Paint Touch-up .357
..................................
Interior Care .358
...................................
Carpeting .358
.................................
Floor Mats .358
.........................................
Fabric .359
...........................................
Vinyl .359
.......................................
Leather .359
...................................
Seat Belts .359
....................................
Windows .360
..........................
Air Fresheners .360
....................
Corrosion Protection .361
.................................
Body Repairs .362
Appearance Care
Appearance Care355