Page 281 of 429

�µ
�Ì
�Î
�Î
�Ì
�Ì
Maint enance
4-cylinder Models
278
Visually inspect the following items:
Service at the indicated distance
or time whichever comes first.
miles x 1,000
km x 1,000
months
Every 110,000 miles (176,000 km)
See information on maintenance and emissions warranty, last column, page . Every 5,000 miles (8,000 km) or 6 months
Check oil and coolant at each fuel stop
Every 15,000 miles (24,000 km) (Use normal schedule except in dusty conditions) Inspect every 110,000 miles (176,000 km), otherwise adjust only if noisy
At 120,000 miles (192,000 km) or 10 years,
then every 60,000 miles (96,000 km) or 5 years
Every 3 years (independent of mileage)
See dust and pollen filter on page for replacement information under special driving conditions. Inspect every 160,000 miles (256,000 km) or 8 years
Every 10,000 miles (16,000 km) or 1 year
Inspect every 30,000 miles (48,000 km) or 2 years
Inspect every 10,000 miles (16,000 km) or 1 year Every 30,000 miles (48,000 km) or 2 years
Lubricate every 10,000 miles (16,000 km) or 1 year Rotate tires every 10,000 miles (16,000 km)
Inspect every 10,000 miles (16,000 km) or 1 year
At 60,000 miles (96,000 km) or 3 years, then every 30,000 miles (48,000 km) or 2 years
Replace engine oil
Replace engine oil filter
Check engine oil and coolant
Replace air cleaner element
Inspect valve clearance
Replace spark plugs
Inspect drive belt
Inspect idle speed
Replace engine coolant
Replace transmission fluid
Inspect front and rear brakes
Replace brake fluid
Check parking brake adjustment
Replace dust and pollen filter
Lubricate all hinges, locks, and latches
Rotate tires (Check tire inflation and condition at
least once per month)
Tie rod ends, steering gear box, and boots
Suspension components
Driveshaft boots
Brake hoses and lines (including ABS)
All fluid levels and condition of fluids
Exhaust system
Fuel lines and connections
Lights and controls, vehicle underbody 20
32
30
48
10
16 40
6450
8060
9670
112 80
128 90
144 100
160110
176120
192
M/T
A/T
:
: 12
2436 6072
48
275
330
Maintenance Schedule for Severe Conditions
Page 287 of 429

�µ
�Ì
�Ì
�Ì
6-cylinder Models
Maint enance284
Visually inspect the following items:
Service at the indicated distance
or time whichever comes first.
miles x 1,000
km x 1,000
months
At 120,000 miles (192,000 km) or 10 years,
then every 60,000 miles (96,000 km) or 5 years Every 7,500 miles (12,000 km) or 1 year
Every 30,000 miles (48,000 km)
Inspect every 105,000 miles (168,000 km), otherwise adjust only if noisy Every 105,000 miles (168,000 km)
Check oil and coolant at each fuel stop
See information on maintenance and emissions warranty, last column, page .
Replace engine oil
Replace engine oil filter
Check engine oil and coolant
Replace air cleaner element
Inspect valve clearance
Replace spark plugs
Replace timing belt and inspect water pump
Inspect drive belt
Replace engine coolant
Replace transmission fluid
Inspect front and rear brakes
Replace brake fluid
Check parking brake adjustment
Replace dust and pollen filter
Rotate tires (Check tire inflation and condition at
least once per month)
Tie rod ends, steering gear box, and boots
Suspension components
Driveshaft boots
Brake hoses and lines (including ABS)
All fluid levels and condition of fluids
Exhaust system
Fuel lines and connections Rotate tires every 7,500 miles (12,000 km)
Every 3 years (independent of mileage)
15
24
12
30
48
2445
72
3660
96
4875
120 60 90
144 72 105
168
84
At 120,000 miles (192,000 km) or 6 years, then every 90,000 miles (144,000 km) or 5 years Every 120,000 miles (192,000 km) or 6 years 120
192
96
: 275
M/T
A/T
Maintenance Schedule for Normal Conditions
Page 289 of 429

�µ
�µ
�Ì
�Î
�Î
�Ì
�Ì �Ì�Î
�Î
6-cylinder Models
Maint enance286
Visually inspect the following items:
Service at the indicated distance
or time whichever comes first.
miles x 1,000
km x 1,000
months
Every 3,750 miles (6,000 km) or 6 monthsCheck oil and coolant at each fuel stop
Inspect every 105,000 miles (168,000 km), otherwise adjust only if noisy Every 15,000 miles (24,000 km)
Every 105,000 miles (168,000 km)
120,000 miles (192,000 km) or 10 years, then every 60,000 miles (96,000 km) or 5 years
See dust and pollen filter on page for replacement information under special driving conditions. See timing belt on page to determine need for replacement.
See information on maintenance and emissions warranty, last column, page .
Tie rod ends, steering gear box, and boots
Suspension components
Driveshaft boots
Brake hoses and lines (including ABS)
All fluid levels and condition of fluids
Exhaust system
Fuel lines and connections
Lights and controls
vehicle underbody Every 7,500 miles (12,000 km) or 6 months
Rotate tires every 7,500 miles (12,000 km)
Replace engine oil and oil filter
Check engine oil and coolant
Replace air cleaner element
Use normal schedule except in dusty
conditions
Inspect valve clearance
Replace spark plugs Replace timing belt and inspect water pump
Inspect drive belt
Replace engine coolant
Replace transmission fluid
Inspect front and rear brakes
Replace brake fluid
Check parking brake adjustment
Replace dust and pollen filter
Lubricate all hinges, locks and latches
Rotate tires (Check tire inflation and condition at
least once per month) Every 3 years (independent of mileage)
Every 7,500 miles (12,000 km) or 6 months
At 60,000 miles (96,000 km) or 4 years, then every 30,000 miles (48,000 km) or 2 years 30
48
24
15
24
12 45
72
3675
120 60 105
168
84
90
144 72
Every 60,000 miles (96,000 km) or 3 years 60
96
48
120
192
96
At
:
1:
2: 275
332 330M/T
A/T
1
2
Maintenance Schedule for Severe Conditions
Page 336 of 429
Use a gauge to measure the air
pressure at least once a month. Even
tires that are in good condition may
lose one to two psi (10 to 20 kPa, 0.1
to 0.2 kgf /cm ) per month.
Remember to check the spare tire at
thesametimeyoucheckallthe
other tires.
Check the pressure in the tires when
they are cold. This means the car
has been parked f or at least three
hours. If you have to drive the car
bef ore checking the tire pressure,
the tires can still be considered
‘‘cold’’ if you drive less than 1 mile
(1.6 km).
Keeping the tires properly inf lated
provides the best combination of
handling, tread lif e, and riding
comf ort. Underinf lated tires wear
unevenly, adversely af f ect handling
and f uel economy, and are more
likely to f ail f rom being overheated.
Overinf lated tires can make your car
ride more harshly, are more prone to
damage f rom road hazards, and wear
unevenly.
We recommend that you visually
check your tires every day. If you
think a tire might be low, check it
immediately with a tire gauge.
To saf ely operate your car, your tires
must be the proper type and size, in
good condition with adequate tread,
and correctly inf lated. The f ollowing
pages give more detailed inf ormation
on how and when to check air
pressure, how to inspect your tires
for damage and wear, and what to do
when your tires need to be replaced.
Add or release air, if needed, to
match the recommended cold tire
pressures on page .334
CONT INUED
Inf lation
Tires
Maint enance333
Using tires that are excessively
worn or improperly inflated can
cause a crash in which you can
be seriously hurt or killed.
Follow all instructions in this
owner’s manual regarding tire
inflation and maintenance.
Page 366 of 429
This section covers the more-
common problems that motorists
experience with their cars. It gives
you inf ormation about how to saf ely
evaluate the problem and what to do
to correct it. If the problem has
stranded you on the side of the road,
you may be able to get going again.
If not, you will also f ind instructions
on getting your car towed.......................
Compact Spare Tire .364
....................
Changing a Flat Tire .365
..........
If Your Engine Won’t Start . 371
Nothing Happens or the Starter Motor Operates ........................
Very Slowly .371
The Starter Operates ................................
Normally .372
................................
Jump Starting .373
............
If Your Engine Overheats . 376
.........
Low Oil Pressure Indicator . 379
..........
Charging System Indicator . 380
.......
Malf unction Indicator Lamp . 381
.......................
Readiness Codes .382
...............
Brake System Indicator . 383
..................
Closing the Moonroof . 384
..............................................
Fuses .386
..........
Checking and Replacing . 386
......................
Emergency Towing .391
Taking Care of the Unexpected
T aking Care of t he Unexpect ed363
Page 368 of 429
If you have a f lat tire while driving,
stop in a saf e place to change it.
Stopping in traf f ic or on the shoulder
of a busy road is dangerous. Drive
slowly along the shoulder until you
gettoanexitoranareatostopthat
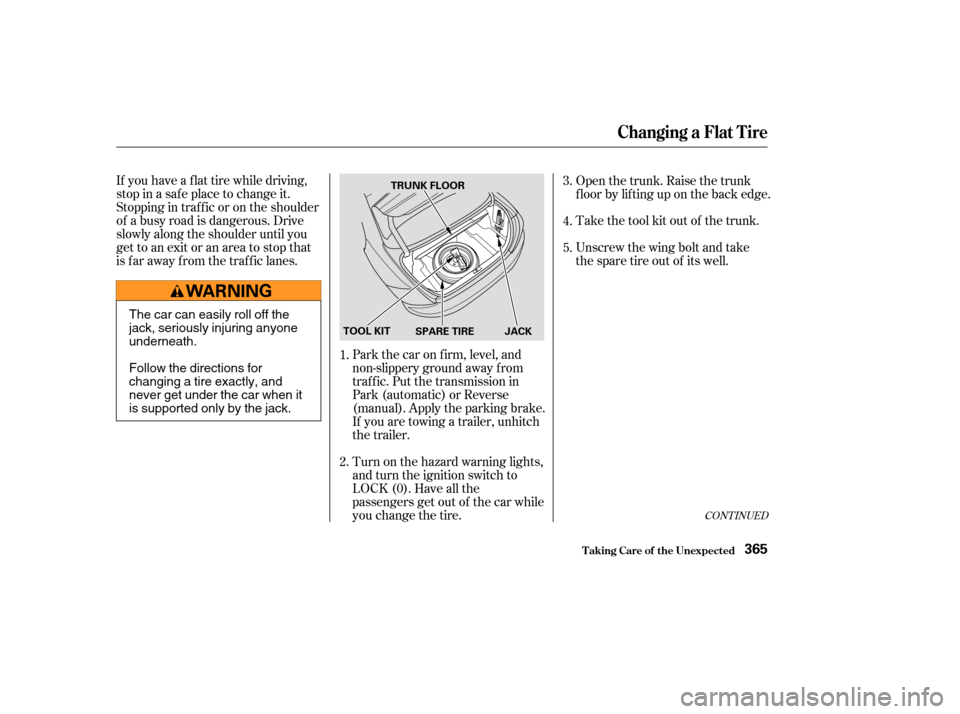
is far away from the traffic lanes.Open the trunk. Raise the trunk
f loor by lif ting up on the back edge.
Take the tool kit out of the trunk.
Unscrew the wing bolt and take
the spare tire out of its well.
If you are towing a trailer, unhitch
the trailer. Park the car on f irm, level, and
non-slippery ground away f rom
traffic. Put the transmission in
Park (automatic) or Reverse
(manual). Apply the parking brake.
Turn on the hazard warning lights,
and turn the ignition switch to
LOCK (0). Have all the
passengers get out of the car while
you change the tire. 5.
4.
3.
2. 1.
CONT INUED
Changing a Flat T ire
T aking Care of t he Unexpect ed365
TRUNK FLOOR
SPARE TIRE JACK
TOOL KIT
The car can easily roll off the
jack, seriously injuring anyone
underneath.
Follow the directions for
changing a tire exactly, and
never get under the car when it
is supported only by the jack.
Page 369 of 429
Turn the jack’s end bracket
counterclockwise to loosen it, then
remove the jack.Loosen the f ive wheel nuts 1/2
turn with the wheel wrench.
The jack is behind a cover in the
right f ender. Remove the cover by
turning the handle counterclock-
wise, then pulling on the cover.
6.
7.8.
T aking Care of t he Unexpect ed
Changing a Flat T ire
366
JACK
WHEEL WRENCHWHEEL NUT
Page 370 of 429
CONT INUED
Use the extension and wheel
wrench as shown to raise the car
until the f lat tire is of f the ground.
Locate the jacking point nearest
thetireyouneedtochange.Place
the jack under the jacking point.
Turn the end bracket clockwise
until the top of the jack contacts
the jacking point. Make sure the
jacking point tab is resting in the
jack notch. Remove the wheel nuts, then
remove the f lat tire. Temporarily
place the f lat tire on the ground
with the outside surface of the
wheel f acing up. You could scratch
the wheel if you put it f ace down.
9.
10.
11.
Changing a Flat T ire
T aking Care of t he Unexpect ed367
JACKING POINT WHEEL WRENCH
EXTENSION