Page 143 of 429
Touching ‘‘ON’’ or ‘‘OFF’’ in the
display turns the air conditioning on
andoff.YouwillseeA/CONorA/C
OFF in the display.
When you turn the A/C of f , the sys-
tem cannot regulate the inside tem-
perature if you set it below the out-
side temperature. With the A/C off,
use the temperature control buttons
to adjust the temperature of the air
flow to a comfortable setting.
Climat e Cont rol Syst em
Comf ort and Convenience Feat ures
A ir Condit ioning (A /C) Icons
140
PASSENGER’S SIDE
TEMPERATURE DISPLAY
DRIVER’S SIDE
TEMPERATURE DISPLAY
AIR CONDITIONING
(A/C) ICONS
MODE ICONS
FAN CONTROL
ICONS A/C BUTTON
Page 147 of 429
The button directs the main
air f low to the windshield f or f aster
def rosting. It also overrides any
MODE selection you may have made.
When you turn of f by
pressing the button again, the
system returns to its former settings. When you select , the A/C
turns on automatically and the
system selects Fresh Air mode. For
f aster def rosting, manually set the
fanspeedtohigh.Youcanalso
increase air f low to the windshield by
closing the side vents in the
dashboard.
This button turns the rear window
def ogger on and of f (see page ).79
Rear Window Def ogger But t on
Climat e Cont rol Syst em
Comf ort and Convenience Feat ures144
DRIVER’S SIDE
TEMPERATURE
CONTROL BUTTONS PASSENGER’S SIDE
TEMPERATURE
CONTROL BUTTONS
REAR WINDOW DEFOGGER BUTTON
DUAL BUTTON
Page 148 of 429
�Û�Ý
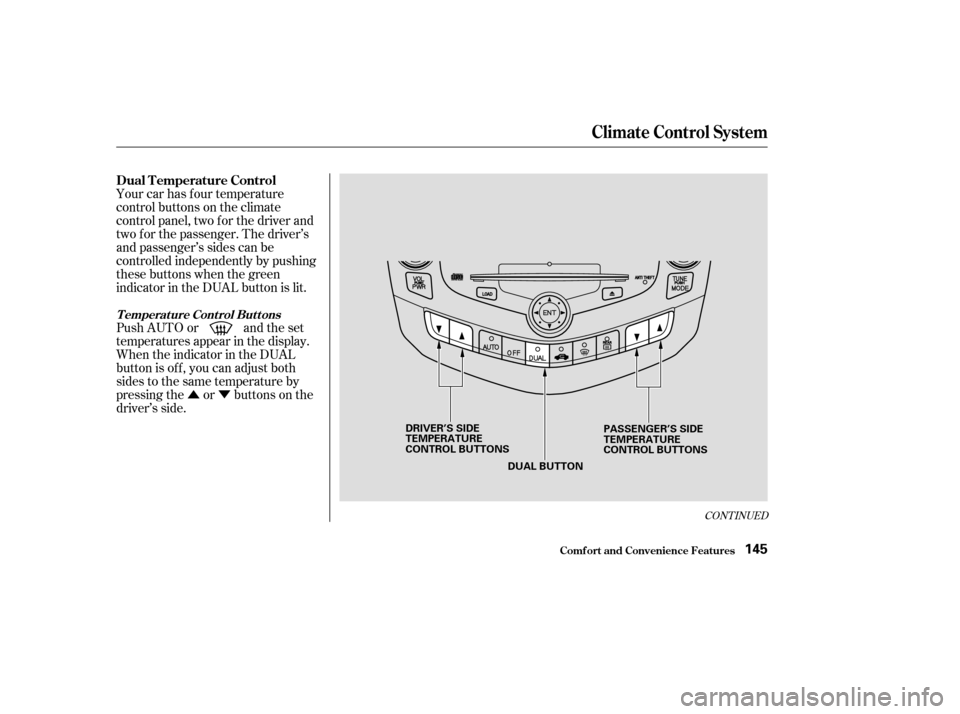
Your car has f our temperature
control buttons on the climate
control panel, two f or the driver and
two f or the passenger. The driver’s
andpassenger’ssidescanbe
controlled independently by pushing
these buttons when the green
indicator in the DUAL button is lit.
Push AUTO or and the set
temperatures appear in the display.
When the indicator in the DUAL
button is off, you can adjust both
sides to the same temperature by
pressing the or buttons on the
driver’s side.
CONT INUED
Dual Temperature Control
Temperature Control Buttons
Climat e Cont rol Syst em
Comf ort and Convenience Feat ures145
DUAL BUTTON
PASSENGER’S SIDE
TEMPERATURE
CONTROL BUTTONS
DRIVER’S SIDE
TEMPERATURE
CONTROL BUTTONS
Page 149 of 429
�Û�Ý�Û�Ý
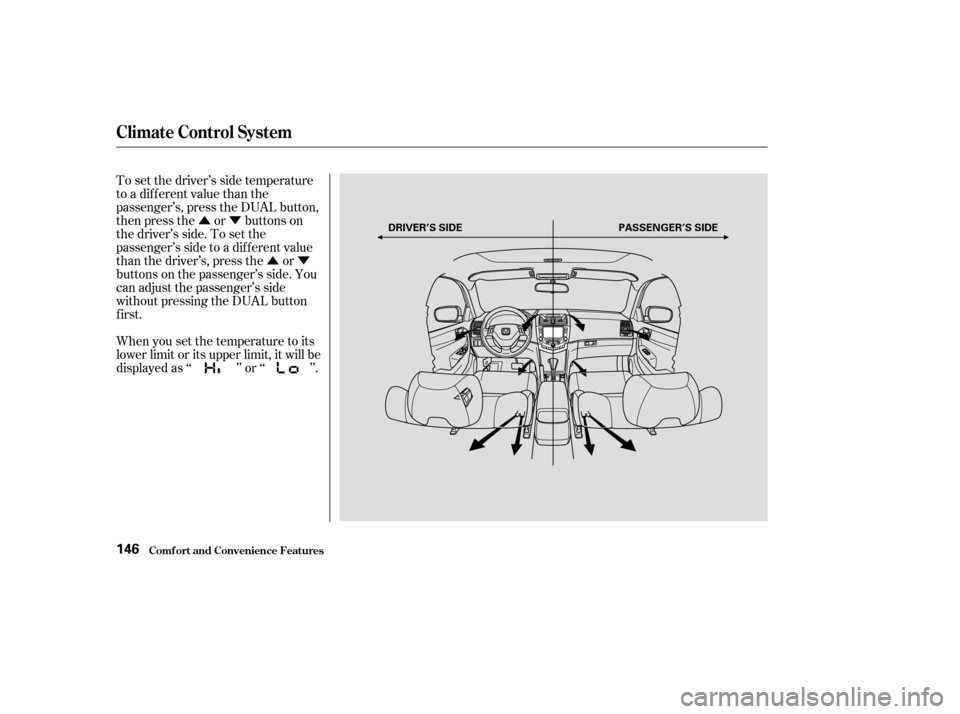
To set the driver’s side temperature
to a different value than the
passenger’s, press the DUAL button,
then press the or buttons on
the driver’s side. To set the
passenger’s side to a dif f erent value
than the driver’s, press the or
buttons on the passenger’s side. You
can adjust the passenger’s side
without pressing the DUAL button
first.
When you set the temperature to its
lower limit or its upper limit, it will be
displayed as ‘‘ ’’ or ‘‘ ’’.
Climat e Cont rol Syst em
Comf ort and Convenience Feat ures146
DRIVER’S SIDE
PASSENGER’S SIDE
Page 221 of 429

�µ
If you are training the second or
third buttons, go directly to Step 1. Unplug the garage door opener
motor f rom the house current.
Bef ore you can use HomeLink to
operate devices around your home, it
must ‘‘learn’’ the proper codes. For
example, to train HomeLink to open
and close the garage door:
Holdtheendof thegaragedoor
opener remote control 2 to 5
inches f rom HomeLink. Make
sure you are not blocking your
view of the red light in HomeLink.Select the HomeLink button you
want to train.
Press the button on the remote
control and the button on
HomeLink at the same time. Hold
down both buttons.
If you just took
delivery of your car and have not
trained any of the buttons in
HomeLink bef ore, you should erase
any previously learned codes bef ore
training the f irst button. To do this,
press and hold the two outside
buttons on HomeLink f or about 20
seconds, until the red light f lashes.
Release the buttons, then proceed to
Step 1.
2. 3.
4.
1.
T raining HomeL inkBef ore you begin
HomeL ink Wireless Control System
Comf ort and Convenience Feat ures218
Page 222 of 429

For security purposes, newer garage
door opening systems use a ‘‘rolling’’
or variable code. Inf ormation f rom
the remote control and the garage
door opener are needed bef ore
HomeLink can operate the garage
door opener.
The ‘‘Training HomeLink’’
procedure trains HomeLink to the
proper garage door opener code.
The f ollowing procedure
synchronizes HomeLink to the
garage door opener so they send and
receive the correct codes.
The red light in HomeLink should
begin f lashing. It will f lash slowly
at first, then rapidly.
When the red light f lashes rapidly,
release both buttons. HomeLink
should have learned the code from
the remote control.
The remote control you are training
may stop transmitting after two
seconds. This is not long enough f or
HomeLink to learn the code. Release
and press the button on the remote
control every two seconds until
HomeLink has learned the code.
Plug in the garage door opener
motor, then test the HomeLink
button by pushing it. It should
operate the garage door. If the button does not work, repeat
this procedure to train it again. If it
still does not work, you may have a
variable or rolling code garage
door opener. Test this by pressing
and holding the HomeLink button
you just trained. If the red light
blinks f or two seconds, then stays
on, you have a rolling code garage
door opener. You may be able to
verify this with the manufacturer’s
documentation. Go to ‘‘Training
With a Rolling Code System.’’
Repeat these steps to train the
other two HomeLink buttons to
operate any other remotely-
controlled devices around your
home (lighting, automatic gate,
security system, etc.).
5.
6.
8.
7.
CONT INUED
Canadian Owners:T raining With a Rolling Code
System
HomeL ink Wireless Control System
Comf ort and Convenience Feat ures219
Page 224 of 429
 This devicemay not cause harmf ul interf erence, and(2) this device")
As required by the FCC:This device complies with Part 15 of theFCC rules. Operation is subject to thef ollowing two conditions: (1) This devicemay not cause harmf ul interf erence, and(2) this device must accept anyinterf erence received, includinginterf erence that may cause undesiredoperation.
Changes or modif ications not expresslyapproved by the party responsible f orcompliance could void the user’sauthority to operate the equipment.
This device complies with IndustryCanada Standard RSS-210.Operation is subject to the f ollowing twoconditions: (1) this device may not causeinterf erence, and (2) this device mustaccept any interf erence that may causeundesired operation of the device.
Youshoulderaseallthreecodes
bef ore selling the car.
Select the HomeLink button you
want to train.
Press and hold the HomeLink
button until the red light begins to
f lash slowly (approximately 20
seconds).
While continuing to hold the
HomeLink button, place the
remotecontrolforthedevice2to
5inchesfromHomeLink. Release both buttons. HomeLink
should now be trained to operate
the device.
Press and hold the button on the
remote control. Hold both buttons
until the red light begins to f lash
rapidly.
Totrainanalreadyprogrammed
HomeLink button to operate a new
device:
Toerasethecodesstoredinallthree
HomeLink buttons, press and hold
the two outside buttons until the red
light begins to f lash, then release the
buttons.
1.
2.
3.
4. 5.
Retraining a Button
Erasing Codes
HomeL ink Wireless Control System
Comf ort and Convenience Feat ures221
Page 240 of 429
The cargo net can be used to help
hold down items stored in the trunk.
To use the cargo net, hook it to the
buttons on the f loor and sides of the
trunk. You can use the cargo net in
several conf igurations by hooking it
to dif f erent buttons.
When you are not using the cargo
net,storeitinthesparetirewell.
There are hooks on the f loor and
sides of the trunk. They can be used
to install a net f or securing items.
On all EX and EX-V6 models
Carrying Cargo
Bef ore Driving
Cargo Net
T runk Hooks
237