Page 346 of 428
Removing the Flat Tire and Installing
the Spare Tire
1. Use the wheel wrench
to loosen all the wheel
nuts. Turn the wheel
wrench
counterclockwise to
loosen the wheel nuts.
Don’t remove
them yet.
la r Front Location RL.
Location
2. Position the jack under the vehicle. If the flat tire is
on the front of the vehicle, position the jack on the
frame behind the flat tire.
If the flat tire is on the rear, position the jack under
the rear axle between the spring anchor and the
shock absorber bracket.
Notice: If your vehicle is equipped with
QUADRASTEERTM avoid contact with tie rods and
tie rod boots when jacking the vehicle.
5-77
Page 348 of 428
Rear Position
3. Make sure the jack head is positioned so that the
rear axle
is resting securely between the grooves
that are on the jack head. Turn the wheel
wrench clockwise to raise the vehicle. Raise the
vehicle far enough
off the ground so there is enough
room for the spare tire to
fit under the wheel well.
4. Remove all the wheel
nuts and take
off the
flat tire.
Rust or dirt on the wheel, or on the parts to
which
it is fastened, can make the wheel nuts
become loose after a time. The wheel could
come
off and cause an accident. When you
change
a wheel, remove any rust or dirt from
the places where the wheel attaches to the
vehicle. In an emergency, you can use a cloth
or
a paper towel to do this; but be sure to use
a scraper or wire brush later, if you need to, to
get all the rust
or dirt off.
5-79
Page 352 of 428
Storing a Flat or Spare Tire and Tools
--xing a jack, a --:e, or ---ier equipment in the
passenger compartment
of the vehicle could
cause injury. In a sudden stop or collision,
loose equipment could strike someone. Store
all these in the proper place.
Notice: An aluminum wheel with a flat tire should
always be stored under the vehicle with the hoist. However, storing
it that way for an extended
period
of time could damage the wheel. To avoid
this, always stow the wheel properly with the valve
stem pointing down and have the wheel repaired
as soon as possible.
Return the bottle jack, wheel blocks, wheel wrench and
jack extensions to their location under the passenger’s
side second row seat. Secure the items in the vehicle as
shown.
Tu
A. Wing Nut F. Storage Bag
B. Wheel Blocks G. Bottle Jack Holder
C. Wheel Wrench and H. Bottle Jack
Extensions Retainer
I. Wheel Block
D. Gloves Retainer
E. Wheel Wrench and
Extensions
5-83
Page 353 of 428
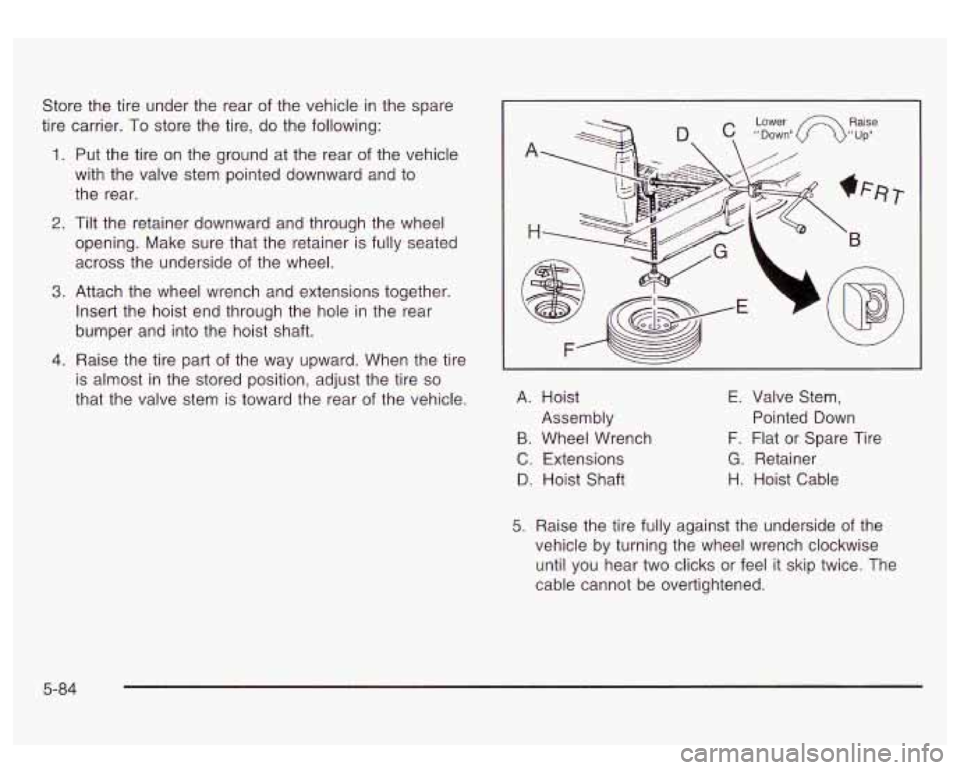
Store the tire under the rear of the vehicle in the spare
tire carrier. To store the tire, do the following:
1. Put the tire on the ground at the rear of the vehicle
with the valve stem pointed downward and to
the rear.
2. Tilt the retainer downward and through the wheel
opening. Make sure that the retainer is fully seated
across the underside of the wheel.
3. Attach the wheel wrench and extensions together.
Insert the hoist end through the hole in the rear
bumper and into the hoist shaft.
4. Raise the tire part of the way upward. When the tire
is almost in the stored position, adjust the tire
so
that the valve stem is toward the rear of the vehicle. A.
Hoist
B. Wheel Wrench
C. Extensions
D. Hoist Shaft
Assembly
E. Valve Stem,
Pointed Down
F. Flat or Spare Tire
G. Retainer
H. Hoist Cable
5. Raise the tire fully against the underside of the
vehicle by turning the wheel wrench clockwise
until you hear two clicks or feel it skip twice. The
cable cannot be overtightened.
5-84
Page 354 of 428
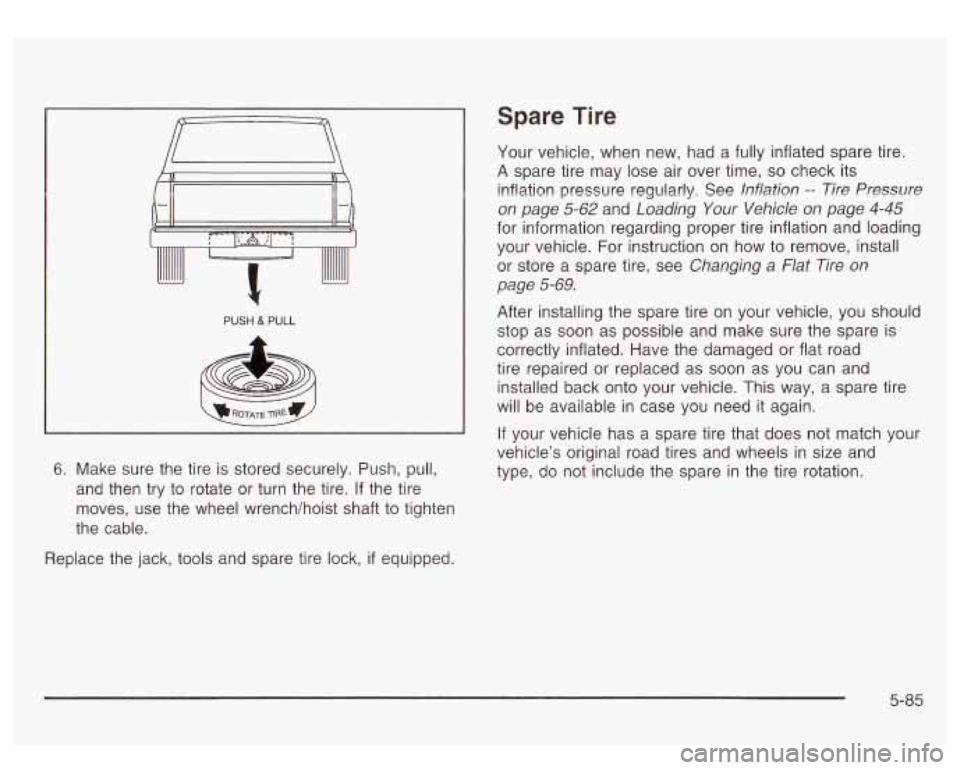
PUSH & PULL
6. Make sure the tire is stored securely. Push, pull,
and then try to rotate or turn the tire.
If the tire
moves, use the wheel wrench/hoist shaft to tighten
the cable.
Spare Tire
Your vehicle, when new, had a fully inflated spare tire.
A spare tire may lose air over time, so check its
inflation pressure regularly. See
Inflation -- Tire Pressure
on page 5-62 and Loading Your Vehicle on page 4-45
for information regarding proper tire inflation and loading
your vehicle. For instruction on how to remove, install
or store a spare tire, see
Changing a Flat Tire on
page
5-69.
After installing the spare tire on your vehicle, you should
stop as soon as possible and make sure the spare is
correctly inflated. Have the damaged or flat road
tire repaired or replaced as soon as you can and
installed back onto your vehicle. This way, a spare tire
will be available in case you need it again.
If your vehicle has a spare tire that does not match your
vehicle’s original road tires and wheels in size and
type, do not include the spare in the tire rotation.
Replace the jack, tools and spare tire
lock, if equipped.
5-85
Page 377 of 428
Maintenance Schedule
Introduction
I
IMPORTANT:
KEEP ENGINE OIL
AT THE PROPER
LNEL AND CHANGE
AS
RECOMMENDED
Have you purchased the GM Protection Plan? The Plan
supplements your new vehicle warranties. See your
Warranty and Owner Assistance booklet or your dealer
for details.
Your Vehicle and the Environment
Proper vehicle maintenance not only helps to keep your
vehicle in good working condition, but also helps the
environment. All recommended maintenance procedures
are important. Improper vehicle maintenance can
even affect the quality of the air we breathe. Improper
fluid levels or the wrong tire inflation can increase
the level of emissions from your vehicle.
To help protect
our environment, and to keep your vehicle in good
condition, please maintain your vehicle properly.
Maintenance Requirements
Maintenance intervals, checks, inspections and
recommended fluids and lubricants as prescribed in this
manual are necessary to keep your vehicle in good
working condition. Any damage caused by failure
to follow recommended maintenance may not be
covered by warranty.
6-2
Page 385 of 428
Part B: Owner Checks and Services
Listed in this part are owner checks and services
which should be performed at the intervals specified to
help ensure the safety, dependability and emission
control performance of your vehicle.
Be sure any necessary repairs are completed at once.
Whenever any fluids or lubricants are added to your
vehicle, make sure they are the proper ones, as shown
in Part
D.
At Each Fuel Fill
It is important for you or a service station attendant to
perform these underhood checks at each fuel fill.
Engine Oil Level Check
Check the engine oil level and add the proper oil if
necessary. See Engine Oil on page 5-13 for further
details.
Engine Coolant Level Check Windshield Washer Fluid Level Check
Check
the windshield washer fluid level in the windshield
washer tank and add the proper fluid
if necessary.
See
Windshield Washer Fluid on page 5-38 for further
details.
At Least Once a Month
Tire Inflation Check
Make sure tries are inflated to the correct pressures.
Don’t forget to check your spare tire. See
Tires on
page 5-61
for further details.
Cassette Tape Player Service
Clean cassette tape player. Cleaning should be done
every
50 hours of tape play. See Audio System(s)
on page 3-61
for further details.
Check the engine coolant level and add
DEX-COOL@
coolant mixture if necessary. See Engine Coolant
on page
5-24 for further details.
6-1 0
Page 386 of 428
At Least Twice a Year
Restraint System Check
Make sure the safety belt reminder light and all your
belts, buckles, latch plates, retractors and anchorages
are working properly. Look for any other loose or
damaged safety belt system parts.
If you see anything
that might keep a safety belt system from doing its
job, have it repaired. Have any torn or frayed safety belts
replaced.
Also look for any opened or broken air bag coverings,
and have them repaired or replaced. (The air bag
system does not need regular maintenance.)
Wiper Blade Check
Inspect wiper blades for wear or cracking. Replace
blade inserts that appear worn or damaged or that
streak or miss areas of the windshield.
Also see
Cleaning the Outside of Your Vehicle on page 5-88.
Spare Tire Check
At least twice a year, after the monthly inflation check of
the spare tire determines that the spare is inflated to
the correct tire inflation pressure, make sure that
the spare tire is stored securely. Push, pull, and then try
to rotate or turn the tire. If it moves, use the wheel
wrenchhatchet to tighten the cable. See
Changing a Flat
Tire on page 5-69.
Weatherstrip
Silicone grease on
longer, seal better,
Lubrication
weatherstrips will make them last
and not stick or squeak. Apply
silicone grease with a clean cloth. During very -cold,
damp weather more frequent application may be
required. See
Part D: Recommended Fluids and
lubricants on page
6- 16.
Automatic Transmission Check
Check the transmission fluid level; add if needed. See
Automatic Transmission Fluid on page 5-27. A fluid loss
may indicate a problem. Check the system and repair
if needed.
At Least Once a Year
Key Lock Cylinders Service
Lubricate the key lock cylinders with the lubricant
specified in Part D.
Body Lubrication Service
Lubricate all body door hinges, hood latch assembly,
secondary latch, pivots, spring anchor, release
pawl, tailgate hinge, tailgate linkage, tailgate handle
pivot points, latch bolt, fuel door hinge, locks and folding
seat hardware. Part
D tells you what to use. More
frequent lubrication may be required when exposed to a
corrosive environment.
6-1 1