Page 82 of 240
When pressing the controls on the keypad, press the middle of the
controls to ensure a good activation.
Programming a personal entry code
To create your own personal entry code:
1. Enter the factory set code.
2. Within five seconds press the 1•2 on the keypad.
3. Enter your personal 5-digit code. Each number must be entered
within five seconds of each other.
Tips:
•Do not set a code that uses five of the same number.
•Do not use five numbers in sequential order.
•The factory set code will work even if you have set your own personal
code.
•If you set a second personal code it will erase your first personal code.
Unlocking and locking the doors using keyless entry
To unlock the driver’s door,enter the factory set 5-digit code or your
personal code. Each number must be pressed within five seconds of each
other. The interior lamps will illuminate after pressing the first control on
the keypad.
To unlock all doors,press the 3•4 control within five seconds.
To lock all doors,press the 7•8 and the 9•0 at the same time. You
do notneed to enter the keypad code first.Note:The interior lamps
will turn off.
Autolock
This feature will automatically lock all the doors when:
•all the doors are closed,
•the ignition key is in the ON position,
•the gearshift lever is shifted into R reverse or a forward gear and
•the brake pedal is released.
This feature will also automatically relock all the doors when:
•the ignition is running and any door is opened then closed, and
•you put the vehicle in motion by releasing the brake pedal.
Locks and Security
82
Page 83 of 240
To deactivate/reactivate the autolock feature using the keypad
Your vehicle comes with the autolock feature activated. To
deactivate/reactivate this feature:
1. Turn the ignition to the OFF position.
2. Close all the doors.
3. Enter the 5-digit entry code.
4. Press and hold the 3•4. While holding the 3•4 press the 7•8.
5. Release the 3•4.
6. Release the 7•8.
The horn will chirp once when the system has been successfully
deactivated.
The horn will chirp twice (one short and one long chirp) when the
system has been successfully reactivated.
SECURILOCK�PASSIVE ANTI-THEFT SYSTEM
SecuriLock�passive anti-theft system is an engine immobilization
system. This system is designed to prevent the engine from being started
unless acoded key programmed to your vehicleis used. The use of
the wrong type of coded key may lead to a“no-start”condition.
Your vehicle comes with two coded keys; additional coded keys may be
purchased from your dealer. The dealer can program your spare keys to
your vehicle or you can program the keys yourself. Refer to
Programming spare keysfor instructions on how to program the coded
key.
Note:The SecuriLock�passive anti-theft system is not compatible with
non-Ford aftermarket remote start systems. Use of these systems may
result in vehicle starting problems and a loss of security protection.
Note:Large metallic objects, electronic devices that are used to
purchase gasoline or similar items, or a second coded key on the same
key chain may cause vehicle starting issues. You need to prevent these
objects from touching the coded key while starting the engine. These
objects will not cause damage to the coded key, but may cause a
momentary issue if they are too close to the key when starting the
engine. If a problem occurs, turn the ignition off, remove all objects on
the key chain away from the coded key and restart the engine.
Locks and Security
83
Page 86 of 240
PERIMETER ALARM SYSTEM (IF EQUIPPED)
The perimeter anti-theft system will help prevent your vehicle from
unauthorized entry.
If there is any potential perimeter anti-theft problem with your vehicle,
ensureALL remote entry transmittersare taken to the dealership to
aid in troubleshooting.
Arming the system
When armed, this system will help protect your vehicle from
unauthorized entry. When unauthorized entry occurs, the system will
flash the turn signal lamps and side repeaters and honk the horn.
The system is ready to arm whenever the key is removed from the
ignition. Any of the following actions will prearm the alarm system:
•Press the remote entry lock control
•Press the interior power door lock control while the door is open
Twenty seconds after one of the above events occurs, any door/hood that
is closed is armed.
Any door/hood that is still open is prearmed and waiting for the
door/hood to be closed.
Once that input is closed, the input will arm in 20 seconds and the
exterior lamps may flash.
Disarming the system
You can disarm the system by any of the following actions:
•Press the transmitter unlock control.
•Unlock the doors with a key.
•Turn a programmed SecuriLock key to RUN /START.
Locks and Security
86
Page 104 of 240
Front and rear seat occupants, including pregnant women,
should wear safety belts for optimum protection in an accident.
Each seating position in your vehicle has a specific safety belt
assembly which is made up of one buckle and one tongue that
are designed to be used as a pair. 1) Use the shoulder belt on the
outside shoulder only. Never wear the shoulder belt under the arm.
2) Never swing the safety belt around your neck over the inside
shoulder. 3) Never use a single belt for more than one person.
While you are fastened in the seat belt, the combination lap/shoulder belt
with a cinch tongue adjusts to your movement. However, if you brake
hard, turn hard, or if your vehicle receives an impact of 8 km/h (5 mph)
or more, the safety belt will become locked and help reduce your
forward movement.
Energy Management Feature
•This vehicle has a safety belt system with an energy management
feature at the front passenger and 2nd row bench seat adjacent to the
sliding door seating positions to help further reduce the risk of injury
in the event of a head-on collision.
•This safety belt system has a retractor assembly that is designed to
extend the seat belt webbing in a controlled manner. This helps
reduce the belt force acting on the user’s chest.
Failure to inspect and replace if necessary the Belt and
Retractor assembly after an accident could increase the risk of
injury in a collision.
Seating and Safety Restraints
104
Page 155 of 240
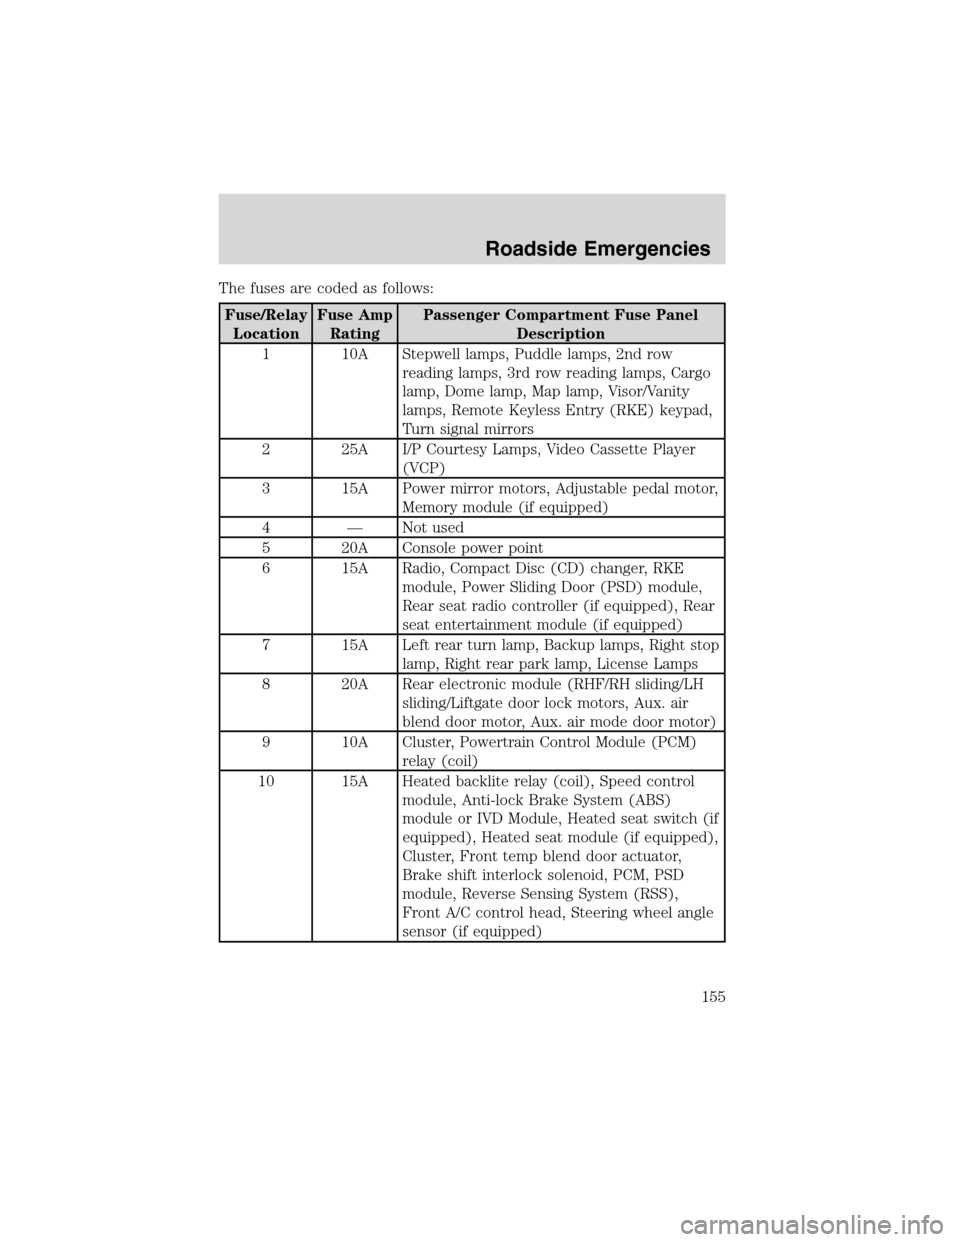
The fuses are coded as follows:
Fuse/Relay
LocationFuse Amp
RatingPassenger Compartment Fuse Panel
Description
1 10A Stepwell lamps, Puddle lamps, 2nd row
reading lamps, 3rd row reading lamps, Cargo
lamp, Dome lamp, Map lamp, Visor/Vanity
lamps, Remote Keyless Entry (RKE) keypad,
Turn signal mirrors
2 25A I/P Courtesy Lamps, Video Cassette Player
(VCP)
3 15A Power mirror motors, Adjustable pedal motor,
Memory module (if equipped)
4—Not used
5 20A Console power point
6 15A Radio, Compact Disc (CD) changer, RKE
module, Power Sliding Door (PSD) module,
Rear seat radio controller (if equipped), Rear
seat entertainment module (if equipped)
7 15A Left rear turn lamp, Backup lamps, Right stop
lamp, Right rear park lamp, License Lamps
8 20A Rear electronic module (RHF/RH sliding/LH
sliding/Liftgate door lock motors, Aux. air
blend door motor, Aux. air mode door motor)
9 10A Cluster, Powertrain Control Module (PCM)
relay (coil)
10 15A Heated backlite relay (coil), Speed control
module, Anti-lock Brake System (ABS)
module or IVD Module, Heated seat switch (if
equipped), Heated seat module (if equipped),
Cluster, Front temp blend door actuator,
Brake shift interlock solenoid, PCM, PSD
module, Reverse Sensing System (RSS),
Front A/C control head, Steering wheel angle
sensor (if equipped)
Roadside Emergencies
155
Page 158 of 240
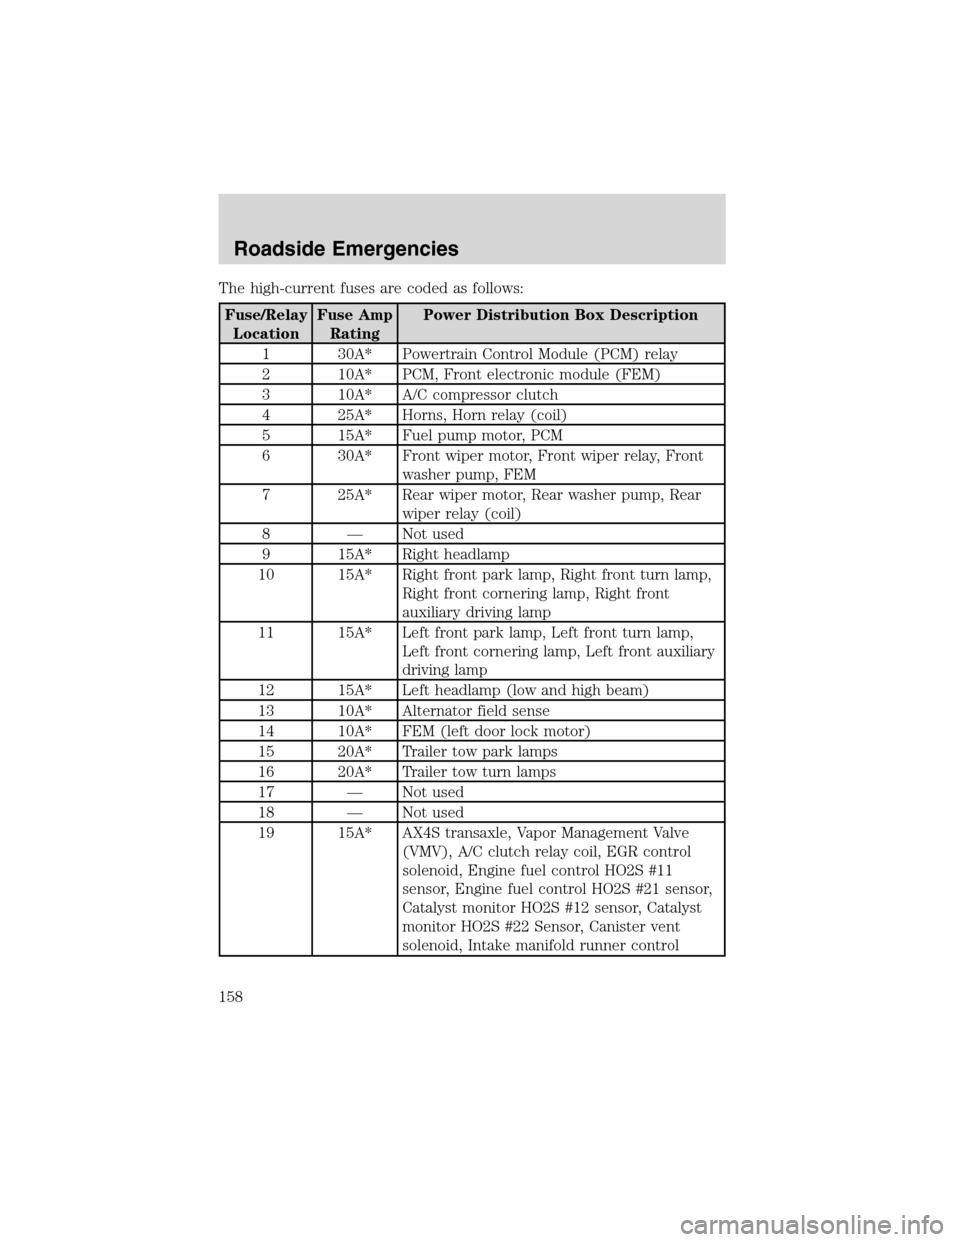
The high-current fuses are coded as follows:
Fuse/Relay
LocationFuse Amp
RatingPower Distribution Box Description
1 30A* Powertrain Control Module (PCM) relay
2 10A* PCM, Front electronic module (FEM)
3 10A* A/C compressor clutch
4 25A* Horns, Horn relay (coil)
5 15A* Fuel pump motor, PCM
6 30A* Front wiper motor, Front wiper relay, Front
washer pump, FEM
7 25A* Rear wiper motor, Rear washer pump, Rear
wiper relay (coil)
8—Not used
9 15A* Right headlamp
10 15A* Right front park lamp, Right front turn lamp,
Right front cornering lamp, Right front
auxiliary driving lamp
11 15A* Left front park lamp, Left front turn lamp,
Left front cornering lamp, Left front auxiliary
driving lamp
12 15A* Left headlamp (low and high beam)
13 10A* Alternator field sense
14 10A* FEM (left door lock motor)
15 20A* Trailer tow park lamps
16 20A* Trailer tow turn lamps
17—Not used
18—Not used
19 15A* AX4S transaxle, Vapor Management Valve
(VMV), A/C clutch relay coil, EGR control
solenoid, Engine fuel control HO2S #11
sensor, Engine fuel control HO2S #21 sensor,
Catalyst monitor HO2S #12 sensor, Catalyst
monitor HO2S #22 Sensor, Canister vent
solenoid, Intake manifold runner control
Roadside Emergencies
158
Page 159 of 240
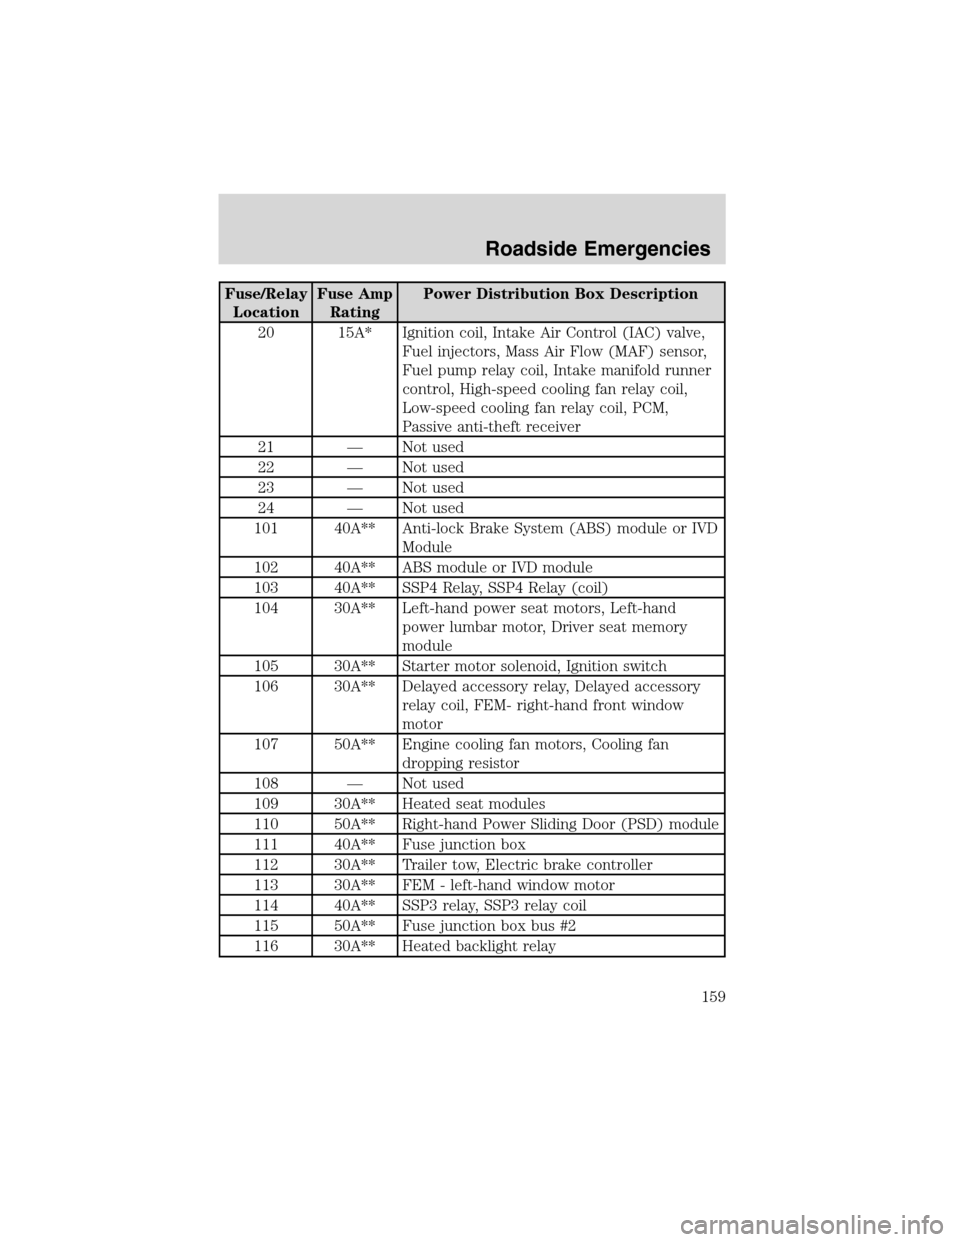
Fuse/Relay
LocationFuse Amp
RatingPower Distribution Box Description
20 15A* Ignition coil, Intake Air Control (IAC) valve,
Fuel injectors, Mass Air Flow (MAF) sensor,
Fuel pump relay coil, Intake manifold runner
control, High-speed cooling fan relay coil,
Low-speed cooling fan relay coil, PCM,
Passive anti-theft receiver
21—Not used
22—Not used
23—Not used
24—Not used
101 40A** Anti-lock Brake System (ABS) module or IVD
Module
102 40A** ABS module or IVD module
103 40A** SSP4 Relay, SSP4 Relay (coil)
104 30A** Left-hand power seat motors, Left-hand
power lumbar motor, Driver seat memory
module
105 30A** Starter motor solenoid, Ignition switch
106 30A** Delayed accessory relay, Delayed accessory
relay coil, FEM- right-hand front window
motor
107 50A** Engine cooling fan motors, Cooling fan
dropping resistor
108—Not used
109 30A** Heated seat modules
110 50A** Right-hand Power Sliding Door (PSD) module
111 40A** Fuse junction box
112 30A** Trailer tow, Electric brake controller
113 30A** FEM - left-hand window motor
114 40A** SSP3 relay, SSP3 relay coil
115 50A** Fuse junction box bus #2
116 30A** Heated backlight relay
Roadside Emergencies
159
Page 165 of 240
If Ford Accessory Running Boards
have been installed, use the jack
adapters supplied with the running
boards as described on the inside of
the jack storage area.
8. Locate the jack notch next to the
door closest to the tire you are
changing, then place the jack on the
frame rail directly behind the notch.
9. Turn the jack handle clockwise
until the wheel is completely off the
ground.
To lessen the risk of
personal injury, do not put
any part of your body under the
vehicle while changing a tire. Do
not start the engine when your
vehicle is on the jack. The jack is
only meant for changing the tire.
10. Remove the lug nuts with the lug wrench.
11. Replace the flat tire with the spare tire, making sure the valve stem
is facing outward. Reinstall lug nuts until the wheel is snug against the
hub. Do not fully tighten the lug nuts until the wheel has been lowered.
12. Lower the wheel by turning the jack handle counterclockwise.
Roadside Emergencies
165