Page 2409 of 4378

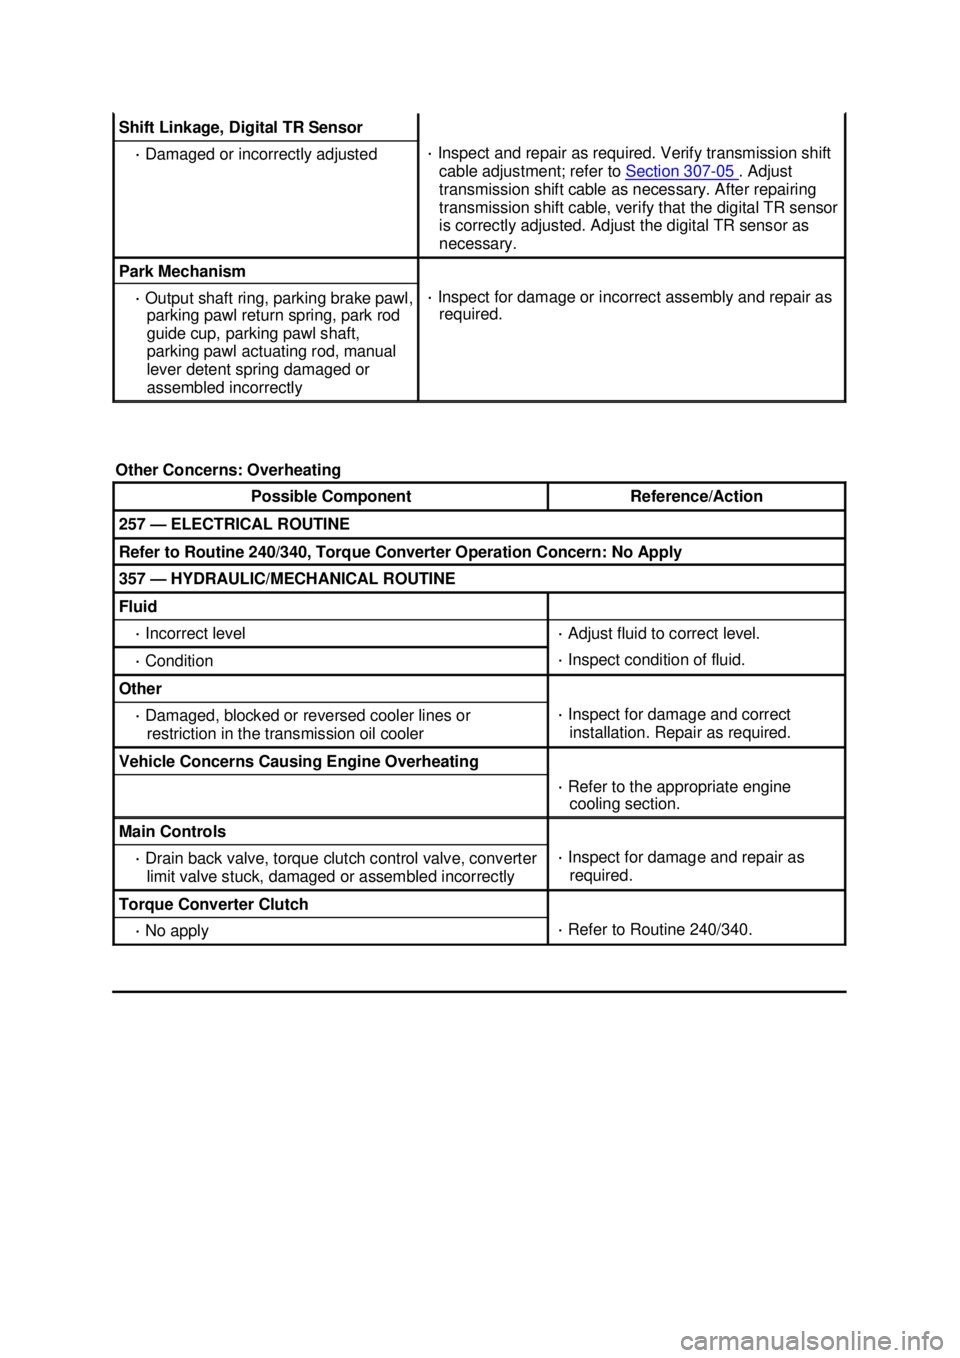
Shift Linkage, Digital TR Sensor
·
Damaged or incorrectly adjusted ·
Inspect and repair as required. Verify transmission shift
cable adjustment; refer to Section 307 - 05 . Adjust
transmission shift cable as necessary. After repairing
transmission shift cable, verify that the digital TR sensor
is correctly adjusted. Adjust the digital TR sensor as
necessary. Park Mechanism
·
Output shaft ring, parking brake pawl,
parking pawl return spring, park rod
guide cup, parking pawl shaft,
parking pawl actuating rod, manual
lever detent spring damaged or
assembled incorrectly ·
Inspect for damage or incorrect assembly and repair as
required.
Other Concerns: Overheating Possible Component Reference/Action
257 —
ELECTRICAL ROUTINE Refer to Routine 240/340, Torque Converter Operation Concern: No Apply
357 —
HYDRAULIC/MECHANICAL ROUTINE Fluid
·
Incorrect level ·
Adjust fluid to correct level. ·
Condition ·
Inspect condition of fluid. Other
·
Damaged, blocked or reversed cooler lines or
restriction in the transmission oil cooler ·
Inspect for damage and correct
installation. Repair as required. Vehicle Concerns Causing Engine Overheating
·
Refer to the appropriate engine
cooling section. Main Controls
·
Drain back valve, torque clutch control valve, converter
limit valve stuck, damaged or assembled incorrectly ·
Inspect for damage and repair as
required. Torque Converter Clutch
·
No apply ·
Refer to Routine 240/340. �K�l�j . 30 �b�a
312003 Mustang Workshop Manual
18. 11. 2011file:///C:/Ford/2000 - 2004/tsocache/SHEF_2748/S3B~us~en~ ...
Page 2441 of 4378
IN-
VEHICLE REPAIR
Manual Control Lever Shaft and Seal
Removal 1. Drain the transmission fluid and remove the fluid pan and filter. For additional information, refer to Fluid Pan, Gasket and Filter in this section.
2. Disconnect the digital transmission range (TR) sensor electrical connector.
3. Disconnect the transmission shift linkage.
4. Remove the digital TR sensor.
SECTION 307-
01: Automatic Transaxle/Transmission 2003 Mustang Workshop Manual Special Tool(s)
Installer, Shift Shaft Fluid Seal
307-
050 (T74P-77498- A) Alignment Gauge, TR Sensor
307-
351 (T97L-70010- A) �K�l�j . 1 �b�a
62003 Mustang Workshop Manual
18. 11. 2011file:///C:/Ford/2000 - 2004/tsocache/SHEF_2748/S3B~us~en~ ...
Page 2442 of 4378
�z
Remove the bolts.
�z Remove the digital TR sensor.
5. Remove the manual control valve detent lever spring. 1. Remove the bolt.
2. Remove the manual control valve detent lever spring.
6. NOTE: Use a shop cloth to protect the transmission case surface.
Remove the manual lever shaft retaining pin.
7. Remove the nut and slide the manual control lever shaft out of the case. �K�l�j . 2 �b�a
62003 Mustang Workshop Manual
18. 11. 2011file:///C:/Ford/2000 - 2004/tsocache/SHEF_2748/S3B~us~en~ ...
Page 2445 of 4378
5. Install the digital TR sensor.
1. Install the digital TR sensor.
2. Loosely install the bolts.
6. NOTE: The tool is designed to fit snug.
NOTE: Manual shift lever shaft must be in the neutral position.
Using the special tools, align the digital TR sensor slots.
7. Tighten the bolts. �K�l�j . 5 �b�a
62003 Mustang Workshop Manual
18. 11. 2011file:///C:/Ford/2000 - 2004/tsocache/SHEF_2748/S3B~us~en~ ...
Page 2446 of 4378
8. With manual lever in overdrive, connect the shift control cable.
9. Install the digital TR sensor electrical connector.
10. Install the filter and transmission fluid pan. For additional information, refer to Fluid Pan, Gasket and Filter in this section. �K�l�j . 6 �b�a
62003 Mustang Workshop Manual
18. 11. 2011file:///C:/Ford/2000 - 2004/tsocache/SHEF_2748/S3B~us~en~ ...
Page 2447 of 4378
IN-
VEHICLE REPAIR
Digital Transmission Range (TR) Sensor
Removal 1. Disconnect the battery ground cable. For additional information, refer to Section 414 - 01 .
2. Raise and support the vehicle. For additional information, refer to Section 100 - 02 .
3. Disconnect the connector.
4. Disconnect the manual lever shift control cable.
5. Remove the digital TR bolts and the TR sensor.
SECTION 307-
01: Automatic Transaxle/Transmission 2003 Mustang Workshop Manual Special Tool(s)
Alignment Gauge, TR Sensor
307-
351 (T97L-70010- A) �K�l�j . 1 �b�a
42003 Mustang Workshop Manual
18. 11. 2011file:///C:/Ford/2000 - 2004/tsocache/SHEF_2748/S3B~us~en~ ...
Page 2448 of 4378
Installation
1. Install the digital TR sensor and loosely install the bolts.
2. NOTE: The tool is designed to fit snugly.
NOTE: Manual shift lever shaft must be in the neutral position.
Using the special tool, align the digital TR sensor slots.
3. Tighten the bolts. �K�l�j . 2 �b�a
42003 Mustang Workshop Manual
18. 11. 2011file:///C:/Ford/2000 - 2004/tsocache/SHEF_2748/S3B~us~en~ ...
Page 2449 of 4378
4. With the manual lever in overdrive connect the shift lever control cable.
5. Install the digital TR sensor electrical connector.
6. Lower the vehicle.
7.
NOTE: When the battery is disconnected and reconnected, some abnormal driving symptoms
may occur while the vehicle relearns its adaptive strategy. The vehicle may need to be driven
16 km (10 miles) or more to relearn the strategy.
Connect the battery ground cable. �K�l�j . 3 �b�a
42003 Mustang Workshop Manual
18. 11. 2011file:///C:/Ford/2000 - 2004/tsocache/SHEF_2748/S3B~us~en~ ...