Page 120 of 216

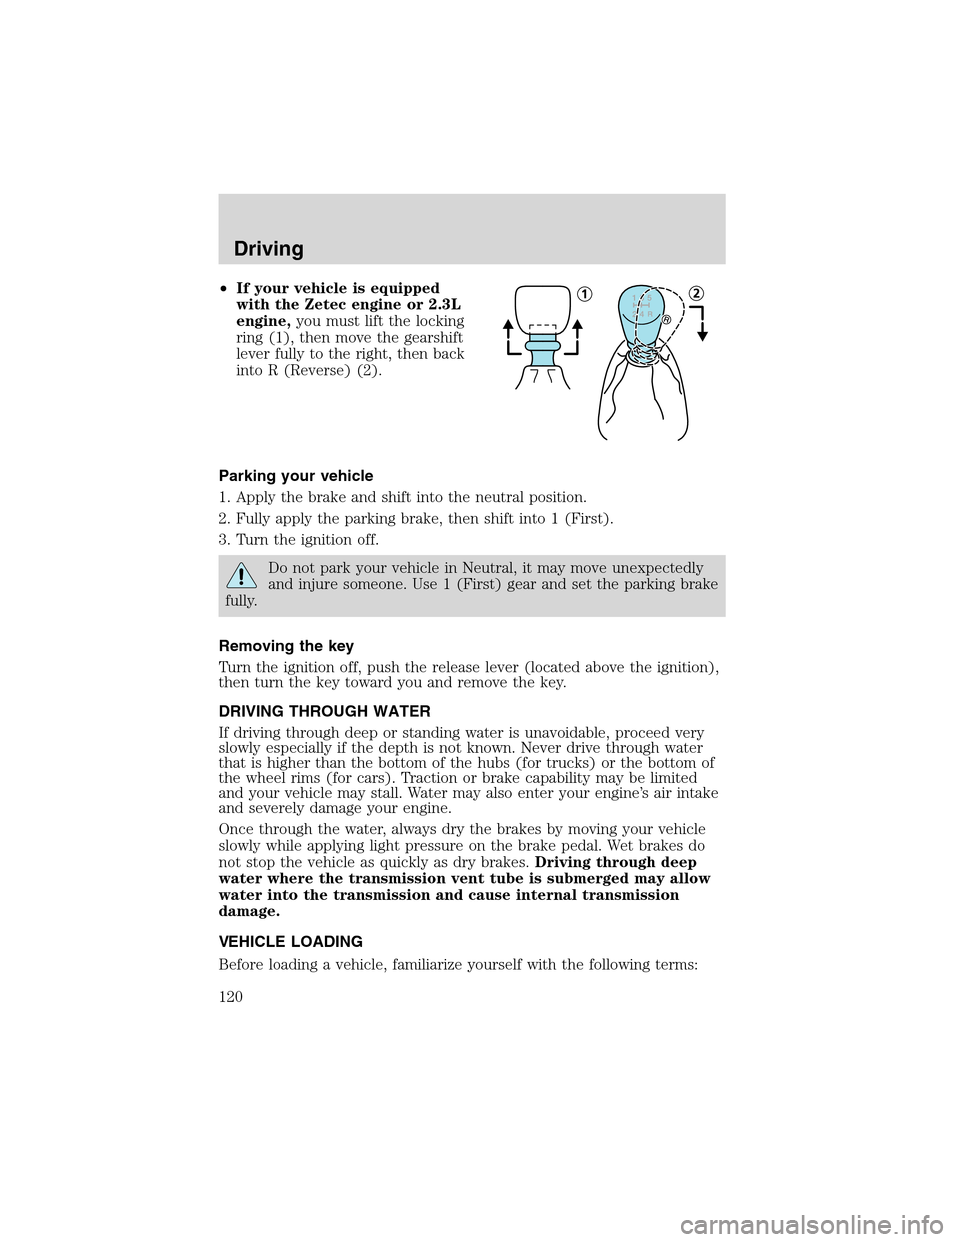
•If your vehicle is equipped
with the Zetec engine or 2.3L
engine,you must lift the locking
ring (1), then move the gearshift
lever fully to the right, then back
into R (Reverse) (2).
Parking your vehicle
1. Apply the brake and shift into the neutral position.
2. Fully apply the parking brake, then shift into 1 (First).
3. Turn the ignition off.
Do not park your vehicle in Neutral, it may move unexpectedly
and injure someone. Use 1 (First) gear and set the parking brake
fully.
Removing the key
Turn the ignition off, push the release lever (located above the ignition),
then turn the key toward you and remove the key.
DRIVING THROUGH WATER
If driving through deep or standing water is unavoidable, proceed very
slowly especially if the depth is not known. Never drive through water
that is higher than the bottom of the hubs (for trucks) or the bottom of
the wheel rims (for cars). Traction or brake capability may be limited
and your vehicle may stall. Water may also enter your engine’s air intake
and severely damage your engine.
Once through the water, always dry the brakes by moving your vehicle
slowly while applying light pressure on the brake pedal. Wet brakes do
not stop the vehicle as quickly as dry brakes.Driving through deep
water where the transmission vent tube is submerged may allow
water into the transmission and cause internal transmission
damage.
VEHICLE LOADING
Before loading a vehicle, familiarize yourself with the following terms:
Driving
120
Page 125 of 216

Roadside EmergenciesGETTING ROADSIDE ASSISTANCE
To fully assist you should you have a vehicle concern, Ford Motor
Company offers a complimentary roadside assistance program. This
program is separate from the New Vehicle Limited Warranty. The service
is available:
•24–hours, seven days a week
•for the New Vehicle Limited Warranty period of three years or 60,000
km (36,000 miles), whichever occurs first on Ford and Mercury
vehicles, and four years or 80,000 km (50,000 miles) on Lincoln
vehicles.
Roadside assistance will cover:
•changing a flat tire
•jump-starts
•lock-out assistance
•limited fuel delivery
•towing of your disabled vehicle to the nearest Ford Motor Company
dealership, or your selling dealer if within 56.3 km (35 miles) of the
nearest Ford Motor Company dealership (one tow per disablement).
Even non-warranty related tows, like accidents or getting stuck in the
mud or snow, are covered (some exclusions apply, such as impound
towing or repossession).
Canadian customers refer to your Owner Information Guide for
information on:
•coverage period
•exact fuel amounts
•towing of your disabled vehicle
•emergency travel expense reimbursement
•travel planning benefits
USING ROADSIDE ASSISTANCE
Complete the roadside assistance identification card and place it in your
wallet for quick reference. In the United States, this card is found in the
Owner Guide portfolio in the glove compartment in Ford vehicles and is
mailed to you if you own a Mercury or Lincoln. In Canada, the card is
found in the Owner Information Guide in the glove compartment.
Roadside Emergencies
125
Page 130 of 216
The fuses are coded as follows.
Fuse/Relay
LocationFuse Amp
RatingPassenger Compartment Fuse
Panel Description
R17—Starter relay
R18–Rear intermittent relay
R19—Front wiper intermittent relay
R20—Not used
R21—Not used
R22—Not used
R23—Horn relay
R24—Battery saver relay
R25—Rear defrost relay
30 10A Light switch
31 15A Radio
32 15A Turn signal
33 20A Horn, Power seats (SVT only)
34 20A Power sunroof
35 7.5A Interior lamps, Power mirrors
36 7.5A A/C switch, Hazard flasher,
Instrument cluster
37—Not used
38—Not used
39—Not used
40 10A Backup lamps (automatic
transaxle)
41 7.5A Radio and cluster (accessory)
42 15A Stop lamps
43 15A Rear wiper
44 20A Fog lamps
45 7.5A Recirculated air, Air conditioning
46 7.5A Anti-lock Brake System (ABS)
47 20A Cigar lighter, Rear power point
(SVT only)
Roadside Emergencies
130
Page 131 of 216

Fuse/Relay
LocationFuse Amp
RatingPassenger Compartment Fuse
Panel Description
48 10A Data link connector
49 25A Rear defroster
50 7.5A Heated mirror, Heated backlite
indicator
51—Not used
52 15A Heated seats
53 10A Backup lamps (manual transaxle)
54 25A Rear power windows
55 25A Front power windows
56 20A Front wipers
57 7.5A Position and side lights (right)
58 7.5A Position and side lights (left)
59 7.5A Light switch (headlamps)
60 7.5A Air bag module
61 7.5A PATS modules, Instrument cluster
62 7.5A License plate lamp
63 20A Power locks (GEM)
Fuse 63 is located on the back of the fuse panel. See your dealer or a
certified technician for service of this fuse.
Power distribution box
The power distribution box is located in the engine compartment. The
power distribution box contains high-current fuses that protect your
vehicle’s main electrical systems from overloads.
Always disconnect the battery before servicing high current
fuses.
Always replace the cover to the power distribution box before
reconnecting the battery or refilling fluid reservoirs
If the battery has been disconnected and reconnected, refer to the
Batterysection of theMaintenance and specificationschapter.
Roadside Emergencies
131
Page 133 of 216
Fuse/Relay
LocationFuse Amp
RatingPower Distribution Box
Description
10 10A (2.0L engine
only)Battery voltage sensor
1A (2.3L engine
only)
11 30A Anti-lock Brake System (ABS)
12 15A Fuel pump
13—Not used
14—Not used
15 10A A/C clutch solenoid
16 10A Low beam (left side -
conventional headlamps)
15A Low beam (left side - HID
headlamps)
17 10A Low beam (right side -
conventional headlamps)
15A Low beam (right side - HID
headlamps)
18 10A (2.0L engine
only)Heated oxygen sensors
15A (2.3L engine
only)
19—Not used
20 10A Engine module
21 20A ABS
22 20A Low beam (DRL)
23—Not used
24 30A Subwoofer
25—Not used
26 10A High beam (left)
27 10A High beam (right)
28—Not used
29—Not used
Roadside Emergencies
133
Page 136 of 216

Tire change procedure
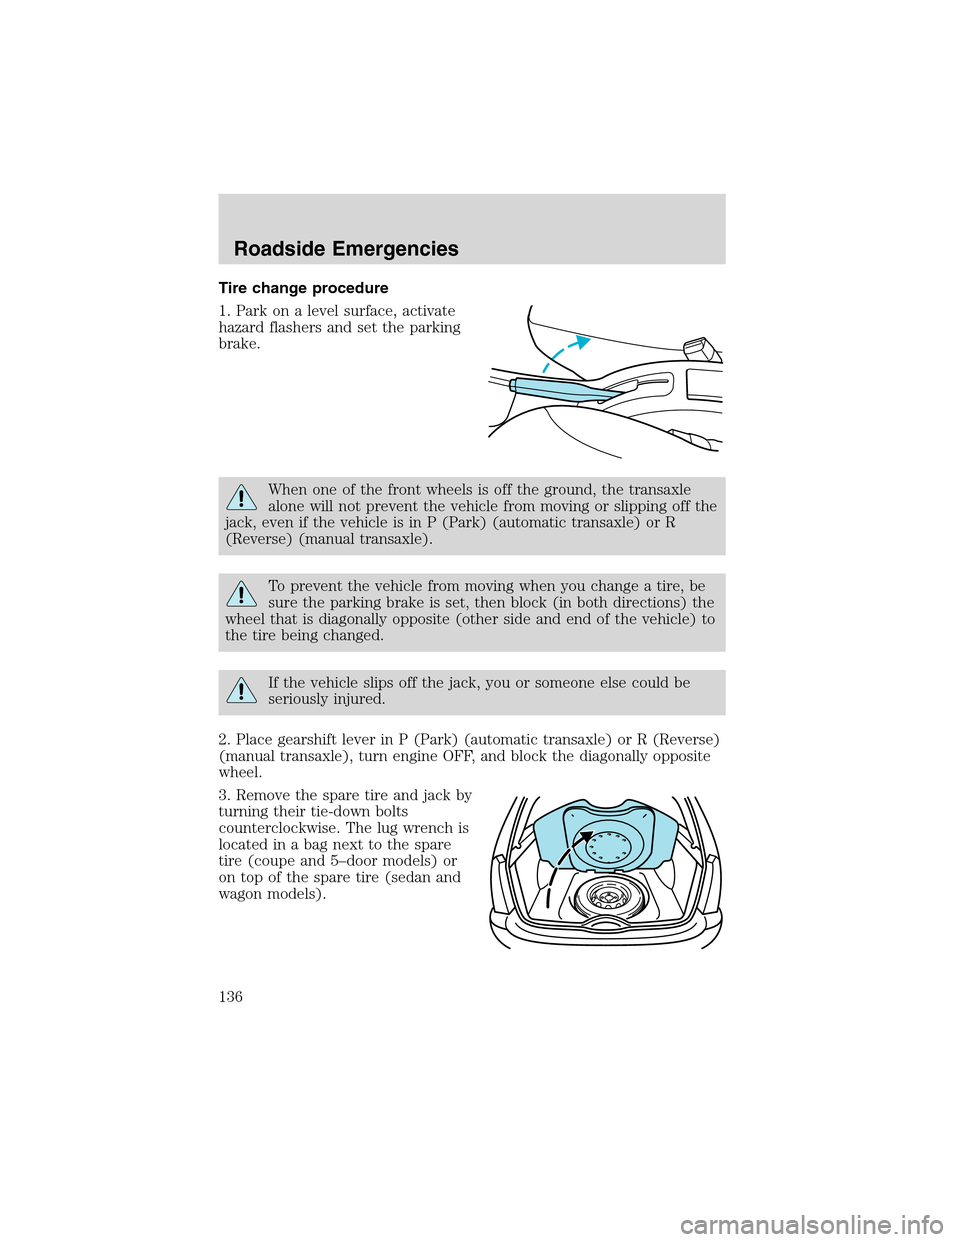
1. Park on a level surface, activate
hazard flashers and set the parking
brake.
When one of the front wheels is off the ground, the transaxle
alone will not prevent the vehicle from moving or slipping off the
jack, even if the vehicle is in P (Park) (automatic transaxle) or R
(Reverse) (manual transaxle).
To prevent the vehicle from moving when you change a tire, be
sure the parking brake is set, then block (in both directions) the
wheel that is diagonally opposite (other side and end of the vehicle) to
the tire being changed.
If the vehicle slips off the jack, you or someone else could be
seriously injured.
2. Place gearshift lever in P (Park) (automatic transaxle) or R (Reverse)
(manual transaxle), turn engine OFF, and block the diagonally opposite
wheel.
3. Remove the spare tire and jack by
turning their tie-down bolts
counterclockwise. The lug wrench is
located in a bag next to the spare
tire (coupe and 5–door models) or
on top of the spare tire (sedan and
wagon models).
Roadside Emergencies
136
Page 137 of 216
4. On coupe models, unsnap and
remove the access door (if
equipped) on the lower rocker
molding to access the proper jacking
points.
5. Loosen each wheel lug nut
one-half turn counterclockwise but
do not remove them until the wheel
is raised off the ground.
Roadside Emergencies
137
Page 138 of 216

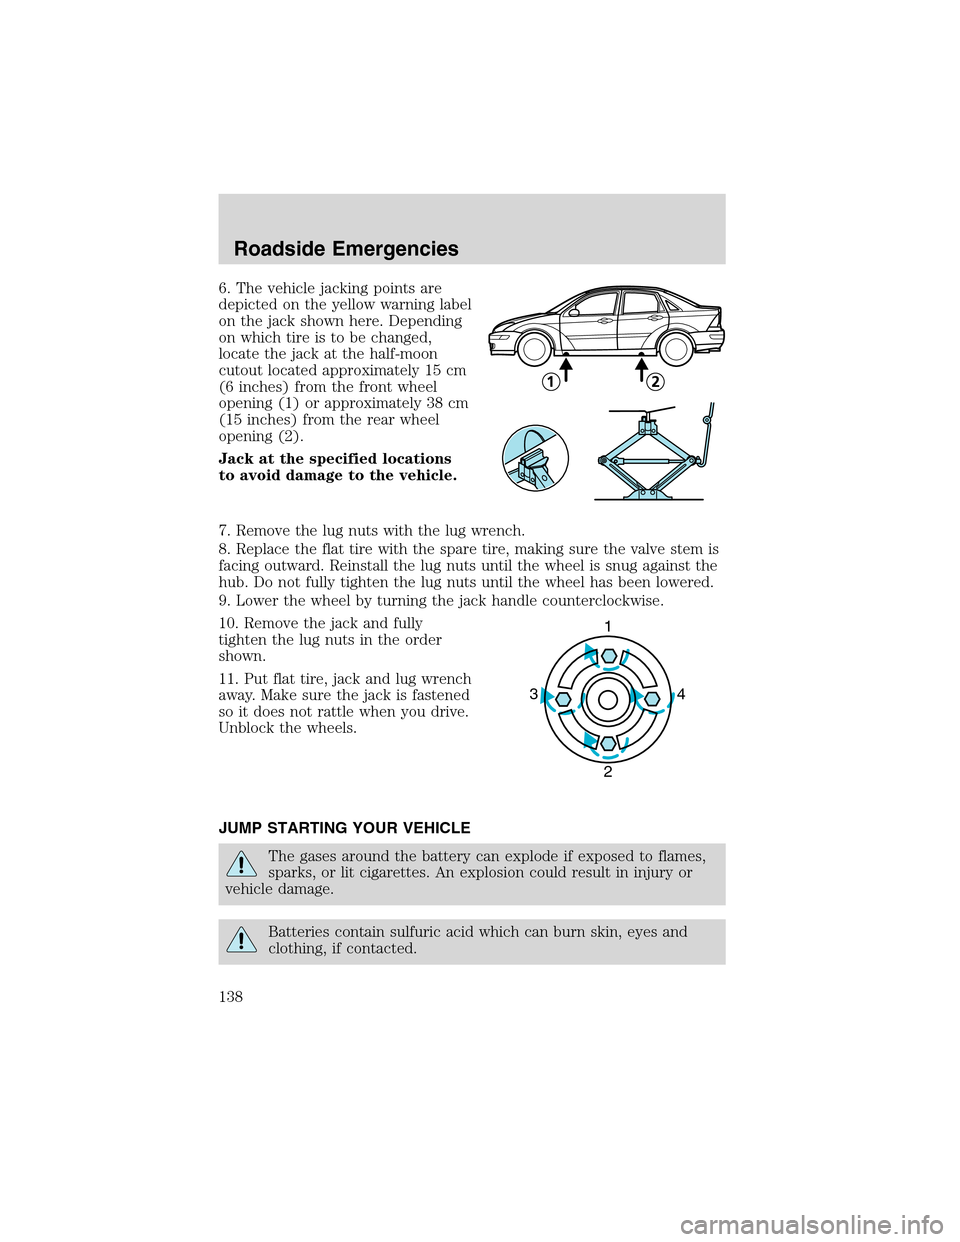
6. The vehicle jacking points are
depicted on the yellow warning label
on the jack shown here. Depending
on which tire is to be changed,
locate the jack at the half-moon
cutout located approximately 15 cm
(6 inches) from the front wheel
opening (1) or approximately 38 cm
(15 inches) from the rear wheel
opening (2).
Jack at the specified locations
to avoid damage to the vehicle.
7. Remove the lug nuts with the lug wrench.
8. Replace the flat tire with the spare tire, making sure the valve stem is
facing outward. Reinstall the lug nuts until the wheel is snug against the
hub. Do not fully tighten the lug nuts until the wheel has been lowered.
9. Lower the wheel by turning the jack handle counterclockwise.
10. Remove the jack and fully
tighten the lug nuts in the order
shown.
11. Put flat tire, jack and lug wrench
away. Make sure the jack is fastened
so it does not rattle when you drive.
Unblock the wheels.
JUMP STARTING YOUR VEHICLE
The gases around the battery can explode if exposed to flames,
sparks, or lit cigarettes. An explosion could result in injury or
vehicle damage.
Batteries contain sulfuric acid which can burn skin, eyes and
clothing, if contacted.
1
4 3
2
Roadside Emergencies
138