2003 FORD F350 load capacity
[x] Cancel search: load capacityPage 141 of 280
Avoid sudden braking as well. Although a 4WD vehicle may accelerate
better than a two-wheel drive vehicle in snow and ice, it won’t stop any
faster, because as in other vehicles, braking occurs at all four wheels. Do
not become overconfident as to road conditions.
Make sure you allow sufficient distance between you and other vehicles
for stopping. Drive slower than usual and consider using one of the lower
gears. In emergency stopping situations, avoid locking of the wheels. Use
a“squeeze”technique, push on the brake pedal with a steadily increasing
force which allows the wheels to brake yet continue to roll so that you
may steer in the direction you want to travel. If you lock the wheels,
release the brake pedal and repeat the squeeze technique. If your vehicle
is equipped with a Four Wheel Anti-Lock Brake System (ABS), apply the
brake steadily. Do not“pump”the brakes. Refer to theBrakessection of
this chapter for additional information on the operation of the anti-lock
brake system.
Never drive with chains on the front tires of 4WD vehicles without also
putting them on the rear tires. This could cause the rear to slide and
swing around during braking.
Tires, Replacement Requirements
Do not use a size and type of tire and wheel other than that
originally provided by Ford Motor Company because it can affect
the safety and performance of your vehicle, which could result in an
increased risk of loss of vehicle control, vehicle rollover, and/or serious
personal injury or death.
Make sure all tires and wheels on the vehicle are of the same size, type,
tread design, brand and load-carrying capacity. If you have questions
regarding tire replacement, see an authorized Ford or Lincoln/Mercury
dealer.
If you nevertheless decide to equip your 4WD for off-road use with tires
larger than what Ford Motor Company recommends, you should not use
these tires for highway driving.
If you use any tire/wheel combination not recommended by Ford Motor
Company, it may adversely affect vehicle handling and could cause
steering, suspension, axle or transfer case failure as well as the increased
risk of loss of vehicle control.
Do not use“aftermarket lift kits”or other suspension modifications,
whether or not they are used with larger tires and wheels.
These“aftermarket lift kits”could adversely affect the vehicle’s handling
characteristics, which could lead to loss of vehicle control or rollover and
serious injury.
Driving
141
ProCarManuals.com
Page 144 of 280
VEHICLE LOADING
Before loading a vehicle, familiarize yourself with the following terms:
•Base Curb Weight:Weight of the vehicle including any standard
equipment, fluids, lubricants, etc. It does not include occupants or
aftermarket equipment.
•Payload:Combined maximum allowable weight of cargo, occupants
and optional equipment. The payload equals the gross vehicle weight
rating minus base curb weight.
•GVW (Gross Vehicle Weight):Base curb weight plus payload
weight.
•GVWR (Gross Vehicle Weight Rating):Maximum allowable total
weight of the base vehicle, occupants, optional equipment and cargo.
The GVWR is specific to each vehicle and is listed on the Safety
Certification Label on the driver’s door pillar.
•GAWR (Gross Axle Weight Rating):Carrying capacity for each axle
system. The GAWR is specific to each vehicle and is listed on the
Safety Certification Label on the driver’s door pillar.
•GCW (Gross Combined Weight):The combined weight of the
towing vehicle (including occupants and cargo) and the loaded trailer.
•GCWR (Gross Combined Weight Rating):Maximum allowable
combined weight of towing vehicle (including occupants and cargo)
and the loaded trailer.
•Maximum Trailer Weight Rating:Maximum weight of a trailer the
vehicle is permitted to tow. The maximum trailer weight rating is
determined by subtracting the vehicle curb weight for each
engine/transmission combination, any required option weight for trailer
towing and the weight of the driver from the GCWR for the towing
vehicle.
•Maximum Trailer Weight:Maximum weight of a trailer the loaded
vehicle (including occupants and cargo) is permitted to tow. It is
determined by subtracting the weight of the loaded trailer towing
vehicle from the GCWR for the towing vehicle.
•Trailer Weight Range:Specified range of trailer weight from zero to
the maximum trailer weight rating.
Remember to figure in the tongue load of your loaded trailer when
figuring the total weight.
The Safety Certification Label, located on the driver’s door pillar, lists
vehicle weight rating limitations. Before adding any additional equipment,
refer to these limitations.
Driving
144
ProCarManuals.com
Page 146 of 280
2nd unit bodies are not included in maximum trailer weight ratings. The
weight of the additional“body”must be subtracted from the maximum
trailer weight.
Your vehicle’s load capacity is designated by weight, not by volume, so
you cannot necessarily use all available space when loading a vehicle.
Towing a trailer places an additional load on your vehicle’s engine,
transmission, axle, brakes, tires and suspension. Inspect these
components carefully prior to and after any towing operation. The
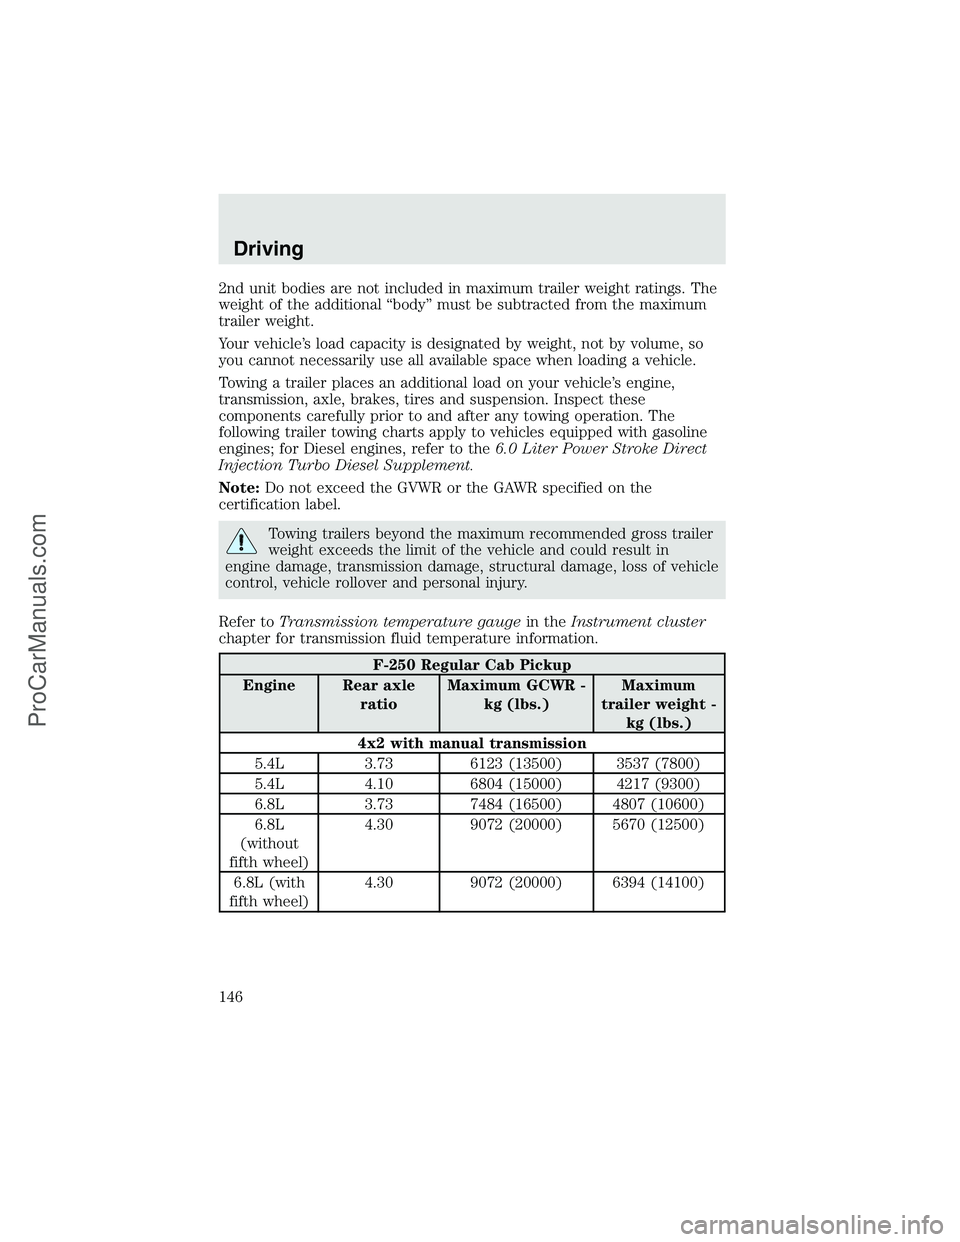
following trailer towing charts apply to vehicles equipped with gasoline
engines; for Diesel engines, refer to the6.0 Liter Power Stroke Direct
Injection Turbo Diesel Supplement.
Note:Do not exceed the GVWR or the GAWR specified on the
certification label.
Towing trailers beyond the maximum recommended gross trailer
weight exceeds the limit of the vehicle and could result in
engine damage, transmission damage, structural damage, loss of vehicle
control, vehicle rollover and personal injury.
Refer toTransmission temperature gaugein theInstrument cluster
chapter for transmission fluid temperature information.
F-250 Regular Cab Pickup
Engine Rear axle
ratioMaximum GCWR -
kg (lbs.)Maximum
trailer weight -
kg (lbs.)
4x2 with manual transmission
5.4L 3.73 6123 (13500) 3537 (7800)
5.4L 4.10 6804 (15000) 4217 (9300)
6.8L 3.73 7484 (16500) 4807 (10600)
6.8L
(without
fifth wheel)4.30 9072 (20000) 5670 (12500)
6.8L (with
fifth wheel)4.30 9072 (20000) 6394 (14100)
Driving
146
ProCarManuals.com
Page 169 of 280
Using a step bumper (if equipped)
The rear bumper is equipped with an integral hitch and only requires a
ball with a 25.4 mm (one inch) shank diameter. The bumper has a 2,270
kg (5,000 lb.) trailer weight and 227 kg (500 lb.) tongue weight capacity.
If it is necessary to relocate the trailer hitch ball position, a
frame-mounted trailer hitch must be installed.
Driving while you tow
When towing a trailer:
•Turn off the speed control. The speed control may shut off
automatically when you are towing on long, steep grades.
•Consult your local motor vehicle speed regulations for towing a trailer.
•If your vehicle is equipped with a 4–speed automatic
transmission:To eliminate excessive transmission shifting, use a
lower gear. This will also assist in transmission cooling. (For additional
information, refer to theUnderstanding the positions of the 4–speed
automatic transmissionsection in this chapter.
•If your vehicle is equipped with a 5–speed automatic
transmission:To eliminate excessive transmission shifting, activate
the Tow/Haul feature. This will also assist in transmission cooling. (For
additional information, refer to theUnderstanding the positions of
the 5–speed automatic transmissionsection in this chapter.
•Anticipate stops and brake gradually.
•Do not exceed the GCWR rating or transmission damage may occur.
Servicing after towing
If you tow a trailer for long distances, your vehicle will require more
frequent service intervals. Refer to your scheduled maintenance guide for
more information.
Trailer towing tips
•Practice turning, stopping and backing up before starting on a trip to
get the feel of the vehicle trailer combination. When turning, make
wider turns so the trailer wheels will clear curbs and other obstacles.
•Allow more distance for stopping with a trailer attached.
•The trailer tongue weight should be 10–15% of the loaded trailer
weight.
•After you have traveled 80 km (50 miles), thoroughly check your
hitch, electrical connections and trailer wheel lug nuts.
Driving
169
ProCarManuals.com
Page 172 of 280
•The Front Axle Accessory Reserve Capacity and the TARC listed on
the bottom right of the Safety Compliance Certification Label will
determine whether or not the addition of a snowplow will overload
your vehicle.
•The weight of the snowplow and supporting components distributed to
the front axle must not exceed the Front Axle Accessory Reserve
Capacity.
•The total weight of the snowplow and aftermarket equipment must
not exceed the TARC.
•The weight of the installed snowplow and aftermarket equipment must
not load the vehicle beyond the GAWR (front/rear) and GVWR listed
on the Safety Compliance Certification Label.
•The total weight of the snowplow and aftermarket equipment must be
considered part of the payload and must not exceed the GCWR for
towing.
•Federal and most local regulations require additional exterior lamps
for snowplow-equipped vehicles. Consult your dealer for additional
information.
•Tires have their maximum inflation pressure and associated load rating
imprinted on the tire sidewall. This pressure may or may not be the
same as that shown as recommended on the vehicle. The vehicle
operator may have to adjust the tire inflation pressure to
accommodate the snowplow and payload. Consult your dealer or
equipment installer for help with proper inflation pressures.
•Federal and some local regulations require additional exterior lamps
for snowplow-equipped vehicles. Consult your dealer for additional
information.
•After installing a snowplow to the vehicle, ensure the vehicle’s front
toe alignment and front ride height are within specification (reset if
required). These specifications are located in the vehicle’s Workshop
Manual.
Note:Do not exceed the GVWR or the GAWR specified on the
certification label.
Removing snowplow
After removing a snowplow from the vehicle, ensure the vehicle’s front
toe alignment and front ride height are within specification (reset if
required).
Driving
172
ProCarManuals.com
Page 190 of 280
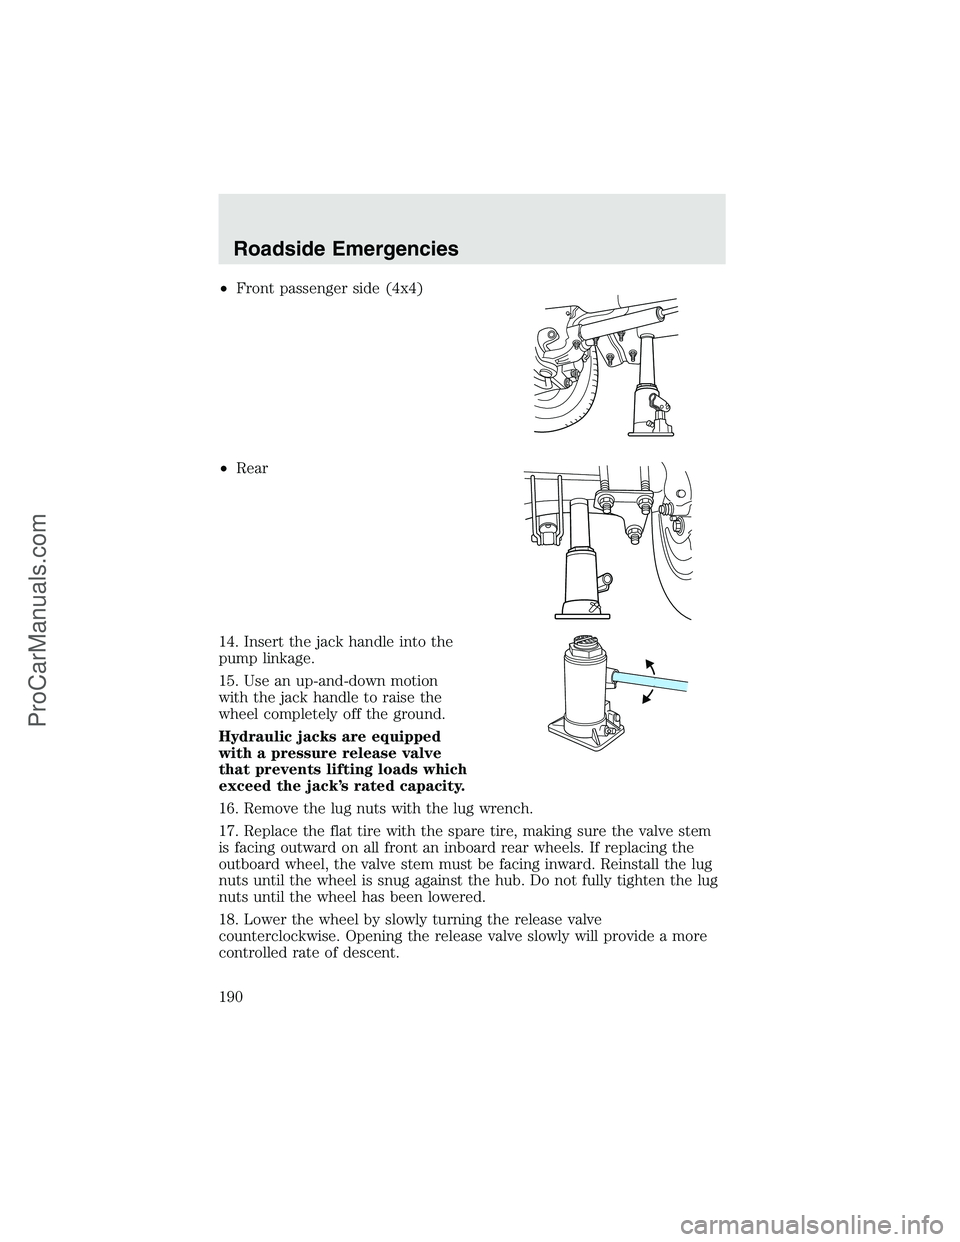
•Front passenger side (4x4)
•Rear
14. Insert the jack handle into the
pump linkage.
15. Use an up-and-down motion
with the jack handle to raise the
wheel completely off the ground.
Hydraulic jacks are equipped
with a pressure release valve
that prevents lifting loads which
exceed the jack’s rated capacity.
16. Remove the lug nuts with the lug wrench.
17. Replace the flat tire with the spare tire, making sure the valve stem
is facing outward on all front an inboard rear wheels. If replacing the
outboard wheel, the valve stem must be facing inward. Reinstall the lug
nuts until the wheel is snug against the hub. Do not fully tighten the lug
nuts until the wheel has been lowered.
18. Lower the wheel by slowly turning the release valve
counterclockwise. Opening the release valve slowly will provide a more
controlled rate of descent.
Roadside Emergencies
190
ProCarManuals.com
Page 252 of 280
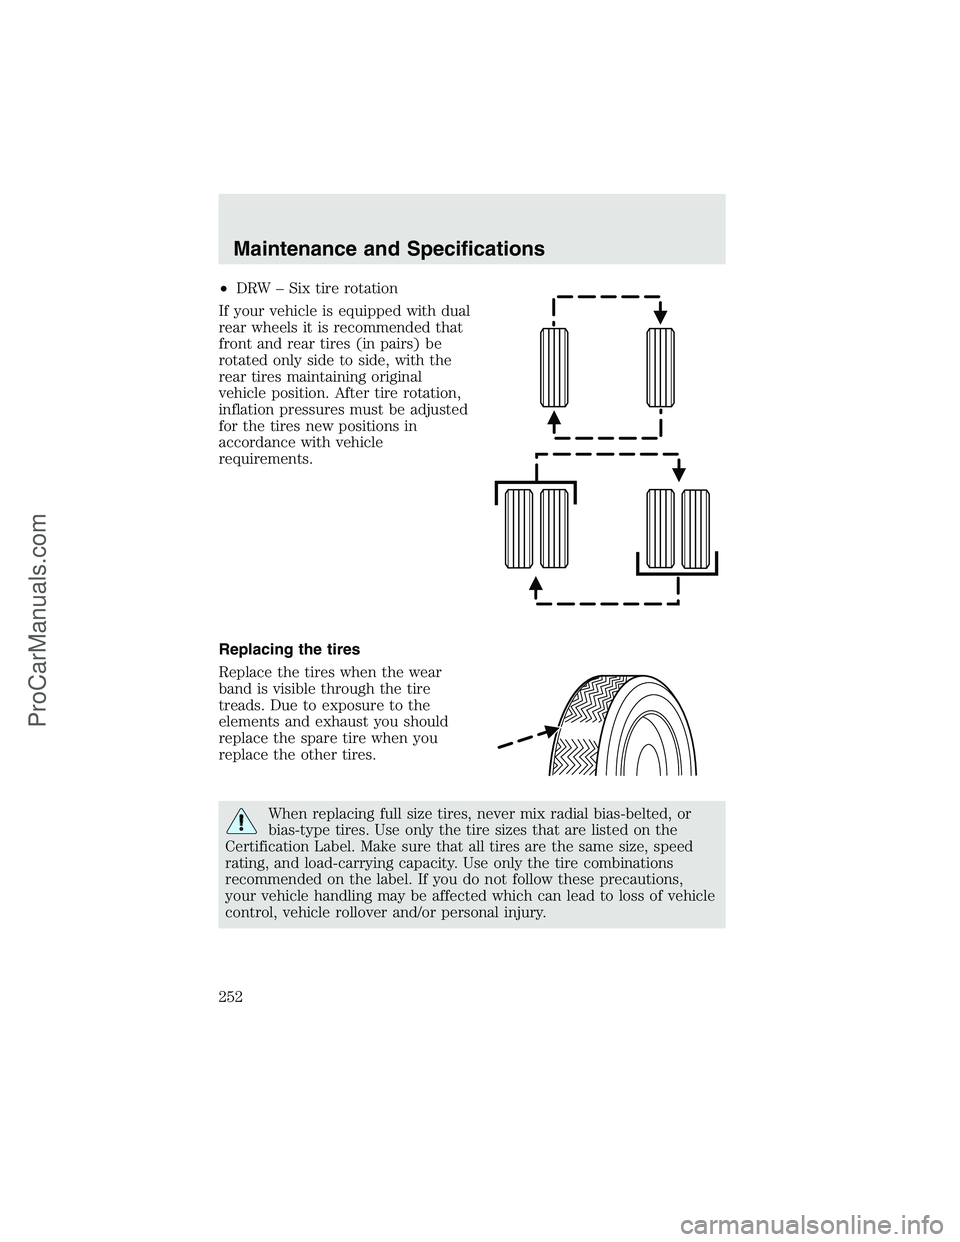
•DRW–Six tire rotation
If your vehicle is equipped with dual
rear wheels it is recommended that
front and rear tires (in pairs) be
rotated only side to side, with the
rear tires maintaining original
vehicle position. After tire rotation,
inflation pressures must be adjusted
for the tires new positions in
accordance with vehicle
requirements.
Replacing the tires
Replace the tires when the wear
band is visible through the tire
treads. Due to exposure to the
elements and exhaust you should
replace the spare tire when you
replace the other tires.
When replacing full size tires, never mix radial bias-belted, or
bias-type tires. Use only the tire sizes that are listed on the
Certification Label. Make sure that all tires are the same size, speed
rating, and load-carrying capacity. Use only the tire combinations
recommended on the label. If you do not follow these precautions,
your vehicle handling may be affected which can lead to loss of vehicle
control, vehicle rollover and/or personal injury.
Maintenance and Specifications
252
ProCarManuals.com
Page 253 of 280
Make sure that all replacement tires are of the same size, type,
speed rating, load-carrying capacity and tread design (e.g.,“All
Terrain”,“Touring”, etc.), as originally offered by Ford.
Do not replace your tires with“high performance”tires or larger
size tires.
Failure to follow these precautions may adversely affect the
handling of the vehicle, and increase the risk of loss of vehicle
control, vehicle rollover and/or personal injury.
Tires that are larger or smaller than your vehicle’s original tires may also
affect the accuracy of your speedometer.
SNOW TIRES AND CHAINS
Snow tires must be the same size and grade as the tires you
currently have on your vehicle.
The tires on your vehicle have all weather treads to provide traction in
rain and snow. However, in some climates, you may need to use snow
tires and chains. If you need to use chains, it is recommended that steel
wheels (of the same size and specifications) be used, as chains may chip
aluminum wheels.
Follow these guidelines when using snow tires and chains:
•Use only SAE Class S chains.
•Install chains securely, verifying that the chains do not touch any
wiring, brake lines or fuel lines.
•Drive cautiously. If you hear the chains rub or bang against your
vehicle, stop and re-tighten the chains. If this does not work, remove
the chains to prevent damage to your vehicle.
•If possible, avoid fully loading your vehicle.
•Remove the tire chains when they are no longer needed. Do not use
tire chains on dry roads.
•The suspension insulation and bumpers will help prevent vehicle
damage. Do not remove these components from your vehicle when
using snow tires and chains.
Maintenance and Specifications
253
ProCarManuals.com