Page 7 of 280
Special instructions
For your added safety, your vehicle is fitted with sophisticated electronic
controls.
Please read the sectionAir bagin theSeating and safety
restraintschapter. Failure to follow the specific warnings and
instructions could result in personal injury.
Front seat mounted rear facing child or infant seats should
NEVERbe used in front of a passenger side air bag unless the
air bag can be and is turned OFF.
Snowplowing
Ford recommends the following specifications for low speed, personal
use snow removal:
•F-150 4x4 (except F-150 Supercrew, Lightning and Harley-Davidson
models)
•5.4L engine
•Heavy-duty service package
•Super engine cooling
•Heavy-duty front suspension package
•Automatic transmission with auxiliary automatic transmission fluid
cooling
•All-terrain tires
•Limited slip and optional axle ratio.
Do not install a snowplow and plow with your vehicle until it has been
driven at least 800 km (500 miles).
F150 SuperCrew, F150 5.4L Supercharged “Lightning” and
Harley-Davidson F-150 Owners: Snowplowing
Your vehicle is not recommended for snowplowing. Ford makes no
representation as to the suitability of your vehicle for snowplowing, in
particular regarding the potential for exceeding vehicle weight limits,
airbag (SRS) deployment sensitivity, vehicle crash integrity, or
powertrain durability. The Snowplow Package Option is not available.
Introduction
7
Page 38 of 280
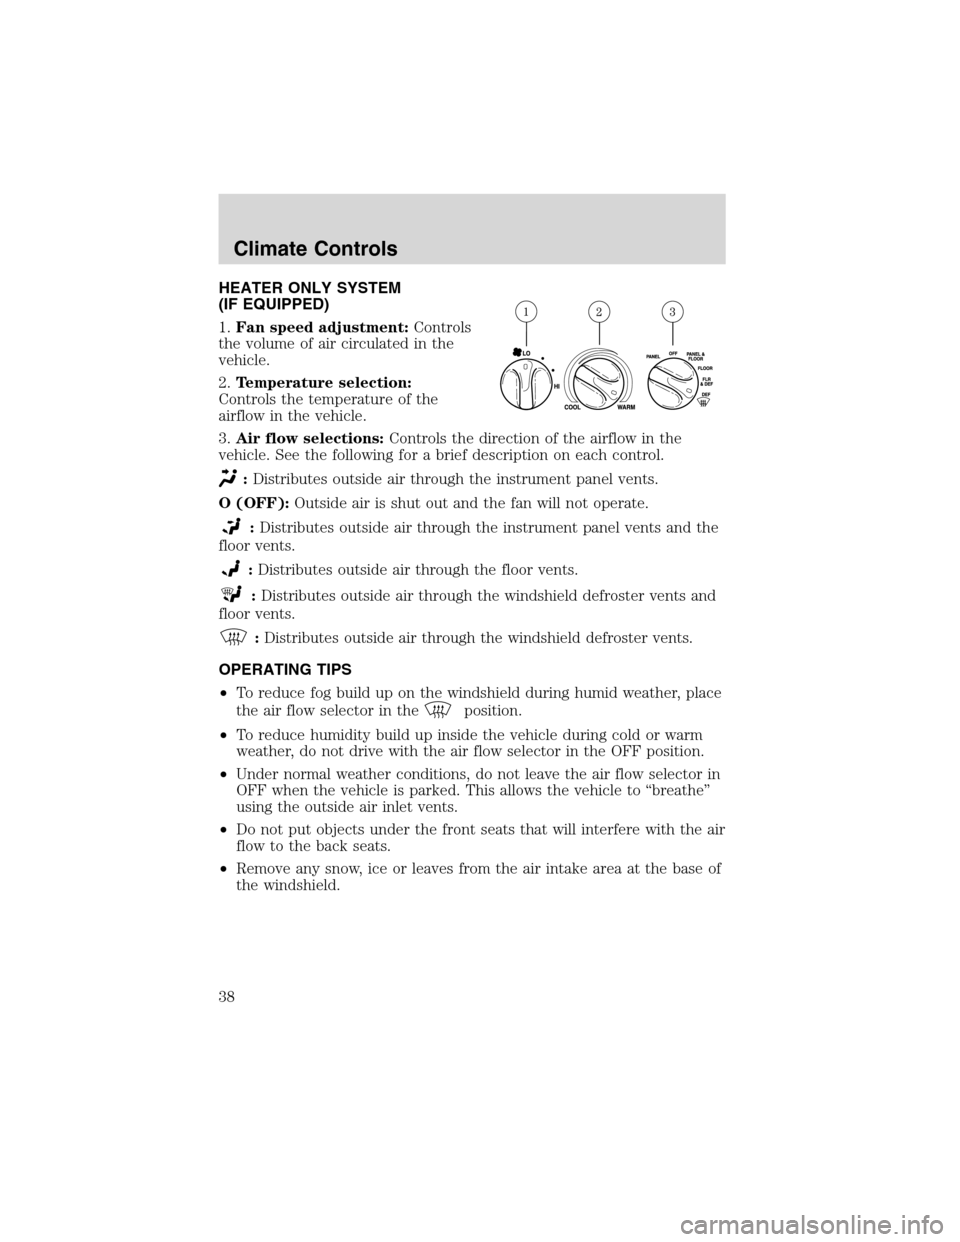
HEATER ONLY SYSTEM
(IF EQUIPPED)
1.Fan speed adjustment:Controls
the volume of air circulated in the
vehicle.
2.Temperature selection:
Controls the temperature of the
airflow in the vehicle.
3.Air flow selections:Controls the direction of the airflow in the
vehicle. See the following for a brief description on each control.
:Distributes outside air through the instrument panel vents.
O (OFF):Outside air is shut out and the fan will not operate.
:Distributes outside air through the instrument panel vents and the
floor vents.
:Distributes outside air through the floor vents.
:Distributes outside air through the windshield defroster vents and
floor vents.
:Distributes outside air through the windshield defroster vents.
OPERATING TIPS
•To reduce fog build up on the windshield during humid weather, place
the air flow selector in the
position.
•To reduce humidity build up inside the vehicle during cold or warm
weather, do not drive with the air flow selector in the OFF position.
•Under normal weather conditions, do not leave the air flow selector in
OFF when the vehicle is parked. This allows the vehicle to“breathe”
using the outside air inlet vents.
•Do not put objects under the front seats that will interfere with the air
flow to the back seats.
•Remove any snow, ice or leaves from the air intake area at the base of
the windshield.
Climate Controls
38
Page 40 of 280
OPERATING TIPS
•To reduce fog build up on the windshield during humid weather, place
the air flow selector in the
position.
•To reduce humidity build up inside the vehicle: do not drive with the
air flow selector in the OFF or MAX A/C position.
•Under normal weather conditions, do not leave the air flow selector in
MAX A/C or OFF when the vehicle is parked. This allows the vehicle
to“breathe”using the outside air inlet vents.
•Do not put objects under the front seats that will interfere with the
airflow to the back seats.
•Remove any snow, ice or leaves from the air intake area at the base of
the windshield.
To aid in side window defogging/demisting in cold weather:
1. Select
2. Select A/C
3. Modulate the temperature control to maintain comfort.
4. Set the fan speed to HI
5. Direct the outer instrument panel vents towards the side windows
To increase airflow to the outer instrument panel vents, close the vents
located in the middle of the instrument panel.
Do not place objects on top of the instrument panel as these
objects may become projectiles in a collision or sudden stop.
Climate Controls
40
Page 43 of 280
OPERATING TIPS
•To reduce fog build up on the windshield during humid weather, place
the air flow selector in the
position.
•To reduce humidity build up inside the vehicle: do not drive with the
air flow selector in the OFF or MAX A/C position.
•Under normal weather conditions, do not leave the air flow selector in
MAX A/C or OFF when the vehicle is parked. This allows the vehicle
to“breathe”using the outside air inlet vents.
•Do not put objects under the front seats that will interfere with the
airflow to the back seats.
•Remove any snow, ice or leaves from the air intake area at the base of
the windshield.
To aid in side window defogging/demisting in cold weather:
1. Select
2. Select A/C
3. Modulate the temperature control to maintain comfort.
4. Set the fan speed to HI
5. Direct the outer instrument panel vents towards the side windows
To increase airflow to the outer instrument panel vents, close the vents
located in the middle of the instrument panel.
Do not place objects on top of the instrument panel as these
objects may become projectiles in a collision or sudden stop.
REAR WINDOW DEFROSTER (IF EQUIPPED)
The rear defroster control is located on the climate control panel and
works to defrost your windshield from fog and ice.
Ensure that the ignition is ON position. Press to turn the defroster
ON/OFF. The indicator light will illuminate when ON.
Climate Controls
43
Page 59 of 280
AUXILIARY POWER POINT
Power outlets are designed for
accessory plugs only. Do not
hang any type of accessory or
accessory bracket from the plug.
Improper use of the power
outlet can cause damage not
covered by your warranty.
The auxiliary power point is located
on the instrument panel.
Do not plug optional electrical accessories into the cigarette
lighter. Use the power point.
Harley-Davidson F-150 only
A second auxiliary power point is
located on the lower rear side of the
console. The power point is
accessible from the rear seats.
Auxiliary power point (SuperCrew only)
An additional auxiliary power point
is located on the right side rear trim
panel next to the rear seat.
CENTER CONSOLE (IF EQUIPPED)
The center console offers several useful storage features. These include:
•Large utility compartment
•Cupholders
•Coin holder slots
•PalmPilot�/PDA holder
•Pen holder
Driver Controls
59
Page 95 of 280
Heated seats (if equipped)
To operate the heated seats:
•Push control located on the side
of the seat to activate.
•Push again to deactivate.
The indicator light on the control will illuminate when activated.
REAR SEATS
Folding up the rear seats (if equipped—SuperCab only)
The rear seatback has a split 60/40 seat. Each seat cushion can be
flipped up into the seatback position.
1. Pull control to release seat
cushion.
2. Rotate seat cushion up until it
locks into vertical storage position.
Returning the seat to seating position
Always be sure that the seat is in a latched position, whether the
seat is occupied or empty. If not latched, the seat may cause
injury during a sudden stop.
1. Pull control on the side of the seat to release seat cushion from
storage position.
2. Push seat cushion down until it locks into horizontal position.
Seating and Safety Restraints
95
Page 96 of 280
Folding down the rear seats (SuperCrew only)
The rear seatback has a split 60/40 seat. Each seat can be folded down
into the load floor position.
1. Remove the head restraint. Push
the release button at the base of the
head restraint post and pull the
head restraint up and out.
2. Pull control to release seat.
3. Pull seatback toward front seat
and down into load floor position.
Seating and Safety Restraints
96
Page 99 of 280
All occupants of the vehicle, including the driver, should always
properly wear their safety belts, even when an air bag (SRS) is
provided.
It is extremely dangerous to ride in a cargo area, inside or
outside of a vehicle. In a collision, people riding in these areas
are more likely to be seriously injured or killed. Do not allow people to
ride in any area of your vehicle that is not equipped with seats and
safety belts. Be sure everyone in your vehicle is in a seat and using a
safety belt properly.
In a rollover crash, an unbelted person is significantly more likely
to die than a person wearing a safety belt.
Each seating position in your vehicle has a specific safety belt
assembly which is made up of one buckle and one tongue that
are designed to be used as a pair. 1) Use the shoulder belt on the
outside shoulder only. Never wear the shoulder belt under the arm. 2)
Never swing the safety belt around your neck over the inside shoulder.
3) Never use a single belt for more than one person.
Always transport children 12 years old and under in the back
seat and always properly use appropriate child restraints.
Safety belts and seats can become hot in a vehicle that has been
closed up in sunny weather; they could burn a small child. Check
seat covers and buckles before you place a child anywhere near them.
Combination lap and shoulder belts
1. Insert the belt tongue into the proper buckle (the buckle closest to
the direction the tongue is coming from) until you hear a snap and feel it
latch. Make sure the tongue is securely fastened in the buckle.
Seating and Safety Restraints
99