Page 22 of 280

1.Bass:Press BASS and the press
SEL to increase/decrease the
amount of bass output.
Treble:Press TREB and then press
SEL to increase/decrease the
amount of treble output.
2.Select:Press and release
SEEK
/for previous/next
strong station, selection or track.
3.Balance:Press BAL then press
SEL to shift the sound from to the
left/right speakers.
Fade:Press FADE then press SEL
to shift the sound from the
front/rear speakers.
4.Eject:Press to eject a CD.
5.RDS:Allows your audio system
to receive station identification or
program type from RDS-equipped
FM radio stations. Press RDS then press SEL to activate/deactivate:
Traffic:Allows you to hear traffic broadcasts. With the feature ON, press
SEEK or SCAN to find a station broadcasting a traffic report (if it is
broadcasting RDS data).Traffic information is not available in most
U.S. markets.
FIND Program type:Allows you to search RDS-equipped stations for a
certain category of music format: Classic, Country, Info, Jazz, Oldies,
R&B, Religious, Rock, Soft, Top 40.
Show TYPE:Displays the station’s call letters and format.
BASS
TREB
BASS
TREB
SEL
BAL
FADE
BAL
FADE
Entertainment Systems
22
Page 23 of 280

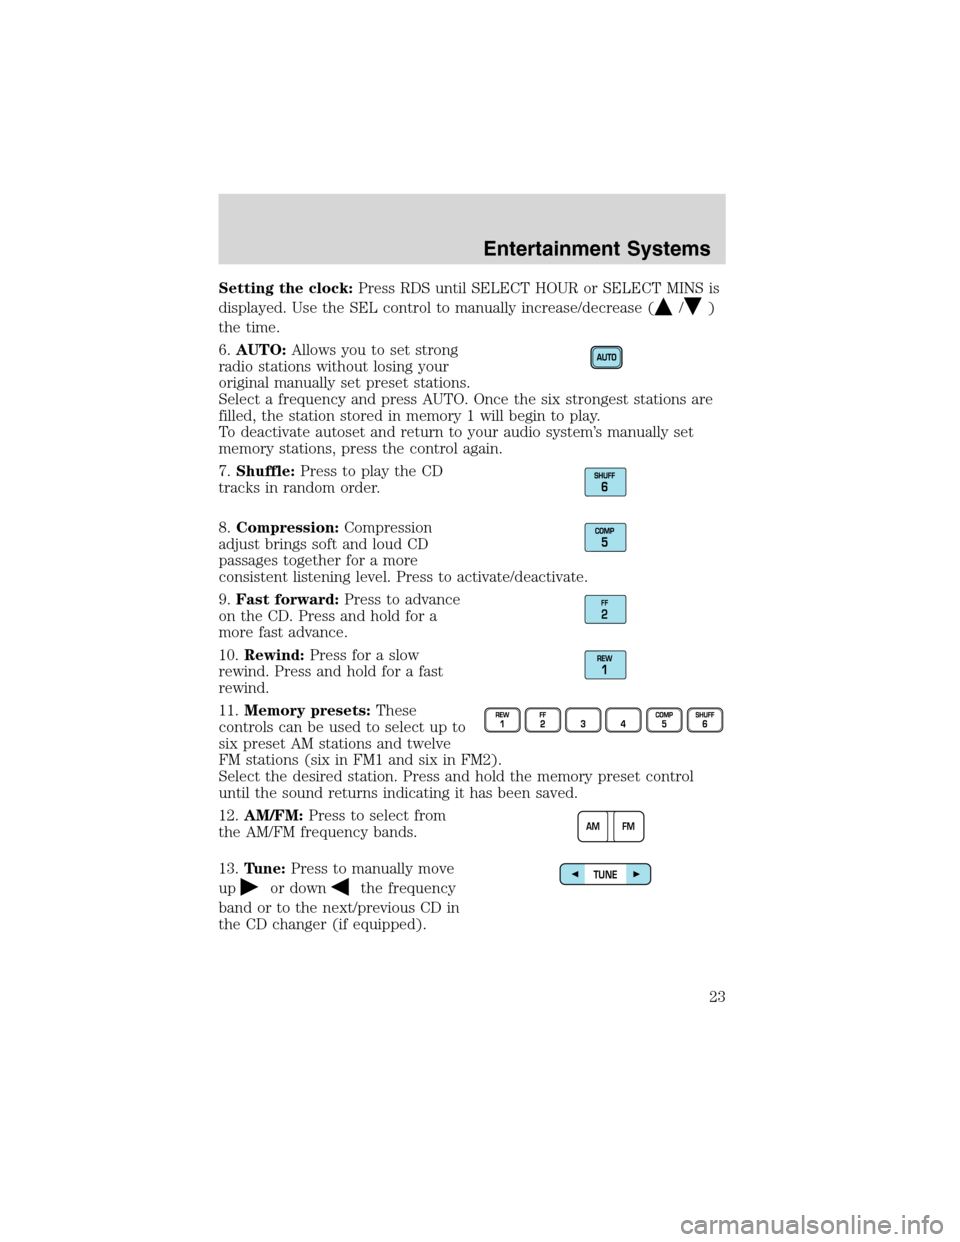
Setting the clock:Press RDS until SELECT HOUR or SELECT MINS is
displayed. Use the SEL control to manually increase/decrease (
/)
the time.
6.AUTO:Allows you to set strong
radio stations without losing your
original manually set preset stations.
Select a frequency and press AUTO. Once the six strongest stations are
filled, the station stored in memory 1 will begin to play.
To deactivate autoset and return to your audio system’s manually set
memory stations, press the control again.
7.Shuffle:Press to play the CD
tracks in random order.
8.Compression:Compression
adjust brings soft and loud CD
passages together for a more
consistent listening level. Press to activate/deactivate.
9.Fast forward:Press to advance
on the CD. Press and hold for a
more fast advance.
10.Rewind:Press for a slow
rewind. Press and hold for a fast
rewind.
11.Memory presets:These
controls can be used to select up to
six preset AM stations and twelve
FM stations (six in FM1 and six in FM2).
Select the desired station. Press and hold the memory preset control
until the sound returns indicating it has been saved.
12.AM/FM:Press to select from
the AM/FM frequency bands.
13.Tune:Press to manually move
up
or downthe frequency
band or to the next/previous CD in
the CD changer (if equipped).
FF2
AM FM
TUNE
Entertainment Systems
23
Page 25 of 280
PIONEER EDITION AUDIO SYSTEM
1.MUTE:Press to mute the playing
media. Press again to return to the
playing media.
2.TAPE:Insert the cassette with
the opening to the right. If a tape is
already inserted into the system,
press TAPE to being tape play.
3.CD:Insert a CD label side up. If a
CD is already inserted, press CD to
begin CD play.
4.TUNE:Works in radio mode.
Press to move down
or up
the frequency band.
TAPE
CD
TUNE
Entertainment Systems
25
Page 32 of 280
for five seconds, then moves to the next station. Press again to stop.
Tape/CD:Press SCAN to sample tape/CD selections for eight seconds.
Press again to stop.
3.CD Door:Insert the disc with
the playing side down and printed
side up.
4.Cassette door:Insert the
cassette with the opening to the
right.
5.Eject:Press to eject the
cassette/CD. The radio will resume
playing.
6.Tape:Press to stop tape during
rewind/fast forward.
CD:Press to start CD play. With the
dual media audio, press CD to
toggle between single CD and CD
changer play.
7.Mute:Press to MUTE playing
media; press again return to playing
media.
8.Auto:Press to set first six strong
stations into AM, FM1 or FM2
memory buttons; press again to
return to normal stations.
Entertainment Systems
32
Page 35 of 280

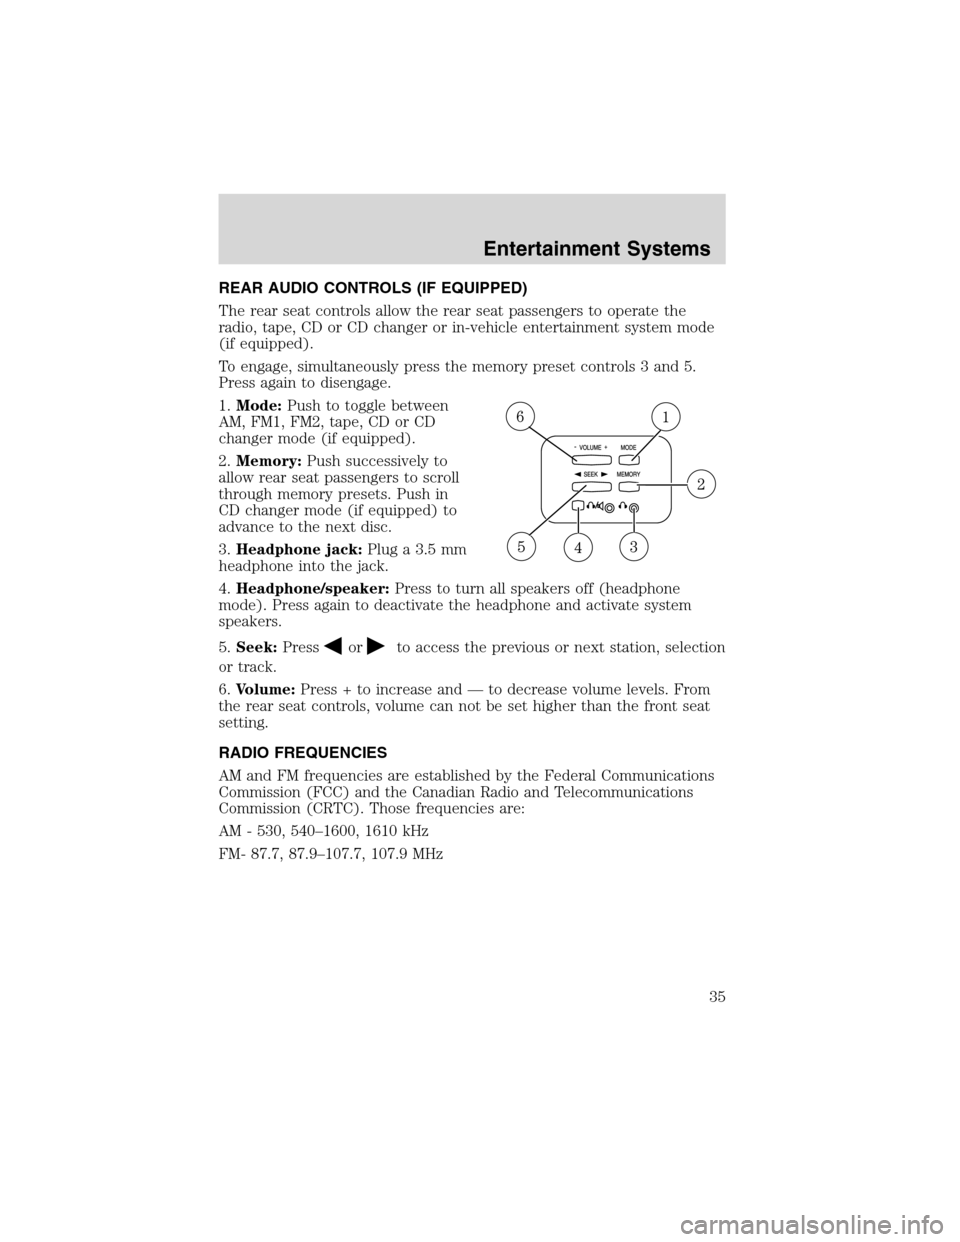
REAR AUDIO CONTROLS (IF EQUIPPED)
The rear seat controls allow the rear seat passengers to operate the
radio, tape, CD or CD changer or in-vehicle entertainment system mode
(if equipped).
To engage, simultaneously press the memory preset controls 3 and 5.
Press again to disengage.
1.Mode:Push to toggle between
AM, FM1, FM2, tape, CD or CD
changer mode (if equipped).
2.Memory:Push successively to
allow rear seat passengers to scroll
through memory presets. Push in
CD changer mode (if equipped) to
advance to the next disc.
3.Headphone jack:Plug a 3.5 mm
headphone into the jack.
4.Headphone/speaker:Press to turn all speakers off (headphone
mode). Press again to deactivate the headphone and activate system
speakers.
5.Seek:Press
orto access the previous or next station, selection
or track.
6.Volume:Press + to increase and—to decrease volume levels. From
the rear seat controls, volume can not be set higher than the front seat
setting.
RADIO FREQUENCIES
AM and FM frequencies are established by the Federal Communications
Commission (FCC) and the Canadian Radio and Telecommunications
Commission (CRTC). Those frequencies are:
AM - 530, 540–1600, 1610 kHz
FM- 87.7, 87.9–107.7, 107.9 MHz
Entertainment Systems
35
Page 37 of 280
CD units are designed to play commercially pressed 12 cm (4.75 in)
audio compact discs only. Due to technical incompatibility, certain
recordable and re-recordable compact discs may not function
correctly when used in Ford CD players. Irregular shaped CDs,
CDs with a scratch protection film attached, and CDs with
homemade paper (adhesive) labels should not be inserted into
the CD player. The label may peel and cause the CD to become
jammed. It is recommended that homemade CDs be identified
with permanent felt tip marker rather than adhesive labels. Ball
point pens may damage CDs. Please contact your dealer for
further information.
AUDIO SYSTEM WARRANTY AND SERVICE
Refer to theWarranty Guidefor audio system warranty information. If
service is necessary, see your dealer or qualified technician.
Entertainment Systems
37
Page 178 of 280
The fuses are coded as follows.
Fuse/Relay
LocationFuse Amp
RatingPassenger Compartment Fuse
Panel Description
1 15A Audio
2 5A Powertrain Control Module
(PCM), Cluster
3 20A Cigar lighter, Data link connector
4 5A Power mirror switch, Mirror turn
signal relays
5 15A Speed control module, Reverse
lamp, Climate mode switch,
Daytime Running Lamps (DRL)
relay, Digital Transmission Range
(DTR) sensor
6 5A Cluster, Brake shift interlock
solenoid, GEM
FUSE1 12 22
21323
617 27
718 28
819 29
930
20
31 21 11 10
RELAY
5 RELAY
4 RELAY
3 RELAY
2 RELAY
1
31424
41525
51626
Roadside Emergencies
178
Page 179 of 280
Fuse/Relay
LocationFuse Amp
RatingPassenger Compartment Fuse
Panel Description
7—Not used
8 5A Radio, Remote entry module,
GEM, In-vehicle entertainment
system (SuperCrew only)
9—Not used
10—Not used
11 30A Front washer pump relay, Wiper
run/park relay, Wiper HI/LO relay,
Windshield wiper motor
12—Not used
13 20A Stop lamp switch (Lamps),
Turn/Hazard flasher
14 15A Battery saver relay, Interior lamp
relay
15 5A Stop lamp switch (speed control,
brake shift interlock), GEM, Rear
Anti-lock Brake System (RABS)
module
16 20A Headlamps (hi beams), Cluster
(hi beam indicator)
17—Not used
18 5A Instrument illumination (dimmer
switch power)
19—Not used
20 5A Audio, GEM, PCM, Transmission
range sensor
21 15A DTR sensor, Clutch switch,
Starter relay, I/P fuse 20
22 10A Air bag module, Passenger air bag
deactivation module
Roadside Emergencies
179