Page 14 of 280
Air bag readiness:If this light fails
to illuminate when ignition is turned
to ON, continues to flash or remains
on, have the system serviced
immediately. A chime will also
sound when a malfunction in the supplemental restraint system has been
detected.
Safety belt:Reminds you to fasten
your safety belt. A chime will also
sound to remind you to fasten your
safety belt.
Charging system:Illuminates when
the battery is not charging properly.
Oil pressure/Engine coolant:
Illuminates when any of the
following conditions has occurred:
•The engine coolant temperature
is high.
•The engine oil pressure is low.
Low fuel:Illuminates when the fuel
level in the fuel tank is at, or near
empty (refer toFuel gaugein this
chapter).
Low washer fluid:Illuminates
when the windshield washer fluid is
low.
Speed control:Illuminates when
the speed control is activated. Turns
off when the speed control system
is deactivated.
LOW
FUEL
CRUISE
Instrument Cluster
14
Page 16 of 280
GAUGES
Standard instrument cluster gauges
Optional instrument cluster gauges
Harley—Davidson instrument cluster gauges
MPHkm/h
20406080100
140 120
160
3040
0 10205060 70
80
90
100
110
130120180
200
DBRAKEPRND2CRUISE DOOR
AJARTHEFT
SERVICE
ENGINE
SOONLOW
FUEL
RPMX1000
L
H
L
H
E
F
C
HSELECT/RESET
PREMIUM
UNLEADED
FUEL ONLY
Instrument Cluster
16
Page 18 of 280
Battery voltage gauge:Indicates
the battery voltage when the
ignition is in the ON position. If the
pointer moves and stays outside the
normal operating range (as
indicated by arrows), have the
vehicle’s electrical system checked
as soon as possible.
Engine oil pressure gauge:
Indicates engine oil pressure. The
needle should stay in the normal
operating range (between“L”and
“H”). If the needle falls below the
normal range, stop the vehicle, turn
off the engine and check the engine
oil level. Add oil if needed. If the oil
level is correct, have your vehicle
checked at your dealership or by a
qualified technician.
Fuel gauge:Indicates
approximately how much fuel is left
in the fuel tank (when the ignition
is in the ON position).
L
H
L
H
E
F
Instrument Cluster
18
Page 74 of 280

To stow the bed extender, follow steps one through four in reverse order.
The bed extender may be used to secure a load of up to 46 kg (100 lbs.)
on the tailgate.
The bed extender should always be kept in the stowed position
with the tailgate closed when not in use.
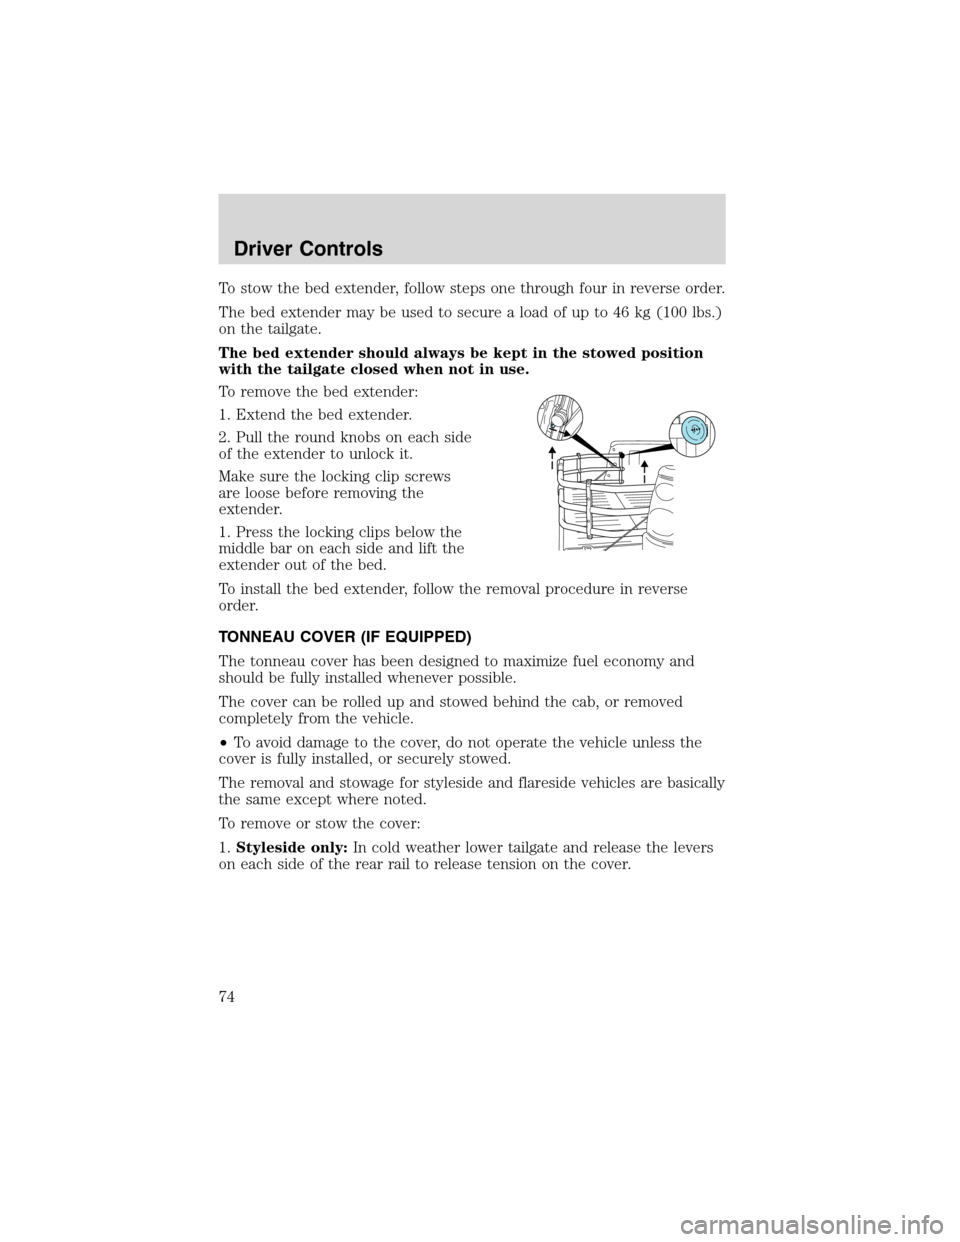
To remove the bed extender:
1. Extend the bed extender.
2. Pull the round knobs on each side
of the extender to unlock it.
Make sure the locking clip screws
are loose before removing the
extender.
1. Press the locking clips below the
middle bar on each side and lift the
extender out of the bed.
To install the bed extender, follow the removal procedure in reverse
order.
TONNEAU COVER (IF EQUIPPED)
The tonneau cover has been designed to maximize fuel economy and
should be fully installed whenever possible.
The cover can be rolled up and stowed behind the cab, or removed
completely from the vehicle.
•To avoid damage to the cover, do not operate the vehicle unless the
cover is fully installed, or securely stowed.
The removal and stowage for styleside and flareside vehicles are basically
the same except where noted.
To remove or stow the cover:
1.Styleside only:In cold weather lower tailgate and release the levers
on each side of the rear rail to release tension on the cover.
Driver Controls
74
Page 77 of 280
HARD TONNEAU COVER (IF EQUIPPED)
The tonneau cover has been designed to maximize fuel economy.
•To avoid damage to the cover, do
not operate the vehicle unless the
cover is fully secured.
To open the cover:
•Unlock the cover (with the key)
and lift the cover up for access to
the pickup box.
To close the cover:
•Close the cover on pickup box.
Driver Controls
77
Page 135 of 280

STARTING
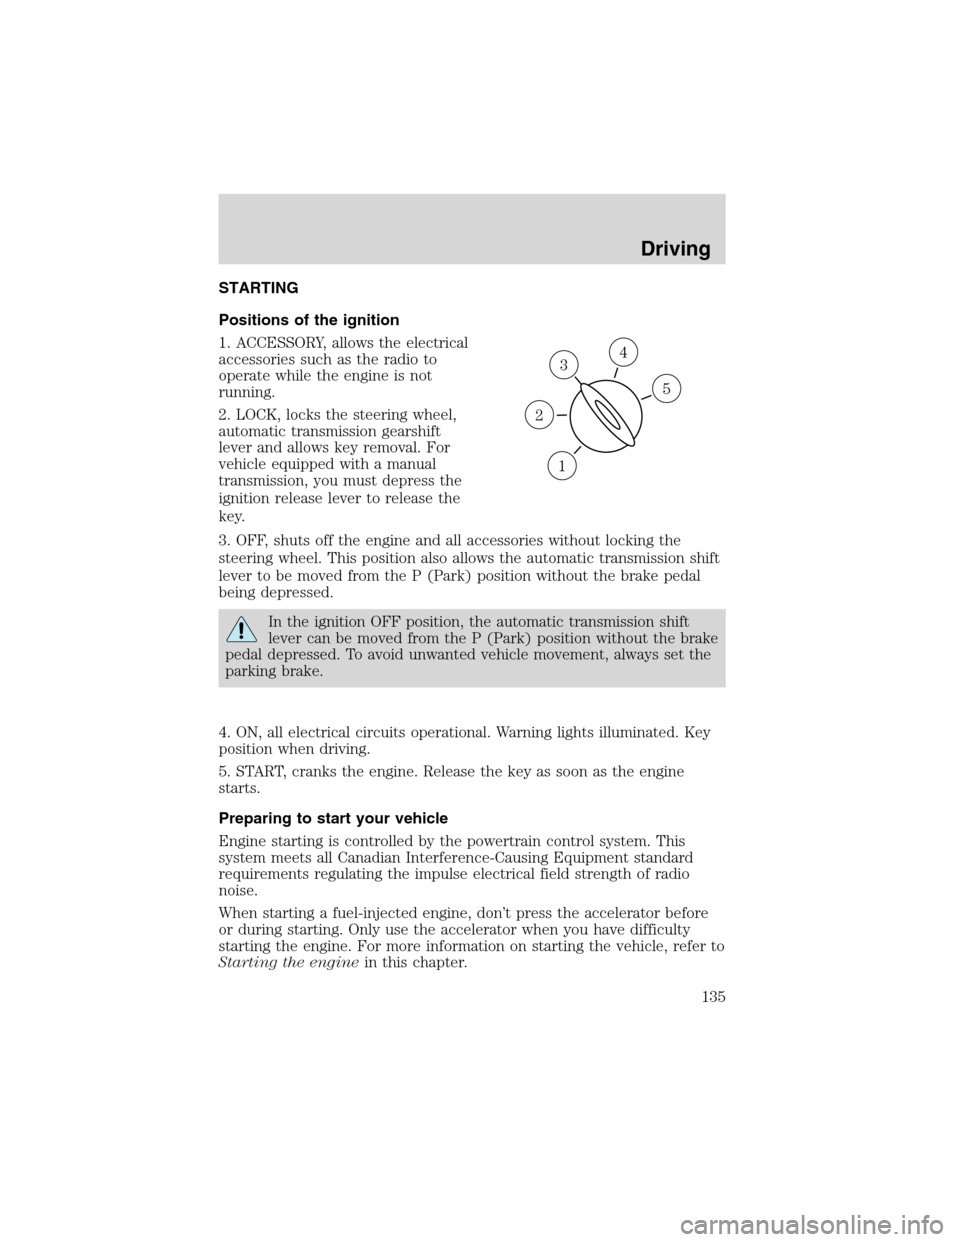
Positions of the ignition
1. ACCESSORY, allows the electrical
accessories such as the radio to
operate while the engine is not
running.
2. LOCK, locks the steering wheel,
automatic transmission gearshift
lever and allows key removal. For
vehicle equipped with a manual
transmission, you must depress the
ignition release lever to release the
key.
3. OFF, shuts off the engine and all accessories without locking the
steering wheel. This position also allows the automatic transmission shift
lever to be moved from the P (Park) position without the brake pedal
being depressed.
In the ignition OFF position, the automatic transmission shift
lever can be moved from the P (Park) position without the brake
pedal depressed. To avoid unwanted vehicle movement, always set the
parking brake.
4. ON, all electrical circuits operational. Warning lights illuminated. Key
position when driving.
5. START, cranks the engine. Release the key as soon as the engine
starts.
Preparing to start your vehicle
Engine starting is controlled by the powertrain control system. This
system meets all Canadian Interference-Causing Equipment standard
requirements regulating the impulse electrical field strength of radio
noise.
When starting a fuel-injected engine, don’t press the accelerator before
or during starting. Only use the accelerator when you have difficulty
starting the engine. For more information on starting the vehicle, refer to
Starting the enginein this chapter.
3
1
2
5
4
Driving
135
Page 144 of 280

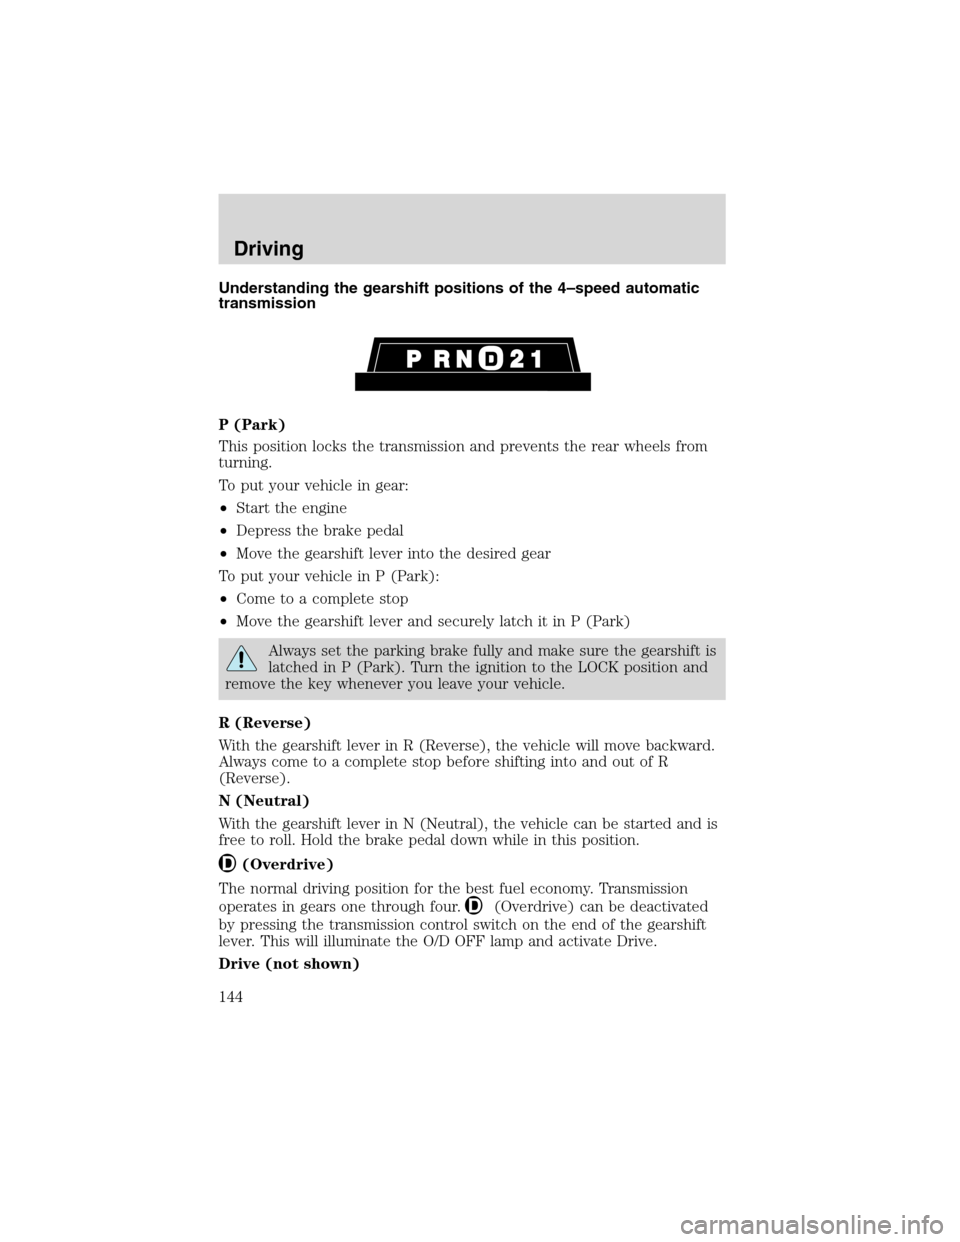
Understanding the gearshift positions of the 4–speed automatic
transmission
P (Park)
This position locks the transmission and prevents the rear wheels from
turning.
To put your vehicle in gear:
•Start the engine
•Depress the brake pedal
•Move the gearshift lever into the desired gear
To put your vehicle in P (Park):
•Come to a complete stop
•Move the gearshift lever and securely latch it in P (Park)
Always set the parking brake fully and make sure the gearshift is
latched in P (Park). Turn the ignition to the LOCK position and
remove the key whenever you leave your vehicle.
R (Reverse)
With the gearshift lever in R (Reverse), the vehicle will move backward.
Always come to a complete stop before shifting into and out of R
(Reverse).
N (Neutral)
With the gearshift lever in N (Neutral), the vehicle can be started and is
free to roll. Hold the brake pedal down while in this position.
(Overdrive)
The normal driving position for the best fuel economy. Transmission
operates in gears one through four.
(Overdrive) can be deactivated
by pressing the transmission control switch on the end of the gearshift
lever. This will illuminate the O/D OFF lamp and activate Drive.
Drive (not shown)
Driving
144
Page 147 of 280

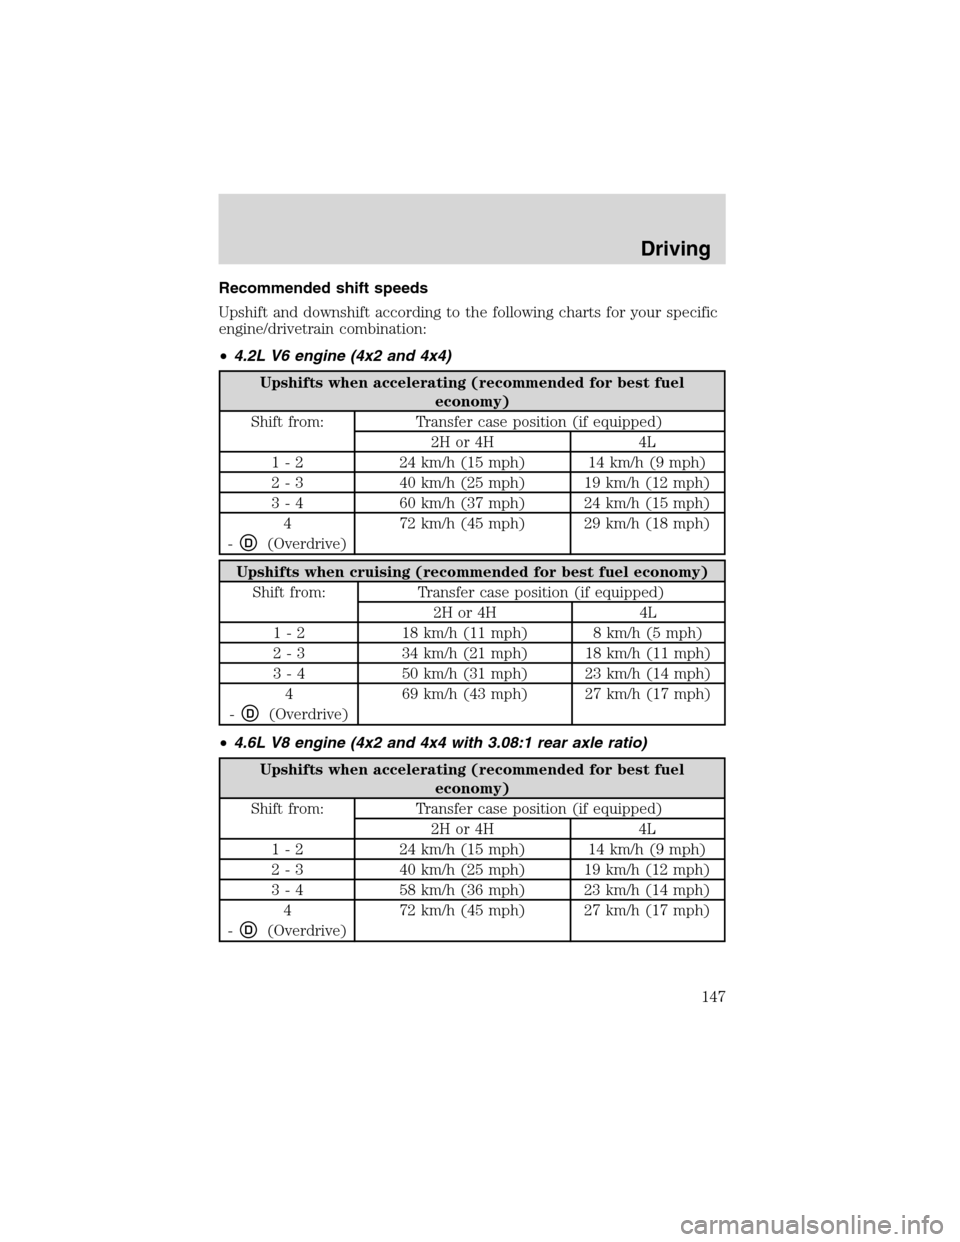
Recommended shift speeds
Upshift and downshift according to the following charts for your specific
engine/drivetrain combination:
•4.2L V6 engine (4x2 and 4x4)
Upshifts when accelerating (recommended for best fuel
economy)
Shift from: Transfer case position (if equipped)
2H or 4H 4L
1 - 2 24 km/h (15 mph) 14 km/h (9 mph)
2 - 3 40 km/h (25 mph) 19 km/h (12 mph)
3 - 4 60 km/h (37 mph) 24 km/h (15 mph)
4
-
D(Overdrive)72 km/h (45 mph) 29 km/h (18 mph)
Upshifts when cruising (recommended for best fuel economy)
Shift from: Transfer case position (if equipped)
2H or 4H 4L
1 - 2 18 km/h (11 mph) 8 km/h (5 mph)
2 - 3 34 km/h (21 mph) 18 km/h (11 mph)
3 - 4 50 km/h (31 mph) 23 km/h (14 mph)
4
-
D(Overdrive)69 km/h (43 mph) 27 km/h (17 mph)
•4.6L V8 engine (4x2 and 4x4 with 3.08:1 rear axle ratio)
Upshifts when accelerating (recommended for best fuel
economy)
Shift from: Transfer case position (if equipped)
2H or 4H 4L
1 - 2 24 km/h (15 mph) 14 km/h (9 mph)
2 - 3 40 km/h (25 mph) 19 km/h (12 mph)
3 - 4 58 km/h (36 mph) 23 km/h (14 mph)
4
-
D(Overdrive)72 km/h (45 mph) 27 km/h (17 mph)
Driving
147