Page 10 of 280
These are some of the symbols you may see on your vehicle.
Vehicle Symbol Glossary
Safety Alert
See Owner’s Guide
Fasten Safety BeltAir Bag-Front
Air Bag-SideChild Seat
Child Seat Installation
WarningChild Seat Lower
Anchor
Child Seat Tether
AnchorBrake System
Anti-Lock Brake SystemBrake Fluid -
Non-Petroleum Based
Traction ControlAdvanceTrac
Master Lighting SwitchHazard Warning Flasher
Fog Lamps-FrontFuse Compartment
Fuel Pump ResetWindshield Wash/Wipe
Windshield
Defrost/DemistRear Window
Defrost/Demist
Introduction
10
Page 43 of 280

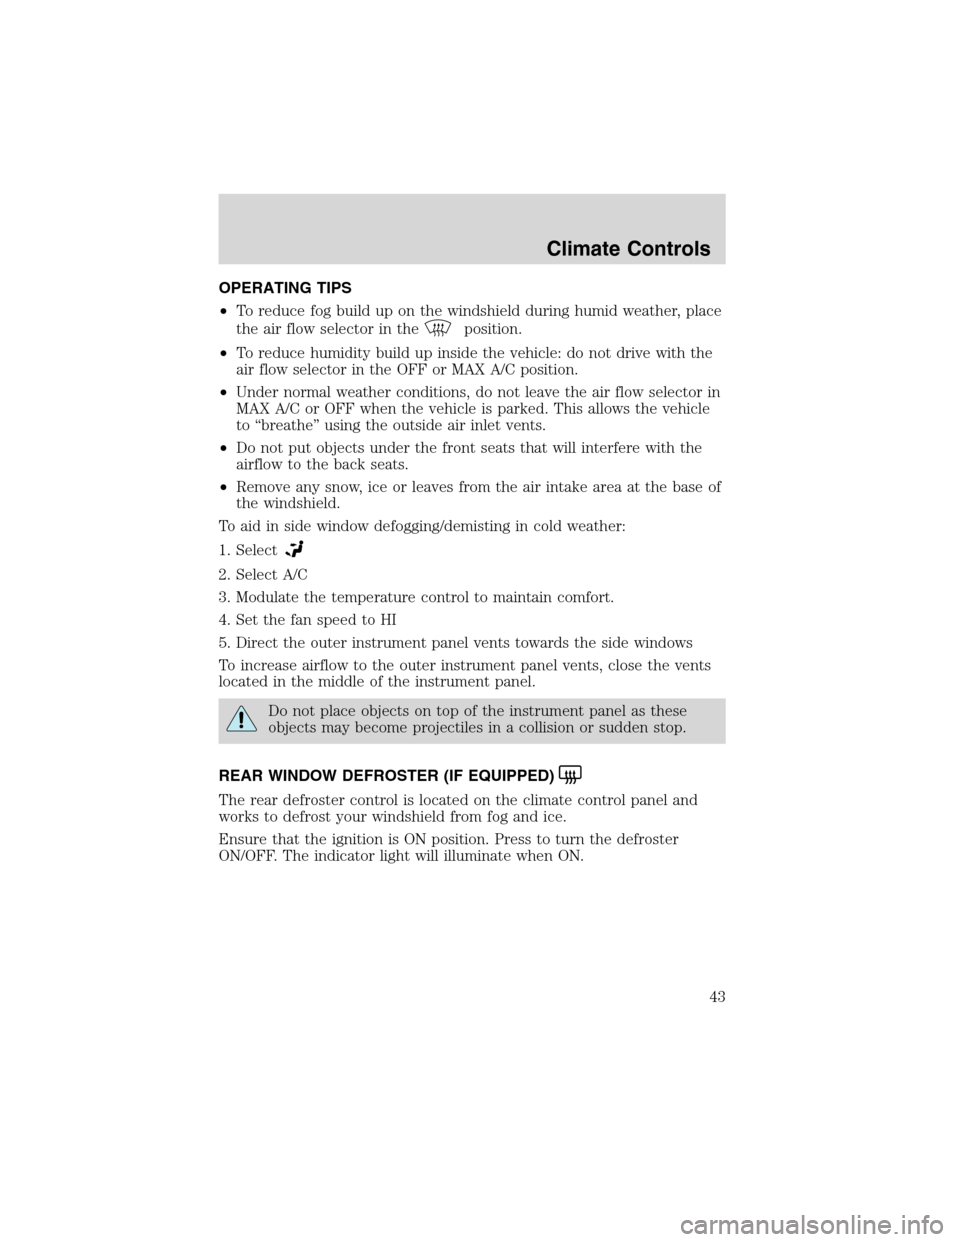
OPERATING TIPS
•To reduce fog build up on the windshield during humid weather, place
the air flow selector in the
position.
•To reduce humidity build up inside the vehicle: do not drive with the
air flow selector in the OFF or MAX A/C position.
•Under normal weather conditions, do not leave the air flow selector in
MAX A/C or OFF when the vehicle is parked. This allows the vehicle
to“breathe”using the outside air inlet vents.
•Do not put objects under the front seats that will interfere with the
airflow to the back seats.
•Remove any snow, ice or leaves from the air intake area at the base of
the windshield.
To aid in side window defogging/demisting in cold weather:
1. Select
2. Select A/C
3. Modulate the temperature control to maintain comfort.
4. Set the fan speed to HI
5. Direct the outer instrument panel vents towards the side windows
To increase airflow to the outer instrument panel vents, close the vents
located in the middle of the instrument panel.
Do not place objects on top of the instrument panel as these
objects may become projectiles in a collision or sudden stop.
REAR WINDOW DEFROSTER (IF EQUIPPED)
The rear defroster control is located on the climate control panel and
works to defrost your windshield from fog and ice.
Ensure that the ignition is ON position. Press to turn the defroster
ON/OFF. The indicator light will illuminate when ON.
Climate Controls
43
Page 44 of 280
HEADLAMP CONTROL
Turns the lamps off.
Turns on the parking lamps,
instrument panel lamps, license
plate lamps and tail lamps.
Turns the headlamps on.
Autolamp control (if equipped)
The autolamp system sets the
headlamps to turn on and off
automatically. It also keeps the
lights on for approximately 20
seconds after the ignition switch is
turned to the OFF position.
•To turn autolamps on, rotate the
control counterclockwise.
•To turn autolamps off, rotate the
control clockwise to the OFF
position.
•Foglamps are not controlled by the autolamps. In order to turn on the
foglamps, you must turn the lamp switch to the
position and
pull toward you for foglamps.
Foglamp control (if equipped)
The foglamps can be turned on only
when the headlamp control is in
the
position and the high
beams are not turned on.
Pull headlamp control towards you
to turn foglamps on. The foglamp
indicator light
will illuminate.
A
A
A
Lights
44
Page 49 of 280
Function Number of
bulbsTrade number
Headlamps 2 9007
Front park/turn lamps 2 3157AK (amber)
Foglamps 2 9145
1
Backup lamp 2 3156K
Rear stop/turn/sidemarker/tail
lamp2 3457K
High-mount brakelamp 1 912
Cargo lamp 2 912
License plate lamp 2 168
Signal mirror lamp (if equipped) 2 906/921
Running board lamp (if equipped) 4 168
All replacement bulbs are clear in color except where noted.
To replace all instrument panel lights - see your dealer
1Harley Davidson package uses bulb number H1 12V
Replacing headlamp bulbs
1. Make sure that the headlamp control is in the OFF position and open
the hood.
2. At the back of the headlamp, pull
clips rearward and up (about
3⁄4
inch) to release the headlamp
assembly.
3. Slide headlamp assembly forward
and disconnect the electrical
connector from the bulb by pulling
rearward.
Lights
49
Page 52 of 280

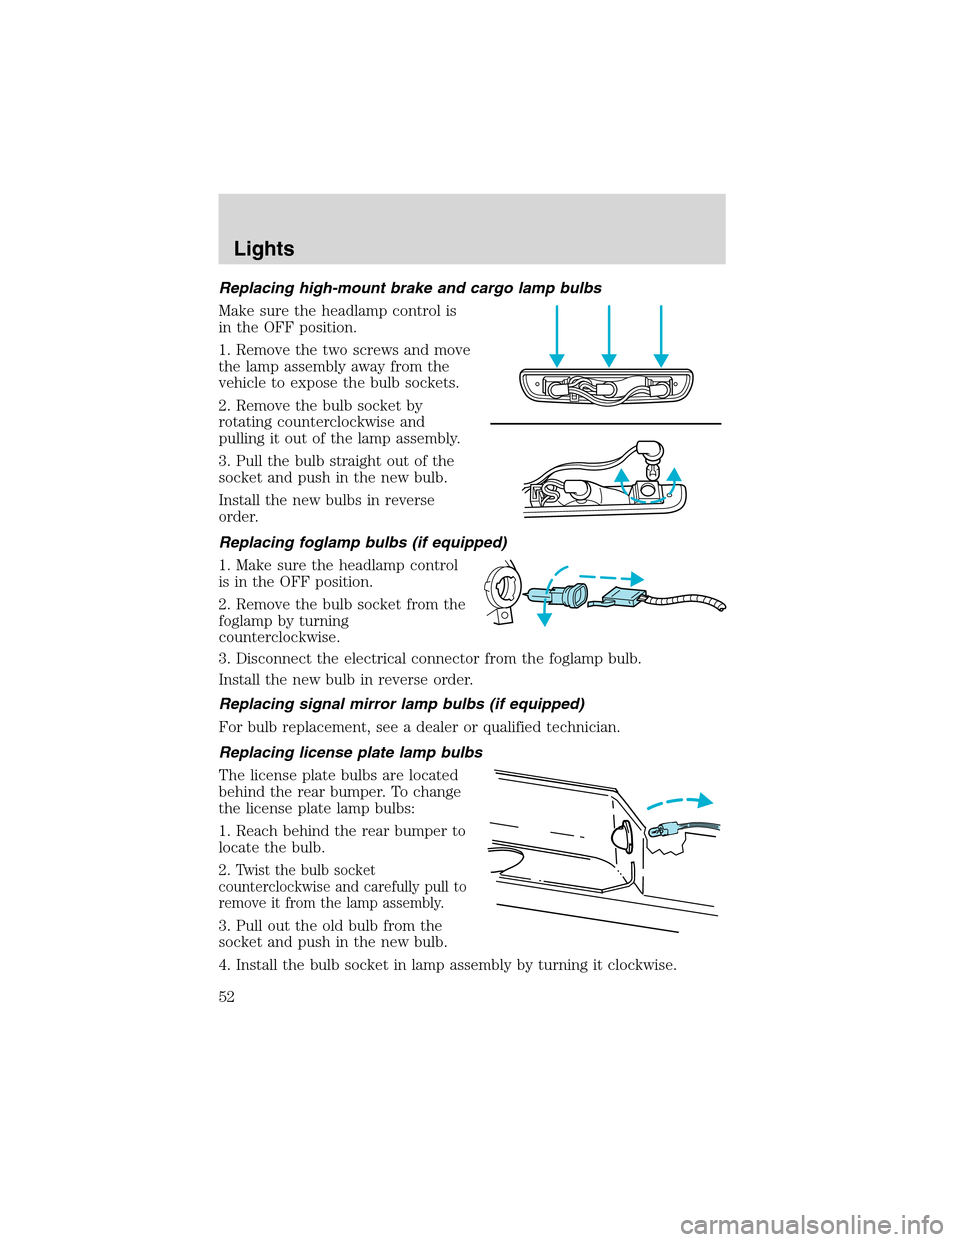
Replacing high-mount brake and cargo lamp bulbs
Make sure the headlamp control is
in the OFF position.
1. Remove the two screws and move
the lamp assembly away from the
vehicle to expose the bulb sockets.
2. Remove the bulb socket by
rotating counterclockwise and
pulling it out of the lamp assembly.
3. Pull the bulb straight out of the
socket and push in the new bulb.
Install the new bulbs in reverse
order.
Replacing foglamp bulbs (if equipped)
1. Make sure the headlamp control
is in the OFF position.
2. Remove the bulb socket from the
foglamp by turning
counterclockwise.
3. Disconnect the electrical connector from the foglamp bulb.
Install the new bulb in reverse order.
Replacing signal mirror lamp bulbs (if equipped)
For bulb replacement, see a dealer or qualified technician.
Replacing license plate lamp bulbs
The license plate bulbs are located
behind the rear bumper. To change
the license plate lamp bulbs:
1. Reach behind the rear bumper to
locate the bulb.
2.
Twist the bulb socket
counterclockwise and carefully pull to
remove it from the lamp assembly.
3. Pull out the old bulb from the
socket and push in the new bulb.
4. Install the bulb socket in lamp assembly by turning it clockwise.
Lights
52
Page 180 of 280

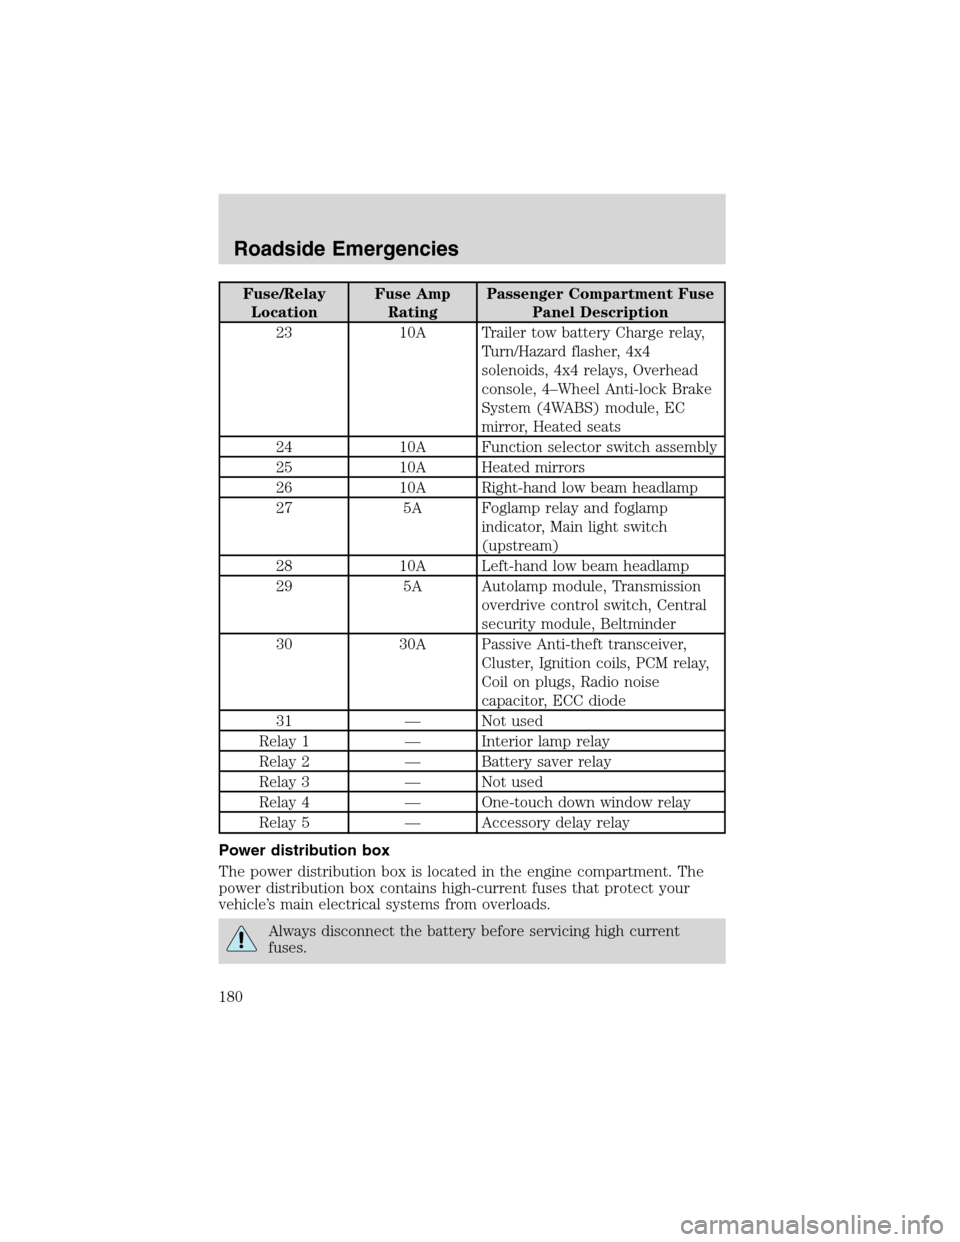
Fuse/Relay
LocationFuse Amp
RatingPassenger Compartment Fuse
Panel Description
23 10A Trailer tow battery Charge relay,
Turn/Hazard flasher, 4x4
solenoids, 4x4 relays, Overhead
console, 4–Wheel Anti-lock Brake
System (4WABS) module, EC
mirror, Heated seats
24 10A Function selector switch assembly
25 10A Heated mirrors
26 10A Right-hand low beam headlamp
27 5A Foglamp relay and foglamp
indicator, Main light switch
(upstream)
28 10A Left-hand low beam headlamp
29 5A Autolamp module, Transmission
overdrive control switch, Central
security module, Beltminder
30 30A Passive Anti-theft transceiver,
Cluster, Ignition coils, PCM relay,
Coil on plugs, Radio noise
capacitor, ECC diode
31—Not used
Relay 1—Interior lamp relay
Relay 2—Battery saver relay
Relay 3—Not used
Relay 4—One-touch down window relay
Relay 5—Accessory delay relay
Power distribution box
The power distribution box is located in the engine compartment. The
power distribution box contains high-current fuses that protect your
vehicle’s main electrical systems from overloads.
Always disconnect the battery before servicing high current
fuses.
Roadside Emergencies
180
Page 184 of 280

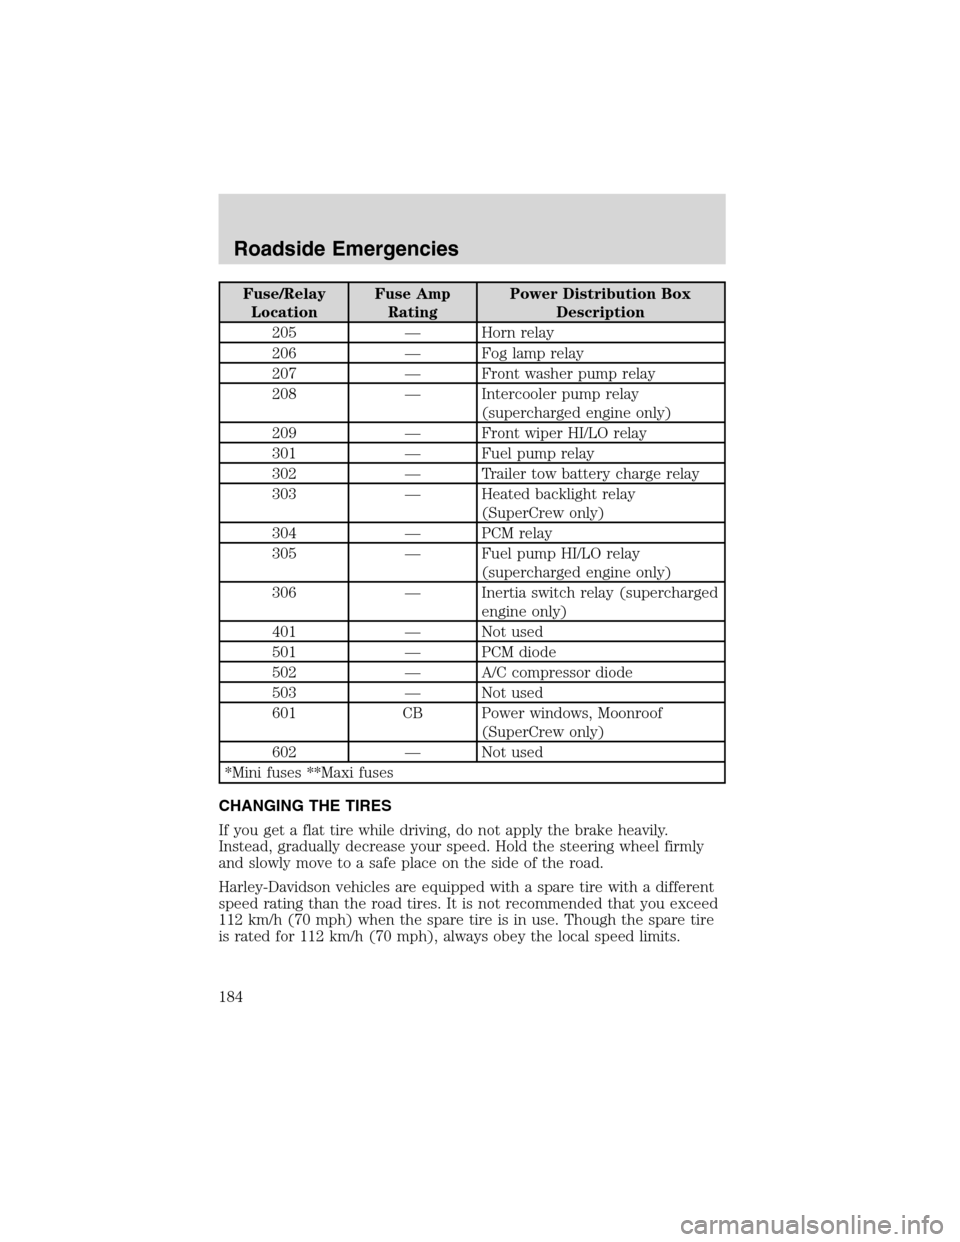
Fuse/Relay
LocationFuse Amp
RatingPower Distribution Box
Description
205—Horn relay
206—Fog lamp relay
207—Front washer pump relay
208—Intercooler pump relay
(supercharged engine only)
209—Front wiper HI/LO relay
301—Fuel pump relay
302—Trailer tow battery charge relay
303—Heated backlight relay
(SuperCrew only)
304—PCM relay
305—Fuel pump HI/LO relay
(supercharged engine only)
306—Inertia switch relay (supercharged
engine only)
401—Not used
501—PCM diode
502—A/C compressor diode
503—Not used
601 CB Power windows, Moonroof
(SuperCrew only)
602—Not used
*Mini fuses **Maxi fuses
CHANGING THE TIRES
If you get a flat tire while driving, do not apply the brake heavily.
Instead, gradually decrease your speed. Hold the steering wheel firmly
and slowly move to a safe place on the side of the road.
Harley-Davidson vehicles are equipped with a spare tire with a different
speed rating than the road tires. It is not recommended that you exceed
112 km/h (70 mph) when the spare tire is in use. Though the spare tire
is rated for 112 km/h (70 mph), always obey the local speed limits.
Roadside Emergencies
184
Page 270 of 280
Dash trim (wood grain)
Engine block heaters
Manual sliding rear window
Power sliding rear window
Remote start system
Tire step
Travel equipment
Cargo cage (SuperCrew only)
Bed mount bike carrier
Bed tent
Fog lights
Hitch mount bike carrier
Inside mirror with compass display
Inside mirror with compass and temperature display
Off road lights
Outside signal mirror (available only with power mirrors)
Pickup box rails
Retractable bed hooks
Running boards (molded, diamond plate, tubular and stirrup step)
Seatback organizer
Speed control
Towing mirrors
Trailer hitch (Class III)
Trailer hitch bars and balls
Trailer hitch wiring adaptor
Trailer swivel hitch
Protection and appearance equipment
Bed mat/bedliner tailgate covers
Bed mats
Bedliners
Bull bar (chrome & black)
Accessories
270