Page 3 of 280
Cleaning 208
Maintenance and Specifications 216
Engine compartment 218
Engine oil 221
Battery 225
Fuel information 233
Air filter(s) 250
Part numbers 255
Refill capacities 256
Lubricant specifications 259
Accessories 269
Index 273
All rights reserved. Reproduction by any means, electronic or mechanical
including photocopying, recording or by any information storage and retrieval
system or translation in whole or part is not permitted without written
authorization from Ford Motor Company. Ford may change the contents without
notice and without incurring obligation.
Copyright © 2002 Ford Motor Company
Table of Contents
3
Page 11 of 280
Vehicle Symbol Glossary
Power Windows
Front/Rear
Power Window Lockout
Child Safety Door
Lock/UnlockInterior Luggage
Compartment Release
Symbol
Panic AlarmEngine Oil
Engine CoolantEngine Coolant
Temperature
Do Not Open When HotBattery
Avoid Smoking, Flames,
or SparksBattery Acid
Explosive GasFan Warning
Power Steering FluidMaintain Correct Fluid
LevelMAX
MIN
Emission SystemEngine Air Filter
Passenger Compartment
Air FilterJack
Check fuel capLow tire warning
Introduction
11
Page 14 of 280
Air bag readiness:If this light fails
to illuminate when ignition is turned
to ON, continues to flash or remains
on, have the system serviced
immediately. A chime will also
sound when a malfunction in the supplemental restraint system has been
detected.
Safety belt:Reminds you to fasten
your safety belt. A chime will also
sound to remind you to fasten your
safety belt.
Charging system:Illuminates when
the battery is not charging properly.
Oil pressure/Engine coolant:
Illuminates when any of the
following conditions has occurred:
•The engine coolant temperature
is high.
•The engine oil pressure is low.
Low fuel:Illuminates when the fuel
level in the fuel tank is at, or near
empty (refer toFuel gaugein this
chapter).
Low washer fluid:Illuminates
when the windshield washer fluid is
low.
Speed control:Illuminates when
the speed control is activated. Turns
off when the speed control system
is deactivated.
LOW
FUEL
CRUISE
Instrument Cluster
14
Page 18 of 280
Battery voltage gauge:Indicates
the battery voltage when the
ignition is in the ON position. If the
pointer moves and stays outside the
normal operating range (as
indicated by arrows), have the
vehicle’s electrical system checked
as soon as possible.
Engine oil pressure gauge:
Indicates engine oil pressure. The
needle should stay in the normal
operating range (between“L”and
“H”). If the needle falls below the
normal range, stop the vehicle, turn
off the engine and check the engine
oil level. Add oil if needed. If the oil
level is correct, have your vehicle
checked at your dealership or by a
qualified technician.
Fuel gauge:Indicates
approximately how much fuel is left
in the fuel tank (when the ignition
is in the ON position).
L
H
L
H
E
F
Instrument Cluster
18
Page 67 of 280

Do not let children play with the moon roof. They may seriously
hurt themselves.
HOMELINK�UNIVERSAL TRANSCEIVER WITH TRAVELNOTE�
(IF EQUIPPED)
The HomeLink�Universal Transceiver, located on the driver’s visor,
provides a convenient way to replace up to three hand-held transmitters
with a single built-in device. This feature will learn the radio frequency
codes of most current transmitters to operate garage doors, entry gate
operators, security systems, entry door locks, and home or office lighting.
When programming your HomeLink�Universal Transceiver to a
garage door or gate, be sure that people and objects are out of
the way to prevent potential harm or damage.
Do not use the HomeLink�Universal Transceiver with any garage door
opener that lacks safety stop and reverse features as required by U.S.
federal safety standards (this includes any garage door opener model
manufactured before April 1, 1982). A garage door which cannot detect
an object, signaling the door to stop and reverse, does not meet current
U.S. federal safety standards. For more information, contact HomeLink�
at:www.homelink.comor1–800–355–3515.
Retain the original transmitter for use in other vehicles as well as for
future programming procedures (i.e. new HomeLink�equipped vehicle
purchase). It is also suggested that upon the sale of the vehicle, the
programmed Homelink�Universal Transceiver buttons be erased for
security purposes, refer toProgrammingin this section.
Programming
Do not program the HomeLink�Universal Transceiver with the
vehicle parked in the garage.
Note:Your vehicle may require the ignition switch to be turned to the
ACC position for programming and/or operation of the HomeLink�.Itis
also recommended that a new battery be placed in the hand-held
transmitter of the device being programmed to HomeLink�for quicker
training and accurate transmission of the radio-frequency signal.
Driver Controls
67
Page 82 of 280

The UNLOCKfeature will work again after:
•a door has become ajar,
•the ignition is turned to the ON position, or
•using the UNLOCK
control on your remote entry transmitter or
unlocking via the keyless entry keypad.
Power door unlock disable feature—activation/deactivation
Please see your dealer in order to activate/deactivate this feature.
Sounding a panic alarm
Press
to activate the alarm. Press again or turn the ignition to ACC
or ON to deactivate.
Note:The panic alarm will only operate when the ignition is in the OFF
position.
Replacing the battery
The remote entry transmitter uses one coin type three-volt lithium
battery CR2032 or equivalent. The typical operating range for your
remote entry transmitter is approximately 10 meters (33 feet). A
decrease in the operating range could be caused by:
•weather conditions,
•nearby radio towers,
•structures around the vehicle and
•other vehicles parked next to the vehicle.
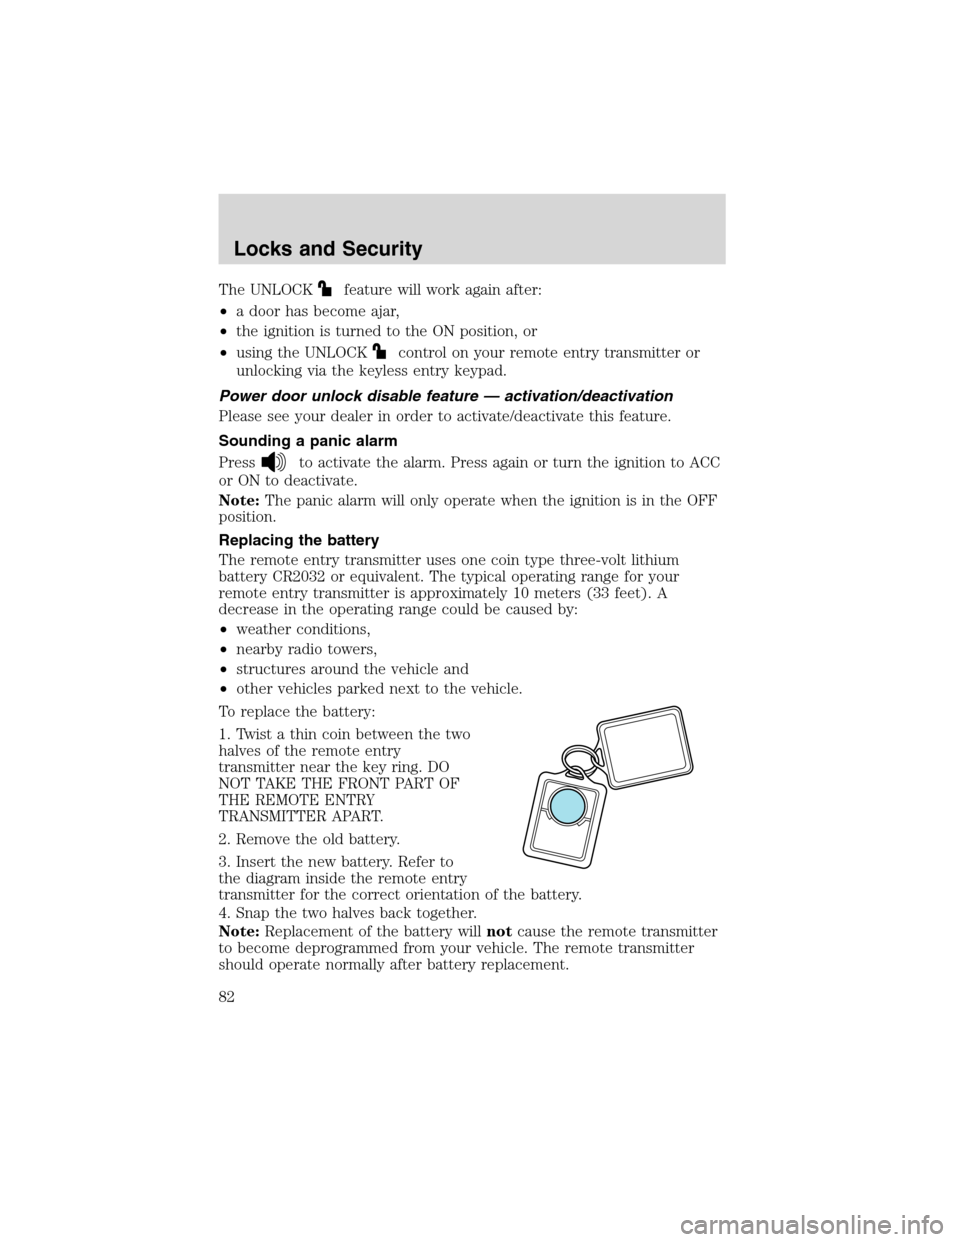
To replace the battery:
1. Twist a thin coin between the two
halves of the remote entry
transmitter near the key ring. DO
NOT TAKE THE FRONT PART OF
THE REMOTE ENTRY
TRANSMITTER APART.
2. Remove the old battery.
3. Insert the new battery. Refer to
the diagram inside the remote entry
transmitter for the correct orientation of the battery.
4. Snap the two halves back together.
Note:Replacement of the battery willnotcause the remote transmitter
to become deprogrammed from your vehicle. The remote transmitter
should operate normally after battery replacement.
Locks and Security
82
Page 84 of 280

•the remote transmitter lock control is pressed, or
•after 25 seconds of illumination.
The dome lamp control (if equipped) mustnotbe set to the OFF
position for the illuminated entry system to operate.
The inside lights will not turn off if:
•they have been turned on with the dimmer control, or
•any door is open.
The battery saver will shut off the interior lamps 45 minutes after the
last door is closed, even if the dimmer control is on.
Autolock (if equipped)
This feature will automatically lock all the doors when:
•all the doors are closed,
•the ignition key is in the ON position,
•the gearshift lever is shifted into R reverse or a forward gear and
•the brake pedal is released.
This feature will also automatically relock all the doors when:
•the ignition is running and any door is opened then closed, and
•you put the vehicle in motion by releasing the brake pedal.
To deactivate/reactivate the autolock feature using the keypad
Your vehicle comes with the autolock feature activated. To
deactivate/reactivate this feature:
1. Turn the ignition to the OFF position.
2. Close all the doors.
3. Enter the 5-digit entry code.
4. Press and hold the 3•4. While holding the 3•4 press the 7•8.
5. Release the 3•4.
6. Release the 7•8.
The horn will chirp once when the system has been successfully
deactivated.
The horn will chirp twice (one short and one long chirp) when the
system has been successfully reactivated.
Locks and Security
84
Page 145 of 280

Drive is activated when the transmission control switch is pressed.
•This position allows for all forward gears except overdrive.
•O/D OFF lamp is illuminated.
•Provides engine braking.
•Use when driving conditions cause excessive shifting from O/D to
other gears. Examples: city traffic, hilly terrain, heavy loads, trailer
towing and when engine braking is required.
•To return to O/D (overdrive mode), press the transmission control
switch. The O/D OFF lamp will not be illuminated.
•O/D (Overdrive) is automatically returned each time the key is turned
off.
2 (Second)
This position allows for second gear only.
•Provides engine braking.
•Use to start-up on slippery roads.
•To return to
(Overdrive), move the gearshift lever into the
(Overdrive) position.
•Selecting 2 (Second) at higher speeds will cause the transmission to
downshift to second gear at the appropriate vehicle speed.
1 (First)
•Provides maximum engine braking.
•Allows upshifts by moving gearshift lever.
•Will not downshift into 1 (First) at high speeds; allows for 1 (First)
when vehicle reaches slower speeds.
Forced downshifts
•Allowed in
(Overdrive) or Drive.
•Depress the accelerator to the floor.
•Allows transmission to select an appropriate gear.
Shift strategy (4R100 automatic transmission)
To account for customer driving habits and conditions, your 4R100
automatic transmission electronically controls the shift quality by using
an adaptive learning strategy. The adaptive learning strategy is
maintained by power from the battery. When the battery is disconnected
Driving
145