2003 FORD EXPLORER spare tire
[x] Cancel search: spare tirePage 190 of 272
Removing the jack and tools
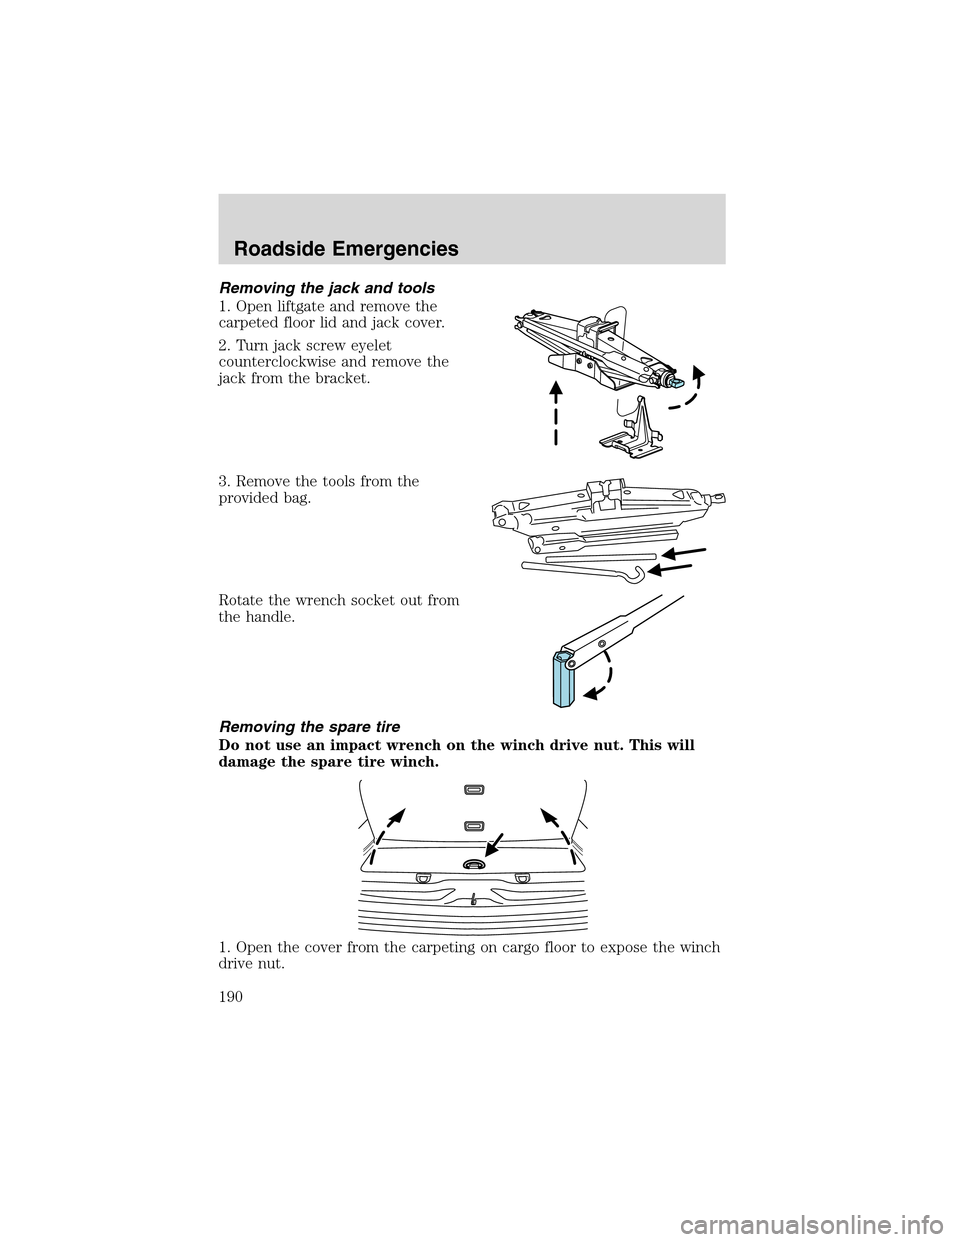
1. Open liftgate and remove the
carpeted floor lid and jack cover.
2. Turn jack screw eyelet
counterclockwise and remove the
jack from the bracket.
3. Remove the tools from the
provided bag.
Rotate the wrench socket out from
the handle.
Removing the spare tire
Do not use an impact wrench on the winch drive nut. This will
damage the spare tire winch.
1. Open the cover from the carpeting on cargo floor to expose the winch
drive nut.
Roadside Emergencies
190
Page 191 of 272
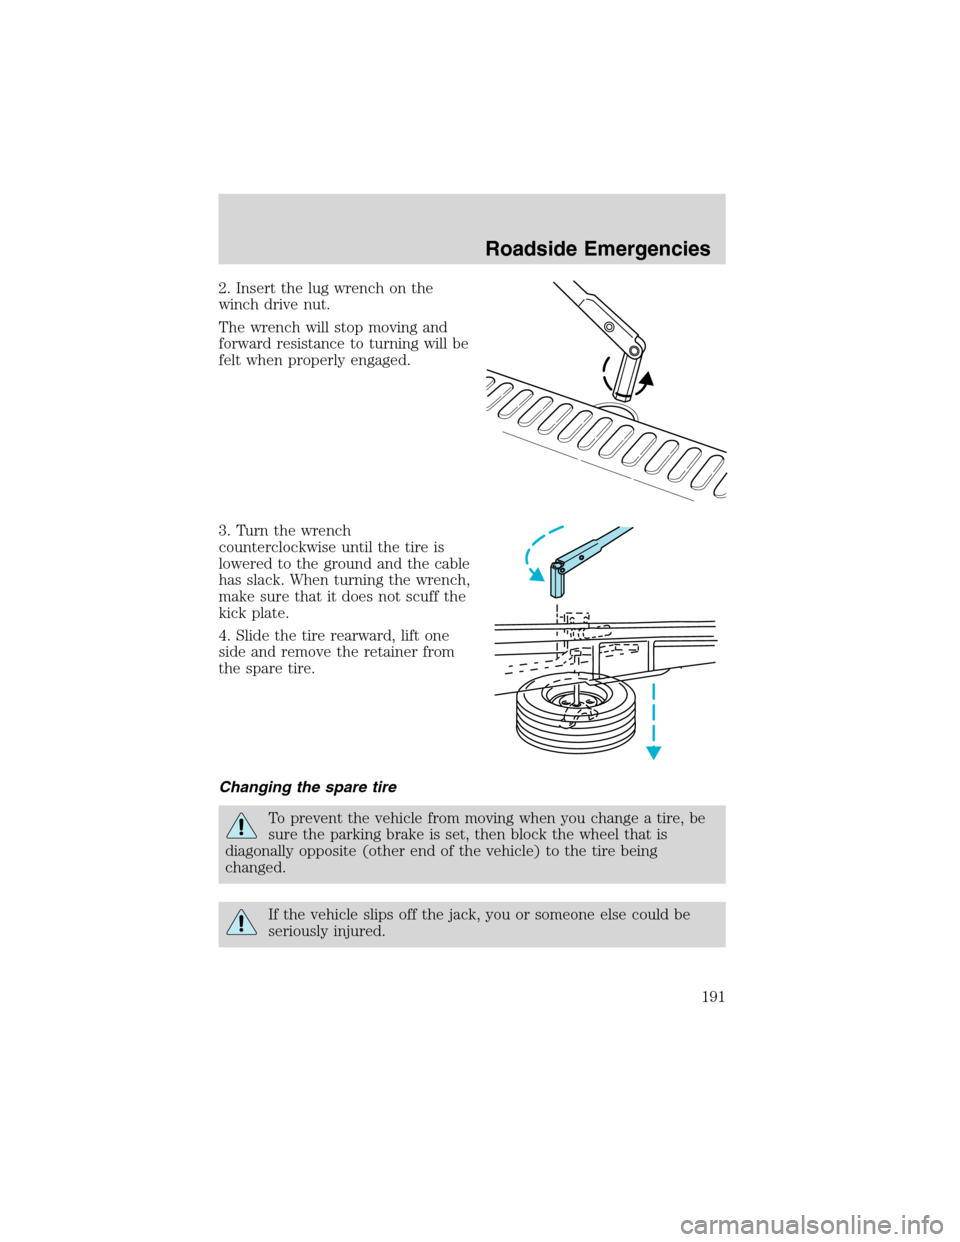
2. Insert the lug wrench on the
winch drive nut.
The wrench will stop moving and
forward resistance to turning will be
felt when properly engaged.
3. Turn the wrench
counterclockwise until the tire is
lowered to the ground and the cable
has slack. When turning the wrench,
make sure that it does not scuff the
kick plate.
4. Slide the tire rearward, lift one
side and remove the retainer from
the spare tire.
Changing the spare tire
To prevent the vehicle from moving when you change a tire, be
sure the parking brake is set, then block the wheel that is
diagonally opposite (other end of the vehicle) to the tire being
changed.
If the vehicle slips off the jack, you or someone else could be
seriously injured.
Roadside Emergencies
191
Page 193 of 272
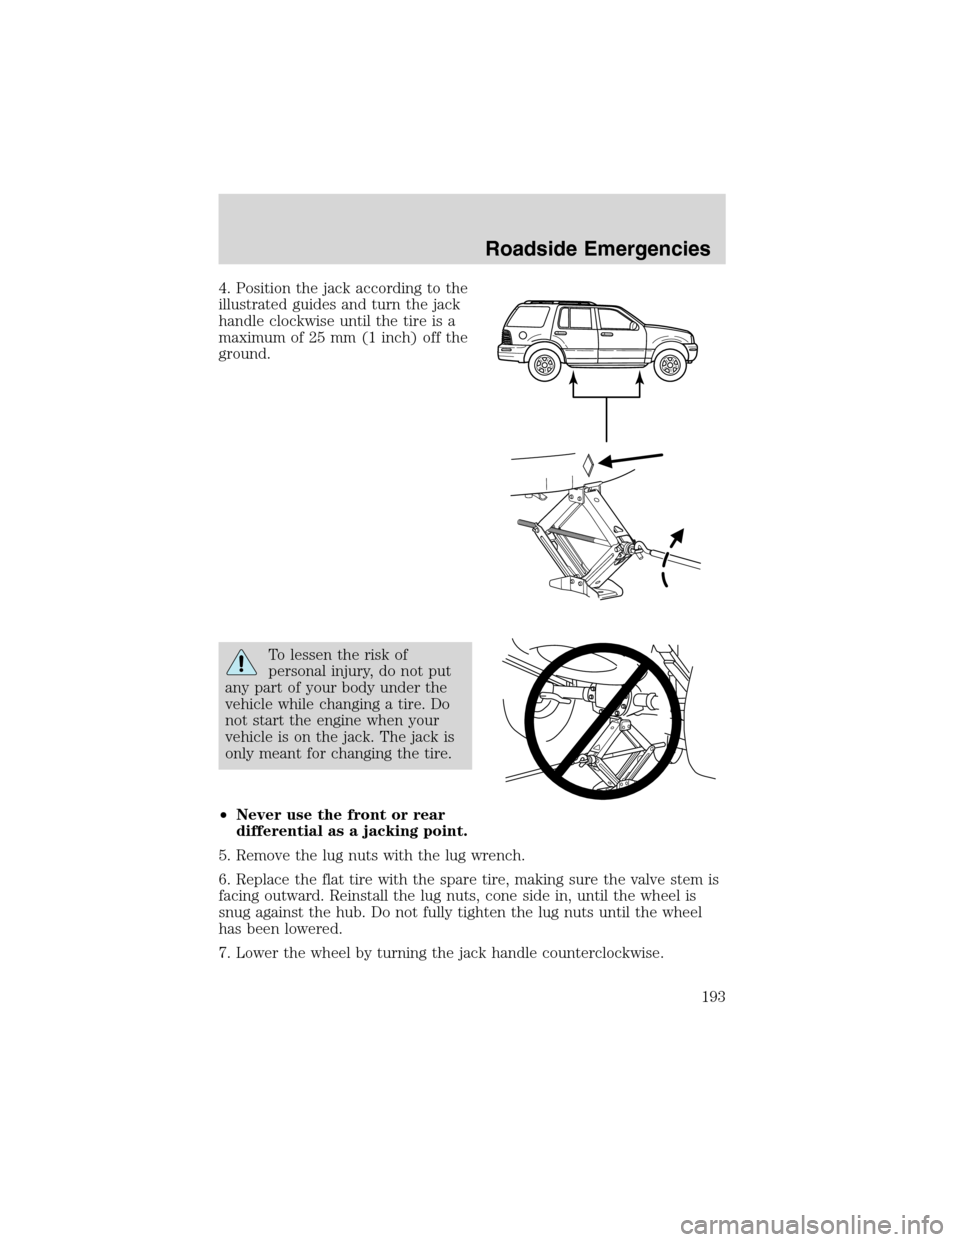
4. Position the jack according to the
illustrated guides and turn the jack
handle clockwise until the tire is a
maximum of 25 mm (1 inch) off the
ground.
To lessen the risk of
personal injury, do not put
any part of your body under the
vehicle while changing a tire. Do
not start the engine when your
vehicle is on the jack. The jack is
only meant for changing the tire.
•Never use the front or rear
differential as a jacking point.
5. Remove the lug nuts with the lug wrench.
6. Replace the flat tire with the spare tire, making sure the valve stem is
facing outward. Reinstall the lug nuts, cone side in, until the wheel is
snug against the hub. Do not fully tighten the lug nuts until the wheel
has been lowered.
7. Lower the wheel by turning the jack handle counterclockwise.
Roadside Emergencies
193
Page 194 of 272
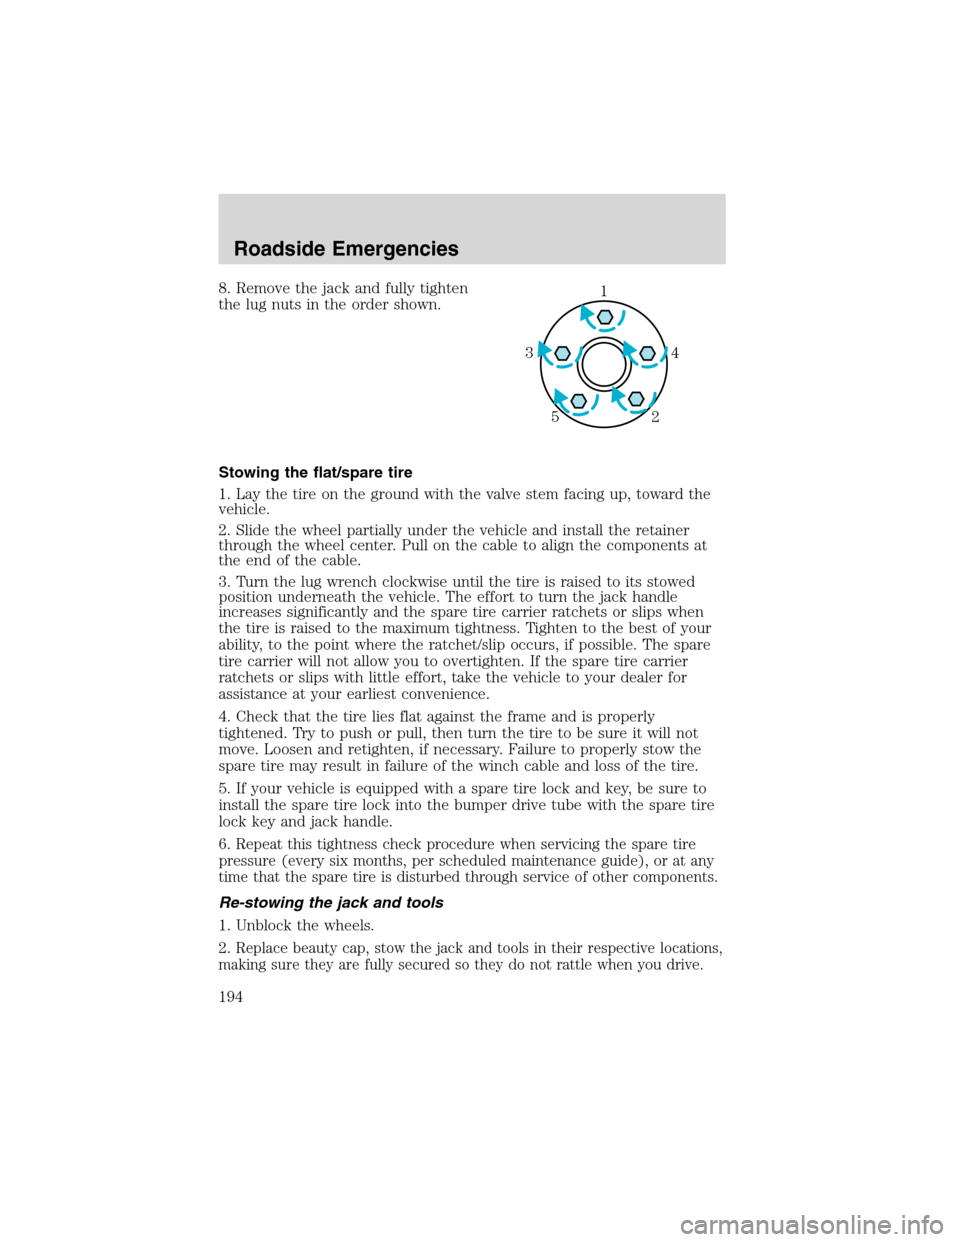
8. Remove the jack and fully tighten
the lug nuts in the order shown.
Stowing the flat/spare tire
1. Lay the tire on the ground with the valve stem facing up, toward the
vehicle.
2. Slide the wheel partially under the vehicle and install the retainer
through the wheel center. Pull on the cable to align the components at
the end of the cable.
3. Turn the lug wrench clockwise until the tire is raised to its stowed
position underneath the vehicle. The effort to turn the jack handle
increases significantly and the spare tire carrier ratchets or slips when
the tire is raised to the maximum tightness. Tighten to the best of your
ability, to the point where the ratchet/slip occurs, if possible. The spare
tire carrier will not allow you to overtighten. If the spare tire carrier
ratchets or slips with little effort, take the vehicle to your dealer for
assistance at your earliest convenience.
4. Check that the tire lies flat against the frame and is properly
tightened. Try to push or pull, then turn the tire to be sure it will not
move. Loosen and retighten, if necessary. Failure to properly stow the
spare tire may result in failure of the winch cable and loss of the tire.
5. If your vehicle is equipped with a spare tire lock and key, be sure to
install the spare tire lock into the bumper drive tube with the spare tire
lock key and jack handle.
6.
Repeat this tightness check procedure when servicing the spare tire
pressure (every six months, per scheduled maintenance guide), or at any
time that the spare tire is disturbed through service of other components.
Re-stowing the jack and tools
1. Unblock the wheels.
2.
Replace beauty cap, stow the jack and tools in their respective locations,
making sure they are fully secured so they do not rattle when you drive.
1
4 3
2 5
Roadside Emergencies
194
Page 249 of 272
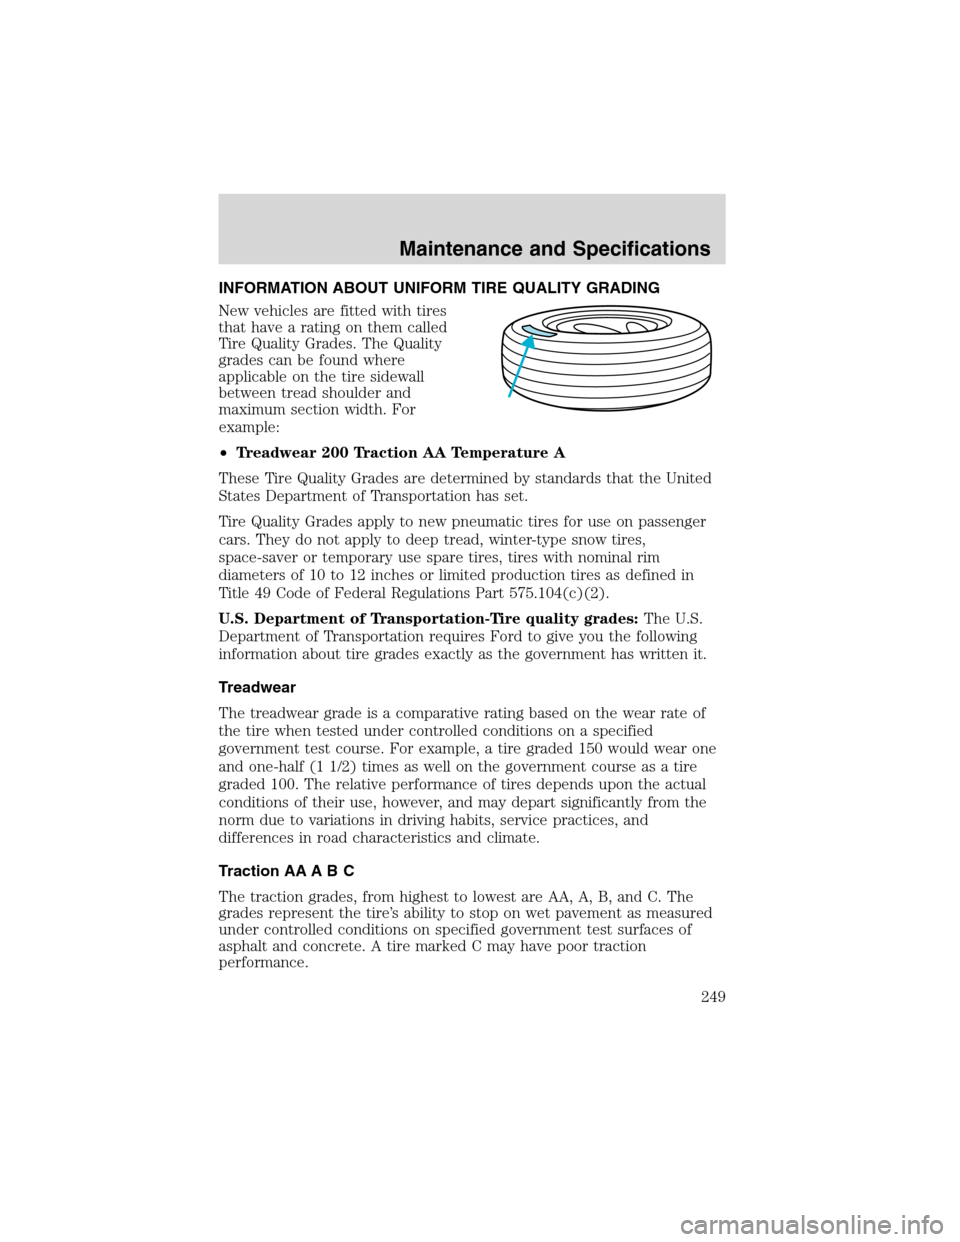
INFORMATION ABOUT UNIFORM TIRE QUALITY GRADING
New vehicles are fitted with tires
that have a rating on them called
Tire Quality Grades. The Quality
grades can be found where
applicable on the tire sidewall
between tread shoulder and
maximum section width. For
example:
•Treadwear 200 Traction AA Temperature A
These Tire Quality Grades are determined by standards that the United
States Department of Transportation has set.
Tire Quality Grades apply to new pneumatic tires for use on passenger
cars. They do not apply to deep tread, winter-type snow tires,
space-saver or temporary use spare tires, tires with nominal rim
diameters of 10 to 12 inches or limited production tires as defined in
Title 49 Code of Federal Regulations Part 575.104(c)(2).
U.S. Department of Transportation-Tire quality grades:The U.S.
Department of Transportation requires Ford to give you the following
information about tire grades exactly as the government has written it.
Treadwear
The treadwear grade is a comparative rating based on the wear rate of
the tire when tested under controlled conditions on a specified
government test course. For example, a tire graded 150 would wear one
and one-half (1 1/2) times as well on the government course as a tire
graded 100. The relative performance of tires depends upon the actual
conditions of their use, however, and may depart significantly from the
norm due to variations in driving habits, service practices, and
differences in road characteristics and climate.
Traction AA A B C
The traction grades, from highest to lowest are AA, A, B, and C. The
grades represent the tire’s ability to stop on wet pavement as measured
under controlled conditions on specified government test surfaces of
asphalt and concrete. A tire marked C may have poor traction
performance.
Maintenance and Specifications
249
Page 251 of 272
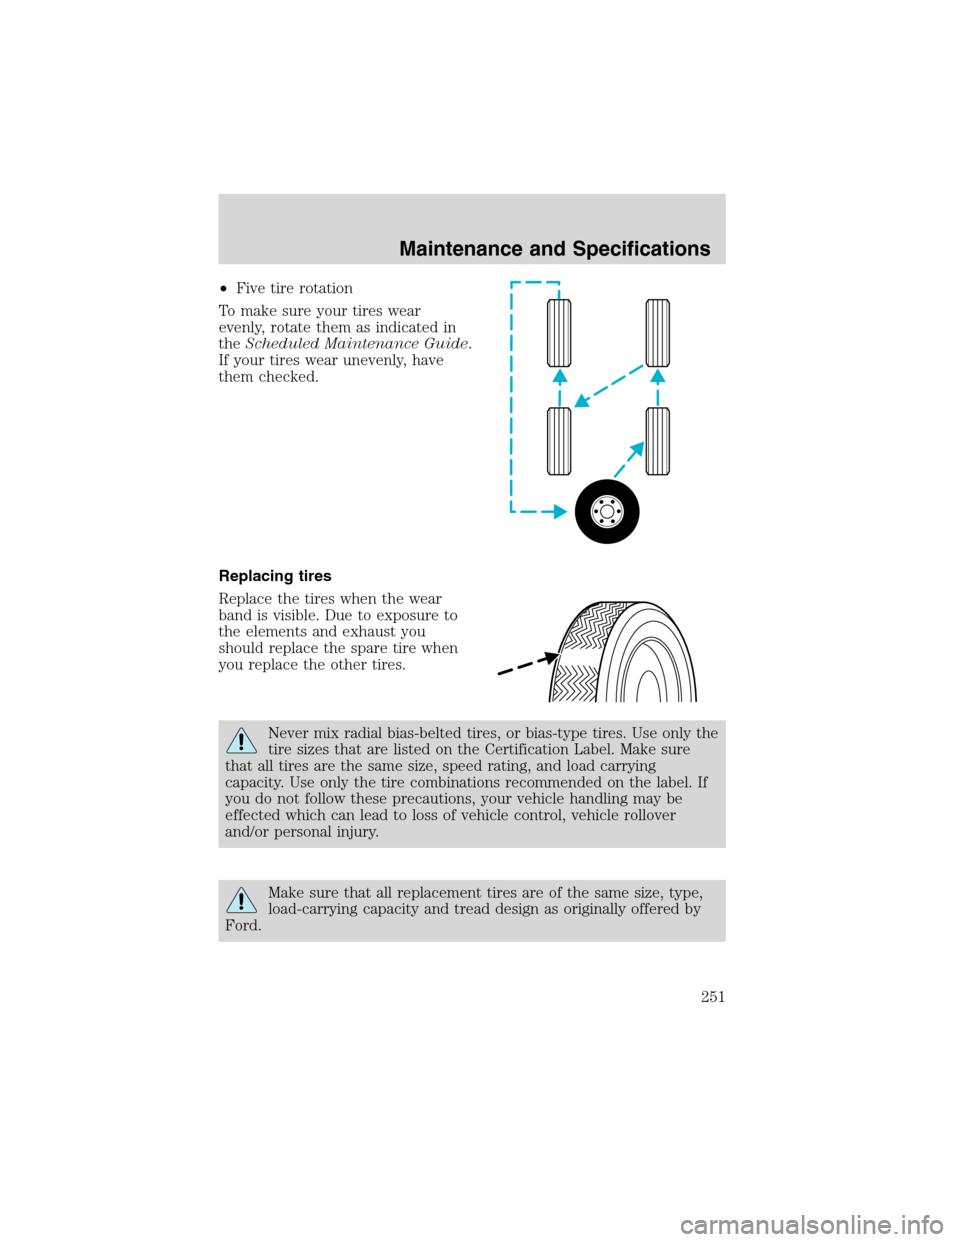
•Five tire rotation
To make sure your tires wear
evenly, rotate them as indicated in
theScheduled Maintenance Guide.
If your tires wear unevenly, have
them checked.
Replacing tires
Replace the tires when the wear
band is visible. Due to exposure to
the elements and exhaust you
should replace the spare tire when
you replace the other tires.
Never mix radial bias-belted tires, or bias-type tires. Use only the
tire sizes that are listed on the Certification Label. Make sure
that all tires are the same size, speed rating, and load carrying
capacity. Use only the tire combinations recommended on the label. If
you do not follow these precautions, your vehicle handling may be
effected which can lead to loss of vehicle control, vehicle rollover
and/or personal injury.
Make sure that all replacement tires are of the same size, type,
load-carrying capacity and tread design as originally offered by
Ford.
Maintenance and Specifications
251
Page 252 of 272
Do not replace your tires with“high performance”tires or larger
size tires.
Failure to follow these precautions, your vehicle handling may be
adversely effected which can lead to loss of vehicle control,
vehicle rollover and/or personal injury.
Tires that are larger or smaller than your vehicle’s original tires may
affect the accuracy of your speedometer.
Tire pressure monitoring system (TPMS) (if equipped)
The tire pressure monitoring system provides the driver with a warning
message indicating when tire pressure is severely low or high. This
system is a supplement to normal tire maintenance including regular
manual inspections. The device will inform the operator of severe low or
high inflation pressures, but may not illuminate for less severe
discrepancies in inflation pressure.
The system uses radio-frequency pressure sensors to monitor the tire
pressure on all tires including the spare. The sensors transmit the tire
pressure readings to the receiver module located in the vehicle. The
receiver module then transmits the status to the message center. For
more tire warning information, refer to theMessage Centerin the
Driver controlschapter.
This device complies with part 15 of the FCC rules and with RS-210 of
Industry Canada. Operation is subject to the following two conditions:
(1) This device may not cause harmful interference, and (2) This device
must accept any interference received, including interference that may
cause undesired operation.
The tire pressure monitoring system is NOT a substitute for
manually checking tire pressure. The tire pressure should be
checked periodically (at least monthly) using a tire gauge, see
Checking the tire pressurein this chapter. Failure to properly
maintain your tire pressure could increase the risk of tire failure, loss
of control, vehicle rollover and personal injury.
Maintenance and Specifications
252
Page 271 of 272
Pedals (see Power adjustable
foot pedals) .................................50
Power adjustable foot pedals .....50
Power distribution box
(see Fuses) ...............................183
Power door locks ........................77
Power point ...........................45, 47
Power steering ..........................142
fluid, checking and adding ....246
fluid, refill capacity ................254
fluid, specifications .........257, 259
Power Windows ...........................48
Preparing to drive your
vehicle ........................................142
R
Radio ......................................17, 21
Rear window defroster ...............32
Relays ................................178, 186
Remote entry system .................79
illuminated entry ......................82
locking/unlocking doors ...........89
opening the trunk .....................79
Reverse sensing system ...........147
Roadside assistance ..................176
Roof rack .....................................75
S
Safety belts (see Safety
restraints) ..................101, 103–108
Safety Canopy ...................118–119
Safety defects, reporting ..........209
Safety restraints ........101, 103–108
belt minder .............................109
cleaning the safety belts ........112extension assembly ................108
for adults .........................104–107
for children .............................121
warning light and chime ........109
Safety seats for children ..........124
Seat belts
(see Safety restraints) .............101
Seats ............................................91
child safety seats ....................124
heated ........................................95
memory seat .......................80, 94
Snowplowing .................................7
Spark plugs,
specifications .....................254, 259
Special notice
ambulance conversions ..............7
utility-type vehicles ....................7
Specification chart,
lubricants ...........................257, 259
Speed control ..............................50
Starting a flex fuel vehicle .......136
Starting your vehicle ........134, 136
jump starting ..........................195
Steering wheel
controls ......................................53
T
Tire warning ..............................252
Tires ...........................188, 249, 252
changing ..........................188, 191
replacing ..................................191
snow tires and chains ............253
spare tire .........................188–190
tire grades ...............................250
treadwear ................................249
Towing .......................................169
recreational towing .................175
Index
271