2003 FORD EXPEDITION jump start
[x] Cancel search: jump startPage 2 of 320
Seating and Safety Restraints 141
Seating 141
Safety restraints 155
Air bags 168
Child restraints 176
Driving 191
Starting 191
Brakes 195
Transmission operation 202
Vehicle loading 219
Trailer towing 221
Roadside Emergencies 227
Getting roadside assistance 227
Hazard flasher switch 228
Fuel pump shut-off switch 228
Fuses and relays 230
Changing tires 236
Jump starting 241
Wrecker towing 247
Customer Assistance 249
Reporting safety defects (U.S. only) 258
Table of Contents
2
Page 227 of 320
GETTING ROADSIDE ASSISTANCE
To fully assist you should you have a vehicle concern, Ford Motor
Company offers a complimentary roadside assistance program. This
program is separate from the New Vehicle Limited Warranty. The service
is available:
•24–hours, seven days a week
•for the New Vehicle Limited Warranty period of three years or 60,000
km (36,000 miles), whichever occurs first on Ford and Mercury
vehicles, and four years or 80,000 km (50,000 miles) on Lincoln
vehicles.
Roadside assistance will cover:
•changing a flat tire.
•jump-starts.
•lock-out assistance.
•limited fuel delivery.
•towing of your disabled vehicle to the nearest Ford Motor Company
dealership, or your selling dealer if within 56.3 km (35 miles) of the
nearest Ford Motor Company dealership (one tow per disablement).
Even non-warranty related tows, like accidents or getting stuck in the
mud or snow, are covered (some exclusions apply, such as impound
towing or repossession).
Canadian customers refer to your Owner Information Guide for
information on:
•Coverage period
•Exact fuel amounts
•Towing of your disabled vehicle
•Emergency travel expense reimbursement
•Travel planning benefits
USING ROADSIDE ASSISTANCE
Complete the roadside assistance identification card and place it in your
wallet for quick reference. In the United States, this card is found in the
Owner Guide portfolio in the glove compartment in Ford vehicles and is
mailed to you if you own a Mercury or Lincoln. In Canada, the card is
found in the Owner Information Guide in the glove compartment.
U.S. Ford or Mercury vehicle customers who require roadside assistance,
call 1–800–241–3673; Lincoln vehicle customers call 1–800–521–4140.
Roadside Emergencies
227
Page 241 of 320
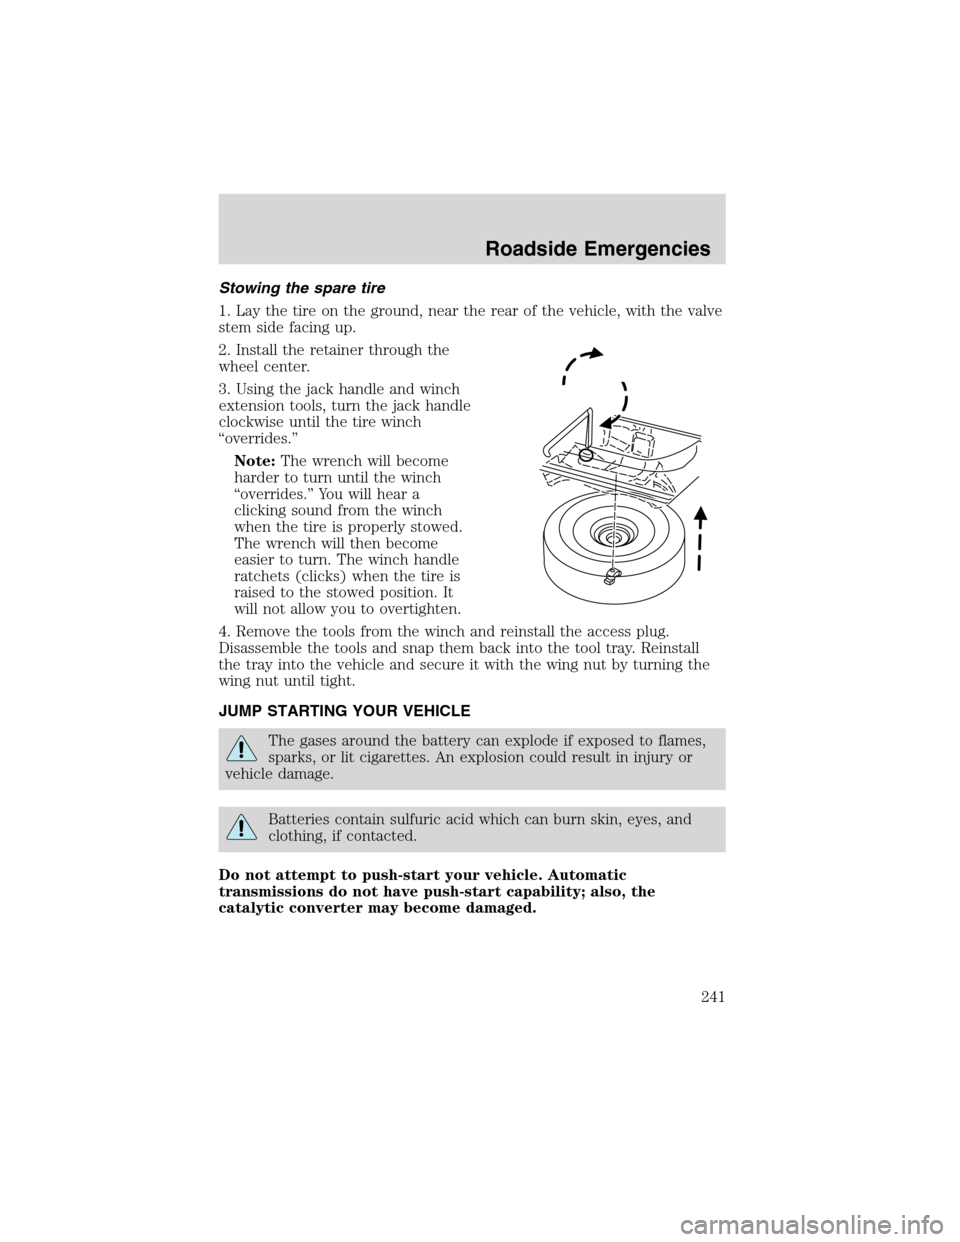
Stowing the spare tire
1. Lay the tire on the ground, near the rear of the vehicle, with the valve
stem side facing up.
2. Install the retainer through the
wheel center.
3. Using the jack handle and winch
extension tools, turn the jack handle
clockwise until the tire winch
“overrides.”
Note:The wrench will become
harder to turn until the winch
“overrides.”You will hear a
clicking sound from the winch
when the tire is properly stowed.
The wrench will then become
easier to turn. The winch handle
ratchets (clicks) when the tire is
raised to the stowed position. It
will not allow you to overtighten.
4. Remove the tools from the winch and reinstall the access plug.
Disassemble the tools and snap them back into the tool tray. Reinstall
the tray into the vehicle and secure it with the wing nut by turning the
wing nut until tight.
JUMP STARTING YOUR VEHICLE
The gases around the battery can explode if exposed to flames,
sparks, or lit cigarettes. An explosion could result in injury or
vehicle damage.
Batteries contain sulfuric acid which can burn skin, eyes, and
clothing, if contacted.
Do not attempt to push-start your vehicle. Automatic
transmissions do not have push-start capability; also, the
catalytic converter may become damaged.
Roadside Emergencies
241
Page 242 of 320
Preparing your vehicle
When the battery is disconnected or a new battery is installed, the
transmission must relearn its shift strategy. As a result, the transmission
may have firm and/or soft shifts. This operation is considered normal and
will not affect function or durability of the transmission. Over time, the
adaptive learning process will fully update transmission operation.
1.Use only a 12–volt supply to start your vehicle.
2. Do not disconnect the battery of the disabled vehicle as this could
damage the vehicle’s electrical system.
3. Park the booster vehicle close to the hood of the disabled vehicle
making sure the two vehiclesdo nottouch. Set the parking brake on
both vehicles and stay clear of the engine cooling fan and other moving
parts.
4. Check all battery terminals and remove any excessive corrosion before
you attach the battery cables. Ensure that vent caps are tight and level.
5. Turn the heater fan on in both vehicles to protect any electrical
surges. Turn all other accessories off.
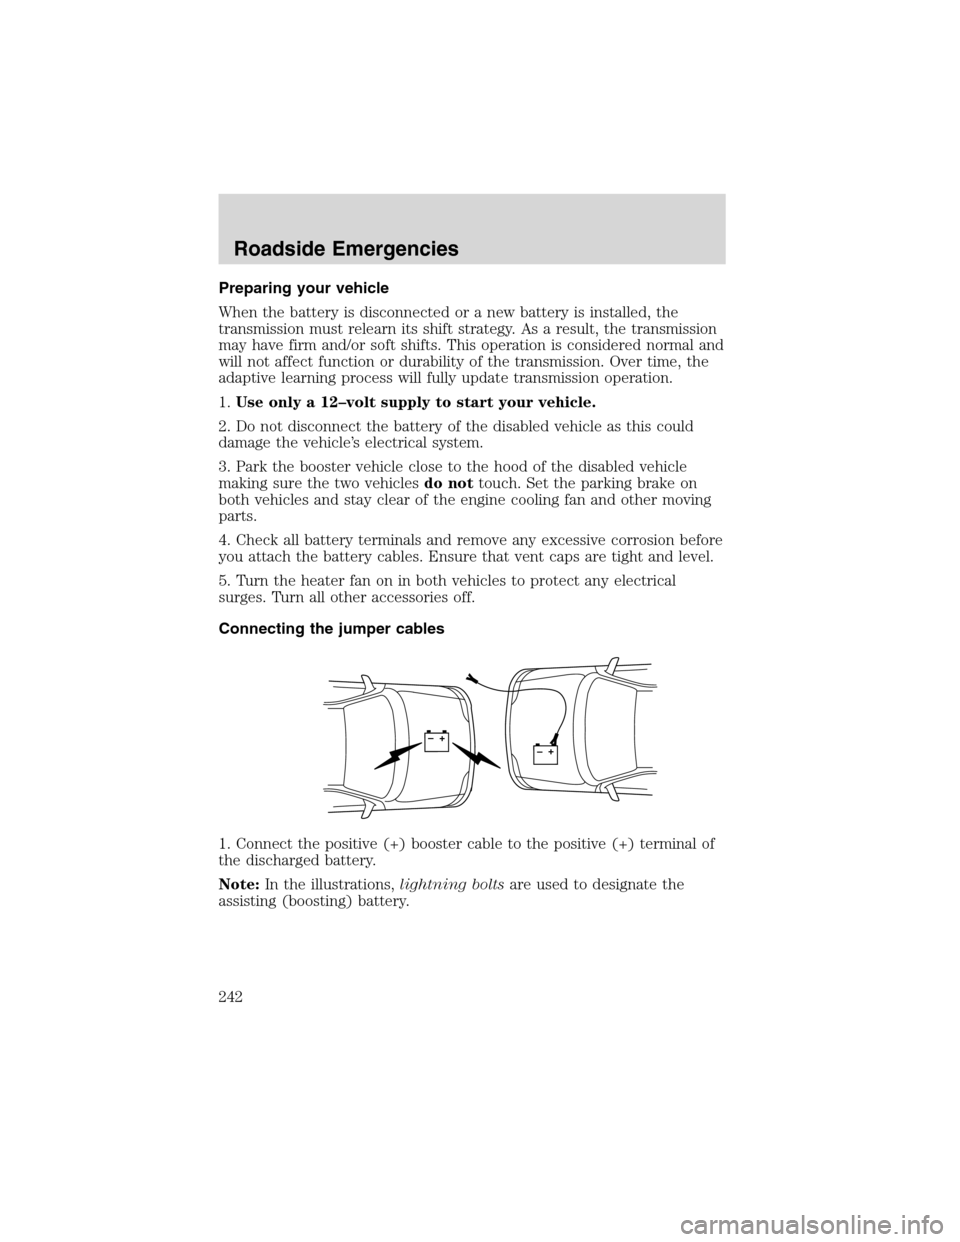
Connecting the jumper cables
1. Connect the positive (+) booster cable to the positive (+) terminal of
the discharged battery.
Note:In the illustrations,lightning boltsare used to designate the
assisting (boosting) battery.
+–+–
Roadside Emergencies
242
Page 244 of 320
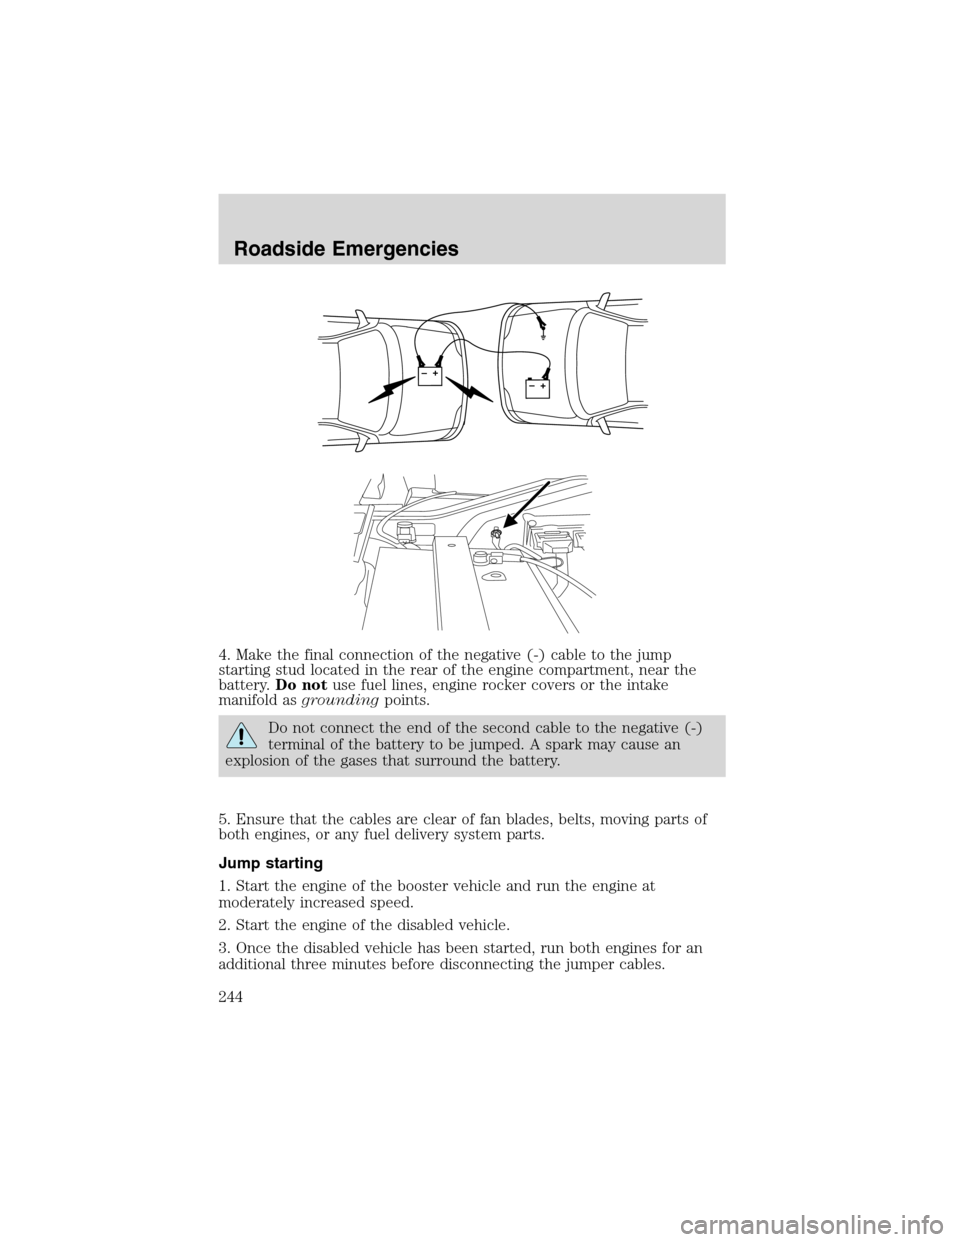
4. Make the final connection of the negative (-) cable to the jump
starting stud located in the rear of the engine compartment, near the
battery.Do notuse fuel lines, engine rocker covers or the intake
manifold asgroundingpoints.
Do not connect the end of the second cable to the negative (-)
terminal of the battery to be jumped. A spark may cause an
explosion of the gases that surround the battery.
5. Ensure that the cables are clear of fan blades, belts, moving parts of
both engines, or any fuel delivery system parts.
Jump starting
1. Start the engine of the booster vehicle and run the engine at
moderately increased speed.
2. Start the engine of the disabled vehicle.
3. Once the disabled vehicle has been started, run both engines for an
additional three minutes before disconnecting the jumper cables.
+–+–
Roadside Emergencies
244
Page 246 of 320
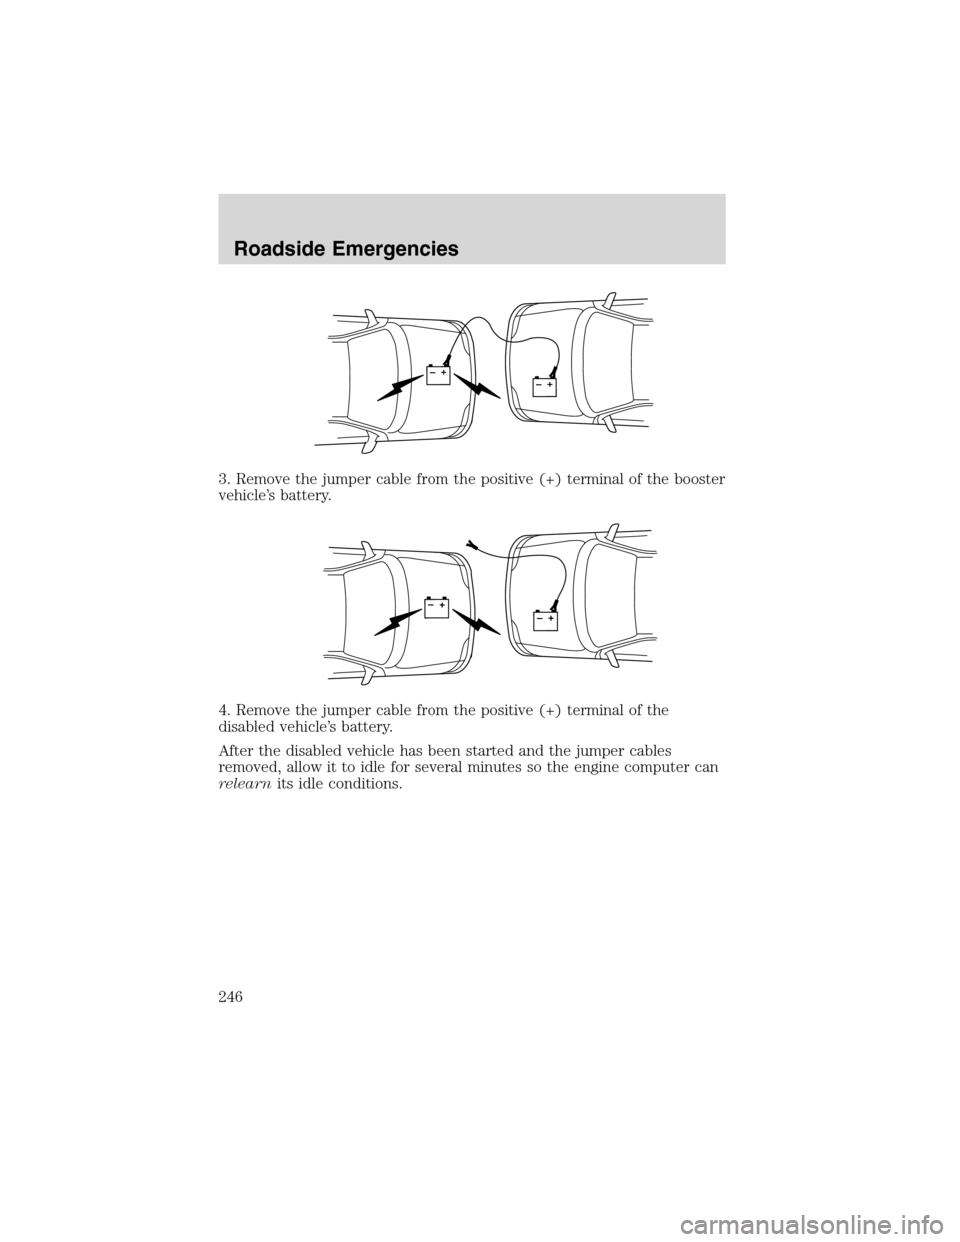
3. Remove the jumper cable from the positive (+) terminal of the booster
vehicle’s battery.
4. Remove the jumper cable from the positive (+) terminal of the
disabled vehicle’s battery.
After the disabled vehicle has been started and the jumper cables
removed, allow it to idle for several minutes so the engine computer can
relearnits idle conditions.
+–+–
+–+–
Roadside Emergencies
246
Page 314 of 320

Changing a tire .........................236
Child safety restraints ..............177
child safety belts ....................177
Child safety seats ......................180
in front seat ............................181
in rear seat ......................181, 184
Cleaning your vehicle
engine compartment ..............260
instrument panel ....................262
interior .............................262–263
plastic parts ............................261
washing ....................................259
waxing .....................................259
wheels ......................................260
wiper blades ............................262
Climate control (see Air
conditioning or Heating) ......69, 72
Clock ................................23, 34, 43
Compass, electronic ..........100, 112
calibration ...............................113
set zone adjustment .......113, 115
Console ......................................125
overhead ..............................95, 97
Controls
power seat ...............................143
steering column ......................106
Coolant
checking and adding ..............274
refill capacities ................278, 300
specifications ..................303, 305
Cruise control
(see Speed control) ..................103
Customer Assistance ................227
Ford accessories for your
vehicle .....................................264
Ford Extended Service Plan .251
Getting assistance outside
the U.S. and Canada ..............255Getting roadside assistance ...227
Getting the service
you need .................................249
Ordering additional
owner’s literature ...................256
The Dispute Settlement
Board .......................................252
Utilizing the Mediation/
Arbitration Program ...............255
D
Daytime running lamps
(see Lamps) ................................82
Defrost
rear window ..............................80
Dipstick
automatic transmission
fluid ..........................................291
engine oil .................................269
Doors
door ajar warning ...............13, 15
lubricant specifications ..........303
Driveline universal joint
and slip yoke .............................293
Driving under special
conditions ..........................212, 215
sand .........................................214
snow and ice ...........................216
through water .................215, 219
E
Electronic message center .......114
Emergencies, roadside
jump-starting ..........................241
Emission control system ..........288
Engine ........................................305
check engine/service engine
soon light ..................................10
Index
314
Page 316 of 320
GVWR (Gross Vehicle
Weight Rating) ..........................219
calculating .......................219, 221
definition .................................219
driving with a heavy load ......219
location ....................................219
H
Hazard flashers .........................228
Headlamps ...................................81
aiming ........................................83
autolamp system .......................81
bulb specifications ....................86
daytime running lights .............82
flash to pass ..............................82
high beam ...........................13, 82
replacing bulbs .........................87
turning on and off ....................81
warning chime ..........................14
Heating
heating and air
conditioning system ...........69, 72
HomeLink universal
transceiver (see Garage
door opener) .............108–109, 111
Hood ..........................................266
I
Ignition ...............................191, 305
Infant seats
(see Safety seats) .....................180
Inspection/maintenance
(I/M) testing ..............................289
Instrument panel
cleaning ...................................262
cluster ........................................10
lighting up panel and
interior .......................................83J
Jack ............................................236
positioning ...............................236
storage .....................................236
Jump-starting your vehicle ......241
K
Keyless entry system
locking and unlocking
doors ........................................137
programming entry code .......135
Keys ...................................137–139
key in ignition chime ...............15
positions of the ignition .........191
L
Lamps
autolamp system .......................81
bulb replacement
specifications chart ..................86
cargo lamps ...............................83
daytime running light ...............82
fog lamps ...................................81
headlamps .................................81
headlamps, flash to pass ..........82
instrument panel, dimming .....83
interior lamps ...............84–85, 87
replacing bulbs ...................86–90
Lane change indicator
(see Turn signal) ........................84
Liftgate ..............................126, 130
Lights, warning and indicator ....10
AdvanceTrac .............................12
air bag ........................................12
anti-lock brakes (ABS) ....11, 196
brake ..........................................11
charging system ........................12
check coolant ............................13
Index
316