Page 87 of 320
Replacing the interior bulbs
Check the operation of all bulbs frequently.
Map lamps
To change the map lamp bulbs:
1. Use a small screwdriver to
remove the map lamp lens.
2. To remove the old bulb, twist
1⁄4
turn and pull it out.
3. Twist in a new bulb.
4. Align and press the map lamp
lens back on and test the lamp operation.
Replacing headlamp bulbs
1. Make sure that the headlamp control is in the OFF position.
2. Open the hood.
3. At the back of the headlamp,
remove the two headlamp assembly
retainer bolts.
4. Loosen the vertical bolt on the
backside of the headlamp assembly.
Do not remove it.
5. Slide headlamp assembly forward
and off of guide ribs to expose the
back of the bulb and wiring connector.
6. Pull off the bulb covers.
Lights
87
Page 88 of 320
7. Once the bulb covers are
removed, the bulbs can be removed
by turning them counterclockwise
and then pulling the bulbs straight
out.
Handle a halogen headlamp bulb carefully and keep out of
children’s reach. Grasp the bulb only by its plastic base and do
not touch the glass. The oil from your hand could cause the bulb to
break the next time the headlamps are operated.
8. Insert the glass end of the new bulb into the headlamp assembly.
When the grooves in the plastic base are aligned, turn the new bulb
clockwise to install.
9. Reinstall the bulb covers.
10. Replace the headlamp assembly and tighten all three retainer bolts to
secure.
Replacing front parking lamp/turn/sidemarker signal bulbs
1. Make sure that the headlamp control is in the OFF position.
2. Open the hood.
3. Remove the two headlamp
assembly retainer bolts and lamp
assembly from the vehicle.
4. Loosen the vertical bolt on the
backside of the headlamp assembly.
Do not remove it.
Lights
88
Page 89 of 320
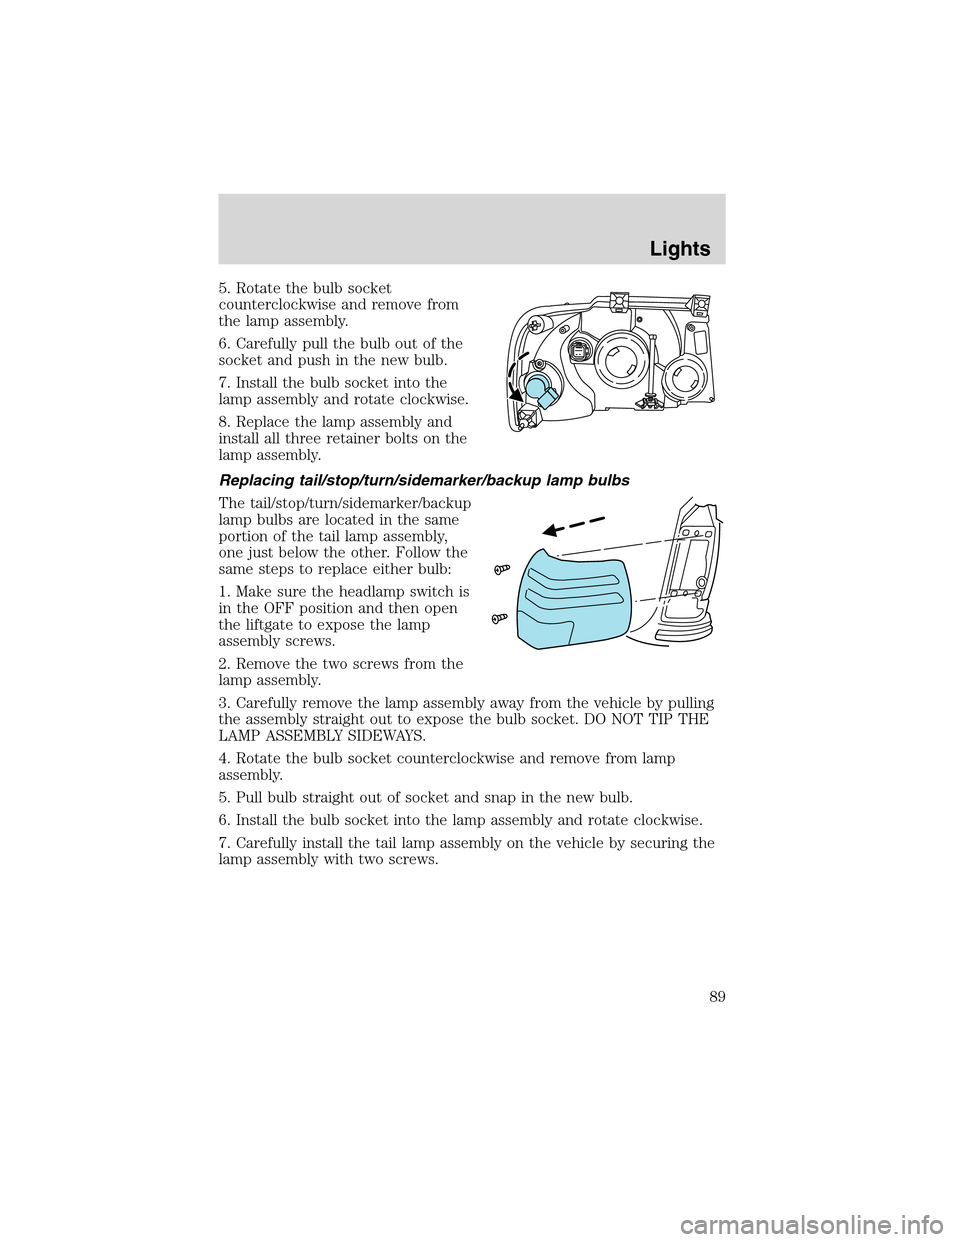
5. Rotate the bulb socket
counterclockwise and remove from
the lamp assembly.
6. Carefully pull the bulb out of the
socket and push in the new bulb.
7. Install the bulb socket into the
lamp assembly and rotate clockwise.
8. Replace the lamp assembly and
install all three retainer bolts on the
lamp assembly.
Replacing tail/stop/turn/sidemarker/backup lamp bulbs
The tail/stop/turn/sidemarker/backup
lamp bulbs are located in the same
portion of the tail lamp assembly,
one just below the other. Follow the
same steps to replace either bulb:
1. Make sure the headlamp switch is
in the OFF position and then open
the liftgate to expose the lamp
assembly screws.
2. Remove the two screws from the
lamp assembly.
3. Carefully remove the lamp assembly away from the vehicle by pulling
the assembly straight out to expose the bulb socket. DO NOT TIP THE
LAMP ASSEMBLY SIDEWAYS.
4. Rotate the bulb socket counterclockwise and remove from lamp
assembly.
5. Pull bulb straight out of socket and snap in the new bulb.
6. Install the bulb socket into the lamp assembly and rotate clockwise.
7. Carefully install the tail lamp assembly on the vehicle by securing the
lamp assembly with two screws.
Lights
89
Page 90 of 320
Replacing foglamp bulbs
Handle a halogen headlamp bulb carefully and keep out of
children’s reach. Grasp the bulb only by its plastic base and do
not touch the glass. The oil from your hand could cause the bulb to
break the next time the headlamps are operated.
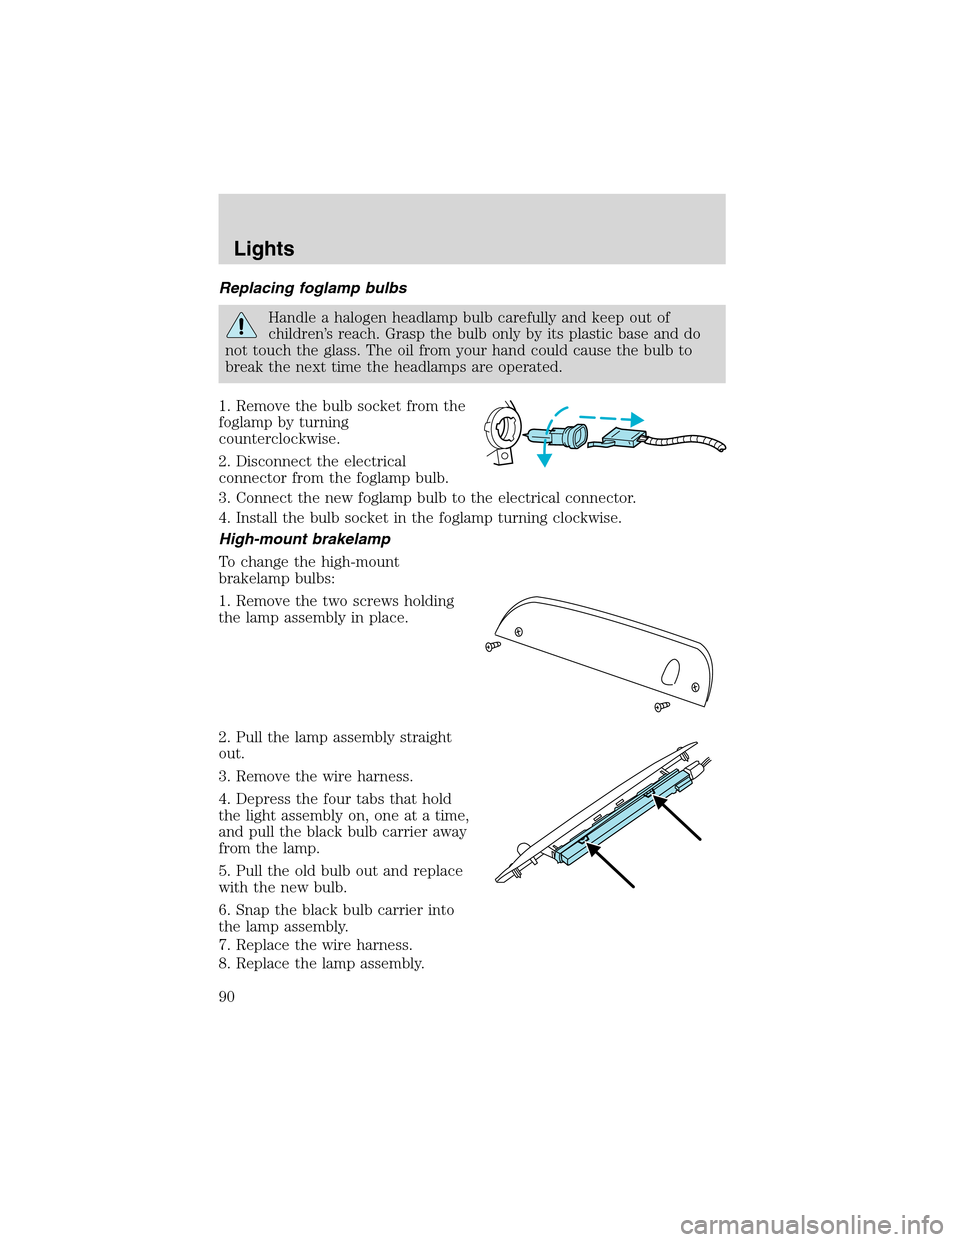
1. Remove the bulb socket from the
foglamp by turning
counterclockwise.
2. Disconnect the electrical
connector from the foglamp bulb.
3. Connect the new foglamp bulb to the electrical connector.
4. Install the bulb socket in the foglamp turning clockwise.
High-mount brakelamp
To change the high-mount
brakelamp bulbs:
1. Remove the two screws holding
the lamp assembly in place.
2. Pull the lamp assembly straight
out.
3. Remove the wire harness.
4. Depress the four tabs that hold
the light assembly on, one at a time,
and pull the black bulb carrier away
from the lamp.
5. Pull the old bulb out and replace
with the new bulb.
6. Snap the black bulb carrier into
the lamp assembly.
7. Replace the wire harness.
8. Replace the lamp assembly.
Lights
90
Page 91 of 320
Replacing license plate lamp bulb
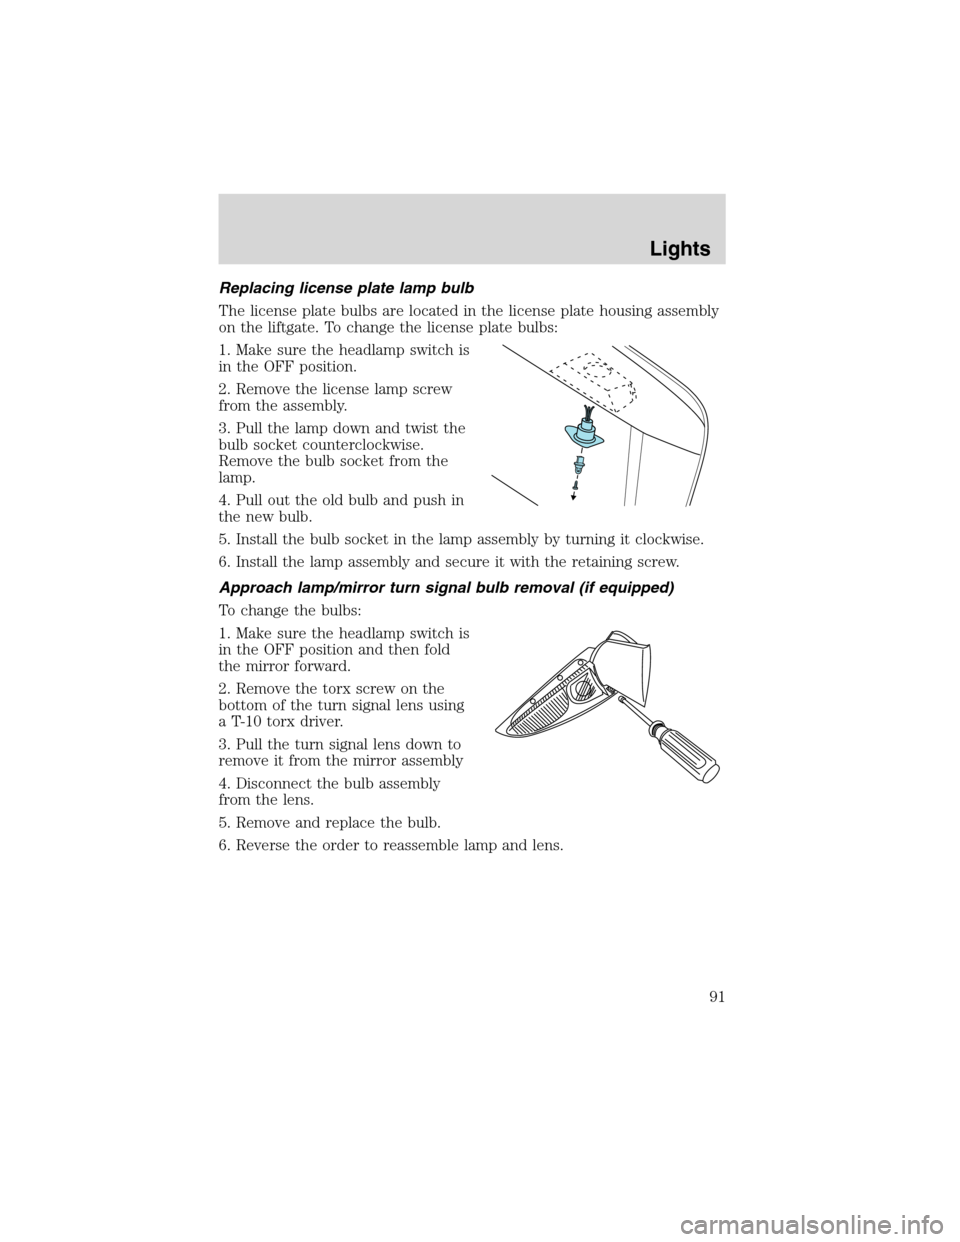
The license plate bulbs are located in the license plate housing assembly
on the liftgate. To change the license plate bulbs:
1. Make sure the headlamp switch is
in the OFF position.
2. Remove the license lamp screw
from the assembly.
3. Pull the lamp down and twist the
bulb socket counterclockwise.
Remove the bulb socket from the
lamp.
4. Pull out the old bulb and push in
the new bulb.
5. Install the bulb socket in the lamp assembly by turning it clockwise.
6. Install the lamp assembly and secure it with the retaining screw.
Approach lamp/mirror turn signal bulb removal (if equipped)
To change the bulbs:
1. Make sure the headlamp switch is
in the OFF position and then fold
the mirror forward.
2. Remove the torx screw on the
bottom of the turn signal lens using
a T-10 torx driver.
3. Pull the turn signal lens down to
remove it from the mirror assembly
4. Disconnect the bulb assembly
from the lens.
5. Remove and replace the bulb.
6. Reverse the order to reassemble lamp and lens.
Lights
91
Page 166 of 320
Do not sit on top of a buckled safety belt to avoid the Belt
Minder�chime. Sitting on the safety belt will increase the risk
of injury in an accident. To disable (one-time) or deactivate the Belt
Minder�feature please follow the directions stated below.
One time disable
Any time the safety belt is buckled and then unbuckled during an
ignition ON cycle, BeltMinder�will be disabled for that ignition cycle
only.
Deactivating/activating the BeltMinder�feature
Read steps1-9thoroughly before proceeding with the
deactivation/activation programming procedure.
The BeltMinder�feature can be deactivated/activated by performing the
following procedure:
Before following the procedure, make sure that:
•The parking brake is set
•The gearshift is in P (Park) (automatic transmission)
•The ignition switch is in the OFF position
•All vehicle doors are closed
•The driver’s safety belt is unbuckled
•The parklamps/headlamps are in OFF position (If vehicle is equipped
with Autolamps, this will not affect the procedure.)
To reduce the risk of injury, do not deactivate/activate the
BeltMinder�feature while driving the vehicle.
1. Turn the ignition switch to the RUN (or ON) position. (DO NOT
START THE ENGINE)
2. Wait until the safety belt warning light turns off. (Approximately 1–2
minutes)
•Steps 3–5 must be completed within 60 seconds or the procedure will
have to be repeated.
Seating and Safety Restraints
166
Page 167 of 320
3. Buckle then unbuckle the safety belt three times, ending with the
safety belt unbuckled. This can be done before or during BeltMinder�
warning activation.
4. Turn on the parklamps/headlamps, turn off the parklamps/headlamps.
5. Buckle then unbuckle the safety belt three times, ending with the
safety belt unbuckled.
•After step 5 the safety belt warning light will be turned on for three
seconds.
6. Within seven seconds of the safety belt warning light turning off,
buckle then unbuckle the safety belt.
•This will disable BeltMinder�if it is currently enabled, or enable
BeltMinder if it is currently disabled.
7. Confirmation of disabling BeltMinder�is provided by flashing the
safety belt warning light four times per second for three seconds.
8. Confirmation of enabling BeltMinder�is provided by flashing the
safety belt warning light four times per second for three seconds,
followed by three seconds with the safety belt warning light off, then
followed by flashing the safety belt warning light four times per second
for three seconds again.
9. After receiving confirmation, the deactivation/activation procedure is
complete.
Safety belt extension assembly
If the safety belt is too short when fully extended, there is a 20 cm (8
inch) safety belt extension assembly that can be added (part number
611C22). This assembly can be obtained from your dealer at no cost.
Use only extensions manufactured by the same supplier as the safety
belt. Manufacturer identification is located at the end of the webbing on
the label. Also, use the safety belt extension only if the safety belt is too
short for you when fully extended.
Do not use extensions to change the fit of the shoulder belt
across the torso.
Seating and Safety Restraints
167
Page 192 of 320
If you smell exhaust fumes inside your vehicle, have your dealer
inspect your vehicle immediately. Do not drive if you smell
exhaust fumes.
Important safety precautions
A computer system controls the engine’s idle revolutions per minute
(RPM). When the engine starts, the idle RPM runs higher than normal in
order to warm the engine. If the engine idle speed does not slow down
automatically, have the vehicle checked. Do not allow the vehicle to idle
for more than 10 minutes at the higher engine RPM.
Before starting the vehicle:
1. Make sure all vehicle occupants have buckled their safety belts. For
more information on safety belts and their proper usage, refer to the
Seating and safety restraintschapter.
2. Make sure the headlamps and vehicle accessories are off.
3. Make sure the gearshift is in P
(Park).
4. Make sure the parking brake is
set.
Driving
192