Page 1 of 184
Introduction 4
Instrument Cluster 10
Warning and control lights 10
Gauges 12
Entertainment Systems 14
AM/FM stereo cassette 14
AM/FM stereo with CD 19
Climate Controls 28
Heater only 28
Manual heating and air conditioning 29
Lights 33
Headlamps 33
Turn signal control 36
Bulb replacement 37
Driver Controls 43
Windshield wiper/washer control 43
Steering wheel adjustment 44
Power windows 44
Mirrors 45
Speed control 45
Locks and Security 51
Keys 51
Locks 51
Anti-theft system53
Table of Contents
1
Page 11 of 184

Driving a vehicle with the brake systemwarning light on is
dangerous. A significant decrease in braking performance may
occur. It will take you longer to stop the vehicle. Have the vehicle
checked by your dealer immediately.
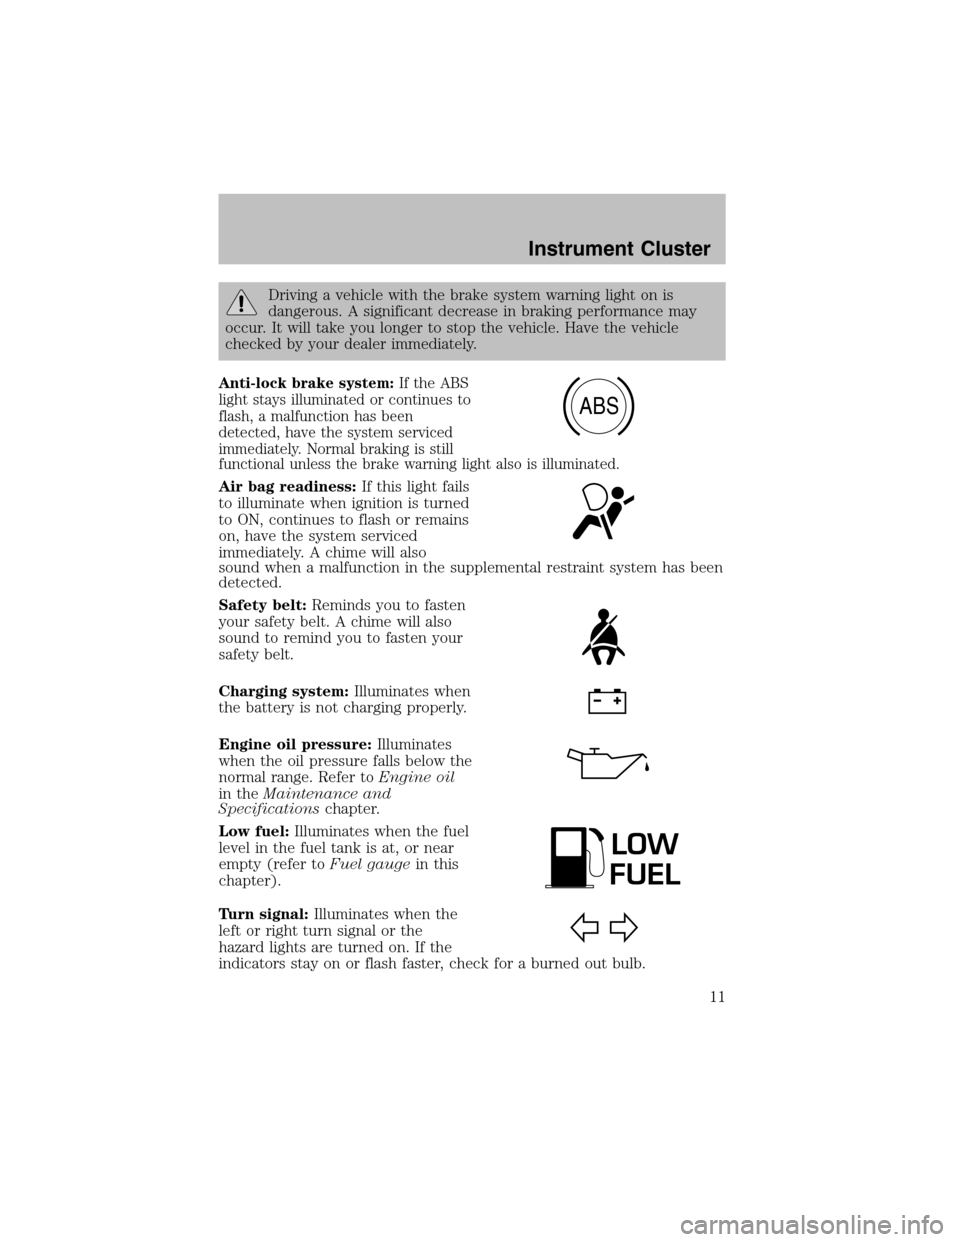
Anti-lock brake system:If the ABS
light stays illuminated or continues to
flash, a malfunction has been
detected, have the systemserviced
immediately. Normal braking is still
functional unless the brake warning light also is illuminated.
Air bag readiness:If this light fails
to illuminate when ignition is turned
to ON, continues to flash or remains
on, have the systemserviced
immediately. A chime will also
sound when a malfunction in the supplemental restraint system has been
detected.
Safety belt:Reminds you to fasten
your safety belt. A chime will also
sound to remind you to fasten your
safety belt.
Charging system:Illuminates when
the battery is not charging properly.
Engine oil pressure:Illuminates
when the oil pressure falls below the
normal range. Refer toEngine oil
in theMaintenance and
Specificationschapter.
Low fuel:Illuminates when the fuel
level in the fuel tank is at, or near
empty (refer toFuel gaugein this
chapter).
Turn signal:Illuminates when the
left or right turn signal or the
hazard lights are turned on. If the
indicators stay on or flash faster, check for a burned out bulb.
ABS
LOW
FUEL
Instrument Cluster
11
Page 26 of 184

RADIO FREQUENCIES
AM and FM frequencies are established by the Federal Communications
Commission (FCC) and the Canadian Radio and Telecommunications
Commission (CRTC). Those frequencies are:
AM - 530, 540–1700, 1710 kHz
FM- 87.7, 87.9–107.7, 107.9 MHz
RADIO RECEPTION FACTORS
There are three factors that can effect radio reception:
•Distance/strength: The further you travel froman FM station, the
weaker the signal and the weaker the reception.
•Terrain: Hills, mountains, tall buildings, power lines, electric fences,
traffic lights and thunderstorms can interfere with your reception.
•Station overload: When you pass a broadcast tower, a stronger signal
may overtake a weaker one and play while the weak station frequency
is displayed.
CASSETTE/PLAYER CARE
Do:
•Use only cassettes that are 90 minutes long or less.
•Tighten very loose tapes by inserting a finger or pencil into the hole
and turning the hub.
•Remove loose labels before inserting tapes.
•Allow tapes which have been subjected to extreme heat, humidity or
cold to reach a moderate temperature before playing.
•Clean the cassette player head with a cassette cleaning cartridge after
10–12 hours of play to maintain good sound/operation.
Don’t:
•Expose tapes to direct sunlight, extreme humidity, heat or cold.
•Leave tapes in the cassette player for a long time when not being
played.
Entertainment Systems
26
Page 36 of 184
Vertical aim adjustment
1. Park the vehicle on a level
surface.
2. With the hood open, locate the
bubble level and the vertical
adjustment screw. The adjustment
screw is located on the outboard
side of the headlamp below the
headlamp upper attachment.
3. The “UP” and “DN” on the bubble
indicate the directional change (up
or down) of the vertical aim.
4. Use a 4 mm wrench or socket to
turn the vertical adjusting screw
clockwise or counterclockwise until
the bubble is centered between the
lines.
Repeat the above process to the other headlamp, if necessary.
TURN SIGNAL CONTROL
•Push down to activate the left
turn signal.
•Push up to activate the right turn
signal.
L
R
UP
DN
DNUP
OFF
Lights
36
Page 40 of 184
12. Turn the headlamps on and make sure they work properly. If the
headlamp was correctly aligned before you changed the bulb, you should
not need to align it again.
Replacing front parking lamp/turn signal bulbs
1. Make sure the headlamp switch is in the OFF position.
2. Open the hood and disconnect the headlamp wiring socket from the
in-line connector. This will make it easier to change the bulb.
3. Remove the protective dust shield from the housing by turning the
dust shield counterclockwise (when viewed fromthe rear).
4. Disconnect the electrical
connector fromthe bulb by pulling
rearward.
Replacing foglamp bulbs
1. Make sure the headlamp switch is
in the OFF position and then
remove the bulb socket from the
foglamp by turning
counterclockwise.
2. Disconnect the electrical
connector fromthe foglamp bulb.
3. Connect the electrical connector
to the new foglamp bulb.
4. Install the bulb socket in the
foglamp turning clockwise.
Lights
40
Page 41 of 184

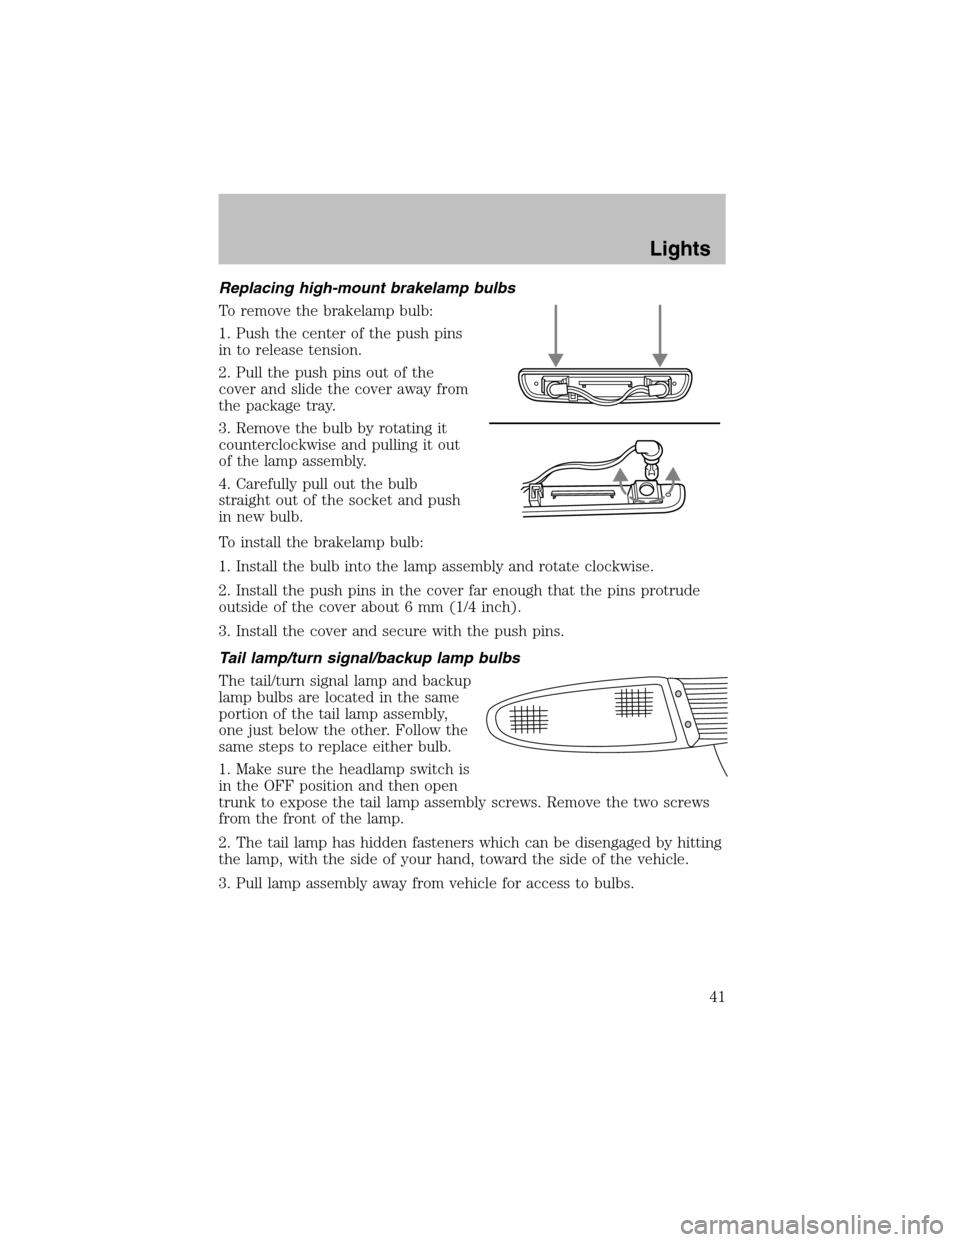
Replacing high-mount brakelamp bulbs
To remove the brakelamp bulb:
1. Push the center of the push pins
in to release tension.
2. Pull the push pins out of the
cover and slide the cover away from
the package tray.
3. Remove the bulb by rotating it
counterclockwise and pulling it out
of the lamp assembly.
4. Carefully pull out the bulb
straight out of the socket and push
in new bulb.
To install the brakelamp bulb:
1. Install the bulb into the lamp assembly and rotate clockwise.
2. Install the push pins in the cover far enough that the pins protrude
outside of the cover about 6 mm (1/4 inch).
3. Install the cover and secure with the push pins.
Tail lamp/turn signal/backup lamp bulbs
The tail/turn signal lamp and backup
lamp bulbs are located in the same
portion of the tail lamp assembly,
one just below the other. Follow the
same steps to replace either bulb.
1. Make sure the headlamp switch is
in the OFF position and then open
trunk to expose the tail lamp assembly screws. Remove the two screws
fromthe front of the lamp.
2. The tail lamp has hidden fasteners which can be disengaged by hitting
the lamp, with the side of your hand, toward the side of the vehicle.
3. Pull lamp assembly away from vehicle for access to bulbs.
Lights
41
Page 107 of 184
Passenger compartment fuse panel
The fuses are coded as follows:
Fuse/Relay
LocationFuse Amp
RatingPassenger Compartment Fuse
Panel Description
DRL 10A Daytime Running Lamps (DRL)
HAZARD 15A Hazard flasher
ROOM 10A Engine controls, RAP system,
Radio, Shift lock, Courtesy lamps,
Starting system, Warning chime,
Instrument cluster
ENGINE 15A Electronic automatic transaxle,
Ignition system, Constant control
relay module (PCM relay)
RADIO 5A Power mirrors, Radio, RAP system
DOOR LOCK 30A Power door locks
HORN 15A Horn, Shift lock
AIR COND 15A A/C-heater, ABS
METER 10A Backup lamps, Engine coolant
level switch, Instrument cluster,
Rear window defrost, Shift lock,
Warning chime, Turn signal switch
(DRL) (DOOR LK)
STOP
HAZARD HORN
TAIL
ROOM(AIR COND) (SUN ROOF)
ENGINE METER(ASC)
RADIO
WIPER
–P. Window (C.B.)
(FOG) CIGAR
(AUDIO)
AIR BAGFUEL INJ
HEATER
–
Roadside Emergencies
107
Page 182 of 184

cargo lamps ...............................34
fog lamps ...................................33
headlamps ...........................33, 38
headlamps, flash to pass ..........34
instrument panel, dimming .....34
interior lamps .....................37–38
replacing bulbs .............37, 40–42
Lane change indicator
(see Turn signal) ........................36
Lights, warning and indicator ....10
anti-lock brakes (ABS) ............90
Load limits ...................................99
GAWR ........................................99
GVWR ........................................99
trailer towing ............................99
Lubricant specifications ...171–172
M
Manual transaxle
fluid capacities ........................170
lubricant specifications ..........172
Manual transmission ...................97
reverse .......................................98
Mirrors
side view mirrors (power) .......45
Moon roof ....................................48
Motorcraft parts ................155, 169
O
Octane rating ............................154
Oil (see Engine oil) ..................141
P
Parking brake ..............................90
Parts (see Motorcraft parts) ....169Power distribution box
(see Fuses) ...............................108
Power door locks ........................51
Power steering ............................91
fluid, checking and adding ....160
fluid, refill capacity ................170
fluid, specifications .........171–172
Power Windows ...........................44
R
Radio ............................................19
Rear window defroster ...............32
Relays ................................105, 110
Remote entry system .................53
locking/unlocking doors ...........51
opening the trunk .....................54
Roadside assistance ..................103
S
Safety belts
(see Safety restraints) .........60–63
Safety defects, reporting ..........129
Safety restraints ....................60–63
belt minder ...............................65
cleaning the safety belts ..........68
extension assembly ..................64
for adults .............................61–63
for children .........................73–74
warning light and chime ..........64
Safety seats for children ............76
Seat belts (see Safety
restraints) ....................................60
Seats ............................................58
child safety seats ......................76
Servicing your vehicle ..............136
Index
182