Page 133 of 232

Using a step bumper (if equipped)
The rear bumper is equipped with an integral hitch and only requires a ball
with a 25.4 mm (one inch) shank diameter. The bumper has a 2,270 kg
(5,000 lb.) trailer weight and 227 kg (500 lb.) tongue weight capacity.
If it is necessary to relocate the trailer hitch ball position, a
frame-mounted trailer hitch must be installed.
Driving while you tow
When towing a trailer:
•Turn off the speed control. The speed control may shut off
automatically when you are towing on long, steep grades.
•Consult your local motor vehicle speed regulations for towing a trailer.
•To eliminate excessive shifting, use a lower gear. This will also assist
in transmission cooling.
•Anticipate stops and brake gradually.
When descending long, steep downhill grades, always use a lower gear to
provide engine braking to save wear on brakes. Use Drive (Overdrive
OFF) on moderately steep hills, Second (2) on steep hills, and First (1)
on very steep hills.Do not apply your brakes continuously, as they
may overheat and become less effective.
Servicing after towing
If you tow a trailer for long distances, your vehicle will require more
frequent service intervals. Refer to your scheduled maintenance guide for
more information.
Trailer towing tips
•Practice turning, stopping and backing up before starting on a trip to
get the feel of the vehicle trailer combination. When turning, make
wider turns so the trailer wheels will clear curbs and other obstacles.
•Allow more distance for stopping with a trailer attached.
•
The trailer tongue weight should be 10–15% of the loaded trailer weight.
•If you will be towing a trailer frequently in hot weather, hilly conditions,
at GCW, or any combination of these factors, consider refilling your rear
axle with synthetic gear lube. Refer to theMaintenance and
specificationschapter for the lubricant specification.
•After you have traveled 80 km (50 miles), thoroughly check your
hitch, electrical connections and trailer wheel lug nuts.
2003 Econoline(eco)
Owners Guide (post-2002-fmt)
USA English(fus)
Driving
133
ProCarManuals.com
Page 137 of 232
Except for commmercial stripped
chassis vehicles, this switch is
located in the passenger’s footwell,
by the kick panel.
On commmercial stripped chassis
vehicles, this switch is located on a
bracket above the brake pedal.
To reset the switch:
1. Turn the ignition OFF.
2. Check the fuel system for leaks.
3. If no leaks are apparent, reset the
switch by pushing in on the reset
button.
4. Turn the ignition ON.
5. Wait a few seconds and return
the key to OFF.
6. Make another check of leaks.
2003 Econoline(eco)
Owners Guide (post-2002-fmt)
USA English(fus)
Roadside Emergencies
137
ProCarManuals.com
Page 138 of 232

FUSES AND RELAYS
Fuses
If electrical components in the
vehicle are not working, a fuse may
have blown. Blown fuses are
identified by a broken wire within
the fuse. Check the appropriate
fuses before replacing any electrical
components.
Note:Always replace a fuse with one that has the specified amperage
rating. Using a fuse with a higher amperage rating can cause severe wire
damage and could start a fire.
Standard fuse amperage rating and color
COLOR
Fuse
ratingMini
fusesStandard
fusesMaxi
fusesCartridge
maxi
fusesFuse link
cartridge
2A Grey Grey———
3A Violet Violet———
4A Pink Pink———
5A Tan Tan———
7.5A Brown Brown———
10A Red Red———
15A Blue Blue———
20A Yellow Yellow Yellow Blue Blue
25A Natural Natural———
30A Green Green Green Pink Pink
40A——Orange Green Green
50A——Red Red Red
60A——Blue—Yellow
70A——Ta n—Brown
80A——Natural—Black
Passenger compartment fuse panel
The fuse panel is located below and to the left of the steering wheel by
the brake pedal. Remove the panel cover to access the fuses.
15
2003 Econoline(eco)
Owners Guide (post-2002-fmt)
USA English(fus)
Roadside Emergencies
138
ProCarManuals.com
Page 139 of 232
To remove a fuse use the fuse puller tool provided on the fuse panel cover.
The fuses are coded as follows.
Fuse/Relay
LocationFuse Amp
RatingPassenger Compartment Fuse
Panel Description
1 20A 4WABS module
2 15A Brake warning lamp, Instrument
cluster, Warning chime, 4WABS relay,
Warning indicators, Low vacuum
warning switch (Diesel only)
3 15A Main light switch, RKE module, Radio,
Instrument illumination, VCP and
video screens, Overhead console
4 15A Power locks w/RKE, Illuminated entry,
Warning chime, Modified vehicle, Main
light switch, Courtesy lamps
5 20A RKE module, Power lock switches,
Memory lock, Power locks with RKE
1234
5
7
689101142
43
44 13 12 14
15 16 17
19 18
2021 22 23
25 24
26 27 28 29
31 30 32 33 3435
37
3638 3940
41
2003 Econoline(eco)
Owners Guide (post-2002-fmt)
USA English(fus)
Roadside Emergencies
139
ProCarManuals.com
Page 140 of 232

Fuse/Relay
LocationFuse Amp
RatingPassenger Compartment Fuse
Panel Description
6 10A Brake shift interlock, Speed control,
DRL module
7 10A Multi-function switch, Turn signals
8 30A Radio capacitor(s), Ignition coil, PCM
diode, PCM power relay, Fuel heater
(Diesel only), Glow plug relay (Diesel
only)
9 30A Wiper control module, Windshield
wiper motor
10 20A Main light switch, Park lamps, License
lamp (external lamps), Multi-function
switch (flash-to-pass)
11 15A Brake pressure switch, Multi-function
switch (hazards), Brake lamp switch,
Brake lamps
12 15A Transmission Range (TR) sensor,
Backup lamps, Auxiliary battery relay
13 15A Blend door actuator, A/C heater,
Function selector switch
14 5A Instrument cluster (air bag and charge
indicator)
15 5A Trailer battery charge relay
16 30A Power seats
17—Not used
18—Not used
19 10A Air bag diagnostic monitor
20 5A Overdrive cancel switch
21 30A Power windows*
22 15A Memory power radio, Rear seat
control unit, Video screen
23 20A Cigar lighter, Data Link Connector
(DLC)
24—Not used
2003 Econoline(eco)
Owners Guide (post-2002-fmt)
USA English(fus)
Roadside Emergencies
140
ProCarManuals.com
Page 143 of 232

Fuse/Relay
LocationFuse Amp
RatingPower Distribution Box Description
14 30A** Trailer running lamps relay, Trailer backup
lamps relay
15 40A** Main light switch, Daytime Running Lights
(DRL)
16 50A** Auxiliary blower motor relay
17 30A** Fuel pump relay
18 60A** I/P fuses 33, 37, 39, 40, 41
19 60A** 4WABS module
20 20A** Electric brake controller
21 50A** Modified vehicle power
22 40A**
Trailer battery charge relay, Modified vehicles
23 60A** Ignition switch, Fuse panel
24 20A* Natural gas tank valves (NGV only)
25 20A* NGV module (NGV only)
26 10A* A/C clutch (4.2L only)
27 15A* DRL module, Horn relay
28—PCM diode
29—Not used
A—Marker lamps relay
B—Stop lamp relay
C—Trailer backup lamps relay
D—Trailer running lamps relay
E—Trailer battery charge relay
F—IDM relay (Diesel only), A/C clutch relay
(4.2L only)
G—PCM relay
H—Blower motor relay
J—Horn relay
K—Fuel pump relay
* Mini fuses ** Maxi fuses
Relays
Relays are located in the power distribution box and should be replaced
by qualified technicians.
2003 Econoline(eco)
Owners Guide (post-2002-fmt)
USA English(fus)
Roadside Emergencies
143
ProCarManuals.com
Page 144 of 232

CHANGING A FLAT TIRE
If you get a flat tire while driving:
•do not brake heavily.
•gradually decrease the vehicle’s speed.
•hold the steering wheel firmly.
•slowly move to a safe place on the side of the road.
The use of tire sealants is not recommended and may
compromise the integrity of your tires.
Spare tire information
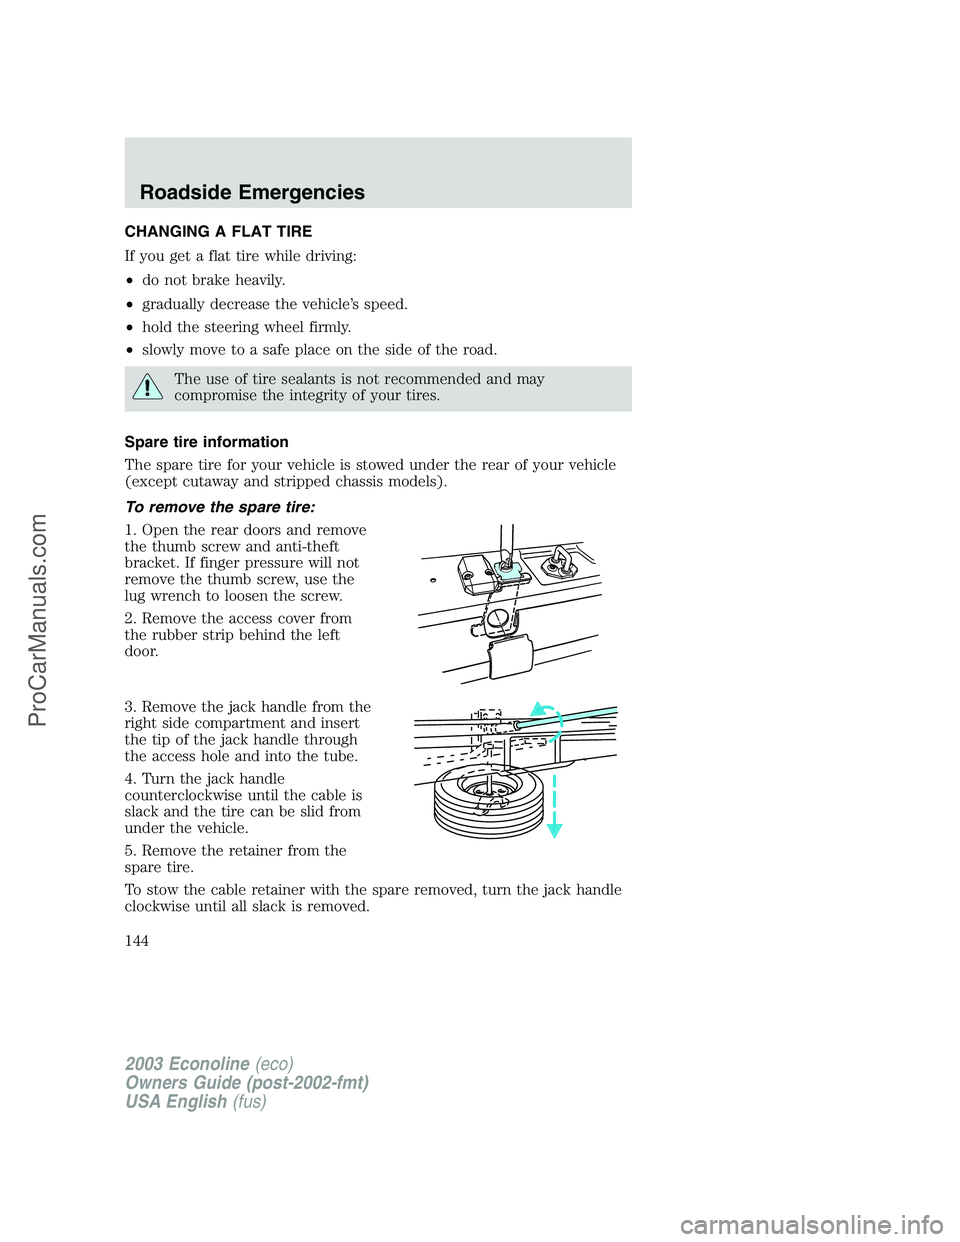
The spare tire for your vehicle is stowed under the rear of your vehicle
(except cutaway and stripped chassis models).
To remove the spare tire:
1. Open the rear doors and remove
the thumb screw and anti-theft
bracket. If finger pressure will not
remove the thumb screw, use the
lug wrench to loosen the screw.
2. Remove the access cover from
the rubber strip behind the left
door.
3. Remove the jack handle from the
right side compartment and insert
the tip of the jack handle through
the access hole and into the tube.
4. Turn the jack handle
counterclockwise until the cable is
slack and the tire can be slid from
under the vehicle.
5. Remove the retainer from the
spare tire.
To stow the cable retainer with the spare removed, turn the jack handle
clockwise until all slack is removed.
2003 Econoline(eco)
Owners Guide (post-2002-fmt)
USA English(fus)
Roadside Emergencies
144
ProCarManuals.com
Page 145 of 232

Tire change procedure
Preparing to change the tire
To prevent the vehicle from moving when you change a tire, be
sure the parking brake is set, then block (in both directions) the
wheel that is diagonally opposite (other side and end of the vehicle) to
the tire being changed.
1. Park on a level surface.
2. Activate the warning flashers.
3. Place the gearshift in P (Park).
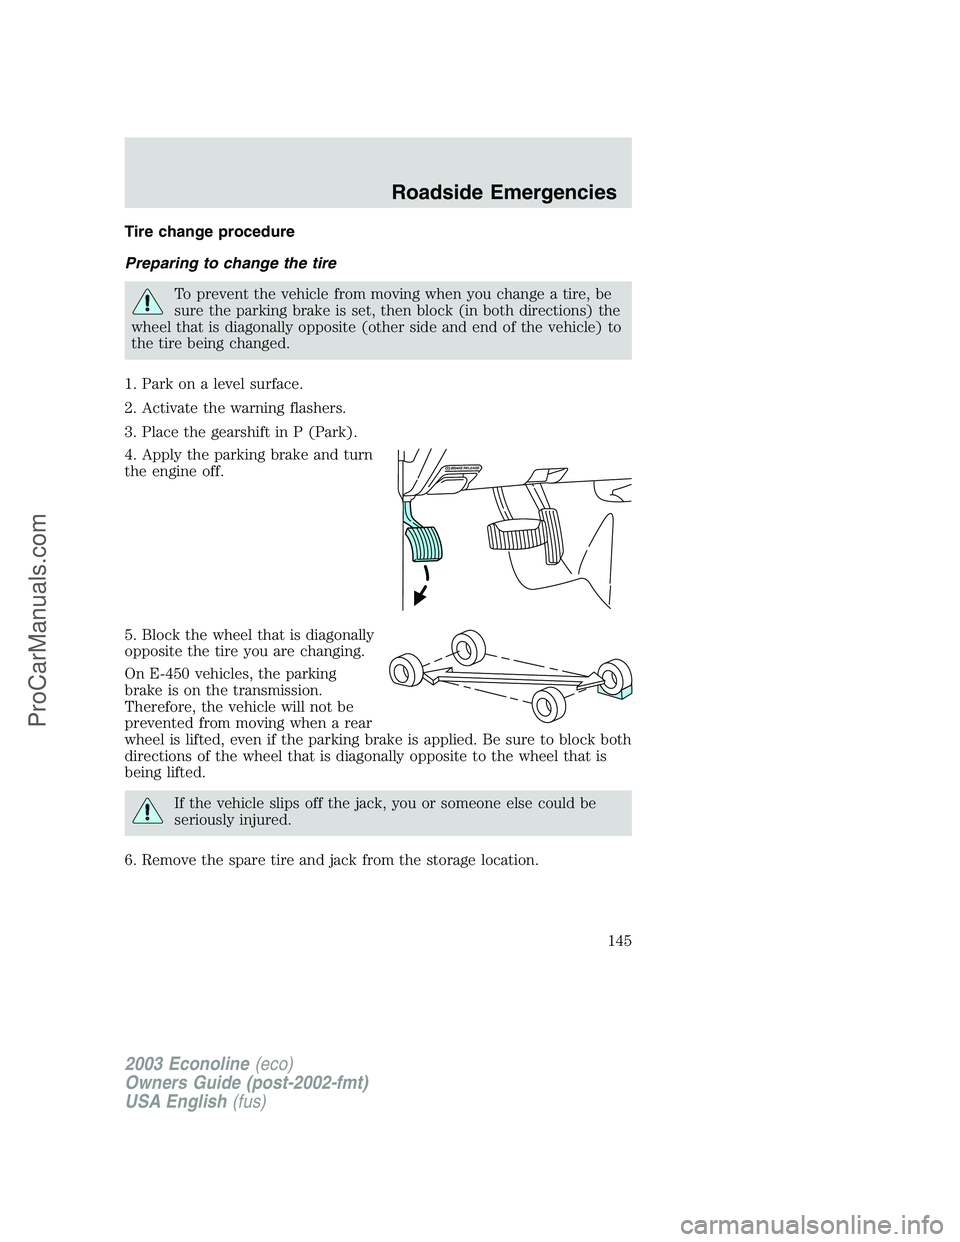
4. Apply the parking brake and turn
the engine off.
5. Block the wheel that is diagonally
opposite the tire you are changing.
On E-450 vehicles, the parking
brake is on the transmission.
Therefore, the vehicle will not be
prevented from moving when a rear
wheel is lifted, even if the parking brake is applied. Be sure to block both
directions of the wheel that is diagonally opposite to the wheel that is
being lifted.
If the vehicle slips off the jack, you or someone else could be
seriously injured.
6. Remove the spare tire and jack from the storage location.
2003 Econoline(eco)
Owners Guide (post-2002-fmt)
USA English(fus)
Roadside Emergencies
145
ProCarManuals.com