Page 3 of 232
Maintenance and Specifications 173
Engine compartment 174
Engine oil 176
Battery 179
Fuel information 190
Air filter(s) 204
Part numbers 210
Refill capacities 211
Lubricant specifications 215
Accessories 222
Index 225
All rights reserved. Reproduction by any means, electronic or mechanical
including photocopying, recording or by any information storage and retrieval
system or translation in whole or part is not permitted without written
authorization from Ford Motor Company. Ford may change the contents without
notice and without incurring obligation.
Copyright © 2002 Ford Motor Company
2003 Econoline(eco)
Owners Guide (post-2002-fmt)
USA English(fus)
Table of Contents
3
ProCarManuals.com
Page 9 of 232
Vehicle Symbol Glossary
Power Windows
Front/Rear
Power Window Lockout
Child Safety Door
Lock/UnlockInterior Luggage
Compartment Release
Symbol
Panic AlarmEngine Oil
Engine CoolantEngine Coolant
Temperature
Do Not Open When HotBattery
Avoid Smoking, Flames,
or SparksBattery Acid
Explosive GasFan Warning
Power Steering FluidMaintain Correct Fluid
LevelMAX
MIN
Emission SystemEngine Air Filter
Passenger Compartment
Air FilterJack
Check fuel capLow tire warning
2003 Econoline(eco)
Owners Guide (post-2002-fmt)
USA English(fus)
Introduction
9
ProCarManuals.com
Page 12 of 232

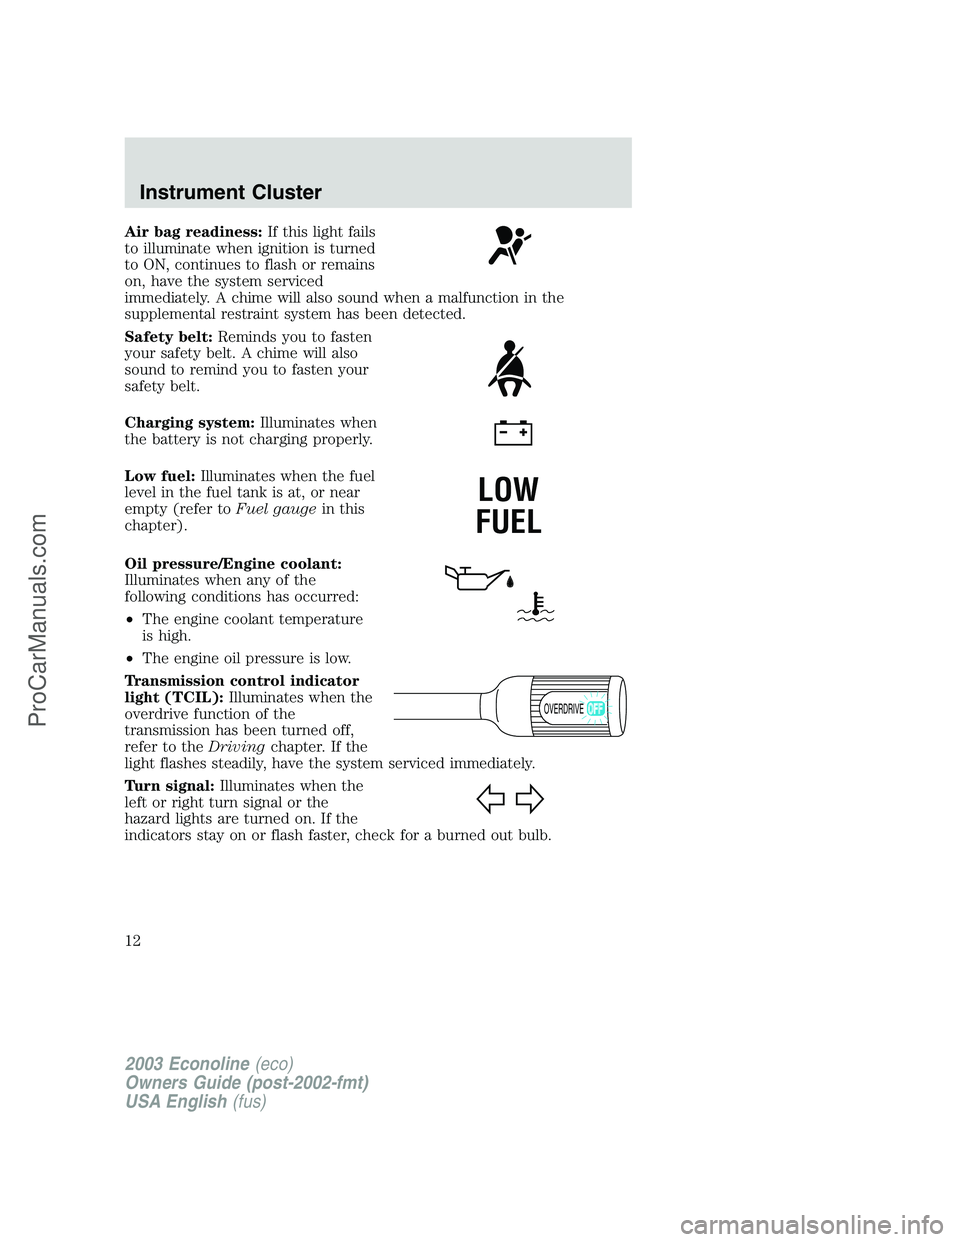
Air bag readiness:If this light fails
to illuminate when ignition is turned
to ON, continues to flash or remains
on, have the system serviced
immediately. A chime will also sound when a malfunction in the
supplemental restraint system has been detected.
Safety belt:Reminds you to fasten
your safety belt. A chime will also
sound to remind you to fasten your
safety belt.
Charging system:Illuminates when
the battery is not charging properly.
Low fuel:Illuminates when the fuel
level in the fuel tank is at, or near
empty (refer toFuel gaugein this
chapter).
Oil pressure/Engine coolant:
Illuminates when any of the
following conditions has occurred:
•The engine coolant temperature
is high.
•The engine oil pressure is low.
Transmission control indicator
light (TCIL):Illuminates when the
overdrive function of the
transmission has been turned off,
refer to theDrivingchapter. If the
light flashes steadily, have the system serviced immediately.
Turn signal:Illuminates when the
left or right turn signal or the
hazard lights are turned on. If the
indicators stay on or flash faster, check for a burned out bulb.
LOW
FUEL
OVERDRIVE
2003 Econoline(eco)
Owners Guide (post-2002-fmt)
USA English(fus)
Instrument Cluster
12
ProCarManuals.com
Page 14 of 232
Never remove the coolant reservoir cap while the engine is
running or hot.
Odometer:Registers the total
kilometers (miles) of the vehicle.
Trip odometer:Registers the
kilometers (miles) of individual
journeys. To reset, depress the
control.
Battery voltage gauge:Indicates
the battery voltage when the
ignition is in the ON position. If the
pointer moves and stays outside the
normal operating range (as
indicated by arrows), have the
vehicle’s electrical system checked
as soon as possible.
Engine oil pressure gauge:
Indicates engine oil pressure. The
needle should stay in the normal
operating range (between“L”and
“H”). If the needle falls below the
normal range, stop the vehicle, turn
off the engine and check the engine
oil level. Add oil if needed. If the oil
level is correct, have your vehicle checked at your dealership or by a
qualified technician.
18
8
2003 Econoline(eco)
Owners Guide (post-2002-fmt)
USA English(fus)
Instrument Cluster
14
ProCarManuals.com
Page 59 of 232

Handle a halogen headlamp bulb carefully and keep out of
children’s reach. Grasp the bulb only by its plastic base and do
not touch the glass. The oil from your hand could cause the bulb to
break the next time the headlamps are operated.
NOTE:If the bulb is accidentally touched, it should be cleaned with
alcohol before being used.
To install the new bulb, follow the removal procedures in reverse order.
Replacing headlamp bulbs (low series)
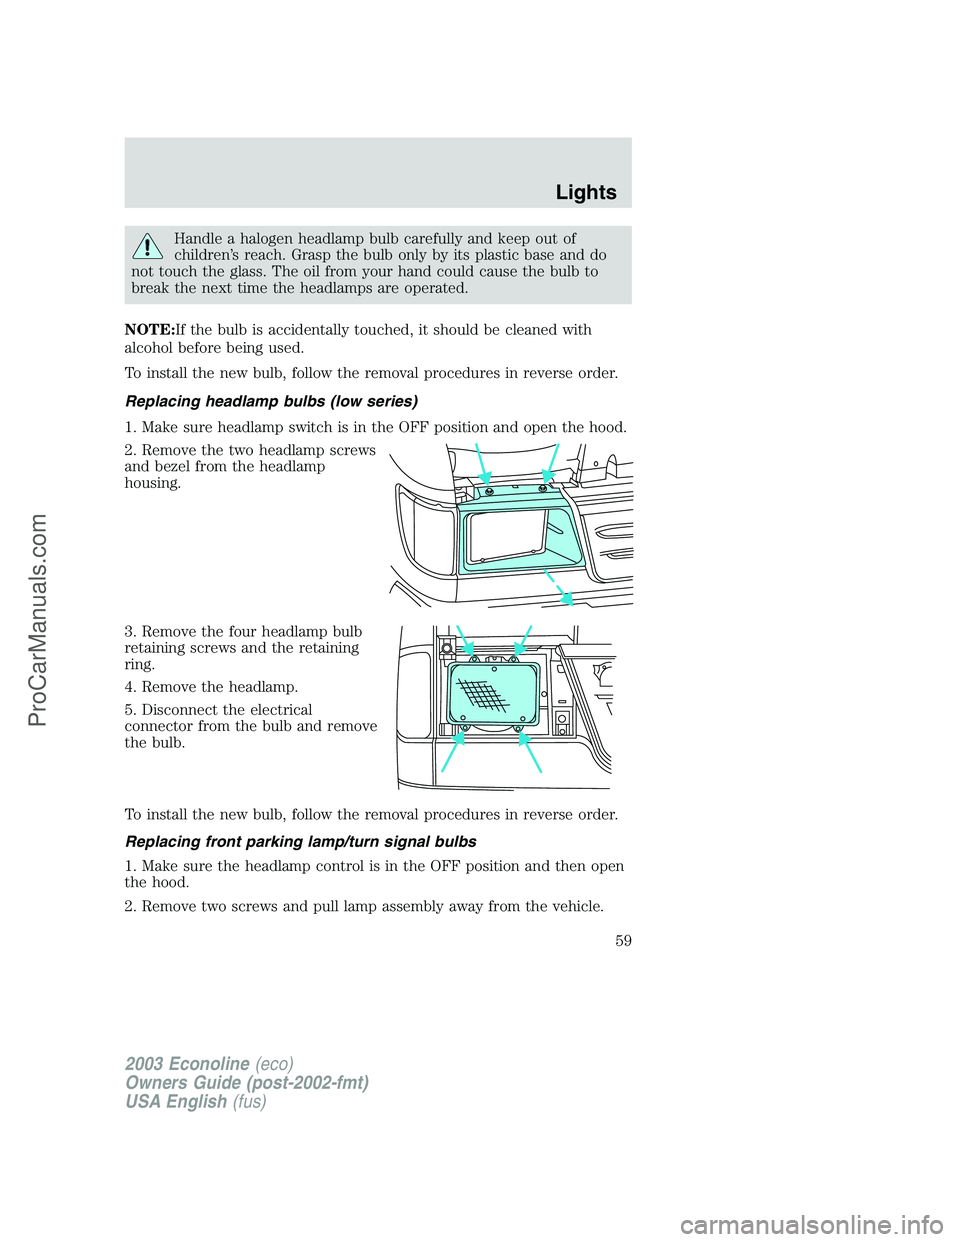
1. Make sure headlamp switch is in the OFF position and open the hood.
2. Remove the two headlamp screws
and bezel from the headlamp
housing.
3. Remove the four headlamp bulb
retaining screws and the retaining
ring.
4. Remove the headlamp.
5. Disconnect the electrical
connector from the bulb and remove
the bulb.
To install the new bulb, follow the removal procedures in reverse order.
Replacing front parking lamp/turn signal bulbs
1. Make sure the headlamp control is in the OFF position and then open
the hood.
2. Remove two screws and pull lamp assembly away from the vehicle.
2003 Econoline(eco)
Owners Guide (post-2002-fmt)
USA English(fus)
Lights
59
ProCarManuals.com
Page 140 of 232

Fuse/Relay
LocationFuse Amp
RatingPassenger Compartment Fuse
Panel Description
6 10A Brake shift interlock, Speed control,
DRL module
7 10A Multi-function switch, Turn signals
8 30A Radio capacitor(s), Ignition coil, PCM
diode, PCM power relay, Fuel heater
(Diesel only), Glow plug relay (Diesel
only)
9 30A Wiper control module, Windshield
wiper motor
10 20A Main light switch, Park lamps, License
lamp (external lamps), Multi-function
switch (flash-to-pass)
11 15A Brake pressure switch, Multi-function
switch (hazards), Brake lamp switch,
Brake lamps
12 15A Transmission Range (TR) sensor,
Backup lamps, Auxiliary battery relay
13 15A Blend door actuator, A/C heater,
Function selector switch
14 5A Instrument cluster (air bag and charge
indicator)
15 5A Trailer battery charge relay
16 30A Power seats
17—Not used
18—Not used
19 10A Air bag diagnostic monitor
20 5A Overdrive cancel switch
21 30A Power windows*
22 15A Memory power radio, Rear seat
control unit, Video screen
23 20A Cigar lighter, Data Link Connector
(DLC)
24—Not used
2003 Econoline(eco)
Owners Guide (post-2002-fmt)
USA English(fus)
Roadside Emergencies
140
ProCarManuals.com
Page 150 of 232

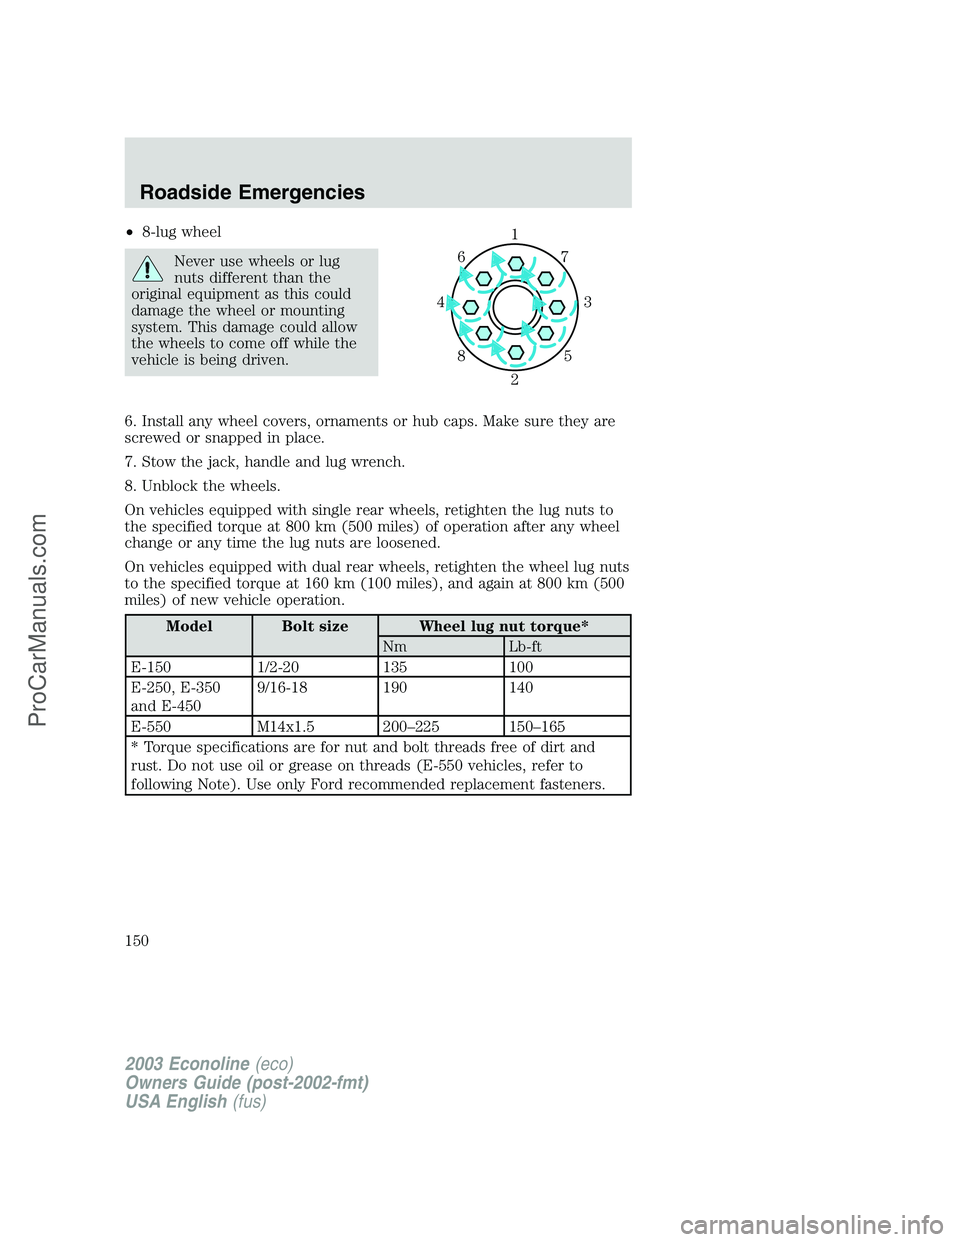
•8-lug wheel
Never use wheels or lug
nuts different than the
original equipment as this could
damage the wheel or mounting
system. This damage could allow
the wheels to come off while the
vehicle is being driven.
6. Install any wheel covers, ornaments or hub caps. Make sure they are
screwed or snapped in place.
7. Stow the jack, handle and lug wrench.
8. Unblock the wheels.
On vehicles equipped with single rear wheels, retighten the lug nuts to
the specified torque at 800 km (500 miles) of operation after any wheel
change or any time the lug nuts are loosened.
On vehicles equipped with dual rear wheels, retighten the wheel lug nuts
to the specified torque at 160 km (100 miles), and again at 800 km (500
miles) of new vehicle operation.
Model Bolt size Wheel lug nut torque*
Nm Lb-ft
E-150 1/2-20 135 100
E-250, E-350
and E-4509/16-18 190 140
E-550 M14x1.5 200–225 150–165
* Torque specifications are for nut and bolt threads free of dirt and
rust. Do not use oil or grease on threads (E-550 vehicles, refer to
following Note). Use only Ford recommended replacement fasteners.
1
3 4
27 6
5 8
2003 Econoline(eco)
Owners Guide (post-2002-fmt)
USA English(fus)
Roadside Emergencies
150
ProCarManuals.com
Page 151 of 232

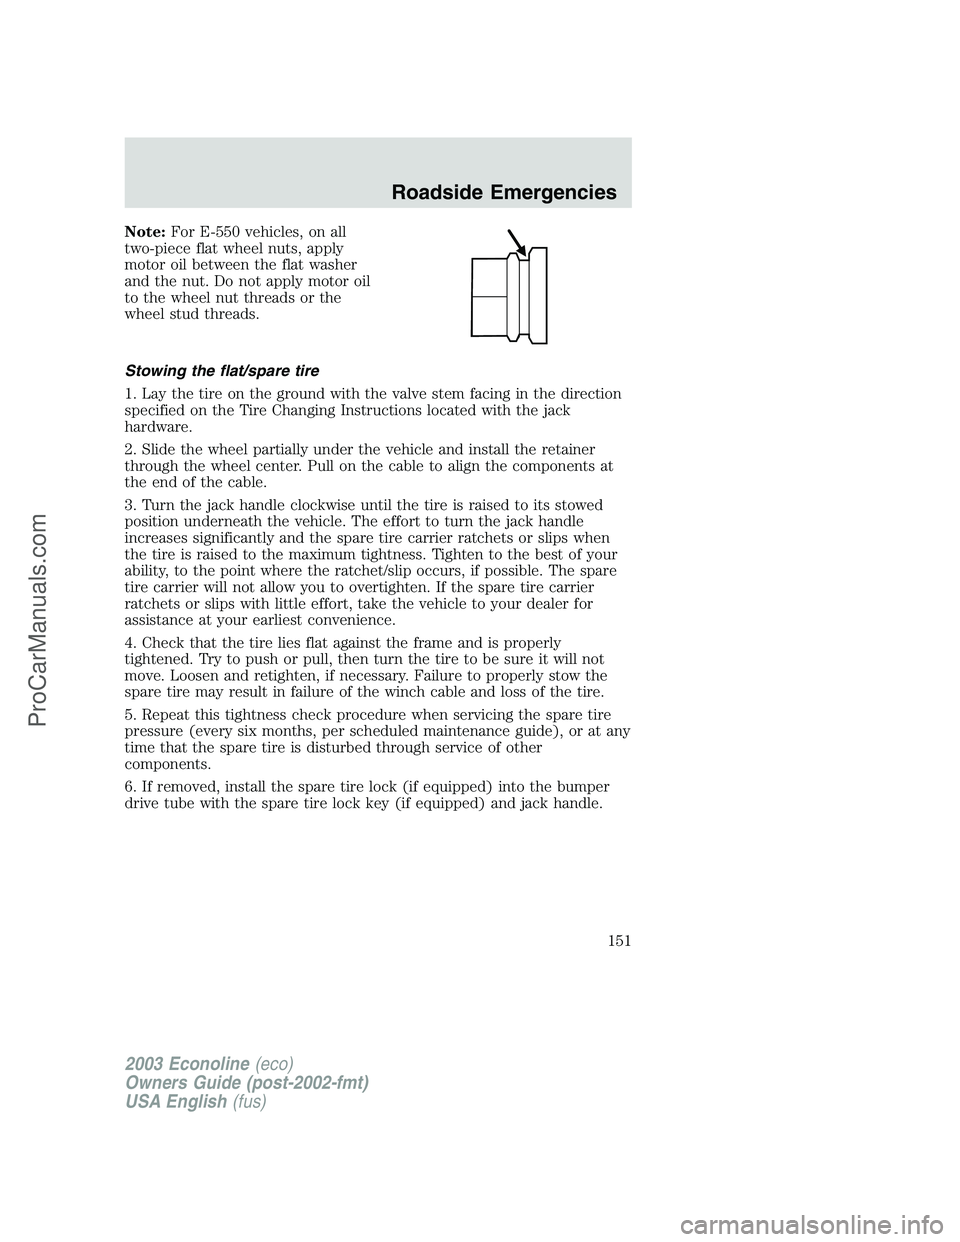
Note:For E-550 vehicles, on all
two-piece flat wheel nuts, apply
motor oil between the flat washer
and the nut. Do not apply motor oil
to the wheel nut threads or the
wheel stud threads.
Stowing the flat/spare tire
1. Lay the tire on the ground with the valve stem facing in the direction
specified on the Tire Changing Instructions located with the jack
hardware.
2. Slide the wheel partially under the vehicle and install the retainer
through the wheel center. Pull on the cable to align the components at
the end of the cable.
3. Turn the jack handle clockwise until the tire is raised to its stowed
position underneath the vehicle. The effort to turn the jack handle
increases significantly and the spare tire carrier ratchets or slips when
the tire is raised to the maximum tightness. Tighten to the best of your
ability, to the point where the ratchet/slip occurs, if possible. The spare
tire carrier will not allow you to overtighten. If the spare tire carrier
ratchets or slips with little effort, take the vehicle to your dealer for
assistance at your earliest convenience.
4. Check that the tire lies flat against the frame and is properly
tightened. Try to push or pull, then turn the tire to be sure it will not
move. Loosen and retighten, if necessary. Failure to properly stow the
spare tire may result in failure of the winch cable and loss of the tire.
5. Repeat this tightness check procedure when servicing the spare tire
pressure (every six months, per scheduled maintenance guide), or at any
time that the spare tire is disturbed through service of other
components.
6. If removed, install the spare tire lock (if equipped) into the bumper
drive tube with the spare tire lock key (if equipped) and jack handle.
2003 Econoline(eco)
Owners Guide (post-2002-fmt)
USA English(fus)
Roadside Emergencies
151
ProCarManuals.com