Page 58 of 232
Function Number of
bulbsTrade number
Map/reading lamp 2 211-2
Roofmarker 5 194
All replacement bulbs are clear in color except where noted.
To replace all instrument panel lights - see your dealer
Replacing headlamp bulbs (aerodynamic)
1. Make sure headlamp switch is in the OFF position and open the hood.
2. Push each clip tab toward the
engine compartment and lift upward
to the stop position, then remove
the headlamp assembly.
3. Disconnect the electrical
connector from the bulb by pulling
rearward.
4. Remove the bulb retaining ring by
rotating it counterclockwise, and
slide the ring off the plastic base.
5. Pull the bulb straight out.
2003 Econoline(eco)
Owners Guide (post-2002-fmt)
USA English(fus)
Lights
58
ProCarManuals.com
Page 59 of 232

Handle a halogen headlamp bulb carefully and keep out of
children’s reach. Grasp the bulb only by its plastic base and do
not touch the glass. The oil from your hand could cause the bulb to
break the next time the headlamps are operated.
NOTE:If the bulb is accidentally touched, it should be cleaned with
alcohol before being used.
To install the new bulb, follow the removal procedures in reverse order.
Replacing headlamp bulbs (low series)
1. Make sure headlamp switch is in the OFF position and open the hood.
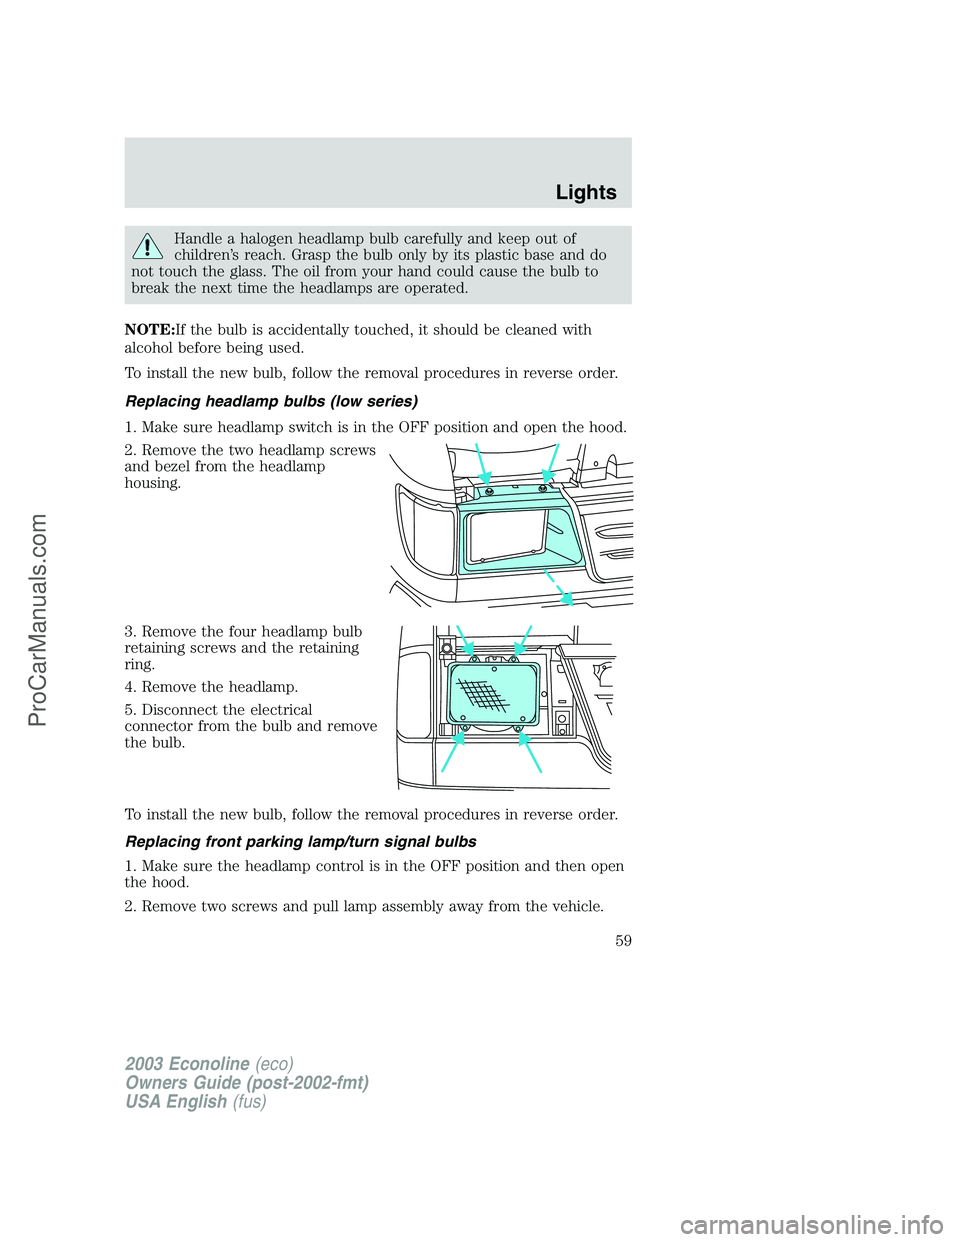
2. Remove the two headlamp screws
and bezel from the headlamp
housing.
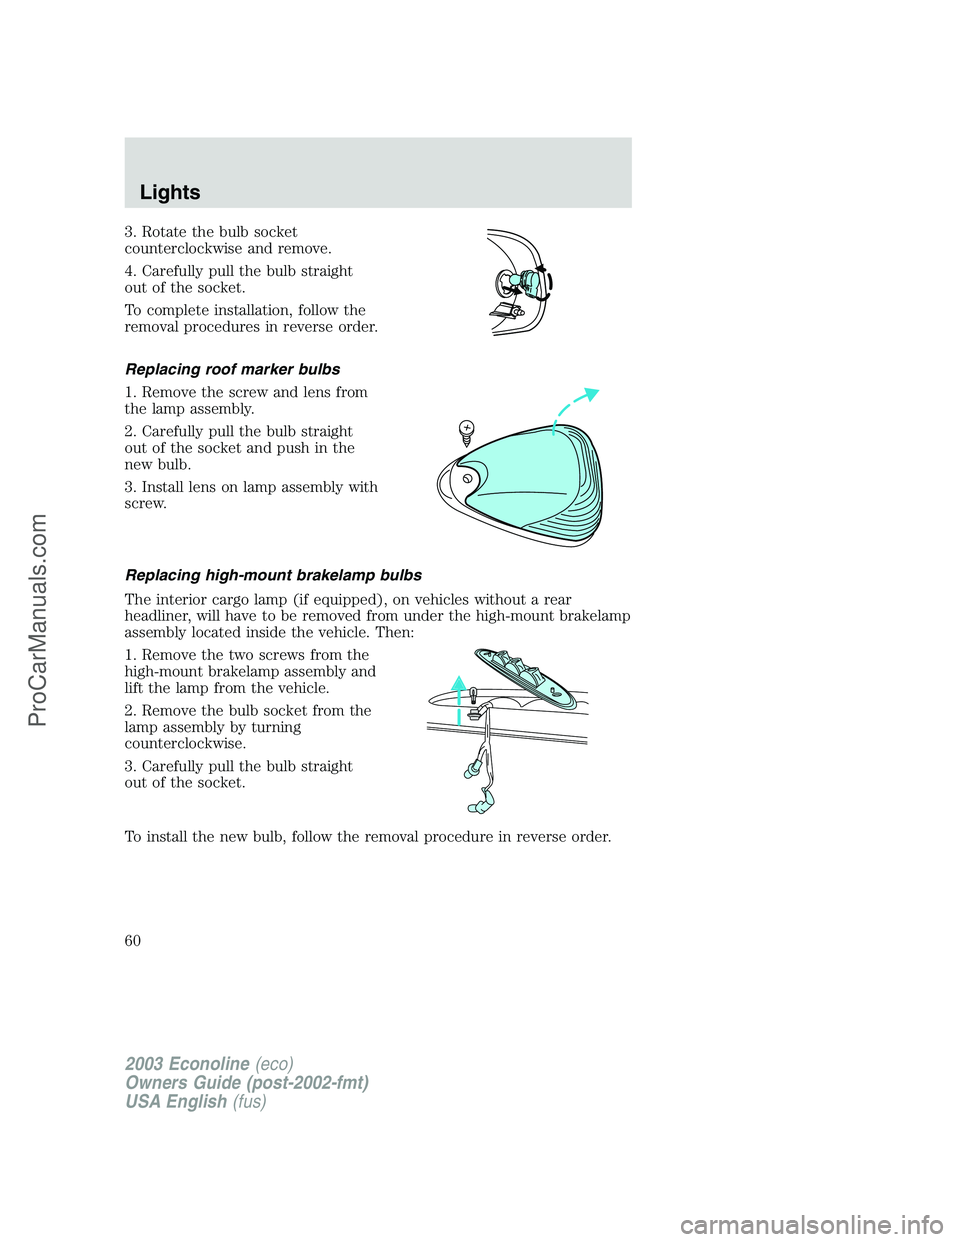
3. Remove the four headlamp bulb
retaining screws and the retaining
ring.
4. Remove the headlamp.
5. Disconnect the electrical
connector from the bulb and remove
the bulb.
To install the new bulb, follow the removal procedures in reverse order.
Replacing front parking lamp/turn signal bulbs
1. Make sure the headlamp control is in the OFF position and then open
the hood.
2. Remove two screws and pull lamp assembly away from the vehicle.
2003 Econoline(eco)
Owners Guide (post-2002-fmt)
USA English(fus)
Lights
59
ProCarManuals.com
Page 60 of 232

3. Rotate the bulb socket
counterclockwise and remove.
4. Carefully pull the bulb straight
out of the socket.
To complete installation, follow the
removal procedures in reverse order.
Replacing roof marker bulbs
1. Remove the screw and lens from
the lamp assembly.
2. Carefully pull the bulb straight
out of the socket and push in the
new bulb.
3. Install lens on lamp assembly with
screw.
Replacing high-mount brakelamp bulbs
The interior cargo lamp (if equipped), on vehicles without a rear
headliner, will have to be removed from under the high-mount brakelamp
assembly located inside the vehicle. Then:
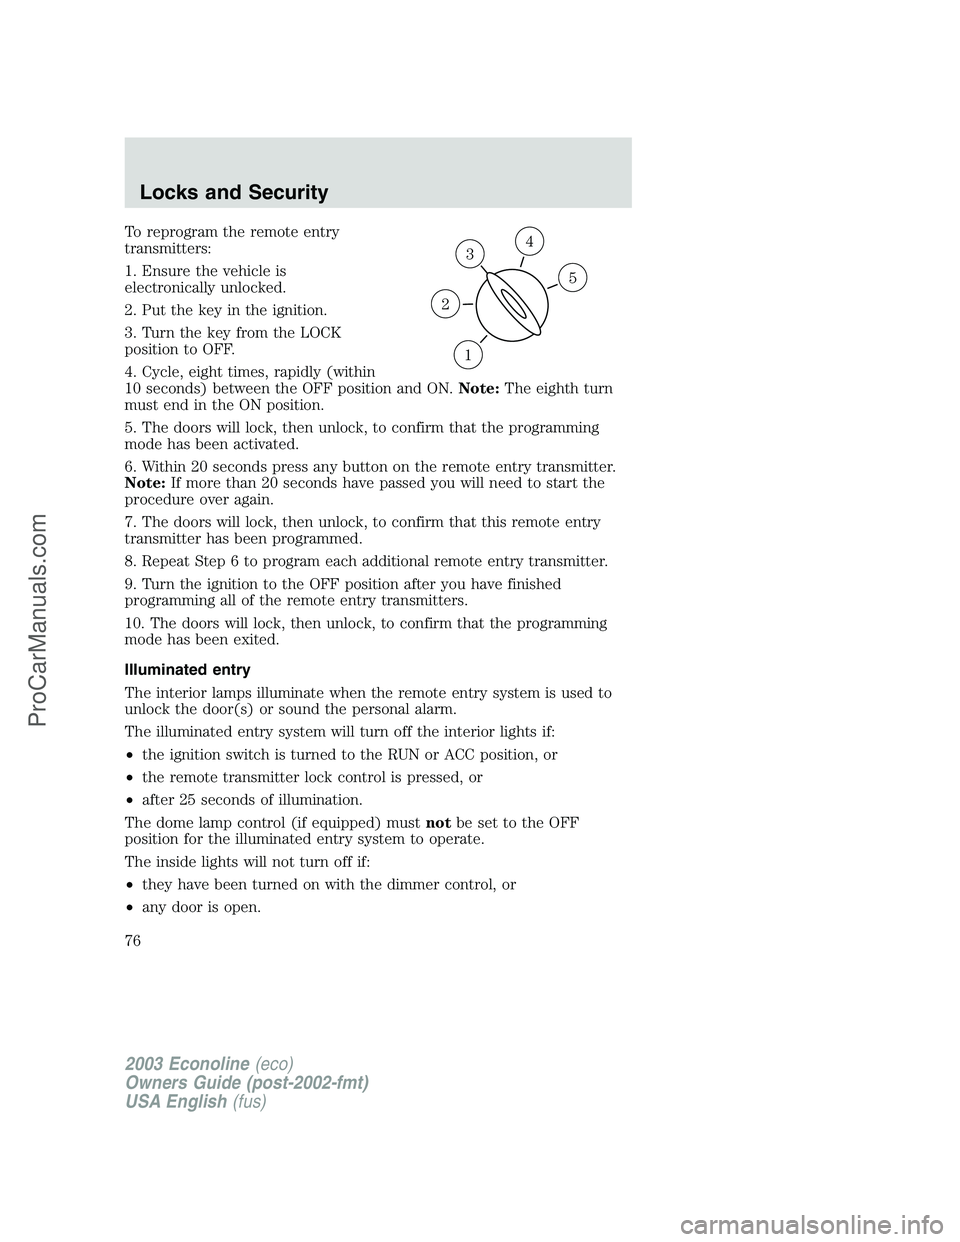
1. Remove the two screws from the
high-mount brakelamp assembly and
lift the lamp from the vehicle.
2. Remove the bulb socket from the
lamp assembly by turning
counterclockwise.
3. Carefully pull the bulb straight
out of the socket.
To install the new bulb, follow the removal procedure in reverse order.
2003 Econoline(eco)
Owners Guide (post-2002-fmt)
USA English(fus)
Lights
60
ProCarManuals.com
Page 61 of 232
Replacing license plate lamp bulbs
1. Turn the headlamp switch to OFF
and then remove the two screws
and the license plate lamp assembly
from the rear door.
2. Remove bulb socket from lamp
assembly by turning
counterclockwise.
3. Pull the bulb out from socket and
push in the new bulb.
To install the new bulb, follow the removal procedures in reverse order.
Replacing tail lamp/turn/backup lamp bulbs
1. Turn the headlamp switch to the
OFF position and then remove the
four screws and the lamp assembly
from vehicle.
2. Rotate bulb socket
counterclockwise and remove from
lamp assembly.
3. Carefully pull the bulb straight
out of the socket and push in the
new bulb.
To install the lamp, follow the removal procedures in reverse order.
2003 Econoline(eco)
Owners Guide (post-2002-fmt)
USA English(fus)
Lights
61
ProCarManuals.com
Page 62 of 232
Replacing brake/tail/backup lamp bulbs — Chassis or cutaway cab
1. Make sure the headlamp switch is
in the OFF position.
2. Remove the four screws and the
lamp from the lamp assembly.
3. Carefully pull the bulb straight
out of the socket and push in the
new bulb.
2003 Econoline(eco)
Owners Guide (post-2002-fmt)
USA English(fus)
Lights
62
ProCarManuals.com
Page 76 of 232

To reprogram the remote entry
transmitters:
1. Ensure the vehicle is
electronically unlocked.
2. Put the key in the ignition.
3. Turn the key from the LOCK
position to OFF.
4. Cycle, eight times, rapidly (within
10 seconds) between the OFF position and ON.Note:The eighth turn
must end in the ON position.
5. The doors will lock, then unlock, to confirm that the programming
mode has been activated.
6. Within 20 seconds press any button on the remote entry transmitter.
Note:If more than 20 seconds have passed you will need to start the
procedure over again.
7. The doors will lock, then unlock, to confirm that this remote entry
transmitter has been programmed.
8. Repeat Step 6 to program each additional remote entry transmitter.
9. Turn the ignition to the OFF position after you have finished
programming all of the remote entry transmitters.
10. The doors will lock, then unlock, to confirm that the programming
mode has been exited.
Illuminated entry
The interior lamps illuminate when the remote entry system is used to
unlock the door(s) or sound the personal alarm.
The illuminated entry system will turn off the interior lights if:
•the ignition switch is turned to the RUN or ACC position, or
•the remote transmitter lock control is pressed, or
•after 25 seconds of illumination.
The dome lamp control (if equipped) mustnotbe set to the OFF
position for the illuminated entry system to operate.
The inside lights will not turn off if:
•they have been turned on with the dimmer control, or
•any door is open.
3
1
2
5
4
2003 Econoline(eco)
Owners Guide (post-2002-fmt)
USA English(fus)
Locks and Security
76
ProCarManuals.com
Page 113 of 232

STARTING
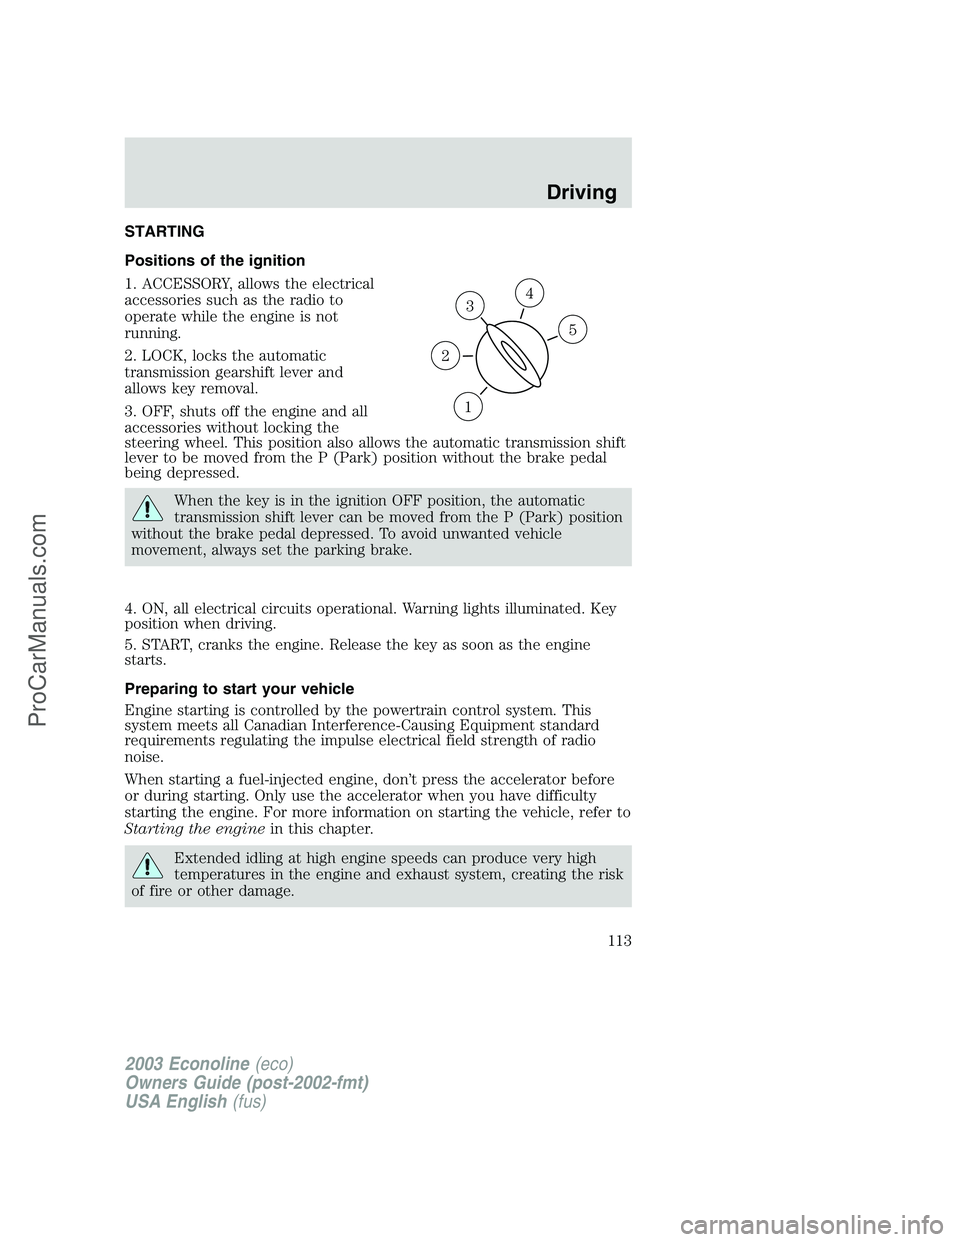
Positions of the ignition
1. ACCESSORY, allows the electrical
accessories such as the radio to
operate while the engine is not
running.
2. LOCK, locks the automatic
transmission gearshift lever and
allows key removal.
3. OFF, shuts off the engine and all
accessories without locking the
steering wheel. This position also allows the automatic transmission shift
lever to be moved from the P (Park) position without the brake pedal
being depressed.
When the key is in the ignition OFF position, the automatic
transmission shift lever can be moved from the P (Park) position
without the brake pedal depressed. To avoid unwanted vehicle
movement, always set the parking brake.
4. ON, all electrical circuits operational. Warning lights illuminated. Key
position when driving.
5. START, cranks the engine. Release the key as soon as the engine
starts.
Preparing to start your vehicle
Engine starting is controlled by the powertrain control system. This
system meets all Canadian Interference-Causing Equipment standard
requirements regulating the impulse electrical field strength of radio
noise.
When starting a fuel-injected engine, don’t press the accelerator before
or during starting. Only use the accelerator when you have difficulty
starting the engine. For more information on starting the vehicle, refer to
Starting the enginein this chapter.
Extended idling at high engine speeds can produce very high
temperatures in the engine and exhaust system, creating the risk
of fire or other damage.
3
1
2
5
4
2003 Econoline(eco)
Owners Guide (post-2002-fmt)
USA English(fus)
Driving
Driving
113
ProCarManuals.com
Page 115 of 232
•Make sure the gearshift is in P
(Park).
•Turn the key to 4 (ON) without
turning the key to 5 (START).
Make sure the corresponding lights illuminate or illuminate briefly. If a
light fails to illuminate, have the vehicle serviced.
•If the driver’s safety belt is fastened, the
light may not illuminate.
Starting the engine
1. Turn the key to 4 (ON) without
turning the key to 5 (START).
2. Turn the key to 5 (START), then
release the key as soon as the
engine starts. Excessive cranking
could damage the starter.
1
2
34
5
3
2
1
5
4
2003 Econoline(eco)
Owners Guide (post-2002-fmt)
USA English(fus)
Driving
115
ProCarManuals.com