2003 CHRYSLER VOYAGER open hood
[x] Cancel search: open hoodPage 1839 of 2177
(4) Remove A-pillar trim panels.
(5) Place protective covers over instrument panel
and hood.
(6) Remove windshield molding. Using pliers, pull
outward on molding at the bottom of A-pillars.
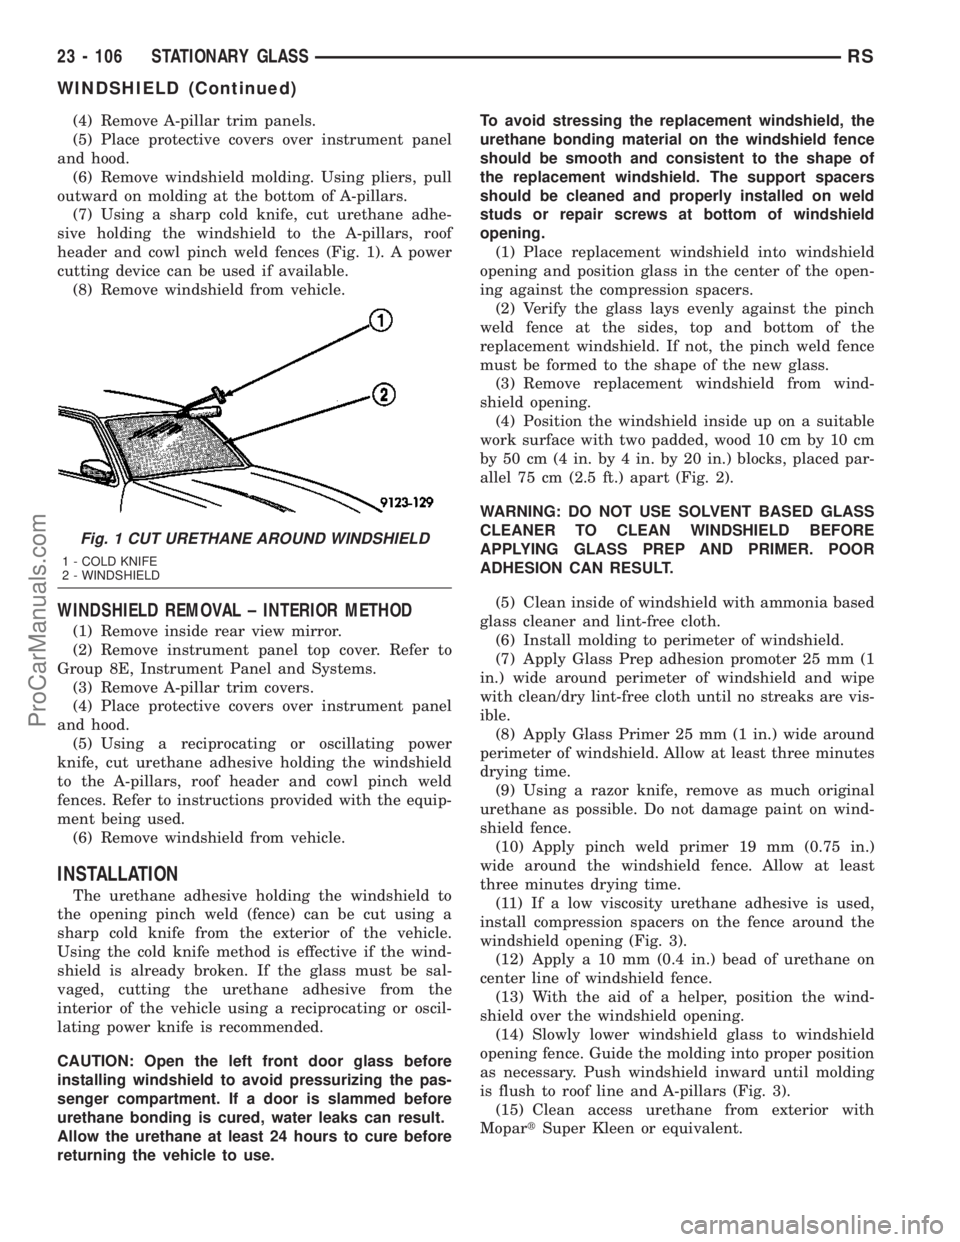
(7) Using a sharp cold knife, cut urethane adhe-
sive holding the windshield to the A-pillars, roof
header and cowl pinch weld fences (Fig. 1). A power
cutting device can be used if available.
(8) Remove windshield from vehicle.
WINDSHIELD REMOVAL ± INTERIOR METHOD
(1) Remove inside rear view mirror.
(2) Remove instrument panel top cover. Refer to
Group 8E, Instrument Panel and Systems.
(3) Remove A-pillar trim covers.
(4) Place protective covers over instrument panel
and hood.
(5) Using a reciprocating or oscillating power
knife, cut urethane adhesive holding the windshield
to the A-pillars, roof header and cowl pinch weld
fences. Refer to instructions provided with the equip-
ment being used.
(6) Remove windshield from vehicle.
INSTALLATION
The urethane adhesive holding the windshield to
the opening pinch weld (fence) can be cut using a
sharp cold knife from the exterior of the vehicle.
Using the cold knife method is effective if the wind-
shield is already broken. If the glass must be sal-
vaged, cutting the urethane adhesive from the
interior of the vehicle using a reciprocating or oscil-
lating power knife is recommended.
CAUTION: Open the left front door glass before
installing windshield to avoid pressurizing the pas-
senger compartment. If a door is slammed before
urethane bonding is cured, water leaks can result.
Allow the urethane at least 24 hours to cure before
returning the vehicle to use.To avoid stressing the replacement windshield, the
urethane bonding material on the windshield fence
should be smooth and consistent to the shape of
the replacement windshield. The support spacers
should be cleaned and properly installed on weld
studs or repair screws at bottom of windshield
opening.
(1) Place replacement windshield into windshield
opening and position glass in the center of the open-
ing against the compression spacers.
(2) Verify the glass lays evenly against the pinch
weld fence at the sides, top and bottom of the
replacement windshield. If not, the pinch weld fence
must be formed to the shape of the new glass.
(3) Remove replacement windshield from wind-
shield opening.
(4) Position the windshield inside up on a suitable
work surface with two padded, wood 10 cm by 10 cm
by 50 cm (4 in. by 4 in. by 20 in.) blocks, placed par-
allel 75 cm (2.5 ft.) apart (Fig. 2).
WARNING: DO NOT USE SOLVENT BASED GLASS
CLEANER TO CLEAN WINDSHIELD BEFORE
APPLYING GLASS PREP AND PRIMER. POOR
ADHESION CAN RESULT.
(5) Clean inside of windshield with ammonia based
glass cleaner and lint-free cloth.
(6) Install molding to perimeter of windshield.
(7) Apply Glass Prep adhesion promoter 25 mm (1
in.) wide around perimeter of windshield and wipe
with clean/dry lint-free cloth until no streaks are vis-
ible.
(8) Apply Glass Primer 25 mm (1 in.) wide around
perimeter of windshield. Allow at least three minutes
drying time.
(9) Using a razor knife, remove as much original
urethane as possible. Do not damage paint on wind-
shield fence.
(10) Apply pinch weld primer 19 mm (0.75 in.)
wide around the windshield fence. Allow at least
three minutes drying time.
(11) If a low viscosity urethane adhesive is used,
install compression spacers on the fence around the
windshield opening (Fig. 3).
(12) Apply a 10 mm (0.4 in.) bead of urethane on
center line of windshield fence.
(13) With the aid of a helper, position the wind-
shield over the windshield opening.
(14) Slowly lower windshield glass to windshield
opening fence. Guide the molding into proper position
as necessary. Push windshield inward until molding
is flush to roof line and A-pillars (Fig. 3).
(15) Clean access urethane from exterior with
MopartSuper Kleen or equivalent.
Fig. 1 CUT URETHANE AROUND WINDSHIELD
1 - COLD KNIFE
2 - WINDSHIELD
23 - 106 STATIONARY GLASSRS
WINDSHIELD (Continued)
ProCarManuals.com
Page 1861 of 2177
DESCRIPTION FIGURE
ROOF TOP JOINT & WINDSHIELD OPENING - LEFT AND RIGHT SIDES 41
LIFT GATE ROOF COACH JOINT - LEFT AND RIGHT SIDES 42
ROOF RAP JOINT - LEFT AND RIGHT SIDES 43
DRAIN HOLE PATCHES 44
WHEELHOUSE VENT HOLE - LEFT SIDE SHOWN - RIGHT SIDE TYPICAL 45
FLOOR PAN HOLES - LEFT AND RIDE SIDES 46
HOOD FRONT HEM FLANGE & SIDES 47
FRONT DOOR LOWER FLANGE 48
LIFTGATE HEM FLANGE AND LATCH COVER SEAMS 49
FRONT DOOR BELT DOOR BELT SEAMS (FRONT) 50
FRONT DOOR BELT DOOR BELT SEAMS (REAR) 51
23 - 128 BODY STRUCTURERS
SEALER LOCATIONS (Continued)
ProCarManuals.com
Page 2063 of 2177
(16) Reconnect the battery negative cable.
(17) Evacuate the refrigerant system. (Refer to 24
- HEATING & AIR CONDITIONING/PLUMBING -
FRONT/REFRIGERANT - STANDARD PROCE-
DURE - REFRIGERANT SYSTEM EVACUATE).
(18) Charge the refrigerant system. (Refer to 24 -
HEATING & AIR CONDITIONING/PLUMBING -
FRONT/REFRIGERANT - STANDARD PROCE-
DURE - REFRIGERANT SYSTEM CHARGE).
INSTALLATION - COMPRESSOR MOUNTING
BRACKET - 2.4L ENGINE
(1) Position the compressor mounting bracket onto
the engine.
(2) Install and tighten the four screws that secure
the compressor mounting bracket to the engine.
Tighten the screws to 54 N´m (40 ft. lbs.).
(3) Reinstall the compressor onto the mounting
bracket. (Refer to 24 - HEATING & AIR CONDI-
TIONING/PLUMBING/COMPRESSOR - INSTALLA-
TION).
CONDENSER
DESCRIPTION
The condenser is integral to a cooling module
which includes the radiator, the electric cooling fan,
the fan shroud, air seals and an automatic transmis-
sion oil cooler. The cooling module is located in the
air flow in the front of the engine compartment
behind the radiator grille. The condenser cannot be
repaired or adjusted and, if faulty or damaged, it
must be replaced. The condenser may be removed
from the cooling module for service without removing
the cooling module from the vehicle.
OPERATION
The condenser is a heat exchanger that allows the
high-pressure refrigerant gas being discharged by the
compressor to give up its heat to the air passing over
the condenser fins. When the refrigerant gas gives up
its heat, it condenses. When the refrigerant leaves
the condenser, it has become a high-pressure liquid
refrigerant. The volume of air flowing over the con-
denser fins is critical to the proper cooling perfor-
mance of the air conditioning system. Therefore, it is
important that there are no objects placed in front of
the radiator grille openings in the front of the vehicle
or foreign material on the condenser fins that might
obstruct air flow. Also, any factory-installed air seals
or shrouds must be properly reinstalled following
radiator or condenser service.
REMOVAL
WARNING: REFER TO THE APPLICABLE WARN-
INGS AND CAUTIONS FOR THIS SYSTEM BEFORE
PERFORMING THE FOLLOWING OPERATION.
(Refer to 24 - HEATING & AIR CONDITIONING/
PLUMBING - FRONT - WARNING - A/C PLUMBING)
and (Refer to 24 - HEATING & AIR CONDITIONING/
PLUMBING - FRONT - CAUTION - A/C PLUMBING).
NOTE: Before removing the condenser, note the
location of each of the radiator and condenser air
seals. These air seals are used to direct air through
the condenser and radiator. The air seals must be
reinstalled in their proper locations in order for the
air conditioning and engine cooling systems to per-
form as designed.
(1) Recover the refrigerant from the refrigerant
system. (Refer to 24 - HEATING & AIR CONDI-
TIONING/PLUMBING - FRONT/REFRIGERANT -
STANDARD PROCEDURE - REFRIGERANT
RECOVERY).
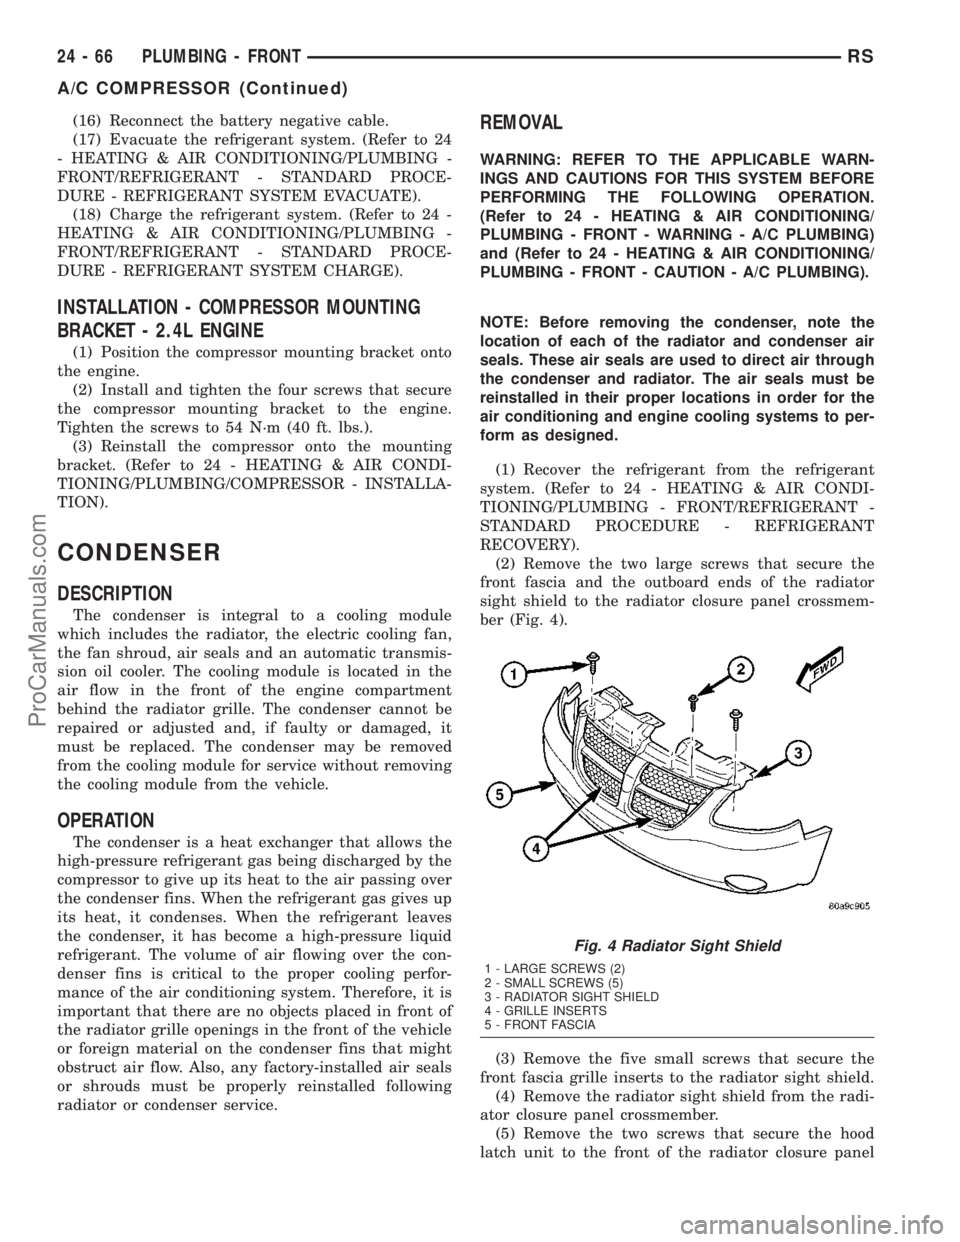
(2) Remove the two large screws that secure the
front fascia and the outboard ends of the radiator
sight shield to the radiator closure panel crossmem-
ber (Fig. 4).
(3) Remove the five small screws that secure the
front fascia grille inserts to the radiator sight shield.
(4) Remove the radiator sight shield from the radi-
ator closure panel crossmember.
(5) Remove the two screws that secure the hood
latch unit to the front of the radiator closure panel
Fig. 4 Radiator Sight Shield
1 - LARGE SCREWS (2)
2 - SMALL SCREWS (5)
3 - RADIATOR SIGHT SHIELD
4 - GRILLE INSERTS
5 - FRONT FASCIA
24 - 66 PLUMBING - FRONTRS
A/C COMPRESSOR (Continued)
ProCarManuals.com
Page 2065 of 2177
(7) Remove the tape or plugs from the condenser
outlet port and the liquid line fitting.
(8) Lubricate a new rubber O-ring seal with clean
refrigerant oil and install it on the liquid line fitting.
(9) Install a new dual plan seal and reconnect the
liquid line fitting to the condenser outlet port on the
right side of the cooling module.
(10) Install and tighten the nut that secures the
liquid line fitting to the condenser. Tighten the nut to
23 N´m (17 ft. lbs.).
(11) Remove the tape or plugs from the condenser
inlet port and the discharge line fitting.
(12) Lubricate a new rubber O-ring seal with clean
refrigerant oil and install it on the discharge line fit-
ting.
(13) Install a new dual plan seal and reconnect the
discharge line fitting to the condenser inlet port on
the right side of the cooling module.
(14) Install and tighten the nut that secures the
discharge line fitting to the condenser. Tighten the
nut to 23 N´m (17 ft. lbs.).
(15) Reconnect the hoses to the transmission oil
cooler fittings on the left side of the cooling module.
(Refer to 7 - COOLING/TRANSMISSION/TRANS
COOLER LINES - INSTALLATION).
(16) Reposition the hood latch unit to the front of
the radiator closure panel crossmember.
(17) Install and tighten the two screws that secure
the hood latch unit to the front of the radiator clo-
sure panel crossmember. Check and adjust the hood
latch as needed. Tighten the screws to 14 N´m (123
in. lbs.).
(18) Position the radiator sight shield onto the
radiator closure panel crossmember.
(19) Install and tighten the five small screws that
secure the front fascia grille inserts to the radiator
sight shield. Tighten the screws to 2 N´m (18 in. lbs.).
(20) Install and tighten the two large screws that
secure the front fascia and the outboard ends of the
radiator sight shield to the radiator closure panel
crossmember. Tighten the screws to 6 N´m (53 in.
lbs.).
(21) Evacuate the refrigerant system. (Refer to 24
- HEATING & AIR CONDITIONING/PLUMBING -
FRONT/REFRIGERANT - STANDARD PROCE-
DURE - REFRIGERANT SYSTEM EVACUATE).
(22) Charge the refrigerant system. (Refer to 24 -
HEATING & AIR CONDITIONING/PLUMBING -
FRONT/REFRIGERANT - STANDARD PROCE-
DURE - REFRIGERANT SYSTEM CHARGE).DISCHARGE LINE
REMOVAL
WARNING: REFER TO THE APPLICABLE WARN-
INGS AND CAUTIONS FOR THIS SYSTEM BEFORE
PERFORMING THE FOLLOWING OPERATION.
(Refer to 24 - HEATING & AIR CONDITIONING/
PLUMBING - FRONT - WARNING - A/C PLUMBING)
and (Refer to 24 - HEATING & AIR CONDITIONING/
PLUMBING - FRONT - CAUTION - A/C PLUMBING).
(1) Recover the refrigerant from the refrigerant
system. (Refer to 24 - HEATING & AIR CONDI-
TIONING/PLUMBING - FRONT/REFRIGERANT -
STANDARD PROCEDURE - REFRIGERANT
RECOVERY).
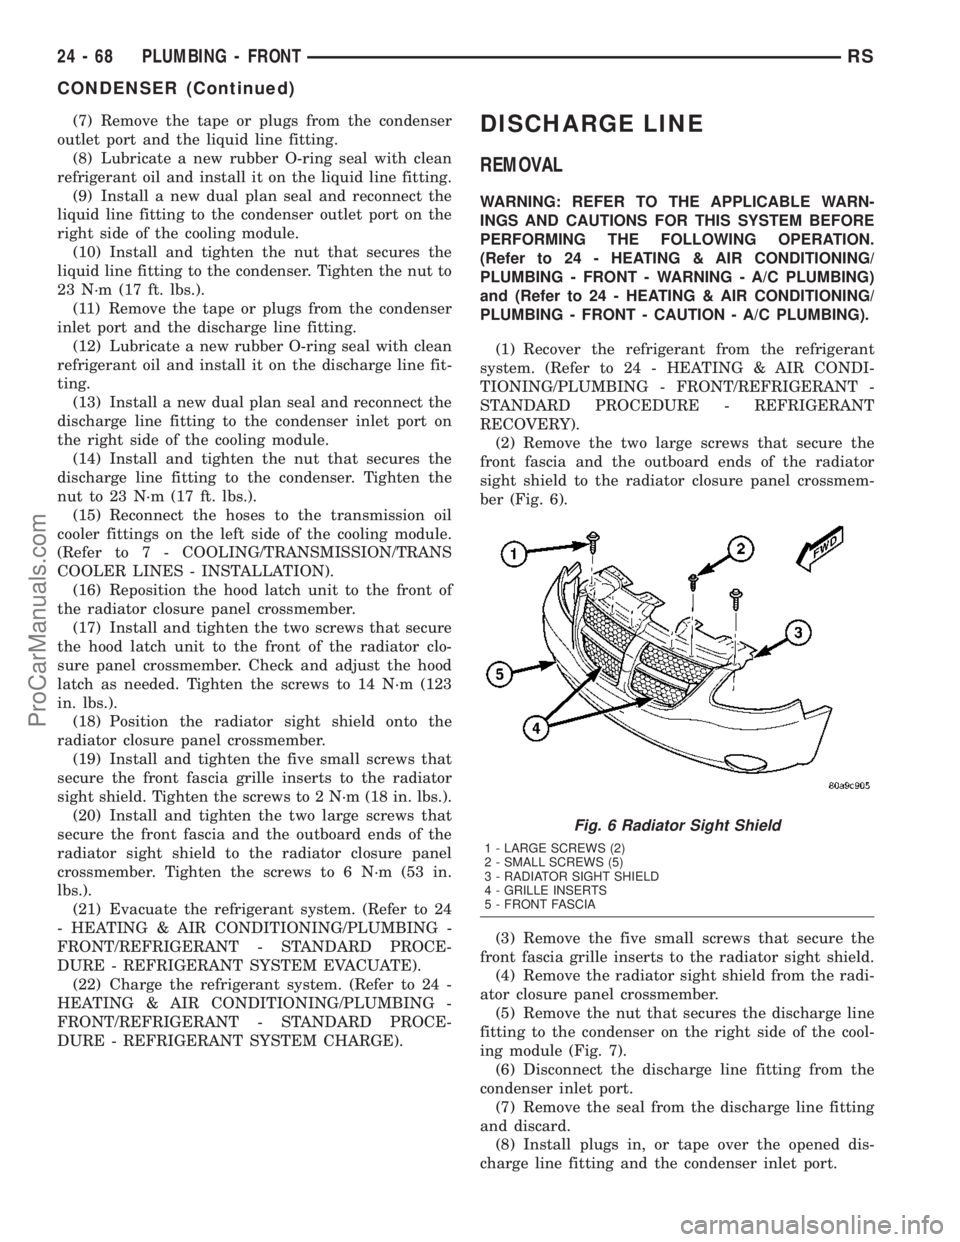
(2) Remove the two large screws that secure the
front fascia and the outboard ends of the radiator
sight shield to the radiator closure panel crossmem-
ber (Fig. 6).
(3) Remove the five small screws that secure the
front fascia grille inserts to the radiator sight shield.
(4) Remove the radiator sight shield from the radi-
ator closure panel crossmember.
(5) Remove the nut that secures the discharge line
fitting to the condenser on the right side of the cool-
ing module (Fig. 7).
(6) Disconnect the discharge line fitting from the
condenser inlet port.
(7) Remove the seal from the discharge line fitting
and discard.
(8) Install plugs in, or tape over the opened dis-
charge line fitting and the condenser inlet port.
Fig. 6 Radiator Sight Shield
1 - LARGE SCREWS (2)
2 - SMALL SCREWS (5)
3 - RADIATOR SIGHT SHIELD
4 - GRILLE INSERTS
5 - FRONT FASCIA
24 - 68 PLUMBING - FRONTRS
CONDENSER (Continued)
ProCarManuals.com
Page 2085 of 2177
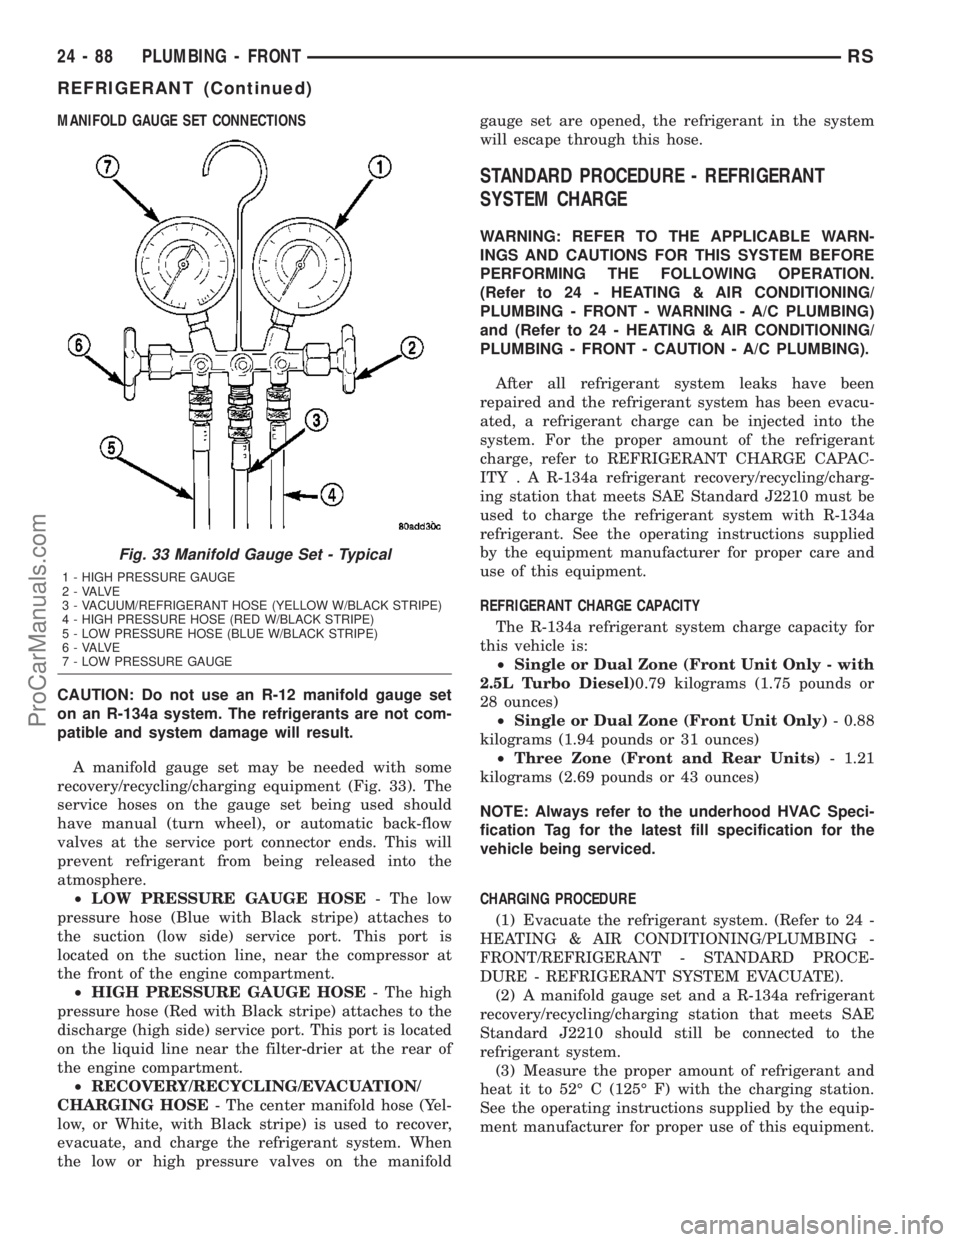
MANIFOLD GAUGE SET CONNECTIONS
CAUTION: Do not use an R-12 manifold gauge set
on an R-134a system. The refrigerants are not com-
patible and system damage will result.
A manifold gauge set may be needed with some
recovery/recycling/charging equipment (Fig. 33). The
service hoses on the gauge set being used should
have manual (turn wheel), or automatic back-flow
valves at the service port connector ends. This will
prevent refrigerant from being released into the
atmosphere.
²LOW PRESSURE GAUGE HOSE- The low
pressure hose (Blue with Black stripe) attaches to
the suction (low side) service port. This port is
located on the suction line, near the compressor at
the front of the engine compartment.
²HIGH PRESSURE GAUGE HOSE- The high
pressure hose (Red with Black stripe) attaches to the
discharge (high side) service port. This port is located
on the liquid line near the filter-drier at the rear of
the engine compartment.
²RECOVERY/RECYCLING/EVACUATION/
CHARGING HOSE- The center manifold hose (Yel-
low, or White, with Black stripe) is used to recover,
evacuate, and charge the refrigerant system. When
the low or high pressure valves on the manifoldgauge set are opened, the refrigerant in the system
will escape through this hose.
STANDARD PROCEDURE - REFRIGERANT
SYSTEM CHARGE
WARNING: REFER TO THE APPLICABLE WARN-
INGS AND CAUTIONS FOR THIS SYSTEM BEFORE
PERFORMING THE FOLLOWING OPERATION.
(Refer to 24 - HEATING & AIR CONDITIONING/
PLUMBING - FRONT - WARNING - A/C PLUMBING)
and (Refer to 24 - HEATING & AIR CONDITIONING/
PLUMBING - FRONT - CAUTION - A/C PLUMBING).
After all refrigerant system leaks have been
repaired and the refrigerant system has been evacu-
ated, a refrigerant charge can be injected into the
system. For the proper amount of the refrigerant
charge, refer to REFRIGERANT CHARGE CAPAC-
ITY . A R-134a refrigerant recovery/recycling/charg-
ing station that meets SAE Standard J2210 must be
used to charge the refrigerant system with R-134a
refrigerant. See the operating instructions supplied
by the equipment manufacturer for proper care and
use of this equipment.
REFRIGERANT CHARGE CAPACITY
The R-134a refrigerant system charge capacity for
this vehicle is:
²Single or Dual Zone (Front Unit Only - with
2.5L Turbo Diesel)0.79 kilograms (1.75 pounds or
28 ounces)
²Single or Dual Zone (Front Unit Only)- 0.88
kilograms (1.94 pounds or 31 ounces)
²Three Zone (Front and Rear Units)- 1.21
kilograms (2.69 pounds or 43 ounces)
NOTE: Always refer to the underhood HVAC Speci-
fication Tag for the latest fill specification for the
vehicle being serviced.
CHARGING PROCEDURE
(1) Evacuate the refrigerant system. (Refer to 24 -
HEATING & AIR CONDITIONING/PLUMBING -
FRONT/REFRIGERANT - STANDARD PROCE-
DURE - REFRIGERANT SYSTEM EVACUATE).
(2) A manifold gauge set and a R-134a refrigerant
recovery/recycling/charging station that meets SAE
Standard J2210 should still be connected to the
refrigerant system.
(3) Measure the proper amount of refrigerant and
heat it to 52É C (125É F) with the charging station.
See the operating instructions supplied by the equip-
ment manufacturer for proper use of this equipment.
Fig. 33 Manifold Gauge Set - Typical
1 - HIGH PRESSURE GAUGE
2 - VALVE
3 - VACUUM/REFRIGERANT HOSE (YELLOW W/BLACK STRIPE)
4 - HIGH PRESSURE HOSE (RED W/BLACK STRIPE)
5 - LOW PRESSURE HOSE (BLUE W/BLACK STRIPE)
6 - VALVE
7 - LOW PRESSURE GAUGE
24 - 88 PLUMBING - FRONTRS
REFRIGERANT (Continued)
ProCarManuals.com
Page 2155 of 2177
HINGE - INSTALLATION, LOWER........23-28
HINGE - INSTALLATION, UPPER.........23-35
HINGE - REMOVAL.........23-18,23-39,23-59
HINGE - REMOVAL, BENCH SEAT BACK . . 23-100
HINGE - REMOVAL, CENTER............23-24
HINGE - REMOVAL, LOWER............23-28
HINGE - REMOVAL, UPPER.............23-35
HINGE COVERS - QUAD BUCKET, 50/50
SPLIT, BENCH - INSTALLATION, SEAT
BACK.............................23-100
HINGE COVERS - QUAD BUCKET, 50/50
SPLIT, BENCH - REMOVAL, SEAT BACK . . 23-100
HOISTING - STANDARD PROCEDURE......0-15
HOLD OPEN LATCH - INSTALLATION.....23-25
HOLD OPEN LATCH - REMOVAL.........23-25
HOLD OPEN LATCH CABLE -
INSTALLATION.......................23-38
HOLD OPEN LATCH CABLE - REMOVAL . . . 23-37
HOLD OPEN LATCH STRIKER -
INSTALLATION.......................23-26
HOLD OPEN LATCH STRIKER -
REMOVAL..........................23-26
HOLDDOWN - DESCRIPTION, BATTERY . . . 8F-15
HOLDDOWN - INSTALLATION, BATTERY . . . 8F-16
HOLDDOWN - OPERATION, BATTERY.....8F-15
HOLDDOWN - REMOVAL, BATTERY......8F-16
HOLDER - INSTALLATION, CUP.........23-63
HOLDER - INSTALLATION, QUAD
BUCKET SEAT SIDE SHIELD - NO CUP.....23-96
HOLDER - INSTALLATION, QUAD
BUCKET SEAT SIDE SHIELD/CUP........23-95
HOLDER - REMOVAL, CUP.............23-63
HOLDER - REMOVAL, QUAD BUCKET
SEAT SIDE SHIELD - NO CUP...........23-96
HOLDER - REMOVAL, QUAD BUCKET
SEAT SIDE SHIELD/CUP...............23-95
HOLDING CLUTCHES - DESCRIPTION....21-207
HOLDING CLUTCHES - OPERATION.....21-207
HOLE REPAIR - DESCRIPTION,
THREADED........................Intro.-5
HONING - STANDARD PROCEDURE,
CYLINDER BORE.................9-112,9-35
HOOD - INSTALLATION................23-60
HOOD - REMOVAL....................23-59
HOOD AJAR SWITCH - EXPORT -
INSTALLATION.......................8Q-3
HOOD AJAR SWITCH - EXPORT -
REMOVAL...........................8Q-3
HORN - DIAGNOSIS AND TESTING.......8H-3
HORN - INSTALLATION.................8H-5
HORN - REMOVAL....................8H-5
HORN CHIRP PREFERENCE - STANDARD
PROCEDURE........................8N-42
HORN RELAY - DIAGNOSIS AND
TESTING............................8H-5
HORN RELAY - INSTALLATION...........8H-5
HORN RELAY - REMOVAL..............8H-5
HORN SWITCH - DESCRIPTION..........8H-5
HORN SYSTEM - DESCRIPTION..........8H-1
HORN SYSTEM - DIAGNOSIS AND
TESTING............................8H-1
HORN SYSTEM - OPERATION............8H-1
HOSE - EXPORT - INSTALLATION,
HEADLAMP WASHER.................8R-12
HOSE - EXPORT - REMOVAL, HEADLAMP
WASHER...........................8R-12
HOSE - INSTALLATION, HEATER . . . 24-101,24-80
HOSE - REMOVAL, HEATER......24-100,24-78
HOSE CLAMPS - DESCRIPTION...........7-1
HOSE CLAMPS - OPERATION.............7-2
HOSES - DESCRIPTION, BRAKE TUBES
....5-14
HOSES - INSPECTION, BRAKE TUBES
.....5-14
HOSES - INSTALLATION, WASHER
.......8R-16
HOSES - OPERATION, BRAKE TUBES
......5-14
HOSES - REMOVAL, WASHER
..........8R-16
HOSES AND CLAMP - STANDARD
PROCEDURE
.........................14-6
HOUSING - INSTALLATION, AIR
CLEANER
........................9-24,9-99
HOUSING - INSTALLATION, HVAC
........24-50
HOUSING - INSTALLATION, LOCK
CYLINDER
..........................19-19
HOUSING - INSTALLATION, REAR
HEATER-A/C
.........................24-58
HOUSING - REMOVAL, AIR CLEANER
. . 9-24,9-99
HOUSING - REMOVAL, HVAC
...........24-49
HOUSING - REMOVAL, LOCK CYLINDER
. . 19-17HOUSING - REMOVAL, REAR HEATER-A/
C .................................24-56
HOUSING FLUID CHANGE - STANDARD
PROCEDURE, OVERRUNNING CLUTCH.....3-41
HOUSING FLUID LEAKAGE - DIAGNOSIS
AND TESTING, TORQUE CONVERTER....21-123
HOW TO USE WIRING DIAGRAMS -
DESCRIPTION.....................8W-01-1
HUB / BEARING - DESCRIPTION.......2-30,2-5
HUB / BEARING - INSTALLATION......2-32,2-5
HUB / BEARING - OPERATION........2-30,2-5
HUB / BEARING - REMOVAL..........2-31,2-5
HUB AND BEARING - DIAGNOSIS AND
TESTING.........................2-30,2-5
HVAC - LWB - INSTALLATION, SEAT
BELT & RETRACTOR - SECOND ROW -
RIGHT OUTBOARD WITH REAR.........8O-15
HVAC - LWB - REMOVAL, SEAT BELT &
RETRACTOR - SECOND ROW - RIGHT
OUTBOARD WITH REAR...............8O-15
HVAC HOUSING - INSTALLATION........24-50
HVAC HOUSING - REMOVAL............24-49
HVAC LOUVER - INSTALLATION, REAR . . . 23-79
HVAC LOUVER - REMOVAL, REAR.......23-79
HYDRAULIC CIRCUITS AND VALVES -
OPERATION..........................5-83
HYDRAULIC LASH ADJUSTER NOISE
DIAGNOSIS - DIAGNOSIS AND
TESTING............................9-34
HYDRAULIC LASH ADJUSTERS -
INSTALLATION........................9-34
HYDRAULIC LASH ADJUSTERS -
REMOVAL...........................9-34
HYDRAULIC LIFTERS - DIAGNOSIS AND
TESTING...........................9-113
HYDRAULIC LIFTERS (CAM IN BLOCK) -
DESCRIPTION.......................9-113
HYDRAULIC LIFTERS (CAM IN BLOCK) -
INSTALLATION.......................9-114
HYDRAULIC LIFTERS (CAM IN BLOCK) -
REMOVAL..........................9-114
HYDRAULIC PRESSURE TESTS -
DIAGNOSIS AND TESTING............21-120
HYDRAULIC SCHEMATICS, SCHEMATICS
AND DIAGRAMS - 41TE TRANSAXLE....21-169
HYDROSTATIC LOCKED ENGINE -
STANDARD PROCEDURE............9-10,9-85
ICU - ASSEMBLY......................5-94
ICU - DISASSEMBLY...................5-93
ICU (INTEGRATED CONTROL UNIT) -
DESCRIPTION........................5-89
ICU (INTEGRATED CONTROL UNIT) -
OPERATION..........................5-90
IDENTIFICATION - DESCRIPTION,
FASTENER.........................Intro.-2
IDENTIFICATION - DESCRIPTION,
VEHICLE............................23-1
IDENTIFICATION AND INFORMATION -
DESCRIPTION, SECTION.............8W-01-6
IDENTIFICATION, DIAGNOSIS AND
TESTING - SEAL......................21-3
IDENTIFICATION NUMBER -
DESCRIPTION, VEHICLE..............Intro.-9
IDLE AIR CONTROL MOTOR -
DESCRIPTION.......................14-28
IDLE AIR CONTROL MOTOR -
INSTALLATION.......................14-29
IDLE AIR CONTROL MOTOR -
OPERATION.........................14-28
IDLE AIR CONTROL MOTOR - REMOVAL
. . 14-29
IGNITION COIL - DESCRIPTION
...........8I-6
IGNITION COIL - OPERATION
.............8I-6
IGNITION INTERLOCK - DESCRIPTION
....19-17
IGNITION SENSE - PCM INPUT -
OPERATION
.........................8E-15
IGNITION SWITCH - INSTALLATION
......19-16
IGNITION SWITCH - REMOVAL
..........19-14
IGNITION SYSTEM - DESCRIPTION
........8I-1
IGNITION SYSTEM - OPERATION
..........8I-1
IGNITION-OFF DRAW TEST - STANDARD
PROCEDURE
........................8F-13
IIITSTATE DISPLAY TEST MODE,
OPERATION - DRB
....................25-9
ILLUMINATION LAMPS - INSTALLATION,
CLUSTER
...........................8L-26
ILLUMINATION LAMPS - REMOVAL,
CLUSTER
...........................8L-26IMMOBILIZER MODULE - DESCRIPTION,
SENTRY KEY........................8E-18
IMMOBILIZER MODULE - INSTALLATION,
SENTRY KEY........................8E-19
IMMOBILIZER MODULE - OPERATION,
SENTRY KEY........................8E-18
IMMOBILIZER MODULE - REMOVAL,
SENTRY KEY........................8E-18
IMMOBILIZER SYSTEM - DIAGNOSIS
AND TESTING, SENTRY KEY.............8Q-3
IMPACT AIRBAG CONTROL MODULE -
DESCRIPTION, SIDE..................8O-17
IMPACT AIRBAG CONTROL MODULE -
INSTALLATION, SIDE.................8O-17
IMPACT AIRBAG CONTROL MODULE -
OPERATION, SIDE....................8O-17
IMPACT AIRBAG CONTROL MODULE -
REMOVAL, SIDE.....................8O-17
INBOARD - 50/50 BENCH -
INSTALLATION, SEAT BELT BUCKLE -
SECOND ROW.......................8O-12
INBOARD - 50/50 BENCH - REMOVAL,
SEAT BELT BUCKLE - SECOND ROW.....8O-12
INBOARD - INSTALLATION, SEAT BELT
BUCKLE - FRONT....................8O-11
INBOARD - QUAD BUCKET -
INSTALLATION, SEAT BELT BUCKLE -
FIRST ROW.........................8O-11
INBOARD - QUAD BUCKET - REMOVAL,
SEAT BELT BUCKLE - FIRST ROW.......8O-11
INBOARD - REMOVAL, SEAT BELT
BUCKLE - FRONT....................8O-11
INDICATOR LAMP - DESCRIPTION,
VTSS/SKIS..........................8Q-5
INDICATOR LAMP - OPERATION,
VTSS/SKIS..........................8Q-5
INDICATORS - DIAGNOSIS AND
TESTING, TREAD WEAR...............22-16
INFLATION PRESSURES - STANDARD
PROCEDURE, TIRE...................22-16
INFO CENTER - DESCRIPTION,
ELECTRONIC VEHICLE.................8M-6
INFO CENTER - INSTALLATION,
ELECTRONIC VEHICLE.................8M-9
INFO CENTER - OPERATION,
ELECTRONIC VEHICLE.................8M-7
INFO CENTER - REMOVAL, ELECTRONIC
VEHICLE............................8M-9
INFRARED TEMPERATURE SENSOR -
DESCRIPTION..................24-23,24-35
INFRARED TEMPERATURE SENSOR -
OPERATION....................24-24,24-35
INITIAL OPERATION - STANDARD
PROCEDURE, POWER STEERING
PUMP.............................19-37
INJECTION SYSTEM - OPERATION.......14-18
INJECTOR - DESCRIPTION, FUEL........14-26
INJECTOR - OPERATION, FUEL..........14-26
INLET AIR TEMPERATURE SENSOR -
DESCRIPTION.......................14-29
INLET AIR TEMPERATURE SENSOR -
OPERATION.........................14-29
INLET FILTER - INSTALLATION..........14-13
INLET FILTER - REMOVAL..............14-13
INLET TUBE - 2.4L - DESCRIPTION,
WATER PUMP........................7-35
INLET TUBE - 2.4L - INSTALLATION,
WATER PUMP........................7-35
INLET TUBE - 2.4L - REMOVAL, WATER
PUMP..............................7-35
INLET TUBE - 3.3/3.8L - INSTALLATION,
WATER PUMP........................7-36
INLET TUBE - 3.3/3.8L - REMOVAL,
WATER PUMP........................7-36
INNER - INSTALLATION, CV BOOT.........3-6
INNER - REMOVAL, CV BOOT.............3-6
INNER BELT MOLDING - INSTALLATION,
FRONT DOOR......................23-112
INNER BELT MOLDING - REMOVAL,
FRONT DOOR......................23-112
INNER SEAL - INSTALLATION, HALF
SHAFT.............................21-12
INNER SEAL - REMOVAL, HALF SHAFT
. . . 21-12
INNER/OUTER - INSTALLATION, CV
BOOT
...............................3-17
INNER/OUTER - REMOVAL, CV BOOT
......3-15
INPUT - DESCRIPTION, SPEED SENSOR
. 21-239
INPUT - INSTALLATION, SPEED SENSOR
. 21-240
16 INDEXRS
Description Group-Page Description Group-Page Description Group-Page
ProCarManuals.com
Page 2171 of 2177
SUSPENSION AND STEERING -
DIAGNOSIS AND TESTING..............2-49
SUSPENSION FASTENER TORQUE,
SPECIFICATIONS - FRONT................2-3
SUSPENSION FASTENER TORQUE,
SPECIFICATIONS - REAR................2-27
SUSPENSION, SPECIAL TOOLS - FRONT....2-3
SUSPENSION, SPECIAL TOOLS - REAR....2-28
SWITCH - DESCRIPTION................8P-6
SWITCH - DESCRIPTION, AUTOSTICK . . . 21-189
SWITCH - DESCRIPTION, BRAKE FLUID
LEVEL..............................5-10
SWITCH - DESCRIPTION, BRAKE LAMP....8L-4
SWITCH - DESCRIPTION, DOOR
CYLINDER LOCK.....................8N-40
SWITCH - DESCRIPTION, DRIVER
HEATED SEAT ........................8G-8
SWITCH - DESCRIPTION, DRIVER SEAT . . . 8N-53
SWITCH - DESCRIPTION, EXTERIOR
HANDLE...........................8N-11
SWITCH - DESCRIPTION, FULL OPEN....8N-12,
8N-31
SWITCH - DESCRIPTION, HORN..........8H-5
SWITCH - DESCRIPTION, LEFT B-PILLAR . 8N-32
SWITCH - DESCRIPTION, MEMORY SET . . 8N-55
SWITCH - DESCRIPTION, MIRROR........8G-5
SWITCH - DESCRIPTION, OIL PRESSURE . 9-141
SWITCH - DESCRIPTION, PASSENGER
HEATED SEAT .......................8G-12
SWITCH - DESCRIPTION, PASSENGER
SEAT ..............................8N-56
SWITCH - DESCRIPTION, REAR
WINDOW DEFOGGER..................8G-2
SWITCH - DESCRIPTION, REAR
WIPER/WASHER.....................8R-15
SWITCH - DESCRIPTION, RIGHT
B-PILLAR..........................8N-32
SWITCH - DIAGNOSIS AND TESTING,
BRAKE LAMP........................8L-5
SWITCH - DIAGNOSIS AND TESTING,
DOOR CYLINDER LOCK...............8N-40
SWITCH - DIAGNOSIS AND TESTING,
DOOR LOCK........................8N-41
SWITCH - DIAGNOSIS AND TESTING,
DRIVER HEATED SEAT.................8G-9
SWITCH - DIAGNOSIS AND TESTING,
DRIVER SEAT.......................8N-54
SWITCH - DIAGNOSIS AND TESTING,
FAILED PARK........................8R-2
SWITCH - DIAGNOSIS AND TESTING,
FRONT WIPER/WASHER................8R-2
SWITCH - DIAGNOSIS AND TESTING,
HEADLAMP.........................8L-15
SWITCH - DIAGNOSIS AND TESTING,
MEMORY...........................8N-56
SWITCH - DIAGNOSIS AND TESTING,
MULTI-FUNCTION....................8L-21
SWITCH - DIAGNOSIS AND TESTING,
PASSENGER HEATED SEAT.............8G-13
SWITCH - DIAGNOSIS AND TESTING,
PASSENGER SEAT....................8N-57
SWITCH - DIAGNOSIS AND TESTING,
REMOTE...........................8N-49
SWITCH - DIAGNOSIS AND TESTING,
TRACTION CONTROL...................5-82
SWITCH - DIAGNOSIS AND TESTING,
WINDOW...........................8N-64
SWITCH - EXPORT - DESCRIPTION,
HEADLAMP LEVELING.................8L-15
SWITCH - EXPORT - DESCRIPTION,
POWER FOLDAWAY MIRROR...........8N-48
SWITCH - EXPORT - DIAGNOSIS AND
TESTING, HEADLAMP.................8L-16
SWITCH - EXPORT - DIAGNOSIS AND
TESTING, HEADLAMP LEVELING........8L-15
SWITCH - EXPORT - INSTALLATION,
HOOD AJAR.........................8Q-3
SWITCH - EXPORT - INSTALLATION,
POWER FOLDAWAY MIRROR...........8N-49
SWITCH - EXPORT - OPERATION,
POWER FOLDAWAY MIRROR
...........8N-48
SWITCH - EXPORT - REMOVAL, HOOD
AJAR
...............................8Q-3
SWITCH - EXPORT - REMOVAL, POWER
FOLDAWAY MIRROR
..................8N-48
SWITCH - INSTALLATION
...............8P-6
SWITCH - INSTALLATION, BACK-UP
LAMP
..............................21-62SWITCH - INSTALLATION, BRAKE FLUID
LEVEL..............................5-11
SWITCH - INSTALLATION, BRAKE LAMP . . . 8L-5
SWITCH - INSTALLATION, CENTER
CONSOLE LAMP.....................8L-26
SWITCH - INSTALLATION, CLUTCH
PEDAL INTERLOCK....................6-14
SWITCH - INSTALLATION, CLUTCH
PEDAL UPSTOP.......................6-16
SWITCH - INSTALLATION, DOOR
CYLINDER LOCK.....................8N-41
SWITCH - INSTALLATION, DOOR LOCK . . . 8N-42
SWITCH - INSTALLATION, DRIVER
HEATED SEAT .......................8G-10
SWITCH - INSTALLATION, DRIVER SEAT . . 8N-55
SWITCH - INSTALLATION, EXTERIOR
HANDLE...........................8N-12
SWITCH - INSTALLATION, FULL OPEN....8N-13
SWITCH - INSTALLATION, GLOVE BOX
LAMP..............................8L-26
SWITCH - INSTALLATION, IGNITION......19-16
SWITCH - INSTALLATION, LEFT
B-PILLAR..........................8N-32
SWITCH - INSTALLATION, MEMORY SET . . 8N-56
SWITCH - INSTALLATION, MULTI-
FUNCTION..........................8L-21
SWITCH - INSTALLATION, OIL
PRESSURE.....................9-141,9-54
SWITCH - INSTALLATION, PASSENGER
HEATED SEAT .......................8G-14
SWITCH - INSTALLATION, PASSENGER
SEAT...............................8N-57
SWITCH - INSTALLATION, REMOTE......8N-49
SWITCH - INSTALLATION, RIGHT
B-PILLAR..........................8N-32
SWITCH - INSTALLATION, SUNROOF....23-120
SWITCH - INSTALLATION, WASHER
FLUID LEVEL........................8R-16
SWITCH - INSTALLATION, WINDOW.....8N-65
SWITCH - OPERATION.................8P-6
SWITCH - OPERATION, AUTOSTICK.....21-189
SWITCH - OPERATION, BRAKE FLUID
LEVEL..............................5-10
SWITCH - OPERATION, BRAKE LAMP......8L-4
SWITCH - OPERATION, DOOR CYLINDER
LOCK..............................8N-40
SWITCH - OPERATION, DRIVER HEATED
SEAT ...............................8G-8
SWITCH - OPERATION, DRIVER SEAT....8N-54
SWITCH - OPERATION, EXTERIOR
HANDLE...........................8N-11
SWITCH - OPERATION, FULL OPEN . 8N-12,8N-31
SWITCH - OPERATION, LEFT B-PILLAR . . . 8N-32
SWITCH - OPERATION, MEMORY SET....8N-56
SWITCH - OPERATION, MIRROR.........8G-5
SWITCH - OPERATION, OIL PRESSURE . . . 9-141
SWITCH - OPERATION, PASSENGER
HEATED SEAT .......................8G-12
SWITCH - OPERATION, PASSENGER
SEAT ..............................8N-56
SWITCH - OPERATION, REAR WINDOW
DEFOGGER..........................8G-2
SWITCH - OPERATION, REAR WIPER/
WASHER...........................8R-15
SWITCH - OPERATION, RIGHT B-PILLAR . . 8N-32
SWITCH - REMOVAL...................8P-6
SWITCH - REMOVAL, BACK-UP LAMP....21-62
SWITCH - REMOVAL, BRAKE FLUID
LEVEL..............................5-11
SWITCH - REMOVAL, BRAKE LAMP.......8L-5
SWITCH - REMOVAL, CENTER CONSOLE
LAMP..............................8L-26
SWITCH - REMOVAL, CLUTCH PEDAL
INTERLOCK..........................6-13
SWITCH - REMOVAL, CLUTCH PEDAL
UPSTOP.............................6-15
SWITCH - REMOVAL, DOOR CYLINDER
LOCK..............................8N-41
SWITCH - REMOVAL, DOOR LOCK.......8N-42
SWITCH - REMOVAL, DRIVER HEATED
SEAT ..............................8G-10
SWITCH - REMOVAL, DRIVER SEAT......8N-55
SWITCH - REMOVAL, EXTERIOR HANDLE . 8N-11
SWITCH - REMOVAL, FULL OPEN
.......8N-13
SWITCH - REMOVAL, GLOVE BOX LAMP
. . 8L-26
SWITCH - REMOVAL, IGNITION
.........19-14
SWITCH - REMOVAL, LEFT B-PILLAR
....8N-32
SWITCH - REMOVAL, MEMORY SET
.....8N-56SWITCH - REMOVAL, MULTI-FUNCTION . . . 8L-21
SWITCH - REMOVAL, OIL PRESSURE....9-141,
9-54
SWITCH - REMOVAL, PASSENGER
HEATED SEAT .......................8G-14
SWITCH - REMOVAL, PASSENGER SEAT . . 8N-57
SWITCH - REMOVAL, REMOTE..........8N-49
SWITCH - REMOVAL, RIGHT B-PILLAR . . . 8N-32
SWITCH - REMOVAL, SUNROOF........23-120
SWITCH - REMOVAL, WASHER FLUID
LEVEL.............................8R-15
SWITCH - REMOVAL, WINDOW.........8N-65
SWITCH ASSY - DESCRIPTION,
SOLENOID/PRESSURE................21-237
SWITCH ASSY - INSTALLATION,
SOLENOID/PRESSURE................21-239
SWITCH ASSY - OPERATION, SOLENOID/
PRESSURE........................21-237
SWITCH ASSY - REMOVAL, SOLENOID/
PRESSURE........................21-238
SWITCHES - DESCRIPTION, REMOTE.....8A-12
SWITCHES - DIAGNOSIS AND TESTING,
REMOTE...........................8A-12
SWITCHES - INSTALLATION, REMOTE....8A-14
SWITCHES - OPERATION, REMOTE......8A-12
SWITCHES - REMOVAL, REMOTE........8A-13
SYMBOLS - DESCRIPTION,
INTERNATIONAL....................Intro.-5
SYMBOLS - DESCRIPTION,
INTERNATIONAL.......................0-1
SYNCHRONIZER - DESCRIPTION.......21-114
SYNCHRONIZER - DISASSEMBLY.......21-114
SYNCHRONIZING CABLE ADJUSTMENT,
INSTALLATION.................23-101,23-87
T850 MANUAL TRANSAXLE - ASSEMBLY . . 21-42
T850 MANUAL TRANSAXLE -
DESCRIPTION.......................21-21
T850 MANUAL TRANSAXLE -
DISASSEMBLY.......................21-35
T850 MANUAL TRANSAXLE -
INSTALLATION.......................21-51
T850 MANUAL TRANSAXLE -
OPERATION.........................21-24
T850 MANUAL TRANSAXLE - REMOVAL . . 21-31
T850 MANUAL TRANSAXLE -
SPECIFICATIONS.....................21-56
T850 TRANSAXLE - SPECIAL TOOLS.......6-6
T850 TRANSAXLE - SPECIAL TOOLS.....21-58
TABLE, SPECIFICATIONS -
SPECIFICATIONS.................8N-29,8N-9
TAIL LAMP - EXPORT - INSTALLATION . . . 8L-23
TAIL LAMP - EXPORT - REMOVAL.......8L-23
TAIL LAMP - INSTALLATION............8L-22
TAIL LAMP - REMOVAL................8L-22
TAIL LAMP UNIT - INSTALLATION.......8L-23
TAIL LAMP UNIT - REMOVAL...........8L-23
TANK - DESCRIPTION, FUEL............14-10
TANK - INSTALLATION, FUEL...........14-11
TANK - OPERATION, FUEL..............14-10
TANK - REMOVAL, FUEL...............14-11
TANK - STANDARD PROCEDURE,
DRAINING FUEL......................14-2
TANK FILLER TUBE - INSTALLATION,
FUEL..............................14-12
TANK FILLER TUBE - REMOVAL, FUEL....14-12
TAPE ATTACHED - INSTALLATION,
EXTERIOR NAME PLATES..............23-50
TAPE ATTACHED - REMOVAL, EXTERIOR
NAME PLATES.......................23-50
TASK MANAGER - DESCRIPTION........25-24
TASK MANAGER - OPERATION..........25-24
TD - INSTALLATION, CLUTCH DISC AND
PRESSURE PLATE - 2.5L...............6-12
TD - REMOVAL, CLUTCH DISC AND
PRESSURE PLATE - 2.5L...............6-11
TEMP SENSOR - DESCRIPTION,
AMBIENT..........................8M-11
TEMP SENSOR - OPERATION, AMBIENT . . 8M-11
TEMPERATURE CONTROL -
DESCRIPTION, AUTOMATIC
.............24-2
TEMPERATURE SENSOR - 2.4L -
DESCRIPTION, ENGINE COOLANT
.........7-21
TEMPERATURE SENSOR - 2.4L -
INSTALLATION, ENGINE COOLANT
........7-21
TEMPERATURE SENSOR - 2.4L -
REMOVAL, ENGINE COOLANT
............7-21
TEMPERATURE SENSOR - 3.3/3.8L -
DESCRIPTION, ENGINE COOLANT
.........7-21
32 INDEXRS
Description Group-Page Description Group-Page Description Group-Page
ProCarManuals.com