2003 CHRYSLER CARAVAN wipers
[x] Cancel search: wipersPage 1783 of 2177
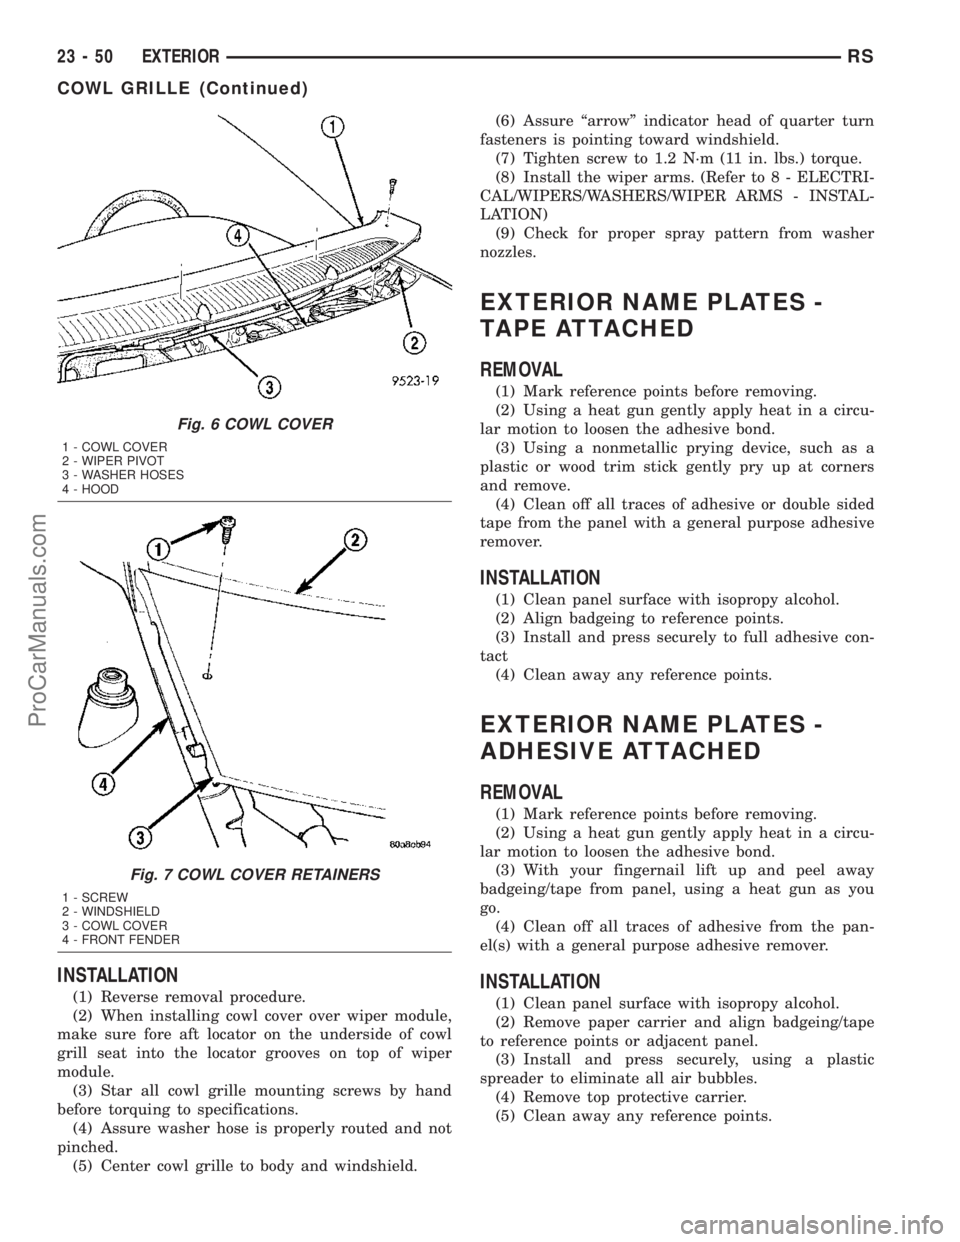
INSTALLATION
(1) Reverse removal procedure.
(2) When installing cowl cover over wiper module,
make sure fore aft locator on the underside of cowl
grill seat into the locator grooves on top of wiper
module.
(3) Star all cowl grille mounting screws by hand
before torquing to specifications.
(4) Assure washer hose is properly routed and not
pinched.
(5) Center cowl grille to body and windshield.(6) Assure ªarrowº indicator head of quarter turn
fasteners is pointing toward windshield.
(7) Tighten screw to 1.2 N´m (11 in. lbs.) torque.
(8) Install the wiper arms. (Refer to 8 - ELECTRI-
CAL/WIPERS/WASHERS/WIPER ARMS - INSTAL-
LATION)
(9) Check for proper spray pattern from washer
nozzles.
EXTERIOR NAME PLATES -
TAPE ATTACHED
REMOVAL
(1) Mark reference points before removing.
(2) Using a heat gun gently apply heat in a circu-
lar motion to loosen the adhesive bond.
(3) Using a nonmetallic prying device, such as a
plastic or wood trim stick gently pry up at corners
and remove.
(4) Clean off all traces of adhesive or double sided
tape from the panel with a general purpose adhesive
remover.
INSTALLATION
(1) Clean panel surface with isopropy alcohol.
(2) Align badgeing to reference points.
(3) Install and press securely to full adhesive con-
tact
(4) Clean away any reference points.
EXTERIOR NAME PLATES -
ADHESIVE ATTACHED
REMOVAL
(1) Mark reference points before removing.
(2) Using a heat gun gently apply heat in a circu-
lar motion to loosen the adhesive bond.
(3) With your fingernail lift up and peel away
badgeing/tape from panel, using a heat gun as you
go.
(4) Clean off all traces of adhesive from the pan-
el(s) with a general purpose adhesive remover.
INSTALLATION
(1) Clean panel surface with isopropy alcohol.
(2) Remove paper carrier and align badgeing/tape
to reference points or adjacent panel.
(3) Install and press securely, using a plastic
spreader to eliminate all air bubbles.
(4) Remove top protective carrier.
(5) Clean away any reference points.
Fig. 6 COWL COVER
1 - COWL COVER
2 - WIPER PIVOT
3 - WASHER HOSES
4 - HOOD
Fig. 7 COWL COVER RETAINERS
1 - SCREW
2 - WINDSHIELD
3 - COWL COVER
4 - FRONT FENDER
23 - 50 EXTERIORRS
COWL GRILLE (Continued)
ProCarManuals.com
Page 1792 of 2177
HOOD
TABLE OF CONTENTS
page page
HINGE
REMOVAL.............................59
INSTALLATION.........................59
HOOD
REMOVAL.............................59
INSTALLATION.........................60
LATCH
REMOVAL.............................60INSTALLATION.........................60
LATCH RELEASE CABLE
REMOVAL.............................60
INSTALLATION.........................61
LATCH STRIKER
REMOVAL.............................61
INSTALLATION.........................61
HINGE
REMOVAL
(1) Remove Front Wiper Unit (Refer to 8 - ELEC-
TRICAL/WIPERS/WASHERS/WIPER MODULE -
REMOVAL) for procedure.
(2) Raise hood.
(3) Mark all bolt and hinge attachment locations
with a grease pencil or other suitable device to pro-
vide reference marks for installation.
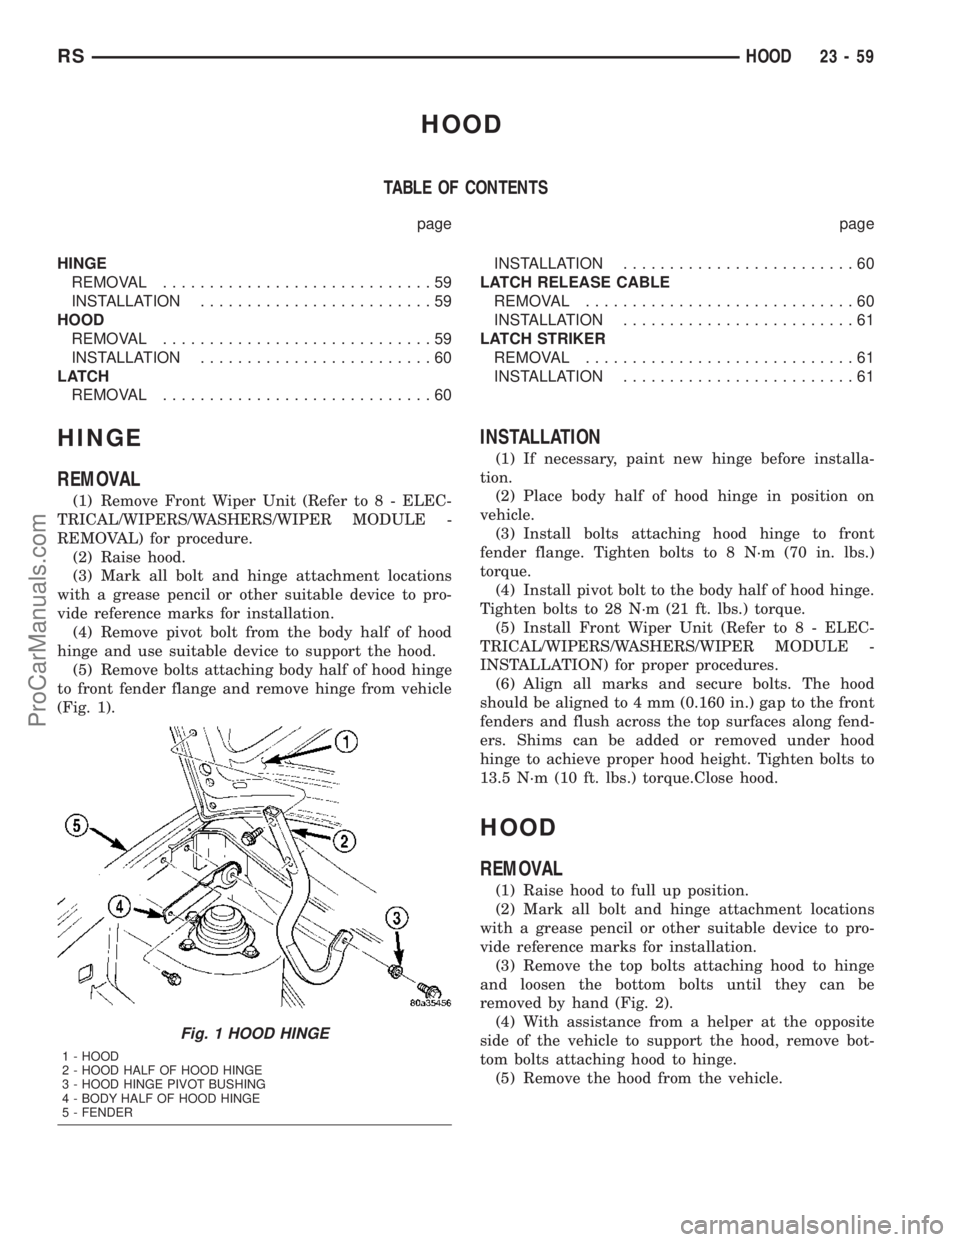
(4) Remove pivot bolt from the body half of hood
hinge and use suitable device to support the hood.
(5) Remove bolts attaching body half of hood hinge
to front fender flange and remove hinge from vehicle
(Fig. 1).
INSTALLATION
(1) If necessary, paint new hinge before installa-
tion.
(2) Place body half of hood hinge in position on
vehicle.
(3) Install bolts attaching hood hinge to front
fender flange. Tighten bolts to 8 N´m (70 in. lbs.)
torque.
(4) Install pivot bolt to the body half of hood hinge.
Tighten bolts to 28 N´m (21 ft. lbs.) torque.
(5) Install Front Wiper Unit (Refer to 8 - ELEC-
TRICAL/WIPERS/WASHERS/WIPER MODULE -
INSTALLATION) for proper procedures.
(6) Align all marks and secure bolts. The hood
should be aligned to 4 mm (0.160 in.) gap to the front
fenders and flush across the top surfaces along fend-
ers. Shims can be added or removed under hood
hinge to achieve proper hood height. Tighten bolts to
13.5 N´m (10 ft. lbs.) torque.Close hood.
HOOD
REMOVAL
(1) Raise hood to full up position.
(2) Mark all bolt and hinge attachment locations
with a grease pencil or other suitable device to pro-
vide reference marks for installation.
(3) Remove the top bolts attaching hood to hinge
and loosen the bottom bolts until they can be
removed by hand (Fig. 2).
(4) With assistance from a helper at the opposite
side of the vehicle to support the hood, remove bot-
tom bolts attaching hood to hinge.
(5) Remove the hood from the vehicle.
Fig. 1 HOOD HINGE
1 - HOOD
2 - HOOD HALF OF HOOD HINGE
3 - HOOD HINGE PIVOT BUSHING
4 - BODY HALF OF HOOD HINGE
5 - FENDER
RSHOOD23-59
ProCarManuals.com
Page 1840 of 2177
(16) Apply 150 mm (6 in.) lengths of 50 mm (2 in.)
masking tape spaced 250 mm (10 in.) apart to hold
molding in place until urethane cures.
(17) Install A-pillar trim panels.
(18) Install cowl cover and wipers.
(19) Install inside rear view mirror.
(20) After urethane has cured, remove tape strips
and water test windshield to verify repair.SLIDING DOOR GLASS
REMOVAL
The temperature of the vehicle should be at least
21É C (70É F) before removing the stationary quarter/
sliding door glass. Butyl sealer becomes more pliable
at high temperatures.
(1) Remove interior trim as necessary to gain
access attaching locations on back of glass.
(2) Remove nuts holding stationary glass to fence.
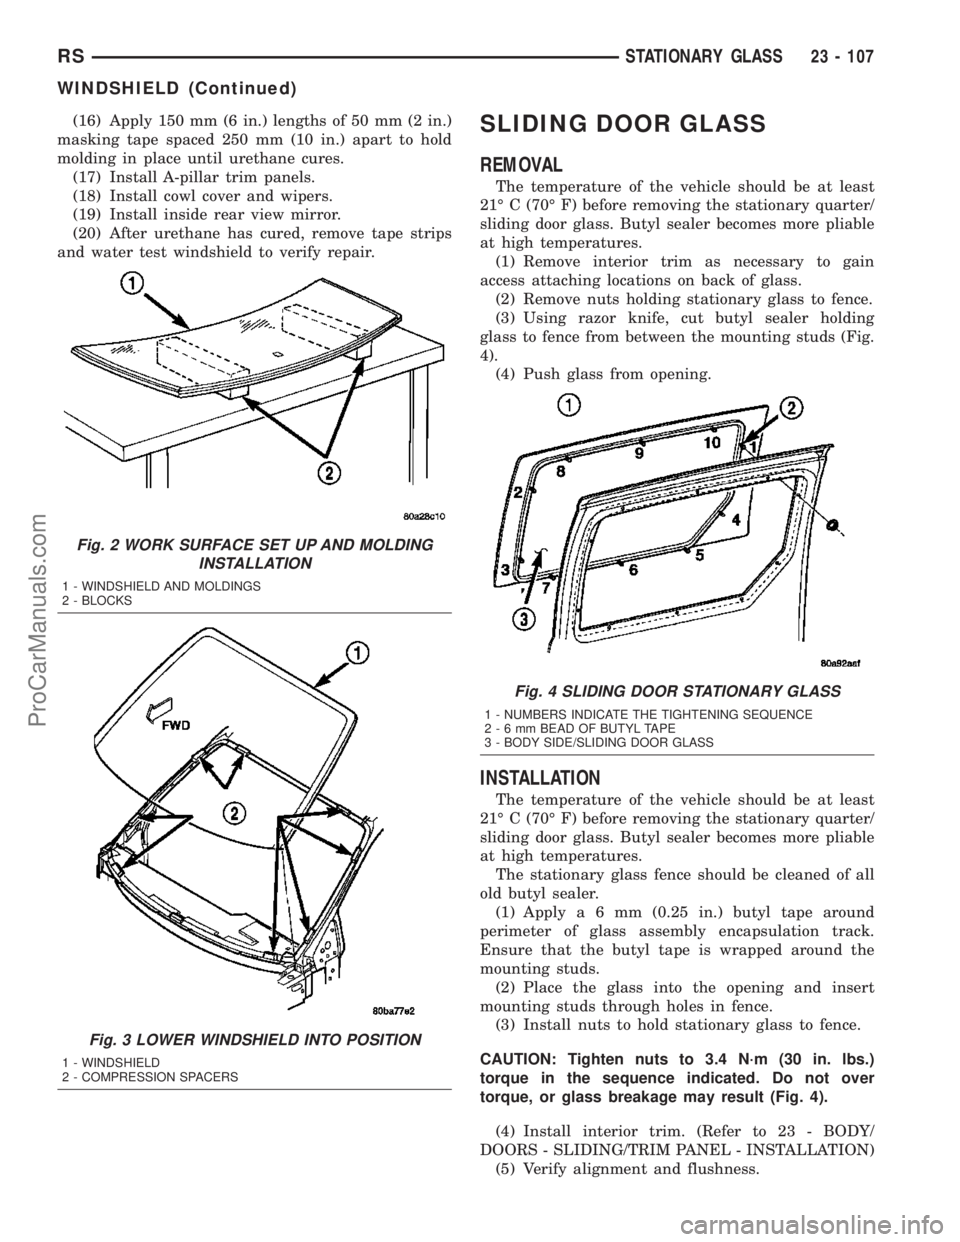
(3) Using razor knife, cut butyl sealer holding
glass to fence from between the mounting studs (Fig.
4).
(4) Push glass from opening.
INSTALLATION
The temperature of the vehicle should be at least
21É C (70É F) before removing the stationary quarter/
sliding door glass. Butyl sealer becomes more pliable
at high temperatures.
The stationary glass fence should be cleaned of all
old butyl sealer.
(1) Applya6mm(0.25 in.) butyl tape around
perimeter of glass assembly encapsulation track.
Ensure that the butyl tape is wrapped around the
mounting studs.
(2) Place the glass into the opening and insert
mounting studs through holes in fence.
(3) Install nuts to hold stationary glass to fence.
CAUTION: Tighten nuts to 3.4 N´m (30 in. lbs.)
torque in the sequence indicated. Do not over
torque, or glass breakage may result (Fig. 4).
(4) Install interior trim. (Refer to 23 - BODY/
DOORS - SLIDING/TRIM PANEL - INSTALLATION)
(5) Verify alignment and flushness.
Fig. 2 WORK SURFACE SET UP AND MOLDING
INSTALLATION
1 - WINDSHIELD AND MOLDINGS
2 - BLOCKS
Fig. 3 LOWER WINDSHIELD INTO POSITION
1 - WINDSHIELD
2 - COMPRESSION SPACERS
Fig. 4 SLIDING DOOR STATIONARY GLASS
1 - NUMBERS INDICATE THE TIGHTENING SEQUENCE
2-6mmBEAD OF BUTYL TAPE
3 - BODY SIDE/SLIDING DOOR GLASS
RSSTATIONARY GLASS23 - 107
WINDSHIELD (Continued)
ProCarManuals.com
Page 2020 of 2177
The evaporator temperature sensor is a switch that
is installed on the top of the expansion valve in the
right rear corner of the engine compartment (Fig.
18). The sensor has a small probe that is inserted in
a small well in the body of the expansion valve that
is filled with a special silicone-based thermal grease.
A small molded plastic push-in retainer secures the
sensor to a threaded hole in the top surface of the
expansion valve. Two terminals within a molded
plastic connector receptacle on the sensor connect it
to the vehicle electrical system through a take out
and connector of the HVAC wire harness.
The evaporator temperature sensor cannot be
adjusted or repaired and, if faulty or damaged, it
must be replaced.
OPERATION
The evaporator temperature sensor monitors the
temperature of the evaporator through its connection
to the top of the expansion valve. The sensor will
change its internal resistance in response to the tem-
peratures it monitors. The heater-A/C control module
is connected to the sensor through a sensor ground
circuit and a sensor signal circuit. As the evaporator
temperature increases, the resistance of the sensor
decreases and the voltage monitored by the module
decreases. The module uses this monitored voltage
reading to an indication of the evaporator tempera-
ture. The heater-A/C control module is programmed
to respond to this input by sending electronic mes-
sages to the Powertrain Control Module (PCM) over
the Programmable Communications Interface (PCI)
data bus, and the PCM then cycles the air condition-
ing compressor clutch as necessary to optimize air
conditioning system performance and to protect the
system from evaporator freezing. The external loca-
tion of the sensor and the use of a screw allows the
sensor to be removed or installed from the expansion
valve without disturbing the refrigerant in the sys-
tem. The evaporator temperature sensor is diagnosed
using a DRBIIItscan tool. Refer to the appropriate
diagnostic information.
REMOVAL
(1) Disconnect and isolate the battery negative
cable.
(2) Remove the air cleaner housing from the right
side of the engine compartment.
(3) Remove the windshield wiper assembly from
the vehicle(Refer to 8 - ELECTRICAL/WIPERS/
WASHERS/WIPER MODULE - REMOVAL).
(4) Remove the temperature sensor attaching
screw from the expansion valve.
(5) Pull the evaporator temperature sensor away
from the expansion valve far enough to access the
red release ring on the wiring connector. Push thered ring toward the connector to release lock and
remove the HVAC wire harness connector from the
temperature sensor.
(6) Remove the evaporator temperature sensor
from the engine compartment. Please note that any
grease removed with the old temperature sensor
must be replaced, failure to do so could result in poor
a/c performance.
INSTALLATION
(1) Position the evaporator temperature sensor
into the right rear corner of the engine compartment.
Please make sure any grease removed with the old
sensor has been replaced before the new sensor is
installed, failure to do so could lead to poor a/c per-
formance.
(2) Reconnect the HVAC wire harness connector
for the evaporator temperature sensor to the sensor
connector receptacle.
(3) Position the evaporator temperature sensor
onto the top of the expansion valve with the sensor
probe inserted into the well in the expansion valve.
(4) Install the temperature sensor retaining screw
and tighten.
(5) Install the window wiper assembly to the vehi-
cle(Refer to 8 - ELECTRICAL/WIPERS/WASHERS/
WIPER MODULE - INSTALLATION).
(6) Reinstall the air cleaner housing into the right
side of the engine compartment.
(7) Reconnect the battery negative cable.
(8) Run the HVAC Cool Down test to verify system
is operating properly(Refer to 24 - HEATING & AIR
CONDITIONING - DIAGNOSIS AND TESTING).
INFRARED TEMPERATURE
SENSOR
DESCRIPTION
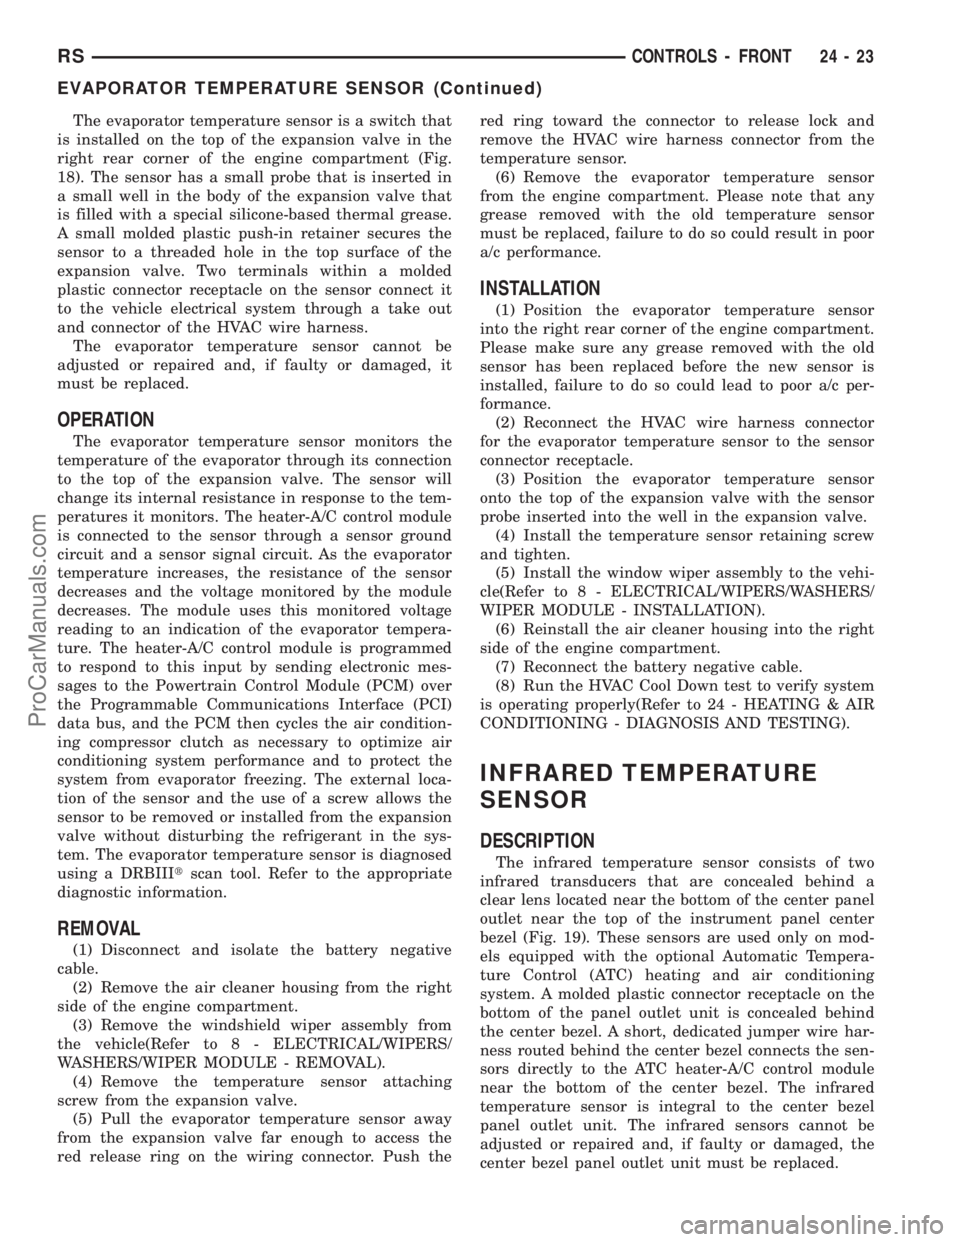
The infrared temperature sensor consists of two
infrared transducers that are concealed behind a
clear lens located near the bottom of the center panel
outlet near the top of the instrument panel center
bezel (Fig. 19). These sensors are used only on mod-
els equipped with the optional Automatic Tempera-
ture Control (ATC) heating and air conditioning
system. A molded plastic connector receptacle on the
bottom of the panel outlet unit is concealed behind
the center bezel. A short, dedicated jumper wire har-
ness routed behind the center bezel connects the sen-
sors directly to the ATC heater-A/C control module
near the bottom of the center bezel. The infrared
temperature sensor is integral to the center bezel
panel outlet unit. The infrared sensors cannot be
adjusted or repaired and, if faulty or damaged, the
center bezel panel outlet unit must be replaced.
RSCONTROLS - FRONT24-23
EVAPORATOR TEMPERATURE SENSOR (Continued)
ProCarManuals.com
Page 2046 of 2177

INSTALLATION
(1) Assemble the right and/or left floor distribution
ducts onto the center floor distribution duct as
required.
(2) Slide the floor distribution duct assembly
under the instrument panel center stack far enough
to engage the center floor distribution duct with the
outlet on the bottom of the heater-A/C housing unit.
(3) Align the locator hole on the center floor distri-
bution duct with the weld stud on the front floor
panel.
(4) Using hand pressure, push the locator hole of
the center floor distribution duct down over the weld
stud on the front floor panel.
(5) Reinstall the carpet onto the front floor panel
and under the instrument panel. (Refer to 23 -
BODY/INTERIOR/CARPETS AND FLOOR MATS -
INSTALLATION).
HVAC HOUSING
REMOVAL
WARNING: REFER TO THE APPLICABLE WARN-
INGS AND CAUTIONS FOR THIS SYSTEM BEFORE
PERFORMING THE FOLLOWING OPERATION.
(Refer to 24 - HEATING & AIR CONDITIONING/
PLUMBING - FRONT - WARNING - A/C PLUMBING),
(Refer to 24 - HEATING & AIR CONDITIONING/
PLUMBING - FRONT - CAUTION - A/C PLUMBING),
and (Refer to 24 - HEATING & AIR CONDITIONING/
PLUMBING - FRONT - WARNING - HEATER PLUMB-
ING).
WARNING: ON VEHICLES EQUIPPED WITH AIR-
BAGS, DISABLE THE AIRBAG SYSTEM BEFORE
ATTEMPTING ANY STEERING WHEEL, STEERING
COLUMN, OR INSTRUMENT PANEL COMPONENT
DIAGNOSIS OR SERVICE. DISCONNECT AND ISO-
LATE THE BATTERY NEGATIVE (GROUND) CABLE,
THEN WAIT TWO MINUTES FOR THE AIRBAG SYS-
TEM CAPACITOR TO DISCHARGE BEFORE PER-
FORMING FURTHER DIAGNOSIS OR SERVICE. THIS
IS THE ONLY SURE WAY TO DISABLE THE AIRBAG
SYSTEM. FAILURE TO TAKE THE PROPER PRE-
CAUTIONS COULD RESULT IN ACCIDENTAL AIR-
BAG DEPLOYMENT AND POSSIBLE PERSONAL
INJURY.
(1) Recover the refrigerant from the refrigerant
system. (Refer to 24 - HEATING & AIR CONDI-
TIONING/PLUMBING - FRONT/REFRIGERANT -
STANDARD PROCEDURE - REFRIGERANT
RECOVERY).
(2) Drain the engine cooling system. (Refer to 7 -
COOLING - STANDARD PROCEDURE - COOLING
SYSTEM DRAIN).
(3) Disconnect and isolate the battery negative
cable.
(4) Remove the windshield wiper module from the
vehicle(Refer to 8 - ELECTRICAL/WIPERS/WASH-
ERS/WIPER MODULE - REMOVAL).
Fig. 12 Floor Distribution Ducts
1 - CENTER FLOOR DISTRIBUTION DUCT
2 - RIGHT FLOOR DISTRIBUTION DUCT
3 - LEFT FLOOR DISTRIBUTION DUCT
4 - WELD STUD
RSDISTRIBUTION - FRONT24-49
FLOOR DISTRIBUTION DUCTS (Continued)
ProCarManuals.com
Page 2048 of 2177
(8) Install the windshield wiper module(Refer to 8
- ELECTRICAL/WIPERS/WASHERS/WIPER MOD-
ULE - INSTALLATION).
(9) Reconnect the battery negative cable.
(10) Refill the engine cooling system. (Refer to 7 -
COOLING - STANDARD PROCEDURE - COOLING
SYSTEM REFILL).
(11) Evacuate the refrigerant system. (Refer to 24 -
HEATING & AIR CONDITIONING/PLUMBING -
FRONT/REFRIGERANT - STANDARD PROCE-
DURE - REFRIGERANT SYSTEM EVACUATE).
(12) Charge the refrigerant system. (Refer to 24 -
HEATING & AIR CONDITIONING/PLUMBING -
FRONT/REFRIGERANT - STANDARD PROCE-
DURE - REFRIGERANT SYSTEM CHARGE).
PANEL DUCTS
REMOVAL
WARNING: ON VEHICLES EQUIPPED WITH AIR-
BAGS, DISABLE THE AIRBAG SYSTEM BEFORE
ATTEMPTING ANY STEERING WHEEL, STEERING
COLUMN, OR INSTRUMENT PANEL COMPONENT
DIAGNOSIS OR SERVICE. DISCONNECT AND ISO-
LATE THE BATTERY NEGATIVE (GROUND) CABLE,
THEN WAIT TWO MINUTES FOR THE AIRBAG SYS-
TEM CAPACITOR TO DISCHARGE BEFORE PER-
FORMING FURTHER DIAGNOSIS OR SERVICE. THIS
IS THE ONLY SURE WAY TO DISABLE THE AIRBAG
SYSTEM. FAILURE TO TAKE THE PROPER PRE-CAUTIONS COULD RESULT IN ACCIDENTAL AIR-
BAG DEPLOYMENT AND POSSIBLE PERSONAL
INJURY.
(1) Disconnect and isolate the battery negative
cable.
(2) Remove the instrument panel from the vehicle.
(Refer to 23 - BODY/INSTRUMENT PANEL/IN-
STRUMENT PANEL ASSEMBLY - REMOVAL).
(3) Place the instrument panel face down on a
suitable work surface. Be certain to take the proper
precautions to protect the face of the instrument
panel from cosmetic damage.
(4) Remove the fasteners that secure the panel
ducts to the instrument panel armature.
(5) Disengage the panel ducts from the panel out-
lets.
(6) Remove the panel ducts from the instrument
panel.
INSTALLATION
(1) Position the panel ducts to the instrument
panel.
(2) Engage the panel ducts to the panel outlets.
(3) Install the fasteners that secure the panel
ducts to the instrument panel armature.
(4) Reinstall the instrument panel into the vehicle.
(Refer to 23 - BODY/INSTRUMENT PANEL/IN-
STRUMENT PANEL ASSEMBLY - INSTALLA-
TION).
(5) Reconnect the battery negative cable.
RSDISTRIBUTION - FRONT24-51
HVAC HOUSING (Continued)
ProCarManuals.com
Page 2175 of 2177
WASHER HOSE - EXPORT -
INSTALLATION, HEADLAMP............8R-12
WASHER HOSE - EXPORT - REMOVAL,
HEADLAMP.........................8R-12
WASHER HOSES - INSTALLATION.......8R-16
WASHER HOSES - REMOVAL...........8R-16
WASHER PUMP MOTOR - EXPORT -
INSTALLATION, HEADLAMP............8R-13
WASHER PUMP MOTOR - EXPORT -
REMOVAL, HEADLAMP................8R-12
WASHER PUMP MOTOR -
INSTALLATION, FRONT.................8R-8
WASHER PUMP MOTOR -
INSTALLATION, REAR.................8R-14
WASHER PUMP MOTOR - REMOVAL,
FRONT..............................8R-8
WASHER PUMP MOTOR - REMOVAL,
REAR..............................8R-13
WASHER RESERVOIR - INSTALLATION . . . 8R-17
WASHER RESERVOIR - REMOVAL.......8R-16
WASHER SYSTEM - DIAGNOSIS AND
TESTING............................8R-4
WASHERS - EXPORT - DESCRIPTION,
HEADLAMP.........................8R-10
WASHERS - EXPORT - DIAGNOSIS AND
TESTING, HEADLAMP.................8R-10
WASHERS - EXPORT - INSTALLATION,
HEADLAMP.........................8R-12
WASHERS - EXPORT - OPERATION,
HEADLAMP.........................8R-10
WASHERS - EXPORT - REMOVAL,
HEADLAMP.........................8R-12
WATER CHANNEL - INSTALLATION......23-118
WATER CHANNEL - REMOVAL.........23-118
WATER LEAKS - DIAGNOSIS AND
TESTING............................23-2
WATER PUMP - 2.4L - CLEANING........7-32
WATER PUMP - 2.4L - DESCRIPTION......7-31
WATER PUMP - 2.4L - INSPECTION.......7-32
WATER PUMP - 2.4L - INSTALLATION.....7-32
WATER PUMP - 2.4L - REMOVAL.........7-31
WATER PUMP - 3.3/3.8L - CLEANING.....7-34
WATER PUMP - 3.3/3.8L - DESCRIPTION . . . 7-33
WATER PUMP - 3.3/3.8L - INSPECTION....7-34
WATER PUMP - 3.3/3.8L -
INSTALLATION........................7-34
WATER PUMP - 3.3/3.8L - REMOVAL......7-33
WATER PUMP INLET TUBE - 2.4L -
DESCRIPTION........................7-35
WATER PUMP INLET TUBE - 2.4L -
INSTALLATION........................7-35
WATER PUMP INLET TUBE - 2.4L -
REMOVAL...........................7-35
WATER PUMP INLET TUBE - 3.3/3.8L -
INSTALLATION........................7-36
WATER PUMP INLET TUBE - 3.3/3.8L -
REMOVAL...........................7-36
WATERSHIELD - INSTALLATION.........23-21
WATERSHIELD - REMOVAL.............23-21
WEAR - STANDARD PROCEDURE,
MEASURING TIMING CHAIN............9-153
WEAR INDICATORS - DIAGNOSIS AND
TESTING, TREAD.....................22-16
WEAR PATTERNS - DIAGNOSIS AND
TESTING, TIRE......................22-16
WEATHERSTRIP - INSTALLATION, FRONT
DOOR............................23-111
WEATHERSTRIP - INSTALLATION, FRONT
DOOR GLASS RUN..................23-110
WEATHERSTRIP - INSTALLATION,
SLIDING DOOR.....................23-112
WEATHERSTRIP - REMOVAL, FRONT
DOOR............................23-111
WEATHERSTRIP - REMOVAL, FRONT
DOOR GLASS RUN..................23-110
WEATHERSTRIP - REMOVAL, SLIDING
DOOR............................23-112WELD LOCATIONS - SPECIFICATIONS . . . 23-161
WHEEL - DESCRIPTION...............22-18
WHEEL - INSPECTION, TONE............5-82
WHEEL - INSTALLATION, STEERING......19-24
WHEEL - REMOVAL, STEERING.........19-23
WHEEL ALIGNMENT - DESCRIPTION......2-46
WHEEL ALIGNMENT - STANDARD
PROCEDURE.........................2-51
WHEEL ALIGNMENT, SPECIFICATIONS.....2-55
WHEEL ASSEMBLY (ALUMINUM WHEEL)
- INSTALLATION, TIRE.................22-8
WHEEL ASSEMBLY (ALUMINUM WHEEL)
- REMOVAL, TIRE.....................22-7
WHEEL ASSEMBLY (STEEL WHEEL) -
INSTALLATION, TIRE...................22-8
WHEEL ASSEMBLY (STEEL WHEEL) -
REMOVAL, TIRE......................22-8
WHEEL BALANCE - STANDARD
PROCEDURE, TIRE....................22-5
WHEEL CARE - CLEANING, ALUMINUM . . . 22-18
WHEEL COVER - DESCRIPTION.........22-19
WHEEL COVER - INSTALLATION.........22-19
WHEEL COVER - REMOVAL............22-19
WHEEL CYLINDERS - INSPECTION........5-57
WHEEL CYLINDERS - INSTALLATION......5-57
WHEEL CYLINDERS - REMOVAL..........5-57
WHEEL INSPECTION - DIAGNOSIS AND
TESTING...........................22-18
WHEEL MATCH MOUNTING - STANDARD
PROCEDURE, TIRE....................22-7
WHEEL MOUNTING STUDS - FRONT -
INSTALLATION.......................22-21
WHEEL MOUNTING STUDS - FRONT -
REMOVAL..........................22-20
WHEEL MOUNTING STUDS - REAR -
INSTALLATION.......................22-22
WHEEL MOUNTING STUDS - REAR -
REMOVAL..........................22-21
WHEEL ROTATION - STANDARD
PROCEDURE, TIRE....................22-7
WHEEL RUNOUT, SPECIFICATIONS -
TONE...............................5-79
WHEEL, SPECIFICATIONS..............22-19
WHEEL SPEED SENSOR - AWD -
INSTALLATION, REAR..................5-80
WHEEL SPEED SENSOR - AWD -
REMOVAL, REAR......................5-80
WHEEL SPEED SENSOR - FWD -
INSTALLATION, REAR..................5-81
WHEEL SPEED SENSOR - FWD -
REMOVAL, REAR......................5-81
WHEEL SPEED SENSOR -
INSTALLATION, FRONT.................5-80
WHEEL SPEED SENSOR - REMOVAL,
FRONT..............................5-79
WHEEL SPEED SENSOR AIR GAP,
SPECIFICATIONS......................5-79
WHEEL VIBRATION - DIAGNOSIS AND
TESTING, TIRE.......................22-1
WHEELHOUSE SPLASH SHIELD -
INSTALLATION, FRONT................23-54
WHEELHOUSE SPLASH SHIELD -
REMOVAL, FRONT....................23-54
WIND DEFLECTOR - INSTALLATION.....23-118
WIND DEFLECTOR - REMOVAL.........23-118
WIND NOISE - DIAGNOSIS AND TESTING . . 23-3
WINDOW - INSTALLATION, QUARTER . . . 23-108
WINDOW - REMOVAL, QUARTER.......23-108
WINDOW CRANK - INSTALLATION.......23-21
WINDOW CRANK - REMOVAL...........23-21
WINDOW DEFOGGER SWITCH -
DESCRIPTION, REAR..................8G-2
WINDOW DEFOGGER SWITCH -
OPERATION, REAR....................8G-2
WINDOW MOTOR - DIAGNOSIS AND
TESTING, VENT......................8N-63
WINDOW MOTOR - INSTALLATION, VENT . 8N-64WINDOW MOTOR - REMOVAL..........8N-64
WINDOW MOTOR - REMOVAL, VENT.....8N-63
WINDOW REGULATOR - MANUAL -
INSTALLATION.......................23-23
WINDOW REGULATOR - MANUAL -
REMOVAL..........................23-23
WINDOW REGULATOR - POWER -
INSTALLATION.......................23-22
WINDOW REGULATOR - POWER -
REMOVAL..........................23-22
WINDOW SWITCH - DIAGNOSIS AND
TESTING...........................8N-64
WINDOW SWITCH - INSTALLATION......8N-65
WINDOW SWITCH - REMOVAL..........8N-65
WINDOWS - DESCRIPTION, POWER.....8N-62
WINDOWS - DIAGNOSIS AND TESTING,
POWER............................8N-62
WINDOWS - OPERATION, POWER.......8N-62
WINDSHIELD - DESCRIPTION..........23-105
WINDSHIELD SAFETY PRECAUTIONS,
WARNING.........................23-105
WIPER ARM - INSTALLATION, REAR.....8R-14
WIPER ARM - REMOVAL, REAR.........8R-14
WIPER ARM ALIGNMENT - STANDARD
PROCEDURE, FRONT..................8R-8
WIPER ARMS - INSTALLATION, FRONT....8R-9
WIPER ARMS - REMOVAL, FRONT........8R-9
WIPER BLADES - CLEANING...........8R-17
WIPER BLADES - INSTALLATION........8R-17
WIPER BLADES - REMOVAL............8R-17
WIPER LINKAGE - INSTALLATION.......8R-18
WIPER LINKAGE - REMOVAL...........8R-17
WIPER MODULE - INSTALLATION.......8R-18
WIPER MODULE - REMOVAL...........8R-18
WIPER MOTOR - INSTALLATION, FRONT . . . 8R-9
WIPER MOTOR - INSTALLATION, REAR . . . 8R-15
WIPER MOTOR - REMOVAL, FRONT......8R-9
WIPER MOTOR - REMOVAL, REAR......8R-14
WIPER SYSTEM - DIAGNOSIS AND
TESTING, FRONT.....................8R-2
WIPER SYSTEM - DIAGNOSIS AND
TESTING, REAR......................8R-4
WIPERS/WASHERS - DESCRIPTION.......8R-1
WIPERS/WASHERS - OPERATION........8R-2
WIPER/WASHER SWITCH -
DESCRIPTION, REAR.................8R-15
WIPER/WASHER SWITCH - DIAGNOSIS
AND TESTING, FRONT.................8R-2
WIPER/WASHER SWITCH - OPERATION,
REAR..............................8R-15
WIRE SPLICING - STANDARD
PROCEDURE.....................8W-01-15
WIRING - INSTALLATION,
SUPPLEMENTAL DIESEL HEATER.......24-112
WIRING - REMOVAL, SUPPLEMENTAL
DIESEL HEATER.....................24-112
WIRING DIAGRAMS - DESCRIPTION,
HOW TO USE .....................8W-01-1
WIRING HARNESS - DESCRIPTION......8N-35
WIRING HARNESS - DIAGNOSIS AND
TESTING.........................8W-01-7
WIRING HARNESS - INSTALLATION......8N-36
WIRING HARNESS - OPERATION........8N-35
WIRING HARNESS - REMOVAL.........8N-35
WIRING/TERMINAL, SPECIAL TOOLS . . 8W-01-10
WORN THREADS - STANDARD
PROCEDURE, REPAIR OF DAMAGED
OR
.............................9-10,9-86
ZONE - DESCRIPTION, DUAL
............24-1
ZONE - DESCRIPTION, MANUAL THREE
....24-1
ZONE - DESCRIPTION, SINGLE
...........24-1
ZONE - OPERATION, DUAL
..............24-3
ZONE - OPERATION, MANUAL THREE
.....24-3
ZONE ATC - OPERATION, THREE
.........24-3
ZONE ATC - OPERATION, TWO
.........24-106
36 INDEXRS
Description Group-Page Description Group-Page Description Group-Page
ProCarManuals.com