2003 CHRYSLER CARAVAN coolant reservoir
[x] Cancel search: coolant reservoirPage 1239 of 2177
INTAKE MANIFOLD - LOWER
REMOVAL
(1) Perform fuel system pressure release proce-
durebefore attempting any repairs.(Refer to 14 -
FUEL SYSTEM/FUEL DELIVERY - STANDARD
PROCEDURE)
(2) Remove upper intake manifold. (Refer to 9 -
ENGINE/MANIFOLDS/INTAKE MANIFOLD -
REMOVAL)
CAUTION: Cover intake manifold openings to pre-
vent foreign material from entering engine.
(3) Disconnect fuel line. (Refer to 14 - FUEL SYS-
TEM/FUEL DELIVERY/QUICK CONNECT FIT-
TING - STANDARD PROCEDURE)
(4) Drain the cooling system. (Refer to 7 - COOL-
ING - STANDARD PROCEDURE)
(5) Remove heater supply and radiator upper
hoses at intake manifold.
(6) Disconnect coolant temperature sensor/fuel
injector wire harness connector.
(7) Remove lower intake manifold support bracket
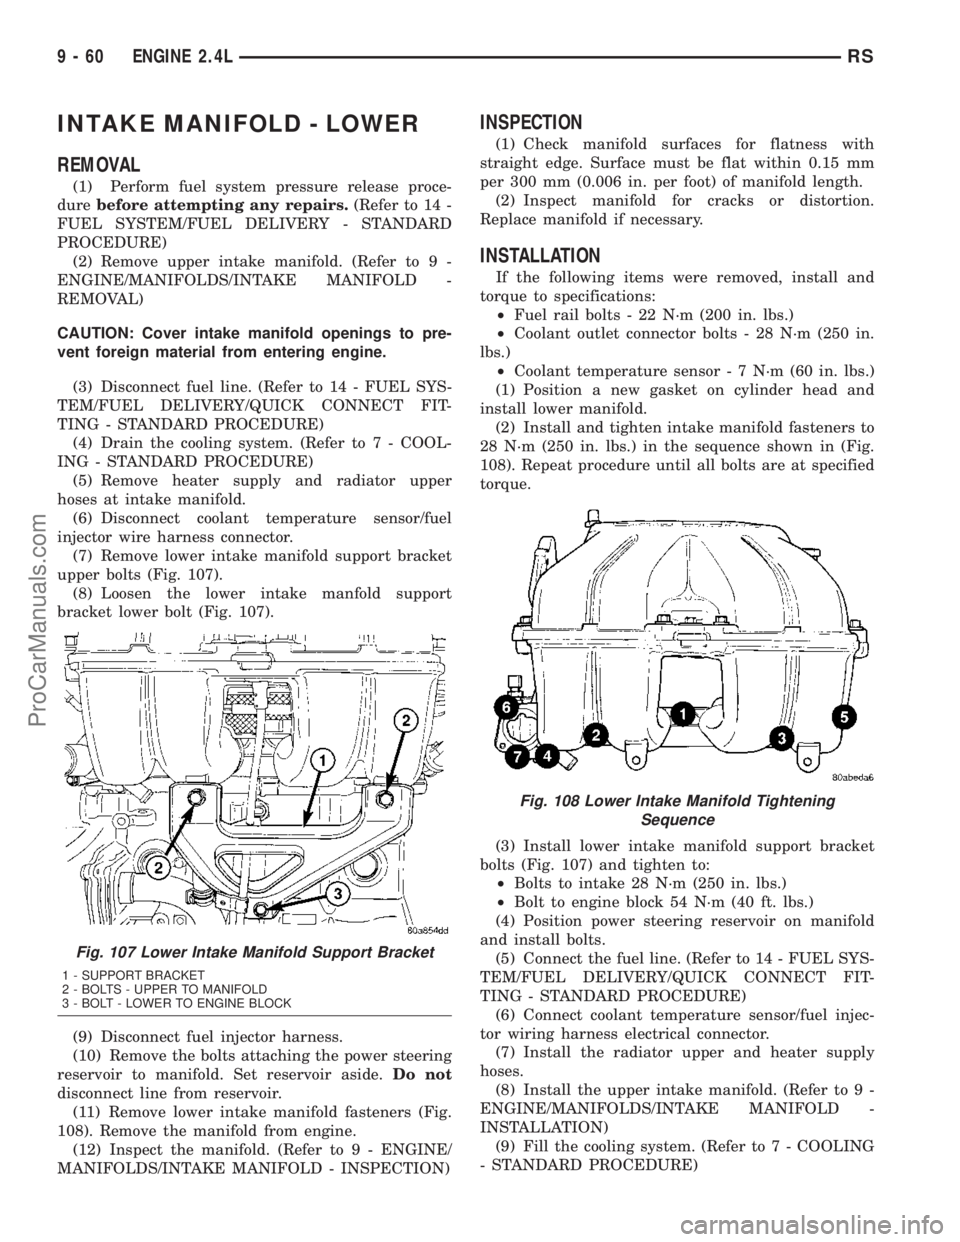
upper bolts (Fig. 107).
(8) Loosen the lower intake manfold support
bracket lower bolt (Fig. 107).
(9) Disconnect fuel injector harness.
(10) Remove the bolts attaching the power steering
reservoir to manifold. Set reservoir aside.Do not
disconnect line from reservoir.
(11) Remove lower intake manifold fasteners (Fig.
108). Remove the manifold from engine.
(12) Inspect the manifold. (Refer to 9 - ENGINE/
MANIFOLDS/INTAKE MANIFOLD - INSPECTION)
INSPECTION
(1) Check manifold surfaces for flatness with
straight edge. Surface must be flat within 0.15 mm
per 300 mm (0.006 in. per foot) of manifold length.
(2) Inspect manifold for cracks or distortion.
Replace manifold if necessary.
INSTALLATION
If the following items were removed, install and
torque to specifications:
²Fuel rail bolts - 22 N´m (200 in. lbs.)
²Coolant outlet connector bolts - 28 N´m (250 in.
lbs.)
²Coolant temperature sensor - 7 N´m (60 in. lbs.)
(1) Position a new gasket on cylinder head and
install lower manifold.
(2) Install and tighten intake manifold fasteners to
28 N´m (250 in. lbs.) in the sequence shown in (Fig.
108). Repeat procedure until all bolts are at specified
torque.
(3) Install lower intake manifold support bracket
bolts (Fig. 107) and tighten to:
²Bolts to intake 28 N´m (250 in. lbs.)
²Bolt to engine block 54 N´m (40 ft. lbs.)
(4) Position power steering reservoir on manifold
and install bolts.
(5) Connect the fuel line. (Refer to 14 - FUEL SYS-
TEM/FUEL DELIVERY/QUICK CONNECT FIT-
TING - STANDARD PROCEDURE)
(6) Connect coolant temperature sensor/fuel injec-
tor wiring harness electrical connector.
(7) Install the radiator upper and heater supply
hoses.
(8) Install the upper intake manifold. (Refer to 9 -
ENGINE/MANIFOLDS/INTAKE MANIFOLD -
INSTALLATION)
(9) Fill the cooling system. (Refer to 7 - COOLING
- STANDARD PROCEDURE)
Fig. 107 Lower Intake Manifold Support Bracket
1 - SUPPORT BRACKET
2 - BOLTS - UPPER TO MANIFOLD
3 - BOLT - LOWER TO ENGINE BLOCK
Fig. 108 Lower Intake Manifold Tightening
Sequence
9 - 60 ENGINE 2.4LRS
ProCarManuals.com
Page 1266 of 2177
(11) Disconnect the throttle cables from the throt-
tle body.
(12) Disconnect the MAP, IAC, and TPS electrical
connectors.
(13) Disconnect the EGR transducer electrical con-
nector (if equipped).
(14) Disconnect the vacuum hoses from throttle
body.
(15) Disconnect the brake booster and speed con-
trol vacuum hoses.
(16) Disengage wire harness clip from the right
side engine mount.
(17) Remove the power steering reservoir from
mounting position and set aside.Do notdisconnect
hose.
(18) Disconnect ground strap from rear of cylinder
head.
(19) Disconnect engine coolant temperature (ECT)
sensor and ignition coil electrical connectors.
(20) Disconnect the fuel injector electrical harness
connector and disengage clip from support bracket.
(21) Disconnect camshaft and crankshaft position
sensor electrical connectors.
(22) Evacuate air conditioning system. Refer to 24
- HEATING & AIR CONDITIONING.
(23) Disconnect A/C compressor electrical connec-
tor.
(24) Disconnect the A/C lines from compressor.
Cover and seal all openings of hoses and compressor.
(25) Remove the radiator upper hose.
(26) Disengage electrical harness clip at transaxle
dipstick tube.
(27) Remove transaxle dipstick tube. Seal opening
using a suitable plug.
NOTE: When the transaxle cooler lines are removed
from the rolled-groove type fittings at the transaxle,
damage to the inner wall of the hose will occur. To
prevent prevent potential leakage, the cooler hoses
must be cut off flush at the transaxle fitting, and a
service cooler hose splice kit must be installed
upon reassembly.
(28) Using a blade or suitable hose cutter, cut
transaxle oil cooler lines off flush with fittings. Plug
cooler lines and fittings to prevent debris from enter-
ing transaxle or cooler circuit. A service splice kit will
be installed upon reassembly.
(29) Disconnect transaxle shift linkage and electri-
cal connectors.
(30)
Raise vehicle on hoist and drain the engine oil.
(31) Remove the axle shafts. (Refer to 3 - DIFFER-
ENTIAL & DRIVELINE/HALF SHAFT - REMOVAL)
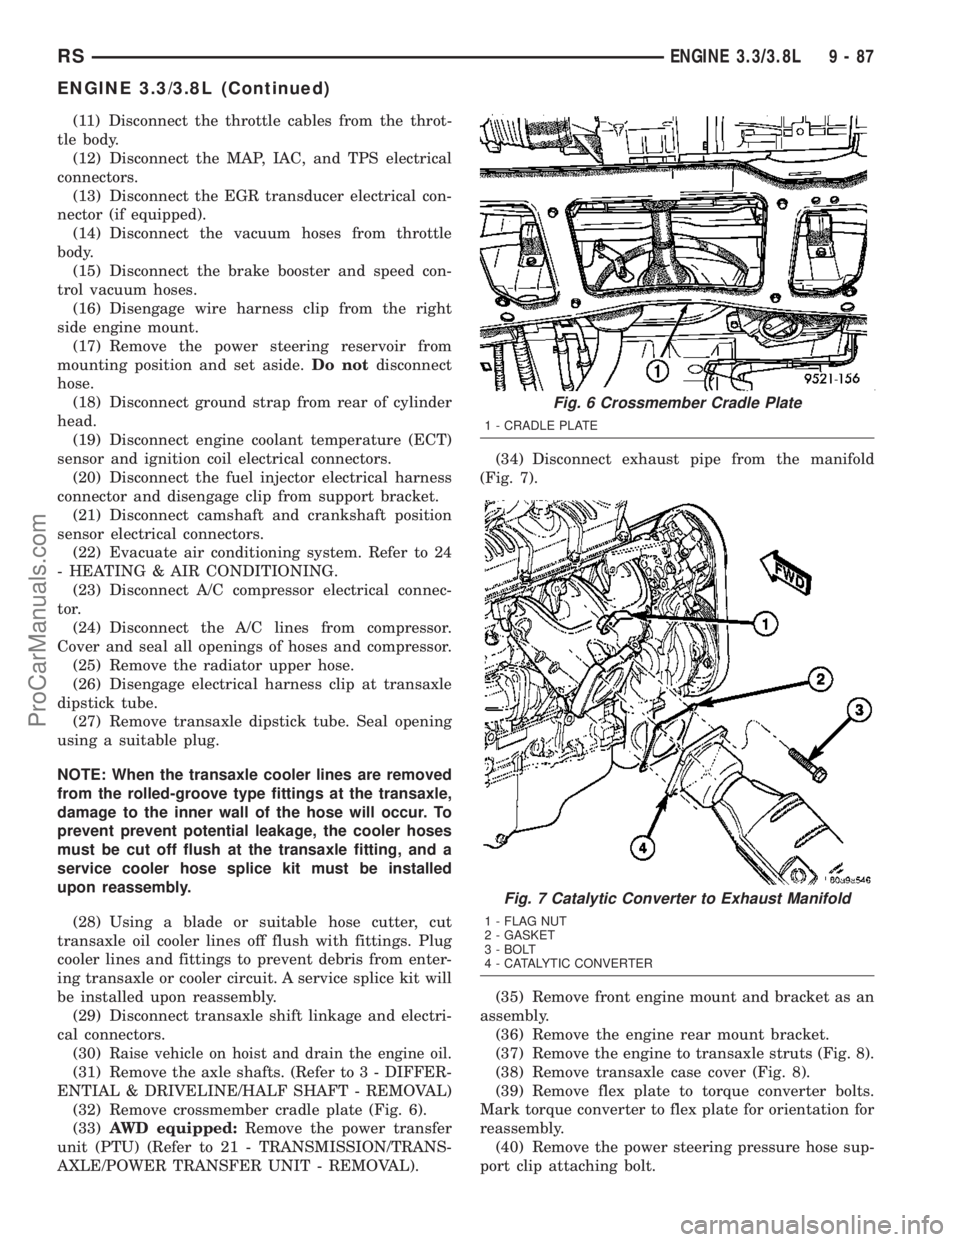
(32) Remove crossmember cradle plate (Fig. 6).
(33)AWD equipped:Remove the power transfer
unit (PTU) (Refer to 21 - TRANSMISSION/TRANS-
AXLE/POWER TRANSFER UNIT - REMOVAL).(34) Disconnect exhaust pipe from the manifold
(Fig. 7).
(35) Remove front engine mount and bracket as an
assembly.
(36) Remove the engine rear mount bracket.
(37) Remove the engine to transaxle struts (Fig. 8).
(38) Remove transaxle case cover (Fig. 8).
(39) Remove flex plate to torque converter bolts.
Mark torque converter to flex plate for orientation for
reassembly.
(40) Remove the power steering pressure hose sup-
port clip attaching bolt.
Fig. 6 Crossmember Cradle Plate
1 - CRADLE PLATE
Fig. 7 Catalytic Converter to Exhaust Manifold
1 - FLAG NUT
2 - GASKET
3 - BOLT
4 - CATALYTIC CONVERTER
RSENGINE 3.3/3.8L9-87
ENGINE 3.3/3.8L (Continued)
ProCarManuals.com
Page 1269 of 2177
(8) Install the generator and wiring harness (Refer
to 8 - ELECTRICAL/CHARGING/GENERATOR -
INSTALLATION).
(9) Raise vehicle.
(10) Attach wiring harness support clip to the
engine oil dipstick tube.
(11) Connect oil pressure switch electrical connec-
tor.
(12) Install the A/C compressor.
(13) Install the water pump pulley.
(14) Connect the radiator lower hose.(15) Install the accessory drive belt and splash
shield (Refer to 7 - COOLING/ACCESSORY DRIVE/
DRIVE BELTS - INSTALLATION).
(16) Connect the engine block heater electrical con-
nector (if equipped).
(17) Connect the knock sensor electrical connector
(3.8L only).
(18) Install the torque converter to flex plate bolts.
(19) Install the transaxle case cover (Fig. 8).
(20) Install the powertrain struts (Fig. 8).
(21) Install the engine rear mount bracket.
(22) Install the engine front mount and bracket
assembly.
(23)AWD equipped;Install the power transfer
unit (PTU) (Refer to 21 - TRANSMISSION/TRANS-
AXLE/POWER TRANSFER UNIT - INSTALLA-
TION).
(24) Install the axle shafts (Refer to 3 - DIFFER-
ENTIAL & DRIVELINE/HALF SHAFT - INSTALLA-
TION).
(25) Connect exhaust pipe to manifold (Fig. 7).
(26) Install crossmember cradle plate (Fig. 6).
(27) Lower vehicle.
(28) Connect transaxle shift linkage.
(29) Connect transaxle electrical connectors.
(30) Remove plugs from transmission cooler hoses
and install transaxle oil cooler line service splice kit.
Refer to instructions included with kit.
(31) Install transaxle dipstick tube and attach
electrical harness clip.
(32) Connect the A/C lines to compressor.
(33) Connect the A/C compressor electrical connec-
tor.
(34) Evacuate and recharge A/C system.
(35) Connect crankshaft and camshaft position
sensors.
(36) Connect the fuel injector electrical harness
connector and engage clip to support bracket.
(37) Connect engine coolant temperature (ECT)
sensor and ignition coil electrical connectors.
(38) Connect the ground strap to rear of cylinder
head.
(39) Install power steering reservoir.
(40) Engage wire harness clip to engine right side
mount.
(41) Connect the brake booster and speed control
vacuum hoses.
(42) Connect the vacuum hoses to the throttle
body.
(43) Connect the EGR transducer electrical connec-
tor (if equipped).
(44) Connect the TPS, IAC, and MAP sensor elec-
trical connectors.
(45) Connect throttle cables to throttle body.
(46) Install the radiator fans (Refer to 7 - COOL-
ING/ENGINE/RADIATOR FAN - INSTALLATION).
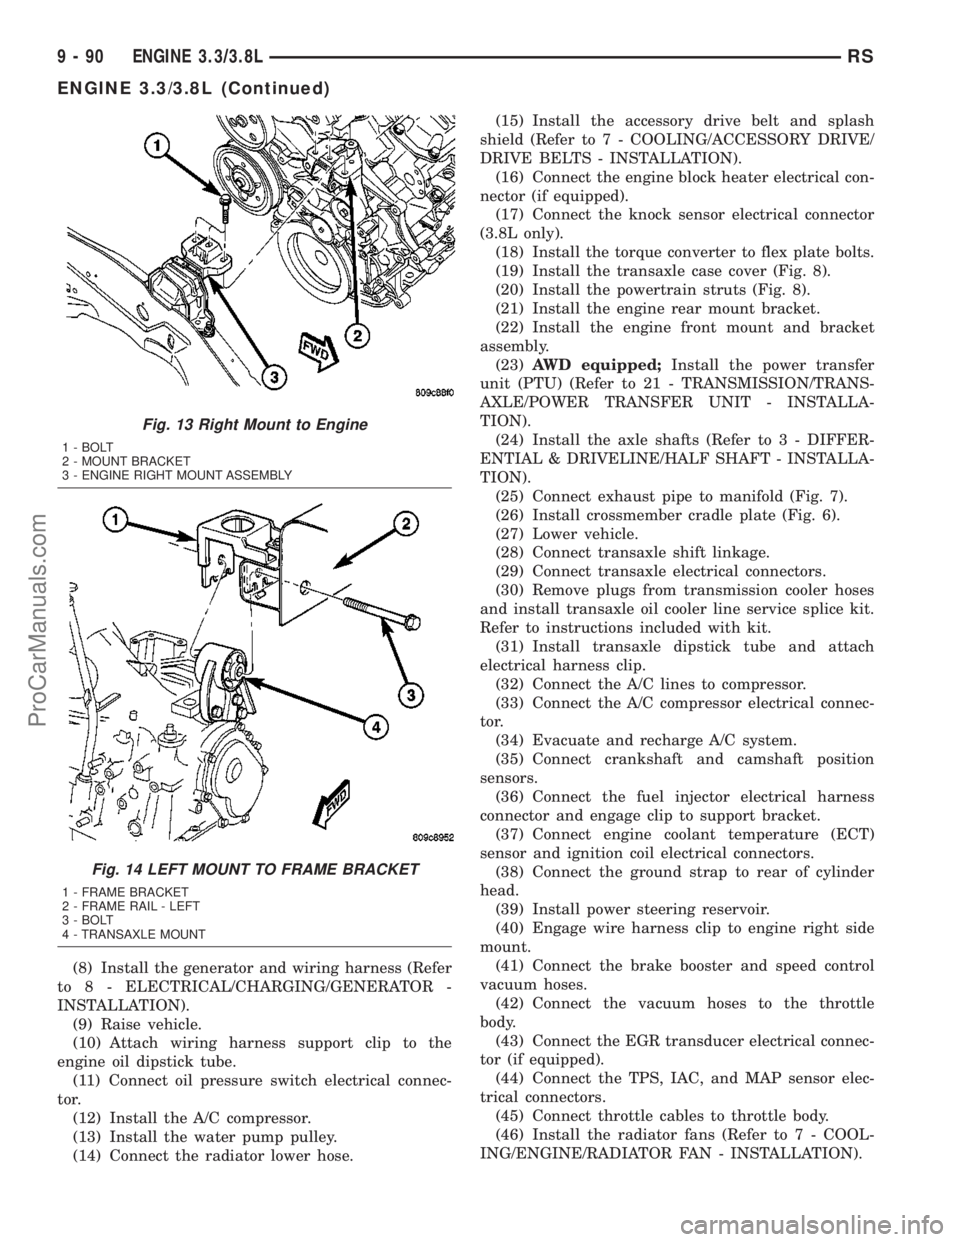
Fig. 13 Right Mount to Engine
1 - BOLT
2 - MOUNT BRACKET
3 - ENGINE RIGHT MOUNT ASSEMBLY
Fig. 14 LEFT MOUNT TO FRAME BRACKET
1 - FRAME BRACKET
2 - FRAME RAIL - LEFT
3 - BOLT
4 - TRANSAXLE MOUNT
9 - 90 ENGINE 3.3/3.8LRS
ENGINE 3.3/3.8L (Continued)
ProCarManuals.com
Page 1323 of 2177
(3) Install cover and tighten screws to 12 N´m (105
in. lbs.).
(4) If removed, install the oil pressure relief valve.
(Refer to 9 - ENGINE/LUBRICATION/OIL PRES-
SURE RELIEF VALVE - INSTALLATION)
INSTALLATION
(1) Install oil pump. (Refer to 9 - ENGINE/LUBRI-
CATION/OIL PUMP - ASSEMBLY)
(2) Install timing chain cover (Refer to 9 -
ENGINE/VALVE TIMING/TIMING BELT / CHAIN
COVER(S) - INSTALLATION) and oil pan (Refer to 9
- ENGINE/VALVE TIMING/TIMING BELT / CHAIN
COVER(S) - INSTALLATION).
INTAKE MANIFOLD
DESCRIPTION
The intake system is made up of an upper and
lower intake manifold. The upper intake manifold is
made of a composite for both the 3.3L engine and for
the 3.8L engine (Fig. 117). The lower intake manifold
is common between the two engines (Fig. 121). It also
provides coolant crossover between cylinder heads
and houses the coolant thermostat (Fig. 121).
The intake manifold utilizes a compact design with
very low restriction and outstanding flow balance.
This design allows the engine to perform with a wide
torque curve while increasing higher rpm horse-
power.
If, for some reason, the molded-in vacuum ports
break, the composite manifold can be salvaged. The
vacuum ports are designed to break at the shoulder,
if overloaded. Additional material in the shoulder
area provides sufficient stock to repair. For more
information and procedure, (Refer to 9 - ENGINE/
MANIFOLDS/INTAKE MANIFOLD - STANDARD
PROCEDURE). Also, if the special screws that attach
the MAP sensor, power steering reservoir, throttle
cable bracket, and the EGR tube become stripped, an
oversized screw is available to repair the stripped-out
condition. For more information and procedure,
(Refer to 9 - ENGINE/MANIFOLDS/INTAKE MANI-
FOLD - STANDARD PROCEDURE)
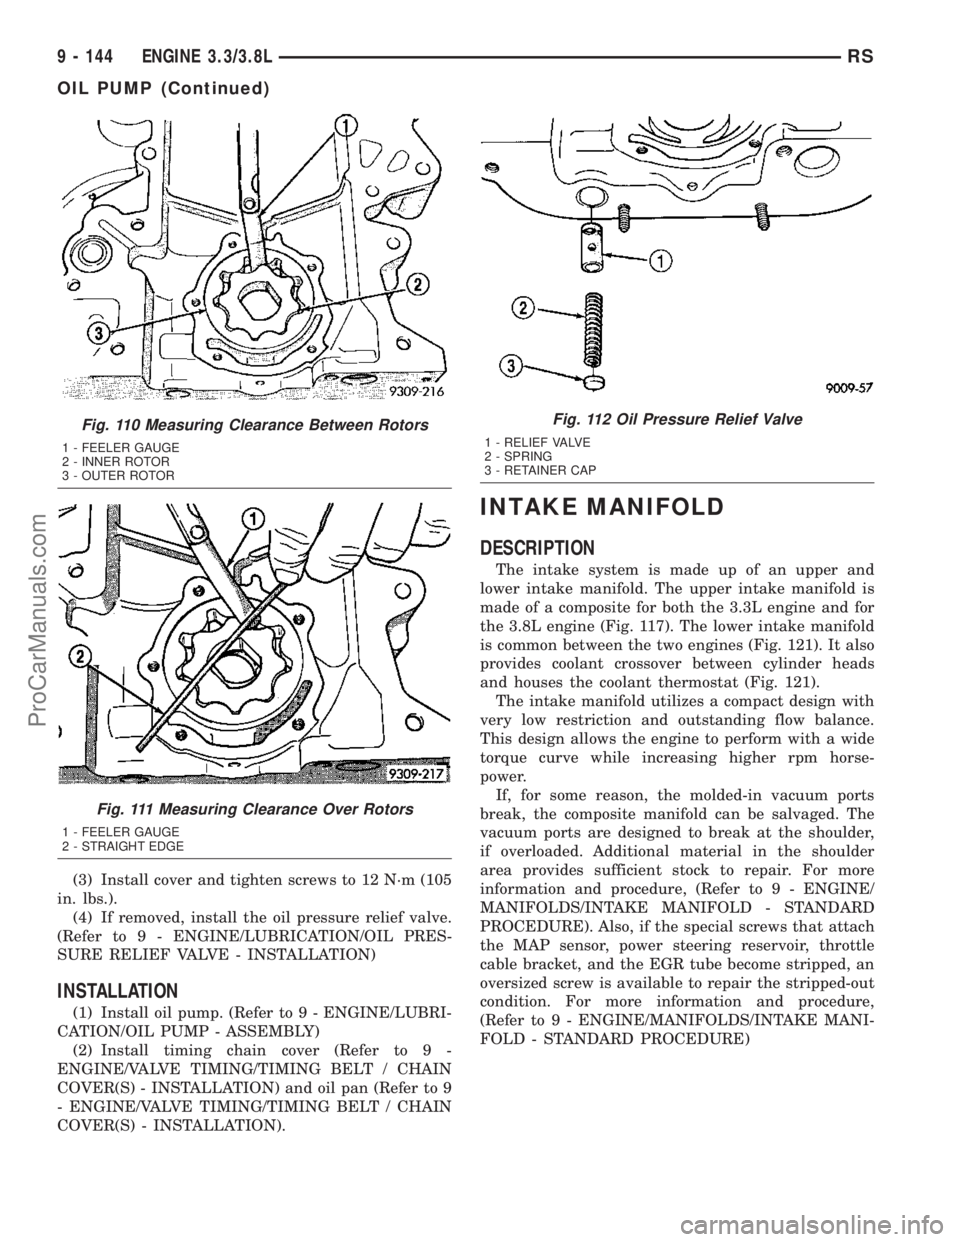
Fig. 110 Measuring Clearance Between Rotors
1 - FEELER GAUGE
2 - INNER ROTOR
3 - OUTER ROTOR
Fig. 111 Measuring Clearance Over Rotors
1 - FEELER GAUGE
2 - STRAIGHT EDGE
Fig. 112 Oil Pressure Relief Valve
1 - RELIEF VALVE
2 - SPRING
3 - RETAINER CAP
9 - 144 ENGINE 3.3/3.8LRS
OIL PUMP (Continued)
ProCarManuals.com
Page 2165 of 2177
REAR WASHER PUMP MOTOR -
INSTALLATION......................8R-14
REAR WASHER PUMP MOTOR -
REMOVAL..........................8R-13
REAR WHEEL SPEED SENSOR - AWD -
INSTALLATION........................5-80
REAR WHEEL SPEED SENSOR - AWD -
REMOVAL...........................5-80
REAR WHEEL SPEED SENSOR - FWD -
INSTALLATION........................5-81
REAR WHEEL SPEED SENSOR - FWD -
REMOVAL...........................5-81
REAR WINDOW DEFOGGER SWITCH -
DESCRIPTION........................8G-2
REAR WINDOW DEFOGGER SWITCH -
OPERATION..........................8G-2
REAR WIPER ARM - INSTALLATION......8R-14
REAR WIPER ARM - REMOVAL.........8R-14
REAR WIPER MOTOR - INSTALLATION . . . 8R-15
REAR WIPER MOTOR - REMOVAL.......8R-14
REAR WIPER SYSTEM - DIAGNOSIS
AND TESTING........................8R-4
REAR WIPER/WASHER SWITCH -
DESCRIPTION.......................8R-15
REAR WIPER/WASHER SWITCH -
OPERATION.........................8R-15
RECEIVE - PCM INPUT - OPERATION,
DATA BUS COMMUNICATION...........8E-15
RECEIVER/DRIER - DESCRIPTION........24-83
RECEIVER/DRIER - INSTALLATION.......24-84
RECEIVER/DRIER - OPERATION.........24-84
RECEIVER/DRIER - REMOVAL...........24-84
RECIRCULATION DOOR ACTUATOR -
DESCRIPTION.......................24-27
RECIRCULATION DOOR ACTUATOR -
INSTALLATION.......................24-28
RECIRCULATION DOOR ACTUATOR -
OPERATION.........................24-27
RECIRCULATION DOOR ACTUATOR -
REMOVAL..........................24-27
RECLINER HANDLE - INSTALLATION.....23-89
RECLINER HANDLE - REMOVAL.........23-89
RECOVERY - STANDARD PROCEDURE,
REFRIGERANT.......................24-89
RECOVERY CONTAINER - DESCRIPTION,
COOLANT............................7-19
RECOVERY CONTAINER - INSTALLATION,
COOLANT............................7-20
RECOVERY CONTAINER - OPERATION,
COOLANT............................7-19
RECOVERY CONTAINER - REMOVAL,
COOLANT............................7-20
RECOVERY SYSTEM - DIAGNOSIS AND
TESTING, COOLANT...................7-20
REFACING VALVES AND VALVE SEATS -
STANDARD PROCEDURE...............9-104
REFERENCES - DESCRIPTION, TORQUE . . Intro.-8
REFRIGERANT - DESCRIPTION..........24-85
REFRIGERANT - OPERATION............24-85
REFRIGERANT OIL - DESCRIPTION......24-90
REFRIGERANT OIL - OPERATION........24-90
REFRIGERANT OIL LEVEL - STANDARD
PROCEDURE........................24-90
REFRIGERANT RECOVERY - STANDARD
PROCEDURE
........................24-89
REFRIGERANT SYSTEM CHARGE -
STANDARD PROCEDURE
...............24-88
REFRIGERANT SYSTEM CHARGE LEVEL
- DIAGNOSIS AND TESTING
............24-85
REFRIGERANT SYSTEM EVACUATE -
STANDARD PROCEDURE
...............24-89
REFRIGERANT SYSTEM LEAKS -
DIAGNOSIS AND TESTING
.............24-86
REFRIGERANT SYSTEM SERVICE
EQUIPMENT - STANDARD PROCEDURE
. . . 24-87
REGULATOR - DESCRIPTION, VOLTAGE
. . . 8F-27
REGULATOR - INSTALLATION, FUEL
PRESSURE
..........................14-7
REGULATOR - MANUAL - INSTALLATION,
WINDOW
...........................23-23
REGULATOR - MANUAL - REMOVAL,
WINDOW
...........................23-23
REGULATOR - OPERATION, FUEL
PRESSURE
..........................14-7
REGULATOR - OPERATION, VOLTAGE
.....8F-27
REGULATOR - POWER - INSTALLATION,
WINDOW
...........................23-22REGULATOR - POWER - REMOVAL,
WINDOW...........................23-22
REGULATOR - REMOVAL, FUEL
PRESSURE..........................14-7
REINFORCEMENT - INSTALLATION,
FRONT BUMPER......................13-2
REINFORCEMENT - INSTALLATION,
GRILLE OPENING....................23-53
REINFORCEMENT - INSTALLATION, REAR
BUMPER............................13-3
REINFORCEMENT - REMOVAL, FRONT
BUMPER............................13-2
REINFORCEMENT - REMOVAL, GRILLE
OPENING...........................23-53
REINFORCEMENT - REMOVAL, REAR
BUMPER............................13-3
RELAY - DESCRIPTION.................8G-6
RELAY - DESCRIPTION, ACCESSORY . . . 8W-97-2
RELAY - DESCRIPTION, AUTO SHUT
DOWN..............................8I-3
RELAY - DESCRIPTION, BLOWER
MOTOR.......................24-13,24-32
RELAY - DESCRIPTION, COMPRESSOR
CLUTCH............................24-21
RELAY - DESCRIPTION, DEFOGGER.......8G-2
RELAY - DESCRIPTION, FUEL PUMP.....14-28
RELAY - DESCRIPTION, RADIATOR FAN....7-30
RELAY - DESCRIPTION, TRANSMISSION
CONTROL.........................21-247
RELAY - DIAGNOSIS & TESTING,
ACCESSORY......................8W-97-2
RELAY - DIAGNOSIS AND TESTING,
BLOWER MOTOR...............24-14,24-33
RELAY - DIAGNOSIS AND TESTING,
COMPRESSOR CLUTCH...............24-22
RELAY - DIAGNOSIS AND TESTING,
HORN..............................8H-5
RELAY - INSTALLATION, BLOWER
MOTOR.......................24-14,24-33
RELAY - INSTALLATION, COMPRESSOR
CLUTCH............................24-22
RELAY - INSTALLATION, HORN..........8H-5
RELAY - INSTALLATION, RADIATOR FAN . . . 7-30
RELAY - OPERATION, ACCESSORY.....8W-97-2
RELAY - OPERATION, AUTO SHUT DOWN . . . 8I-3
RELAY - OPERATION, BLOWER MOTOR . . 24-13,
24-32
RELAY - OPERATION, COMPRESSOR
CLUTCH............................24-21
RELAY - OPERATION, FUEL PUMP.......14-28
RELAY - OPERATION, RADIATOR FAN......7-30
RELAY - OPERATION, TRANSMISSION
CONTROL.........................21-248
RELAY - REMOVAL, BLOWER MOTOR....24-14,
24-33
RELAY - REMOVAL, COMPRESSOR
CLUTCH............................24-22
RELAY - REMOVAL, HORN..............8H-5
RELAY - REMOVAL, RADIATOR FAN.......7-30
RELEASE - STANDARD PROCEDURE,
PARKING BRAKE AUTOMATIC
ADJUSTER TENSION...................5-58
RELEASE CABLE - INSTALLATION, LATCH . 23-61
RELEASE CABLE - REMOVAL, LATCH.....23-60
RELEASE LEVER AND BEARING -
INSTALLATION, CLUTCH.................6-7
RELEASE LEVER AND BEARING -
REMOVAL, CLUTCH.....................6-6
RELEASE PROCEDURE - STANDARD
PROCEDURE, FUEL SYSTEM
PRESSURE..........................14-2
RELIEF VALVE - INSTALLATION, OIL
PRESSURE.........................9-141
RELIEF VALVE - REMOVAL, OIL
PRESSURE.........................9-141
REMOTE KEYLESS ENTRY MODULE -
DESCRIPTION.......................8N-43
REMOTE KEYLESS ENTRY MODULE -
DIAGNOSIS AND TESTING.............8N-43
REMOTE KEYLESS ENTRY MODULE -
INSTALLATION
......................8N-44
REMOTE KEYLESS ENTRY MODULE -
OPERATION
.........................8N-43
REMOTE KEYLESS ENTRY MODULE -
REMOVAL
..........................8N-44
REMOTE SWITCH - DIAGNOSIS AND
TESTING
...........................8N-49
REMOTE SWITCH - INSTALLATION
......8N-49REMOTE SWITCH - REMOVAL..........8N-49
REMOTE SWITCHES - DESCRIPTION.....8A-12
REMOTE SWITCHES - DIAGNOSIS AND
TESTING...........................8A-12
REMOTE SWITCHES - INSTALLATION.....8A-14
REMOTE SWITCHES - OPERATION.......8A-12
REMOTE SWITCHES - REMOVAL........8A-13
REPAIR - DESCRIPTION, FRONT CRADLE
CROSSMEMBER THREAD...............13-9
REPAIR - DESCRIPTION, THREADED
HOLE.............................Intro.-5
REPAIR - STANDARD PROCEDURE, GRID
LINE AND TERMINAL..................8G-3
REPAIR - STANDARD PROCEDURE,
INTAKE MANIFOLD VACUUM PORT......9-145
REPAIR - STANDARD PROCEDURE,
MANIFOLD STRIPPED THREAD..........9-145
REPAIR - STANDARD PROCEDURE,
PLASTIC BODY PANEL.................23-3
REPAIR OF DAMAGED OR WORN
THREADS - STANDARD PROCEDURE . . 9-10,9-86
REPAIR REAR - STANDARD
PROCEDURE, GRID LINE...............8G-2
REPAIRING - STANDARD PROCEDURE,
TIRE LEAK..........................22-17
REPEATER LAMP - EXPORT -
INSTALLATION.......................8L-22
REPEATER LAMP - EXPORT - REMOVAL . . 8L-22
REQUIREMENTS - DESCRIPTION, FUEL.....0-4
REQUIREMENTS - DIESEL ENGINE -
DESCRIPTION, FUEL....................0-6
RESERVOIR - DESCRIPTION, VACUUM....8P-6
RESERVOIR - INSTALLATION, VACUUM....8P-6
RESERVOIR - INSTALLATION, WASHER . . . 8R-17
RESERVOIR - OPERATION, VACUUM......8P-6
RESERVOIR - REMOVAL, VACUUM........8P-6
RESERVOIR - REMOVAL, WASHER......8R-16
RESET - STANDARD PROCEDURE,
PARKING BRAKE AUTOMATIC
ADJUSTER TENSION...................5-59
RESISTANCE, SPECIFICATIONS - SPARK
PLUG CABLE.........................8I-2
RESISTANCE TEST - DIAGNOSIS AND
TESTING, FEED CIRCUIT...............8F-32
RESISTOR - DESCRIPTION, BLOWER
MOTOR.......................24-14,24-34
RESISTOR - DIAGNOSIS AND TESTING,
BLOWER MOTOR...............24-15,24-34
RESISTOR - INSTALLATION, BLOWER
MOTOR.......................24-16,24-35
RESISTOR - OPERATION, BLOWER
MOTOR.......................24-15,24-34
RESISTOR - REMOVAL, BLOWER
MOTOR.......................24-16,24-35
RESONATOR - INSTALLATION............11-9
RESONATOR - REMOVAL...............11-9
RESTRAINT CONTROLLER -
DESCRIPTION, OCCUPANT..............8O-7
RESTRAINT CONTROLLER -
INSTALLATION, OCCUPANT.............8O-7
RESTRAINT CONTROLLER - OPERATION,
OCCUPANT..........................8O-7
RESTRAINT CONTROLLER - REMOVAL,
OCCUPANT..........................8O-7
RESTRAINTS - DESCRIPTION............8O-2
RESTRAINTS - OPERATION.............8O-2
RESTRAINTS - WARNING...............8O-2
RESTRICTION CHECK - DIAGNOSIS AND
TESTING, EXHAUST SYSTEM............11-2
RETAINER - INSTALLATION,
CRANKSHAFT REAR OIL SEAL..........9-129
RETAINER - INSTALLATION, PLASTIC
GROCERY BAG.....................23-103
RETAINER - REMOVAL, CRANKSHAFT
REAR OIL SEAL......................9-129
RETAINER - REMOVAL, PLASTIC
GROCERY BAG.....................23-103
RETRACTOR - FIRST ROW - OUTBOARD
- INSTALLATION, SEAT BELT
...........8O-13
RETRACTOR - FIRST ROW - OUTBOARD
- REMOVAL, SEAT BELT
...............8O-13
RETRACTOR - OUTBOARD - FRONT -
INSTALLATION, SEAT BELT
.............8O-13
RETRACTOR - OUTBOARD - FRONT -
REMOVAL, SEAT BELT
................8O-13
RETRACTOR - SECOND ROW - LEFT
OUTBOARD - INSTALLATION, SEAT
BELT
..............................8O-16
26 INDEXRS
Description Group-Page Description Group-Page Description Group-Page
ProCarManuals.com